It’s surprisingly easy to learn how to remove scratches from car paint, especially when you’re dealing with minor scuffs and swirls. The real secret? You have to figure out how deep the scratch is first. Once you know what you’re up against, it’s just a matter of cleaning the area and using the right polishing compound to gently buff the mark away.
That First Scratch Is a Universal Heartbreak
Every car owner knows the feeling. That gut-sinking, aggravating moment you spot the first scratch on your car’s otherwise perfect paint.
It doesn’t matter if it came from a runaway shopping cart, a careless door ding in a tight parking lot, or a low-hanging branch you didn’t see. That single blemish can feel monumental. Suddenly, your pride and joy looks vulnerable, and your mind immediately jumps to how much a trip to the body shop is going to cost.
But what if you didn’t have to make that trip? What if you could fix it yourself? Bringing back that flawless, showroom finish is more achievable than you probably think. This guide is your roadmap to doing just that, moving past the generic advice to give you techniques that actually work in the real world.
Reclaiming Your Investment
Your car is more than just a way to get from A to B; it’s a huge investment, both financially and emotionally. Keeping it looking its best isn’t just about vanity—it’s about protecting its value and feeling good about what you drive. This desire to maintain a car’s appearance is what has fueled a massive industry.
The global market for car scratch removers was valued at around $1.58 billion in 2024. It’s expected to keep growing as more and more people look for affordable, do-it-yourself solutions for automotive care. You can dig into the numbers in this market analysis report on ResearchAndMarkets.com.
This trend just goes to show you’re not the only one looking for a way to handle these annoying repairs at home.
I’ll never forget my first DIY scratch repair. A few years back, my brand-new black sedan got covered in hideous swirl marks from a touch-style automatic car wash. I took it to a professional detailer, and the quote he gave me was just staggering. I decided right then I was going to figure it out myself. I spent a weekend researching, bought a quality compound, and started on a small, hidden test spot. The feeling of watching those swirls completely disappear under my own hands was incredible. It wasn’t just about the money I saved; it was about taking control and proving I could bring back that deep, reflective shine on my own.
This is exactly where advanced paint protection becomes a total game-changer. Imagine a surface so tough that minor scuffs and abrasions are no longer a constant worry. Titan Coatings was the first to bring Elastomer coatings to the market, a unique technology that’s as hard as glass but stays flexible. That flexibility is the key—it prevents the coating from cracking when the temperature swings from freezing cold to scorching hot, a common failure point for rigid ceramic coatings.
Your journey to a perfect finish starts with understanding the damage. Let’s dive into that crucial first step.
First, Figure Out What You’re Dealing With
Before you even think about grabbing a polisher or a bottle of compound, take a deep breath. The single most important part of fixing a scratch is figuring out exactly what kind of damage you’re up against.
Jumping in with the wrong product is a surefire way to turn a small scuff into a big, expensive problem. Trust me, I’ve seen it happen. You have to know your enemy before you can win the war.
The best tool for the job? Your own fingernail. It’s a simple but surprisingly accurate gauge. Gently run your fingernail over the scratch. If it glides right over without catching, you can breathe a sigh of relief. That’s almost certainly a light surface scratch, confined to the top layer of your car’s paint—the clear coat. This is the best-case scenario.
But if your nail snags in the groove, that’s your signal the damage is more serious. It means the scratch has dug past the clear coat and is likely into the color layer (base coat) or even deeper.
A Quick Look at Your Car’s Paint Layers
To make the right call, it helps to understand what you’re actually working on. A car’s paint job isn’t just one coat of color; it’s a sophisticated system built in layers.
- Clear Coat: This is the thick, tough, transparent layer on top. It’s the bodyguard for your paint, protecting it from UV rays, bird droppings, and minor scuffs. Most of those annoying swirl marks and light scratches live exclusively in this layer.
- Base Coat: This is the pretty part—the layer that gives your car its color. It’s much thinner than the clear coat and has zero protective qualities on its own.
- Primer: Sitting right on the metal, this layer helps the paint stick. If you see a dull white, grey, or sometimes blackish color at the bottom of a scratch, you’ve hit primer.
- Bare Metal: The last stop. If you see shiny silver, the scratch has cut through everything. You need to act fast to prevent rust from setting in.
This quick diagram helps visualize which repair method is best suited for the level of damage you’re seeing.
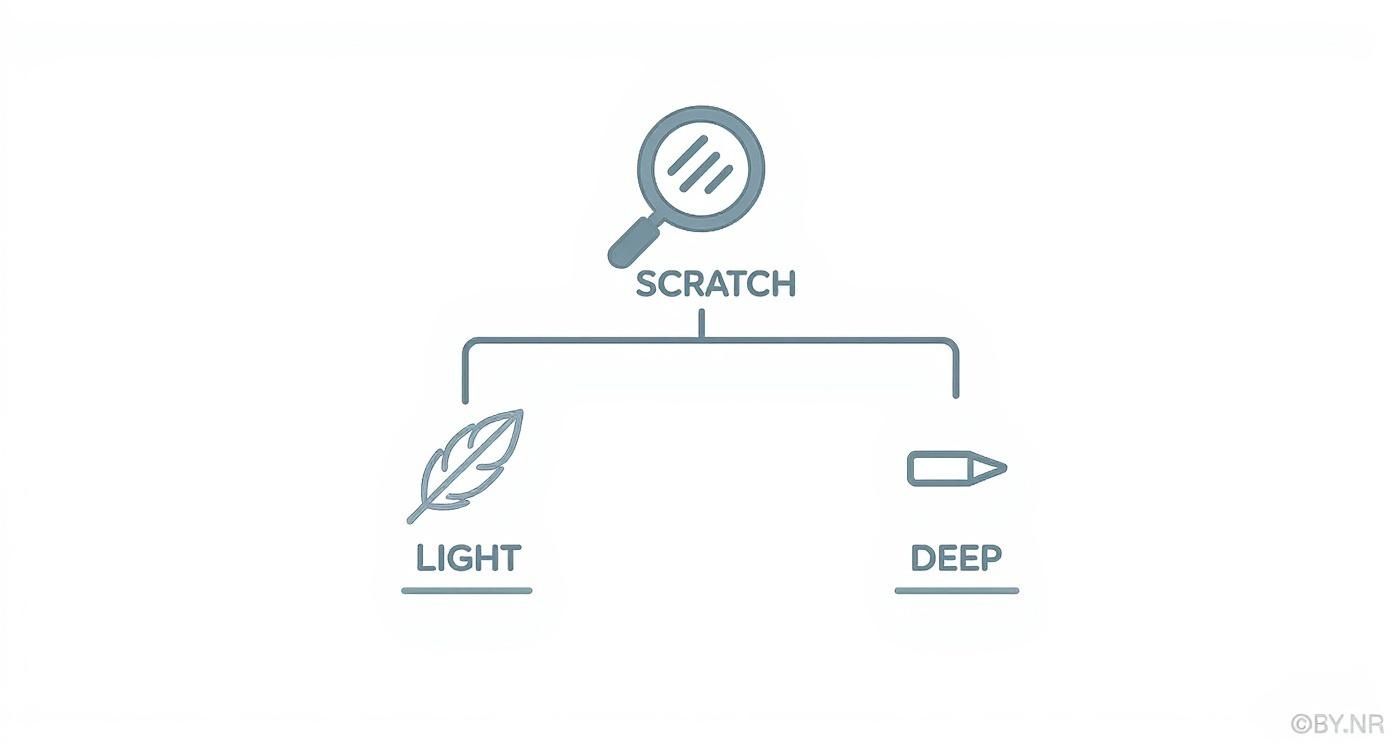
The big takeaway here is simple: the depth of the scratch completely changes your repair strategy.
Real-World Examples
Let’s make this practical. You pull your car into the sun after a trip through the automatic car wash and notice those spiderweb-like swirls all over the doors. Your fingernail slides right over them. That’s a classic clear coat issue, and a good polish will make it disappear.
Now, picture this: you come out to your car and find a nasty, thin white line on the fender from where a shopping cart got a little too friendly. Your nail catches in it instantly. That’s a much deeper problem that has gone through the clear coat. It’s going to demand a more aggressive compound, and if it’s bad enough, maybe even touch-up paint.
Crucial Tip: No matter what, the surface must be surgically clean before you start. Polishing a dirty panel just grinds that dirt and grit into the paint, creating a thousand new scratches.
Always start by thoroughly washing and drying the damaged area. To be absolutely sure you’re not making things worse, you might need to go a step further. Using a dedicated iron fallout remover is a pro move; it chemically dissolves tiny embedded metal particles that washing alone can’t touch.
Taking the time to properly assess the damage and prep the surface is the difference between a flawless, invisible repair and a DIY disaster.
Fixing Light Scratches in the Clear Coat
For those annoying but shallow scratches that haven’t broken through the clear coat, a good quality compound and polish are your best friends. This is where you can perform some real DIY magic, turning a hazy, swirled finish back into a flawless mirror. Don’t think of it as a brute force job; it’s all about patience and technique.
Think about this common scenario: you’ve just washed your car, and the sun hits the paint just right, revealing a chaotic web of fine swirl marks on the door. It’s a frustrating sight that completely ruins the car’s sharp, clean lines. If you run your fingernail over them and it doesn’t catch, you’re in luck—the damage is only skin deep, and this is a battle you can definitely win at home.
Prepping the Surface for a Flawless Repair
Before you even think about picking up a bottle of compound, you have to create a perfectly clean canvas. I can’t stress this enough. Any tiny bit of dust or grit left on the surface will get dragged around during polishing, turning your repair attempt into a scratch-creating nightmare.
Start by giving the entire panel a thorough wash with a quality car shampoo and a clean microfiber mitt. After you’ve dried it completely with a soft towel, there’s one more crucial step. You need to make sure the paint is free of any bonded contaminants—the stuff that washing alone won’t remove. This is where a clay bar comes in. It’s an essential process for anyone serious about paint care. If you’re new to it, this guide to clay bar treatments breaks down everything you need to know.
Your Arsenal: Compound vs. Polish
It’s vital to understand the difference between your two main tools here. People often use “compound” and “polish” interchangeably, but they have very different jobs.
- Cutting Compound: This is the heavy hitter. It’s more aggressive because it contains larger abrasives designed to level the clear coat. It essentially “cuts” the surface down until it’s flush with the bottom of the scratch. This is the product that does the actual removal.
- Finishing Polish: This product has much, much finer abrasives. Its job is to clean up the microscopic haze left by the compound, refining the surface into that brilliant, high-gloss shine. Polishing is what brings back the depth and clarity.
A good analogy is sanding wood. You start with a coarser grit to remove the major imperfections, then you switch to a finer grit to make the surface perfectly smooth. Same principle applies here.
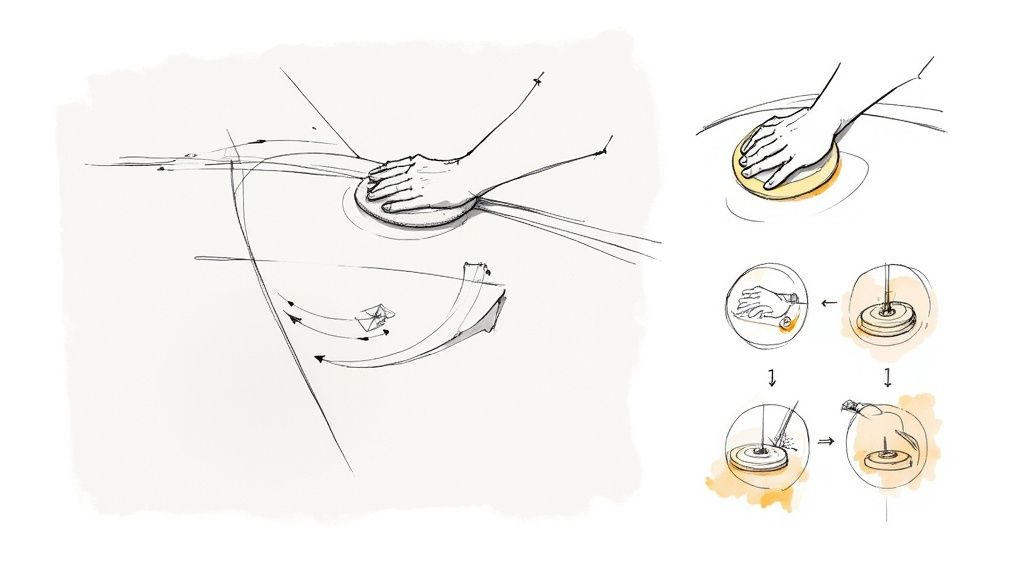
The Art of Application: By Hand or Machine
For a small, isolated area like a single door panel, working by hand is a perfectly good option. Start by applying a pea-sized amount of cutting compound to a clean microfiber applicator pad. I always recommend working in a small, manageable section, maybe two-feet-by-two-feet at most. Use firm, consistent pressure in overlapping circular motions. You’re looking to break down the abrasives in the compound until the product goes from a haze to a clear, oily film.
After a few minutes of work, wipe the residue away with a fresh microfiber towel and inspect your progress.
The swirl marks should be gone, but you’ll probably notice the area looks a bit dull or hazy compared to the rest of the panel. Don’t panic! This is completely normal and it’s your sign that the compound has done its job.
Now, grab a new, clean applicator pad and repeat the exact same process with your finishing polish. You can ease up on the pressure this time; you’re focusing on burnishing the paint to a mirror shine, not cutting it. Another final wipe-down should reveal a flawless, deep gloss that blends seamlessly with the surrounding paint.
Of course, if you’re tackling larger areas like a whole hood or the entire car, a dual-action (DA) polisher will be your best friend. It’s far more efficient and delivers more consistent results than your arm ever could.
Effective scratch removal is all about stages. Light clear-coat scratches usually come out with polishing compounds, but deeper defects might need you to step it up a notch. This can mean wet sanding with incredibly fine 3000 to 5000 grit paper before you even begin polishing. You can see these advanced techniques in action in this comprehensive video guide on YouTube.
By taking this methodical approach, you can completely erase those frustrating scratches. The result isn’t just a repaired panel; it’s the immense satisfaction of having restored your car’s beauty with your own two hands.
Tackling Deeper Paint Scratches
So, you ran your fingernail over the scratch, and it caught. That’s the moment your stomach drops a little, because you know a simple polish isn’t going to cut it. This means the damage has gone past the clear coat and bitten into the color underneath.
It’s definitely a more intimidating repair, but don’t dial the body shop just yet. With the right tools and a healthy dose of patience, this is a challenge you can absolutely conquer. This isn’t a quick fix; it’s a project for a quiet weekend afternoon where you can really focus. Precision is the name of the game here, not speed.
Your Advanced Repair Toolkit
For a repair of this magnitude, we need to upgrade the arsenal. Forget the simple polish; it’s time for some more specialized gear.
- Factory-Matched Touch-Up Paint: This is non-negotiable. Look for the paint code on a sticker inside the driver’s side door jamb to get an exact match.
- High-Grit Wet/Dry Sandpaper: You’ll want a variety pack, typically ranging from 2000 to 5000 grit. The lower grits do the heavy lifting, and the higher grits bring back the shine.
- Small Sanding Block: Don’t even think about using your fingers. You’ll create uneven pressure and make a mess. A small, firm block is essential for a flat, consistent finish.
- Fine-Tipped Applicator: The brush that comes in the touch-up bottle is usually way too thick for precise work. An artist’s brush or even a toothpick will give you the control you need.
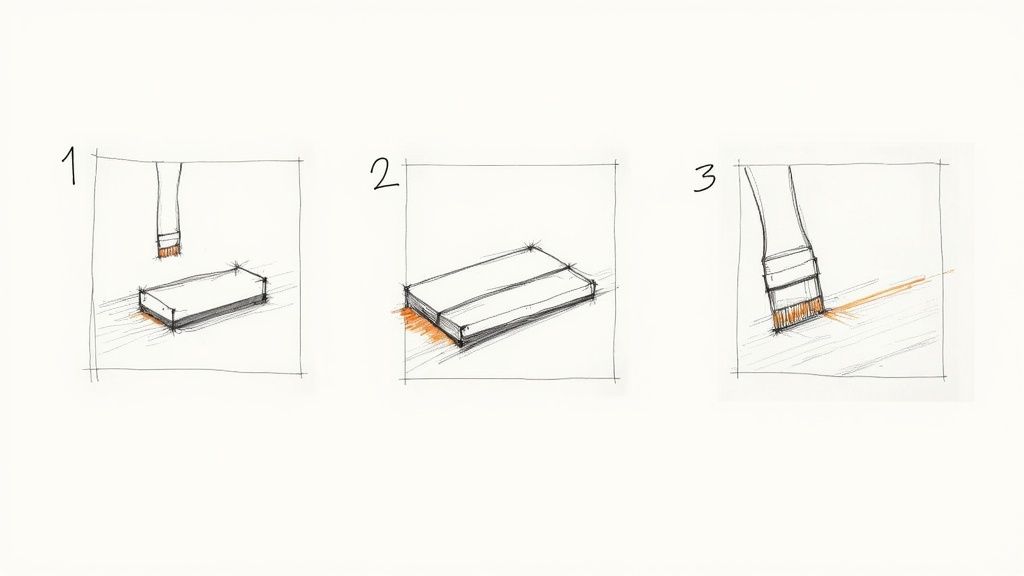
The Art of Wet-Sanding and Painting
First things first: clean the area meticulously. A good wipe-down with isopropyl alcohol will strip any wax, grease, or contaminants from the scratch, ensuring your new paint has a clean surface to bond to.
Now for the delicate part—wet-sanding. The goal here isn’t to remove the scratch, but to gently knock down its raised edges. This creates a smoother, V-shaped channel for the new paint to fill. Soak a small piece of 2000-grit sandpaper in water for at least 10 minutes, wrap it around your sanding block, and lightly sand only the immediate edges of the scratch. The water is crucial; it lubricates the surface and prevents the paper from getting clogged with paint debris.
Wipe the area dry and check your work. You should see a small, dull halo right around the scratch. That’s perfect. Now it’s time for the paint.
Shake the touch-up paint bottle like you mean it, then dab a tiny amount onto your applicator. Carefully place the paint into the scratch, applying the thinnest layer imaginable.
Expert Tip: Your first few layers will shrink as they dry, and the scratch will look almost the same. This is completely normal. Resist the temptation to glob on a thick coat to fill it in one go—you’ll end up with a raised blob that’s a nightmare to level later.
Let that first coat dry completely, which can take anywhere from 30 minutes to a few hours. Then, repeat the process. You’re slowly building up the paint, one paper-thin layer at a time, until the repair is just slightly higher than the factory paint around it. This might take 5, 10, or even more layers. Patience is your best friend here.
Leveling and Finishing the Job
Once the final layer of paint has cured for a full 24 hours, it’s time to make it disappear.
Using your sanding block and wet 3000-grit sandpaper, gently sand the raised touch-up paint. Your goal is to level it until it feels perfectly flush with the surrounding paint. Let the sandpaper do the work; don’t apply much pressure.
Next, switch to the wet 5000-grit paper to remove the finer sanding marks left by the 3000-grit, further refining the surface.
Finally, bring back the shine. Just like we did for the light scratches, use a quality cutting compound followed by a finishing polish to eliminate the sanding haze and restore that deep, uniform gloss. The result should be a repair so good you have to search for it.
After all that effort, the last thing you want is for it to get damaged again. This is where a high-quality professional coating comes in. A product like Titan’s Elastomer Vulcan creates a protective shield that’s as hard as glass but remains flexible. This unique quality allows it to resist cracking from temperature swings, ensuring your meticulous repair—and the rest of your paint—stays protected for the long haul.
The Ultimate Defense Against Future Scratches
You’ve put in the hours—sanding, compounding, and polishing until that paint is flawless. It’s got a mirror-like shine you can be proud of. The last thing you want is for a new set of scratches to ruin all that hard work a week later. Now, the game shifts from fixing damage to preventing it from ever happening again.
Your first line of defense is simply washing your car correctly. Seriously. Using the two-bucket method with clean microfiber mitts and quality drying towels will stop the vast majority of swirl marks right in their tracks. But to really guard your finish against the harsh realities of daily driving, you need something tougher.
Beyond Wax: A New Era of Paint Protection
Let me tell you about a client of ours. He was a true enthusiast, spending nearly every weekend waxing his black Porsche. He loved the deep shine but was completely worn out by the constant upkeep and frustrated that new, tiny scratches kept showing up no matter what he did. He was looking for a permanent solution—a single application that would provide serious, long-term defense.
This is where things get interesting. Traditional waxes and sealants are great, but they’re temporary. Modern coating technologies, on the other hand, create a far more durable shield. While you’ve probably heard of ceramic coatings, we’ve taken it to the next level at Titan Coatings by pioneering Elastomer coatings—the first of their kind on the market.
With more cars on the road than ever, minor cosmetic damage like scratches is an unavoidable headache that hurts both your pride and your car’s resale value. It’s no wonder that over 55% of vehicle owners are now rolling up their sleeves and tackling DIY repairs to save money. You can discover more insights about this trend on Coherent Market Insights.
This huge boom in DIY care makes it even more critical to protect the results of your hard work with a professional-grade solution.
The Power of Flexibility and Hardness
So, what makes these coatings different? Using our groundbreaking nano tubes technology and proprietary Dark Matter tech, Titan’s coatings form a protective layer that’s incredibly hard yet remarkably flexible. That flexibility is the secret sauce.
Standard ceramic coatings are extremely rigid, which actually makes them brittle. Think about it: a car’s metal panels expand in the summer heat and contract in the bitter cold. A rigid coating can’t handle that movement and develops micro-fractures, which compromises its protective ability.
Titan’s Elastic coatings, however, are designed to move with your car. This elasticity prevents cracking under stress from temperature swings, ensuring the protection lasts longer and performs better. It’s like wearing armor that absorbs an impact instead of shattering.
If you’re still weighing your options, our detailed guide on paint protection film and ceramic coatings can help you sort through the pros and cons.
For those who want the absolute best in paint protection, a product like our Titan ‘PYR’ takes this a step further with advanced self-healing properties. This means minor swirls and light scuffs—the kind you get from a stray tree branch or a dusty car cover—can literally disappear with a little heat from the sun or a heat gun.
Imagine a finish that doesn’t just resist scratches but actively repairs itself from minor damage. Investing in a professional-grade coating isn’t just about keeping a shine; it’s about giving yourself the peace of mind that your hard-earned repair work is protected for years to come.
Your Top Car Scratch Questions, Answered
Even with the best guide in hand, you’re bound to have questions before you start working on your car’s paint. I get it. Getting the right answers can be the difference between a job well done and a trip to the body shop. Let’s clear up some of the most common questions I hear from car owners.
So, Can I Really Use Toothpaste on a Scratch?
This is a classic car-care myth that just won’t die, and the short answer is: please don’t. It’s a terrible idea.
Yes, toothpaste is technically abrasive, but the abrasives are crude and completely wrong for a car’s clear coat. Using it is like trying to sand a delicate piece of wood with a chunk of gravel. You’ll just chew up the finish, creating a dull, hazy mess of tiny new scratches that looks far worse than what you started with.
Always, always use a dedicated automotive polish or compound. These products are engineered with uniform abrasives designed to level the clear coat safely and bring back a factory shine. Trust me, trying to save a few bucks with toothpaste will almost certainly lead to a much more expensive professional fix later on.
What’s the Real Difference Between a Polish and a Compound?
This is a great question, and knowing the answer is crucial for getting professional-level results. They might look the same in the bottle, but they serve very different purposes.
The easiest way to think about it is like sandpaper for your paint, just on a microscopic level.
- Rubbing Compound: This is your heavy hitter. It has larger, more aggressive abrasives designed to “cut” through the clear coat and level out deeper scratches and heavy oxidation. It works fast, but it will always leave the surface looking a bit dull or hazy.
- Polishing Compound: This is your finishing tool. Its abrasives are much, much finer. A polish is used to remove the haze left by the compound, along with very light swirls and imperfections. It doesn’t really cut; it burnishes the surface to restore that deep, wet-looking gloss.
The pro-level workflow is almost always a two-step process. You use the compound to fix the actual problem, then follow it up with a polish to restore the beauty.
When Should I Just Call a Professional?
Knowing when to put the tools down is just as important as knowing how to use them. There are a couple of clear signs that a scratch is beyond a simple DIY repair.
The absolute number one sign is seeing bare metal. If the scratch is so deep that you see the shiny silver of the body panel underneath, stop immediately. At that point, rust is your biggest enemy, and preventing it requires proper priming, sealing, and paintwork that goes beyond typical detailing.
Crucial Takeaway: If you feel like you’re making things worse—maybe you’ve been a bit too aggressive with the polisher and created a dull or discolored patch—it’s time to call for help. Pushing forward can seriously damage your paint and devalue your car, turning a minor issue into a major expense.
I once saw a car where the owner tried to fix a small key scratch with a kitchen scouring pad. In his mind, it was just a tougher sponge. He turned a two-inch line into a massive, swirled-out disaster on his door. His intention was good, but the execution was costly. Recognizing that a situation has escalated is a skill in itself. Making that call to a pro is the smartest, not the weakest, move you can make.
For a truly long-term solution that protects your paint from future damage, explore the advanced Elastomer coatings from Titan Coatings. Our unique technology, using nano tubes and Dark Matter tech, creates a shield that’s hard like glass but remains flexible, preventing cracks from temperature changes and keeping your car’s finish flawless. Learn more at https://www.titancoatings.us.
0 Comments