Before you even think about putting a polisher to a car's paint, you need one indispensable tool: a digital paint thickness gauge. These little devices are your secret weapon, using magnetic induction or eddy currents to give you an instant, precise reading of the total paint depth—from the primer and base coat right up to the clear coat you'll be working on.
It’s a simple measurement, but it’s the most critical step you’ll take before any paint correction begins.
Why Every Detailer Needs to Master Paint Thickness Measurement
Let me paint a picture for you—one every seasoned detailer dreads. A client brings you their pride and joy for a full paint correction. You’ve done the prep work, the car is gleaming, and you’re ready to start polishing out those swirls. You fire up the buffer, make your first pass, and then your stomach drops. You've burned right through the clear coat.
It’s the ultimate nightmare scenario. A costly, irreversible mistake that completely shatters your client's trust and torpedoes your reputation.
This is what separates the pros from the amateurs. The difference wasn't the tool or the polish; it was the data. Knowing how to measure paint thickness isn't just a professional courtesy; it's the very foundation of safe, effective detailing. It turns pure guesswork into a calculated science, giving you a complete picture of the canvas before you ever lay a machine on it.

From Millimeters to Microns: Speaking the Language of Paint
When we talk about paint thickness, we're working on a microscopic scale. The entire cross-section of a car's finish—from bare metal to the top of the clear coat—is often thinner than a single sheet of paper. We call this total depth the Dry Film Thickness (DFT).
Getting comfortable with the units of measurement is absolutely non-negotiable.
- Micron (µm): This is the global standard in the auto industry. One micron is one-millionth of a meter.
- Mil: Primarily used in the U.S., a mil is one-thousandth of an inch. For quick conversion, one mil is equal to 25.4 microns.
A brand-new car straight from the factory usually has a DFT between 80-130 µm. The clear coat, which is your only line of defense and the layer you're actually polishing, often makes up just 40-70 µm of that total. When you consider that an aggressive polishing pass can easily strip away 5-10 µm, you realize just how thin your margin for error really is.
To put these numbers into context, here’s a quick breakdown of what you're likely to find on a typical factory paint job.
Paint Thickness Quick Reference Guide
| Layer | Typical Thickness (Microns µm) | Typical Thickness (Mils) |
|---|---|---|
| Clear Coat | 40 – 70 µm | 1.6 – 2.8 mils |
| Base (Color) Coat | 15 – 30 µm | 0.6 – 1.2 mils |
| Primer | 20 – 40 µm | 0.8 – 1.6 mils |
| Total DFT (Factory) | 80 – 130 µm | 3.2 – 5.1 mils |
These values are a solid starting point, but always remember that every vehicle is different. The numbers you get from your gauge are the ultimate source of truth.
Uncovering a Vehicle's Hidden History
A paint thickness gauge does more than just tell you if it's safe to polish. It's a detective tool that uncovers a vehicle's entire life story.
While factory paint typically falls within that 80 to 130 µm range, it's not uncommon to see spikes up to 350 µm or more on vehicles that have had post-production touch-ups or collision repairs. A reading that's double the factory average is a massive red flag. It almost always points to hidden body filler, repainted panels, or other secrets lurking beneath the surface.
This intel is gold. A panel with suspiciously high readings tells you to back off and use a much gentler approach. On the flip side, a dangerously thin reading is your cue to stop and inform the client that aggressive correction is off the table, recommending a protective coating instead.
This is precisely where a product like Titan's Alpha Quartz shines. After you’ve meticulously measured and perfected a vehicle’s paint, you need to lock in that finish. As the first company to introduce Elastomer coatings using nano tube and Dark Matter tech, we've created something revolutionary. Alpha Quartz offers an unmatched blend of hardness and flexibility. It won’t crack under extreme temperature swings, from frozen to hot, and its elasticity helps it absorb impacts from road debris. It's the ultimate shield to protect your hard work and give your client lasting peace of mind.
Choosing the Right Paint Thickness Gauge
Picking the right tool to measure paint thickness can feel overwhelming, with a ton of technical jargon to sort through. But getting this right is non-negotiable. Your paint gauge isn't just another piece of gear; it's the one thing standing between you and a disastrous, costly mistake.
Imagine this: you're a mobile detailer, and you pull up to a client’s gorgeous, aluminum-bodied sports car. You grab your trusty, budget-friendly gauge, place it on the hood… and get an error message. That's the exact moment you realize that not all gauges are created equal. Understanding the tech inside the tool is just as crucial as having one in the first place.
In the automotive world, it really boils down to two main technologies: magnetic induction and eddy current. Think of them as specialists, each trained for a specific type of material.
Magnetic Induction Gauges: These are your go-to for ferrous metals—think steel, which makes up the body of most cars on the road. They create a magnetic field and measure how much resistance it encounters. That resistance tells the gauge the distance between its probe and the steel panel, giving you the coating thickness. They’re workhorses: reliable and usually more affordable.
Eddy Current Gauges: Now, these are the experts for non-ferrous metals like aluminum, which you'll find more and more on modern performance cars and luxury vehicles. This type of gauge generates a high-frequency field that creates tiny electrical currents (eddy currents) in the metal. By measuring the properties of these currents, it can accurately calculate the coating thickness on non-magnetic panels.
For any serious detailer, a combination gauge that packs both technologies into one unit is the undisputed champion. It automatically senses the metal underneath and switches to the correct mode, saving you time and, more importantly, eliminating the risk of using the wrong tool on the wrong panel. For more on must-have gear, check out our complete guide on building the perfect mobile detailing equipment list.
Ferrous vs. Non-Ferrous Gauges Explained
So, why can't one type of gauge just do it all? It really just comes down to physics. A magnetic induction gauge needs a magnetic panel to work. When you put it on an aluminum hood, there's no magnetic pull to measure, so it simply can't get a reading.
On the flip side, an eddy current gauge is built specifically to work with conductive metals that aren't magnetic. That specialization is what makes it so accurate on aluminum but totally useless on steel. This isn't just a small detail; using the wrong gauge will give you either a reading that's wildly off or no reading at all—and both are equally dangerous when you’re about to start polishing.
Pro Tip: Always be sure what you're working on. If your gauge isn't an auto-detecting combo model, a small magnet is a foolproof way to check. If it sticks, the panel is steel (ferrous). If it doesn't, you're likely dealing with aluminum (non-ferrous).
What About Ultrasonic Gauges and Advanced Methods?
While magnetic and eddy current gauges will handle nearly everything you'll encounter in a detailing bay, you might occasionally hear about ultrasonic gauges. These are in a completely different league. Instead of measuring the distance to a metal substrate, they use sound waves to measure the thickness of individual layers on non-metallic surfaces like plastic, carbon fiber, or fiberglass. They're essential for specialized bodywork or marine applications, but for most detailers, they're total overkill.
The quest for precision in coating measurement goes way beyond the garage. For instance, in high-stakes industries like aviation and defense—where Titan Coatings has its roots—even more sophisticated methods are the norm. Pulsed terahertz (THz) waves, for example, are used for measuring multi-layer, military-grade polymers with incredible accuracy. This background in extreme precision is what drives the development of all our products. You can read more about the science behind these advanced measurement techniques if you're curious.
In the end, choosing the right gauge comes down to knowing the vehicles you work on. Investing in a quality combination gauge isn't just an expense; it's one of the smartest moves a detailer can make. It arms you with accurate data, prevents catastrophic errors, and builds the kind of client confidence that separates the amateurs from the true professionals.
Mastering Your Measurement Technique
Having a quality paint thickness gauge in your toolbox is a great start, but knowing how to use it with precision is what separates the pros from the amateurs. The numbers flashing on that little screen are only as good as the technique behind them. This is where a steady hand and a methodical process turn raw data into a clear roadmap for a flawless finish.
It all starts with calibration. This is the one step you absolutely cannot skip. By using the zero plates (the bare metal discs that come with your gauge) and the plastic shims of known thickness, you’re essentially "teaching" the device what, say, 100 microns actually feels like. Neglecting this can throw your readings off by a margin that could mean the difference between a safe, stunning polish and a costly, gut-wrenching strike-through.
This visual guide breaks down the core technologies that make these tools work.
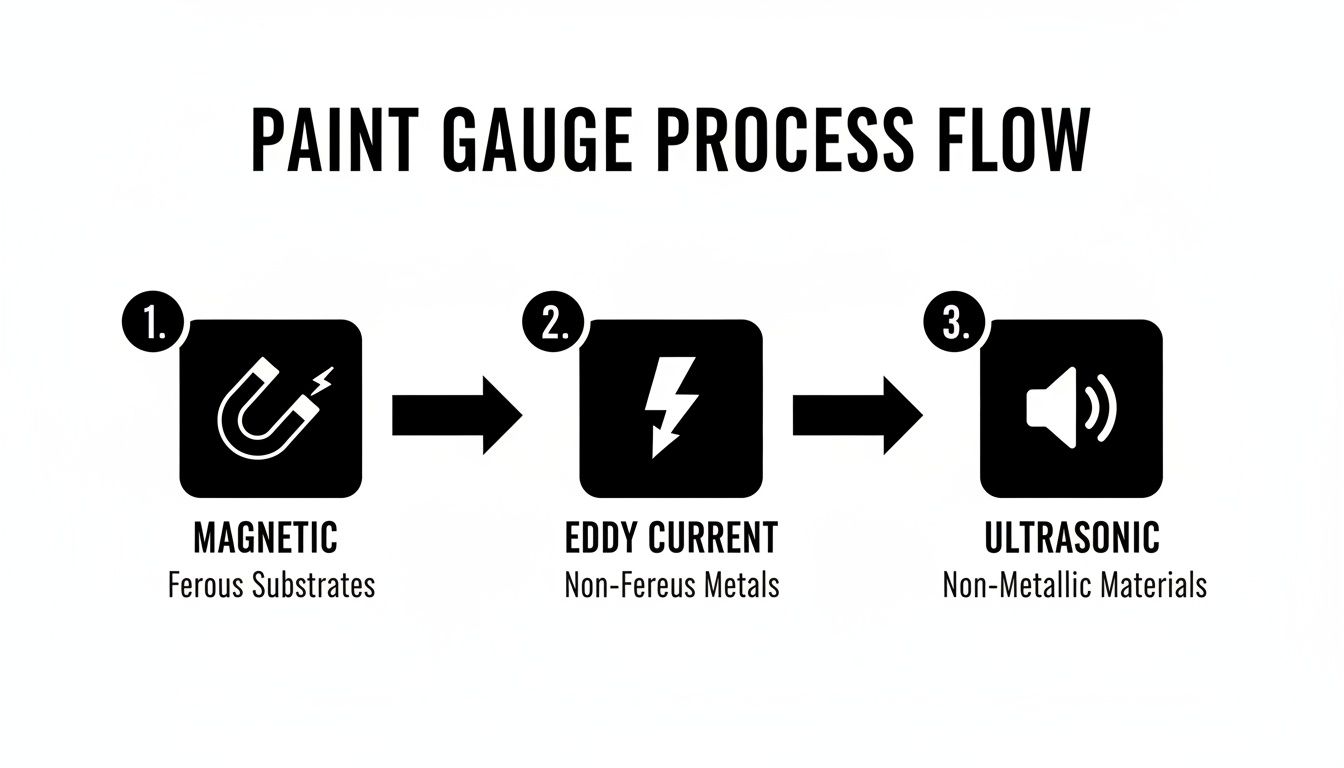
You can see how each technology is purpose-built: magnetic for steel, eddy current for aluminum, and ultrasonic for non-metals. It’s all about using the right tool for the right material.
Building Your Paint Map
Once your gauge is dialed in, it's time to get to know the vehicle. Don't just poke around randomly. The key is to be systematic. Imagine a grid on every single panel—the hood, doors, roof, you name it.
A solid strategy for getting a complete picture includes:
- Taking at least 5-7 readings on each panel.
- Measuring both the large, flat areas and the trickier curved sections.
- Paying close attention to high-risk zones like panel edges and body lines, where paint is almost always thinner.
Following this process helps you build a detailed "paint map" of the entire vehicle. It’s the best way to uncover the car's history. You’ll quickly spot inconsistencies that scream "previous repair!" or flag a dangerously thin area long before a polisher ever touches the paint. Of course, for accurate readings, the surface must be spotless. You can find the right process in our guide on how to decontaminate car paint.
A Quick Story: How Precision Saved a Classic
Let me tell you about a detailer I know. He was brought in to restore a vintage muscle car—a real head-turner. As he started his methodical measurement process, a huge red flag popped up. The passenger door consistently read over 400 microns, while the rest of the car hovered around a factory-spec 120 microns.
He immediately put the buffer down and called the owner. The owner was floored; he had no idea the car had undergone major bodywork and was loaded with filler. That simple act of measuring saved him from grinding through layers of Bondo and paint, which would have ruined the panel and his reputation.
That’s the real power of proper technique. It’s not just about collecting numbers. It’s about uncovering the story hidden beneath the shine so you can make smart, professional decisions that protect the vehicle and earn your client’s trust.
This commitment to precision is exactly what drove us to develop our advanced protective coatings. After you've spent all that time measuring, correcting, and perfecting a surface, you need a final layer of protection that honors that hard work. Our Alpha Quartz Elastomer coating, which is built on cutting-edge nano tube technology, was created for this exact moment.
Its unique chemistry makes it hard as glass but incredibly flexible. This elasticity means it won’t crack when temperatures swing from freezing cold to blistering heat. It also helps the coating absorb small impacts from bugs or road debris, preserving that flawless finish you worked so hard to create. Whether you're a weekend warrior or a mobile pro, its easy application and stunning results make it the perfect way to lock in your work.
Common Measurement Errors and How to Fix Them
Even experienced technicians can make mistakes. Getting a skewed reading is frustrating, but it's usually caused by a few common slip-ups that are easy to correct.
| Common Mistake | Why It Happens | How to Correct It |
|---|---|---|
| Tilting the Gauge | The probe isn't sitting perfectly flat (90°) on the surface, causing an inaccurate reading. | Place the probe gently but firmly onto the surface. Ensure the entire base of the probe makes full, flat contact before you take the reading. |
| Measuring on a Dirty Surface | Dirt, wax, or other contaminants create a false layer between the probe and the paint, artificially inflating the numbers. | Always measure on a surface that has been thoroughly washed and decontaminated. |
| Ignoring Substrate Effects | Taking readings too close to an edge, a sharp curve, or a different type of metal can interfere with the magnetic or eddy-current field. | Take measurements on flat, stable areas at least an inch away from panel edges or complex body lines. |
| Skipping Calibration | The gauge's internal settings have drifted due to temperature changes or heavy use, leading to consistently high or low readings. | Calibrate your gauge at the start of every job, or anytime you move to a drastically different environment. |
By being mindful of these details, you ensure every measurement you take is one you can trust, allowing you to work with confidence and precision.
Translating Data Into Detailing Decisions
Alright, you've meticulously mapped the vehicle, panel by panel, and now you're looking at a list of numbers. This is where the real work begins. This is the moment measurement transforms into strategy. The data from your gauge isn't just a set of figures; it's the car's entire life story, and your job is to read it correctly to make smart, safe, and effective decisions.
Knowing how to interpret these numbers is what separates the pros from the amateurs. It’s the bridge between just owning a fancy tool and using it to deliver exceptional, predictable results. Without this crucial step, you’re just polishing in the dark.
Decoding the Numbers: What They Really Mean
Your paint thickness gauge gives you the objective truth about the surface you're about to work on. Understanding the typical benchmarks for automotive paint is the first step in turning that data into a solid plan.
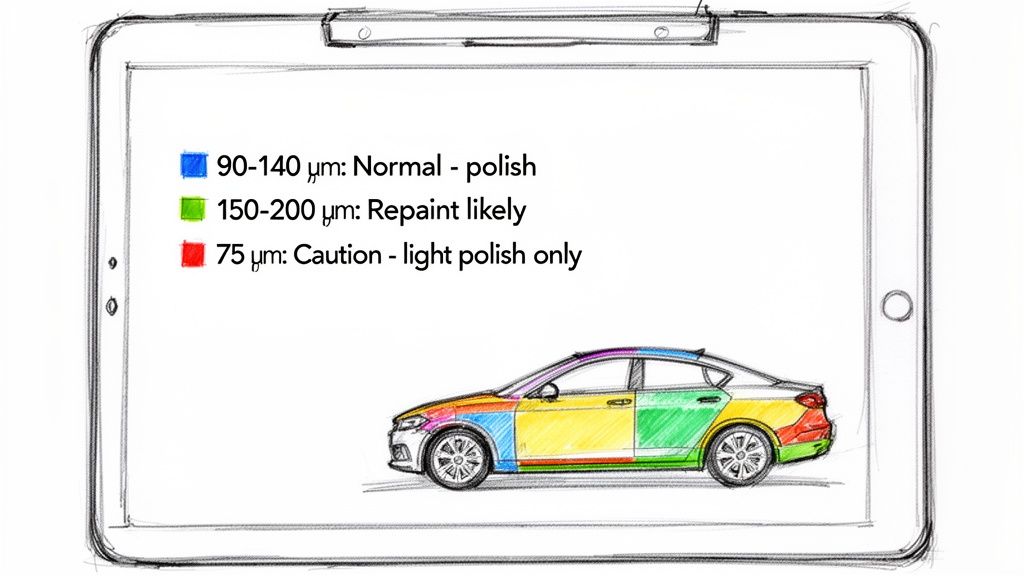
Here are the key ranges you absolutely need to commit to memory:
- 90-140 Microns (3.5 – 5.5 mils): This is the sweet spot. When you see numbers in this range, you're looking at a healthy, original factory finish with enough clear coat to work with safely.
- Below 85 Microns (< 3.4 mils): Red alert. Proceed with extreme caution. This reading screams "dangerously thin clear coat." Aggressive compounding is completely off the table, and even a light polish needs to be done with incredible care.
- Over 200 Microns (> 8 mils): This is a massive red flag. A reading this high almost always means a repaint, likely hiding previous bodywork or collision damage. The paint here could be softer, harder, or far less stable than the original finish.
Remember, the variations are just as important as the numbers themselves. If most of a car reads around 110 microns, but one door consistently shows 250 microns, you’ve just uncovered a hidden repair. That knowledge is your power—it tells you to treat that panel with a completely different, much gentler approach.
The Story of Smart Protection
A detailer we work with, Alex, recently had a client bring in a gorgeous, meticulously cared-for black sedan. The owner wanted a two-step paint correction to get rid of some fine swirls and bring back that deep, wet gloss. Before a single pad touched the paint, Alex did what he always does: he mapped the entire car.
The readings were a dream—consistent and healthy, averaging 125 microns across every single panel. That data gave him the green light and the confidence to perform the correction exactly as planned, knowing he had plenty of clear coat to work with.
But Alex’s job didn’t end there. After achieving a flawless, mirror-like finish, he knew he had to protect it with something just as advanced. With the paint depth confirmed, he applied Titan's Alpha Quartz Elastomer coating.
This wasn't just another ceramic coating. Born from our exclusive nanotube technology and Dark Matter tech, Alpha Quartz is a true game-changer. It's engineered to be hard like glass yet incredibly flexible. This elasticity means it won’t crack under intense temperature shifts—from freezing winters to scorching summers—ensuring the protection is as durable as it is beautiful.
This story perfectly illustrates the link between measurement and application. The data confirmed the surface was a perfect candidate for correction, and the flawless result demanded a premium, long-lasting shield like Alpha Quartz.
Applying Industry Standards in Your Bay
The principles of proper coating thickness aren't just for detailers; they're critical in high-stakes industries like aerospace and marine. For instance, the IMO PSPC's 90:10 rule mandates that 90% of measurements must be at or above the specified thickness, with no more than 10% falling slightly below. For us in the detailing world, this translates to ensuring that when you apply a professional-grade product, you're achieving the intended protective layer without any weak spots. You can find more on how metrology standards are applied across industries and see how our work fits into a bigger picture.
By interpreting your gauge readings, you're not just deciding how to polish; you're determining the best way to preserve the vehicle for the long haul. This data helps you make informed recommendations, whether that means choosing between paint protection film vs. ceramic coating or advising a client on a safer course of action. Your data provides the "why" behind every service you perform.
Protecting Every Surface Beyond the Paint
You’ve spent hours with your paint gauge, ensuring every panel has a flawless, healthy finish. But a truly comprehensive detail doesn't stop at the clear coat. Think of it this way: your precision work on the paint is just one part of the vehicle's overall protection. To really do the job right, that same level of care has to extend to every other critical surface, especially the glass.
Picture this: you're heading home after a long day when the sky just opens up. A sudden, blinding downpour has your wipers smearing water back and forth, turning every oncoming headlight into a starburst of glare. For a few terrifying seconds, you can barely see the road. It's a harrowing experience, and one that's all too common.
That exact scenario is why advanced glass protection isn't just a nice-to-have; it's a must.
Achieving Flawless Visibility with Advanced Coatings
That stressful, white-knuckle drive in the rain is completely avoidable. With a product like Titan's APEX Glass Ceramic Coating, you can turn a standard windshield into an active, high-performance shield against the elements. Best of all, the application is simple enough for any dedicated enthusiast to handle right in their own garage.
The difference is night and day. Once cured, the coating creates an intensely hydrophobic surface. Rainwater has no choice but to bead into perfect little spheres and zip right off the glass as you drive.
- Drastically Improved Visibility: Instead of a smeary mess, you get a clear line of sight as rain sheets off effortlessly.
- Reduced Wiper Use: Get up to highway speeds, and you'll often find you don't even need your wipers on at all.
- Stress-Free Night Driving: The coating cuts down on the blinding glare from streetlights and oncoming traffic, making rainy night drives far less exhausting.
The application is incredibly easy, enhancing visibility and making driving under rain stress-free. It’s a small investment of your time for a massive upgrade in driving safety and comfort.
Locking in Your Perfect Finish with User-Friendly Protection
After all the measuring, correcting, and polishing is done, the final step is to lock in all that hard work. While our elastomer coatings offer the pinnacle of long-term durability, sometimes you need a solution that delivers fantastic results without the intensive application process. This is where a top-tier spray ceramic really shines.
Titan’s Ultra Ceramic Spray was developed for both seasoned pros and serious DIYers. It lays down a brilliant, slick layer of SiO2 protection that amps up the gloss and makes the surface ridiculously easy to clean. For mobile detailers, its quick flash time and stunning results make it a perfect upsell.
The bottom line is simple: a job isn't finished until it's protected. Whether it's the paint you just spent hours perfecting or the glass that keeps your client safe, that final layer of high-quality protection is what separates a good job from a great one.
Of course, true vehicle care goes beyond just the surfaces we detail. This holistic view is best managed by following a solid car maintenance checklist that covers everything from engine fluids to tire health. Adopting this wider perspective ensures your meticulous detailing is part of a complete system of care, keeping the entire car in prime condition. Real expertise is about seeing the whole picture, not just one perfect panel.
Got Questions? We've Got Answers
Even when you feel you've got the hang of measuring paint thickness, questions always come up in the middle of a job. It's those little uncertainties that can make you second-guess your approach. Let's walk through some of the most common questions I hear from detailers, both seasoned pros and those just starting out.
How Often Do I Really Need to Calibrate My Gauge?
Think of it like this: calibrate at the start of every single job. Every. Single. Time. It should be muscle memory before you even touch a polisher to a new car.
Beyond that, you absolutely need to re-calibrate if you drop the gauge, swap out the batteries, or if the numbers just start to feel "off." It takes less than a minute, but that one minute is your insurance policy. It protects the car you're working on, and just as importantly, it protects your reputation.
What’s the Deal If One Panel Reads Way Higher Than the Rest?
When you see a panel spike to 200-250 microns (that's about 8-10 mils) or more, a big red flag should go up. That's almost always a sign of a repaint, and it often means there's body filler hiding underneath. This isn't a panel you can attack with your usual methods.
This is where you switch gears. Back off on the aggressive pads and compounds. More importantly, this is a crucial conversation to have with your client. Pointing it out shows you're not just a detailer; you're a professional who understands the vehicle's history. It manages their expectations and builds a massive amount of trust.
A high reading isn't just a number; it's a story. It tells you about the car's hidden history and guides you to make smarter, safer decisions. Ignoring it is like ignoring a warning sign on the road—it puts both you and the vehicle at risk.
Can My Gauge Tell Me How Thick a Ceramic Coating Is?
Short answer: nope. Your standard magnetic or eddy current gauge is designed to measure the distance from its probe all the way down to the metal substrate. A ceramic coating is a microscopically thin layer—typically just 1-3 microns—sitting on top of everything else.
That's far too thin for these gauges to even register. The tool is reading the full stack of primer, base coat, and clear coat. The ceramic coating is just a whisper-thin film on top of that, completely invisible to the gauge.
Why Are My Readings Bouncing Around in the Same Spot?
Inconsistent numbers are frustrating, but the cause is usually simple. The most common culprit is your technique. The probe has to sit perfectly flat against the panel. Even a tiny, almost unnoticeable tilt will throw the measurement off.
Also, make sure the surface is spotless. Any bit of dirt, grime, or leftover wax can lift the probe just enough to skew the reading. Always work on a clean, decontaminated surface.
If you've checked your technique and the surface is clean, run through this quick mental checklist:
- Did I just re-calibrate? If not, do it now.
- How's the battery life? Weak batteries can cause all sorts of baffling issues.
- Is the probe tip clean and free of damage? Give it a quick inspection.
Getting these little details right is what separates a good detailer from a great one. You're not just taking numbers; you're reading the canvas you're about to perfect. That's how you deliver those jaw-dropping results safely and consistently.
At Titan Coatings, we know that precision is the foundation of protection. Once you've measured the paint and confirmed it's ready for the final step, lock in that perfect finish. You can find all our professional-grade products, from elastomer coatings to easy-to-use sprays, in our online shop. For incredible gloss and user-friendly application, check out our Ultra Ceramic Spray and see the difference for yourself.
0 Comments