A lot of people arrive at this problem the same way. The lenses were fine for years, then one day the light catches them just wrong and you see it. A patchy shimmer. A peeling edge. A cloudy zone that won't wipe away no matter how carefully you clean it. At that point, most “scratch removal” advice on the internet starts pushing polishes, pastes, or abrasives.
That's the wrong mental model.
If you're searching for how to remove scratch resistant coating from eyeglasses, you're usually not fixing a scratch in the lens itself. You're dealing with a failed surface layer. That distinction matters because coatings are engineered systems, not dust you can buff off. In coating work, whether on optics, windshields, or painted surfaces, the same rule applies. A layer designed to bond hard and stay clear rarely comes off cleanly once it starts failing.
The Story of a Failing Eyeglass Coating
You clean the lenses twice, then three times, and the haze still sits in the same spot. Under a lamp, the surface shows a rainbow sheen, a rough-edged patch, or fine crackling that seems to live below the wipe marks. That pattern points to coating failure, which behaves very differently from skin oil or dried cleaner residue.

Modern eyeglass coatings act like advanced engineered films used in other industries. In automotive refinishing, for example, a hard clear layer on a headlight has to bond to the substrate, stay optically clear, and survive heat, UV exposure, and cleaning chemicals. The same material logic shows up in eyewear. Work on a lens surface has to respect what sits underneath, which is why guides on how to restore a headlight lens focus so much on the base material and surface prep. Eyeglass lenses are even less forgiving because any distortion sits directly in your line of sight.
Why removal is a last resort
A scratch-resistant or anti-reflective treatment is usually a thin functional stack, not a single simple layer. It may include a hard coat for abrasion resistance, layers that manage reflection, and top treatments that change how skin oil and water spread across the surface. Once that stack starts to fail, removal stops being routine cleaning and becomes controlled damage to recover usable vision from a bad surface.
That trade-off matters.
After the coating is stripped, the lens may look clearer, but it also loses the performance that coating provided. Glare can increase. Smudges may show faster. If the hard coat comes off with the failed layer, the lens can scratch more easily during normal use. In the lab, that is why a fresh pair of lenses is often the cleaner solution when the prescription still matters and the frame is worth keeping.
Why failure looks so uneven
Coatings rarely let go in a uniform way. Moisture creeps in at an edge. Heat and cleaning chemicals weaken one area first. Repeated flexing from daily wear can stress the bond between the coating and the lens substrate. One section turns cloudy, another develops a peeled border, and a third still looks intact.
That uneven bond is what makes DIY removal risky. A softened patch may wipe away with light pressure while a neighboring area stays tightly attached. People push harder, switch to abrasives, and end up cutting into the base lens. On glass, there is sometimes a narrow path to remove the failed layer with care. On many plastics, especially modern lightweight lenses, the same approach can leave permanent haze, distortion, or stress damage.
The main point is simple. A failing coating is a materials problem before it becomes a cleaning problem.
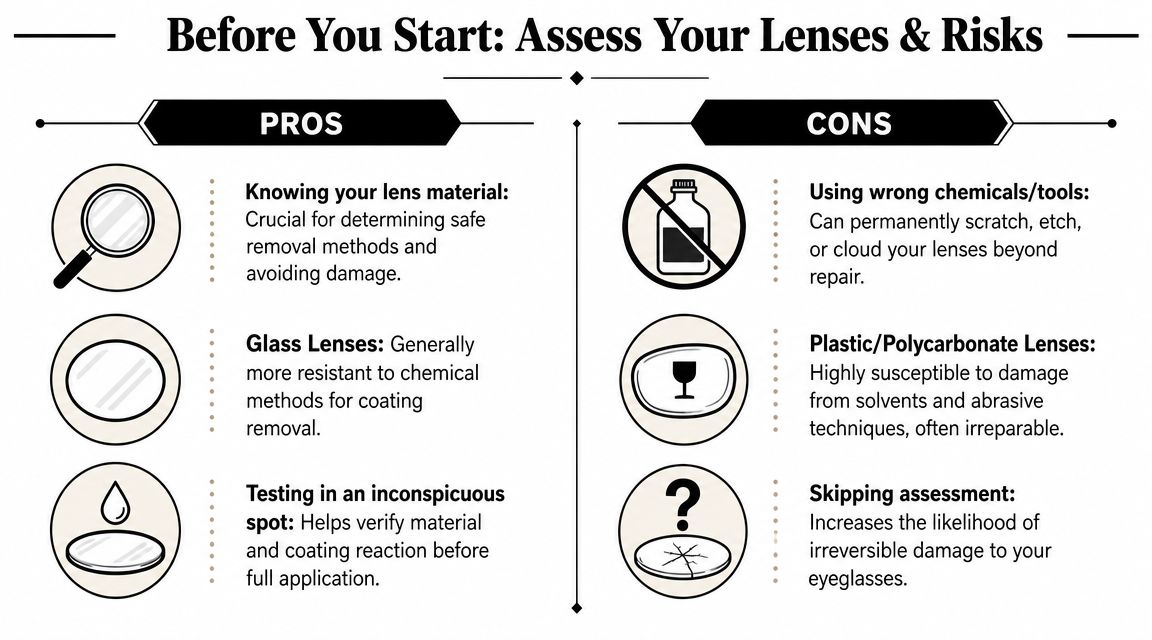
First Assess Your Lenses and the Risks
A pair of glasses can go from mildly annoying to unusable in one bad cleaning attempt. Before any solvent touches the lens, identify what the lens is made of and what layer is failing. That first check decides whether you are removing a damaged surface film or attacking the lens itself.
Most current prescription lenses are plastic. Polycarbonate and other lightweight materials dominate because they are impact resistant and easier to wear all day. They also react poorly to the kinds of stripping methods people pass around online. Glass lenses are less common, heavier, and generally more stable during careful chemical work, which is why nearly every serious DIY discussion starts with lens material.
Quick ways to judge lens type at home
No home check is perfect, but a few clues are useful together:
- Weight and feel: Glass usually feels noticeably heavier for its size.
- Temperature feel: Glass often feels cooler to the touch at first.
- Sound: A very gentle tap with a fingernail can sound sharper on glass and duller on plastic.
- Age and style: Older prescription lenses are more likely to be glass. Many modern everyday lenses are not.
If the signs conflict, stop there and ask an optician. Material guesses are where recoverable lenses get ruined.
Why the substrate matters more than many DIY guides admit
The coating may be the visible problem, but the base lens is the expensive part. On plastic lenses, scratch-resistant and anti-reflective systems are usually tied to primers and hard coats that help the surface stay clear and durable. Once you start dissolving or abrading that stack, there is very little margin for error. Polycarbonate is especially risky because solvents, heat, and prolonged chemical contact can leave haze, stress marks, or permanent distortion.
Glass behaves differently. Its surface is harder, chemically more stable, and less likely to deform during controlled coating removal. That does not make it easy. It only means the process has a narrower, more predictable failure mode.
If you want a broader reality check on what scratch fixes can and cannot do, the roundup of Prescript Glasses lens scratch solutions is a useful reference.
| Lens situation | Best next move |
|---|---|
| You confirmed glass lenses and the failure is limited to coating | Careful DIY removal may be possible |
| You suspect polycarbonate or another plastic lens | Replacement is usually the safer move |
| You have expensive lenses, strong prescription, or specialty coatings | Professional evaluation makes more sense |
| The frame is delicate or valuable | Avoid soaking or heat exposure |
When replacement makes more sense
In the lab, at this point, I slow people down. A stripped lens can end up optically cleaner than a peeling one, but it can also come back with more glare, weaker scratch resistance, and a surface that marks up faster in daily wear. If the prescription matters, that trade-off deserves a hard look before you start.
The closest analogy is automotive coating work. On a windshield or a ceramic-coated panel, the cleaner or polish has to match both the surface and the coating chemistry, or the finish suffers in ways that are hard to reverse. Good automotive glass care follows the same logic, including guidance on the best way to clean an auto windshield. Eyeglass lenses are even less forgiving because you look through them at close range, not across them.
If you cannot identify the lens material with confidence, do not try to strip the coating.
Safe Methods vs Damaging Internet Myths
A peeling lens makes people reach for whatever cuts haze fastest. That instinct is exactly how good lenses get ruined. Scratch-resistant and anti-reflective stacks are thin engineered films bonded to a finished optical surface. Once a method starts cutting into the lens itself, there is no practical way to polish that surface back to true optical quality at home.
The bad advice online usually comes from mixing up two very different jobs. One approach grinds the surface until the damaged area is less obvious. The other tries to weaken the bond between coating layers so they release with less force. For eyeglasses, that distinction matters because you wear the result on your face and look through it all day.
What should stay off the bench
Toothpaste, baking soda paste, melamine foam, polishing compound, metal polish, and sandpaper all act like abrasives, even when they are marketed as gentle. They can dull a failed patch enough to change how it catches light, but they also leave fine scratches across the viewing zone.
Automotive polishing creates false confidence here. On paint or exterior trim, a broad glossy surface can sometimes hide minor marring after correction. A prescription lens is much less forgiving. Small defects scatter light, reduce contrast, and add eye strain because your visual system keeps trying to focus through the damage.
If you are sorting through general scratch advice, Prescript Glasses lens scratch solutions is a useful comparison point because it helps separate temporary cosmetic tricks from methods that respect the lens surface.
Methods people attempt, and why the risk changes by material
Chemical removal gets repeated online for a reason. Coatings fail at the interface between layers, so softening that interface at least follows the chemistry of the problem.
For glass lenses, alcohol soaks are the least unreasonable DIY method because glass is much harder and more chemically stable than common eyeglass plastics. The coating may soften or lift before the substrate is harmed. Even then, results vary with coating age, hard-coat chemistry, and prior heat exposure.
For plastic lenses, the situation changes fast. Polycarbonate and other plastics rely on hard coats for surface durability, and those layers are tied closely to the lens underneath. Products sold as etching or stripping agents do not have much margin for error on those materials. A process that loosens the coating can also haze, swell, craze, or permanently distort the lens. That is why plastic lenses, especially polycarbonate, are usually a no-go for DIY stripping.
Why internet results are so inconsistent
Two lenses that look equally damaged can respond in completely different ways. One may release in patches. Another may smear, half-lift, or leave islands of hard coat behind. I have seen lenses that softened after mild solvent exposure and others that barely changed because the failure was not in the top layer at all.
Several variables drive that unpredictability. Lens material matters. Coating stack design matters. Heat history matters too. A pair left on a dashboard, cleaned with harsh sprays for years, or exposed to skin oils and sunscreen can age very differently from a newer pair stored properly. In coating work, this is routine. Surface prep, adhesion, and layer chemistry decide whether a film releases cleanly or tears apart.
That same discipline applies to basic cleaning. Household shortcuts often create problems that show up later as haze, residue, or weakened coatings, which is why guidance on whether dish soap is safe for car washing translates surprisingly well to lenses. The surface chemistry is different, but the rule is similar. Use products that fit the coating, not products that merely seem to clean aggressively.
A good rule is simple. If a method depends on scrubbing hard, polishing, or "buffing out" the defect, it is attacking the lens surface. If a method aims to soften a failing layer with minimal mechanical force, it at least matches how these coatings are built. That does not make it safe on every lens. It means the failure mechanism and the removal method are finally speaking the same language.
A Cautious Step-by-Step Removal for Glass Lenses
If you have confirmed glass lenses, the least destructive DIY path is an isopropyl alcohol soak. It still carries risk, but it at least aligns with how these coatings tend to fail. The goal isn't to scrub the coating off. The goal is to soften it enough that it releases with minimal force.
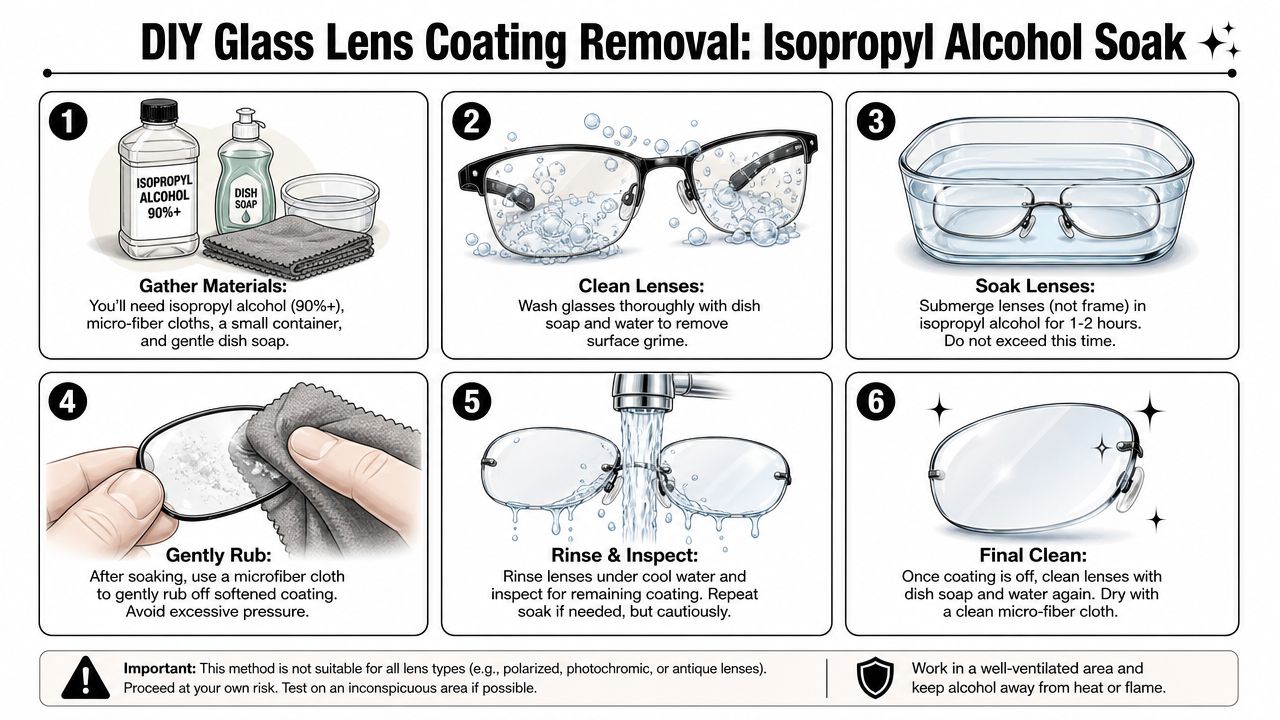
What you need on the bench
Set up like you would for delicate trim or instrument work, not garage improvisation.
- High-concentration isopropyl alcohol: Use 90%+ if available.
- A shallow container: Glass or chemical-resistant plastic works better than something flimsy.
- Microfiber cloths: Clean ones only.
- A fingernail or soft plastic edge: Not metal. Not a razor.
- Mild dish soap and cool water: For pre-clean and rinse.
- Good light: You need to see the coating's response clearly.
If the frame is delicate, avoid submerging it. Remove lenses if you know how. If you don't, work carefully and understand that frame finishes can suffer.
The actual soak process
Start by washing the lenses with mild dish soap and cool water. Dry them with a clean microfiber so you're not trapping grit against the surface later.
Then test one small, inconspicuous corner, as coatings don't react uniformly.
For glass prescription lenses, field demonstrations show visible softening at about 5 minutes, progressive flaking by 20 minutes, and stronger lift after a couple of hours of immersion, after which a plastic scraper or fingernail can remove what remains, as shown in this demonstration of glass lens AR coating removal with isopropyl alcohol.
Use that timeline as observation points, not a countdown to force.
At around 5 minutes
Look for slight edge lift, dulling, or a change in the way the damaged area reflects light.At around 20 minutes
Check whether the layer begins to flake when touched very lightly with a fingernail.After longer immersion
Some coatings release much better after extended soak time. The point is patience, not pressure.
How to remove the softened film
Once the coating starts releasing, use the lightest touch that works. A fingernail is often safer than a tool because it gives immediate feedback. If you feel resistance, stop. Re-soak. Forcing stubborn spots is how secondary scratches happen.
A useful comparison comes from architectural glass work. People who handle window glass scratch repair already understand the difference between correcting a surface and degrading it. Optical glass is even less forgiving because any haze sits in your line of sight.
Bench note: If the coating comes off in islands and leaves stubborn dots, that's normal. It means the bond is failing unevenly. More force won't make that more uniform.
What to avoid while doing it
- Don't scrape with metal
- Don't use paper towels
- Don't combine heat and solvent casually
- Don't assume one lens will match the other
- Don't keep chasing perfection if clarity is getting worse
One more hard limit matters. Once the AR coating is removed, it cannot be reapplied to the same lens, so if clarity ends up compromised, replacement becomes the practical endpoint. If you work in glass correction or detailing, that logic will sound familiar. You can level a damaged surface only so far before the better answer is replacement. The same material discipline applies when selecting specialized tools like glass polishing pads. The right tool matters, but so does knowing when the substrate shouldn't be pushed further.
After the Strip Post-Removal Lens Care
If the strip worked, the lens may look cleaner, but it is no longer what it was when it left the lab. The anti-reflective and scratch-resistant functions are gone. You now have a bare, more vulnerable optical surface.

Treat the lens like an unprotected finish
Many people undo their own work. They remove the failed layer, see better for a day, then go back to shirt-corner wiping, dry rubbing, or tossing the glasses face-down.
That won't hold up.
Use a rinse-first cleaning routine. Remove dust with water before touching the surface. Use mild soap if needed, then dry with a clean microfiber only. Store the glasses in a case, and don't let the bare lens grind against keys, dashboards, counters, or bag liners.
Expect new trade-offs
A stripped lens may have less haze from the failed coating, but it can also show more glare and pick up marks more easily. That's the trade you made.
The closest analogy from automotive care is a polished surface with no fresh protection on it. It may look clearer in the moment, but it needs gentler handling from then on. That same mindset is why protected glass performs differently from untreated glass in daily use, which is the whole point behind advanced ceramic coating for glass systems in automotive applications.
A bare lens can be usable. It just won't be as forgiving.
Knowing When to Fold Professional and Alternative Options
A risky lens is easy to spot in the lab. The coating is failing, vision is getting worse, and the owner wants one last fix before paying for replacement. That is the point where judgment matters more than persistence.
Stop and reassess if the glasses carry a high prescription, a premium progressive design, an uncertain lens material, or a frame finish that could react badly to heat or chemicals. In those cases, one mistake can cost more than a new pair of lenses. Coating removal sounds simple, but the coating stack and the substrate behave like a matched system. Once that stack starts to fail, restoring full optical performance on the same lens is rarely realistic.
Professional shops usually make a hard choice here. They either strip under controlled conditions when the lens type allows it, or they replace the lenses outright. That approach protects centration, surface quality, and prescription accuracy. It also avoids the common DIY outcome where haze is gone but glare, fine scratching, or frame damage replaces it.
Good reasons to walk away from DIY
- You cannot confirm whether the lenses are glass, polycarbonate, Trivex, or high-index plastic
- The prescription is strong enough that remaking the lenses would be expensive
- The coating failure sits in the main viewing zone
- The frame has painted, plated, or specialty finishes
- You need dependable optics for driving, work, or all-day wear
Polycarbonate deserves special caution. In practice, it is a no-go for home stripping because the same chemistry that attacks the failed coating can also attack the lens itself. The result can shift from cosmetic damage to optical distortion fast. Automotive coating shops work with the same principle on softer substrates. Aggressive correction methods that are tolerated on one surface can permanently mark another.
If you want a second perspective before replacing lenses, this guide with expert advice on eyewear scratches is useful because it sets realistic limits on what surface repair can and cannot do.
Replacement is often the cleaner technical decision. It gives you a fresh optical surface, a new coating system applied under factory conditions, and a known result instead of a salvage attempt. If clear vision matters more than squeezing one more experiment out of a failing lens, that is usually the right call.
If you care about surface performance, clarity, and long-term protection in other parts of your world, take a look at APEX NANO – Titan Coatings. Their work in advanced protective coatings speaks to the same principle behind this article. The right coating system matters, and the right time to protect a surface is before it fails.
0 Comments