Mike opened the door of his daily driver and gave me the look every detailer recognizes. Coffee on the passenger seat, dust in every seam, a windshield haze that showed up at sunset, and just enough odor to remind you the cabin had been lived in hard.
A proper DIY car detailing interior job starts when you stop thinking like a person with a spray bottle and start thinking like a technician.
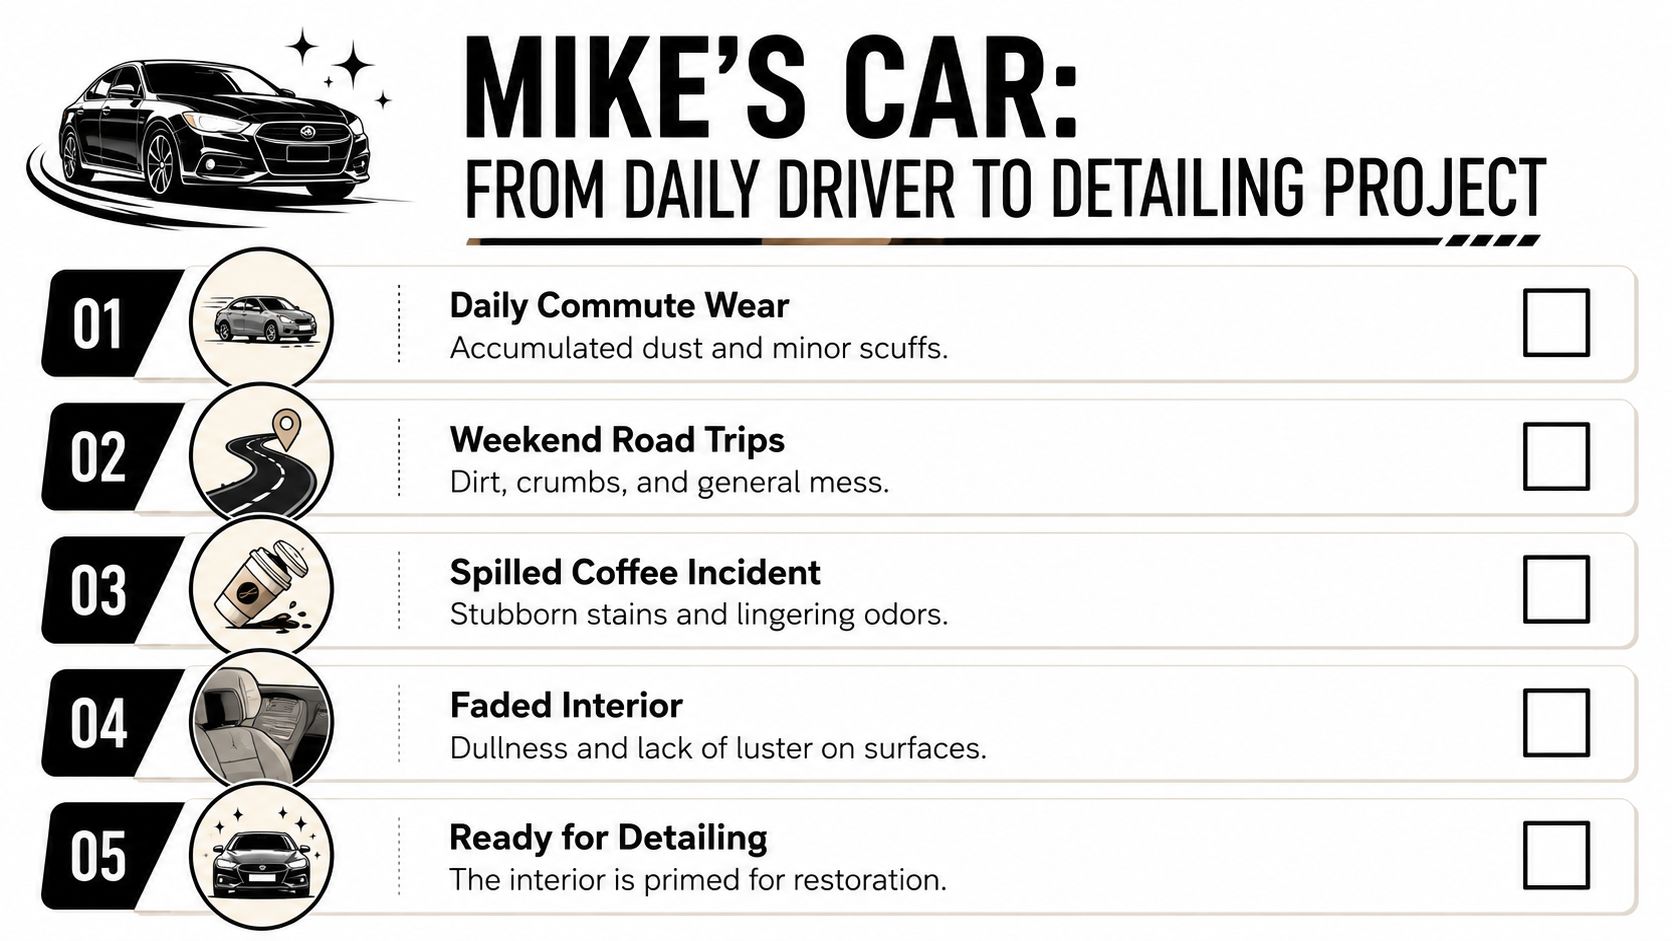
From Daily Driver to Detailing Project
Most interiors don't become rough overnight. They fade by accumulation. A commute adds dust. A road trip adds crumbs. One spilled drink turns into a stain line around stitching, then a smell that hangs around longer than it should.
Mike's car was exactly that kind of project. Not neglected. Just used.
That's why interior detailing matters far beyond appearance. The global car detailing services market was estimated at USD 41.40 billion in 2024 and is projected to reach USD 58.06 billion by 2030, with a projected 5.9% CAGR from 2025 to 2030, according to Grand View Research's car detailing services market report. That scale tells you something important. Caring for a vehicle's cabin isn't a niche habit. It's part of a much larger maintenance mindset tied to appearance, hygiene, and resale value.
Start with inspection, not chemicals
Before touching a towel, inspect the cabin like a pro:
- Look for material changes. Soft-touch trim, glossy piano-black panels, coated leather, screens, cloth inserts, rubber mats. They don't all respond to the same cleaner.
- Map key problem areas. Cupholders, seat bolsters, steering wheel, door pulls, carpet edges, under-seat tracks, and the lower windshield.
- Check the type of dirt. Dry dust behaves differently than oily fingerprints, spilled drinks, sunscreen residue, or pet hair.
Practical rule: If you don't identify the surface first, you'll choose the wrong chemistry second.
That's also where planning beats speed. A lot of DIY failures happen because people jump straight into wiping. They smear grime across trim, oversaturate fabric, or use the same towel on glass and dashboards.
Build a kit that matches the job
You don't need a van full of gear, but you do need the right categories of tools. For a workable setup, I'd separate them like this:
| Need | What belongs here | Why it matters |
|---|---|---|
| Basic cleanup | Vacuum, microfiber towels, soft brushes | Handles most dust and loose debris safely |
| Surface cleaning | Material-safe interior cleaner, glass cleaner | Lets you clean by substrate instead of by guesswork |
| Problem solving | Spot-cleaning mix, stronger APC for selected areas | Useful for stains and heavily soiled mats |
| Finishing tools | Dedicated glass towels, detail brushes | Makes the end result look professional |
If you're building out your setup for repeat use, a practical reference is Titan's mobile detailing equipment list. It helps sort the must-haves from the tools that make the work smoother.
A useful side lesson applies beyond detailing. Shops that communicate process clearly usually earn more trust, which is one reason structured resources like Polaris Marketing Solutions' SEO playbook are worth a read. Good operators in any service business win by turning expertise into a repeatable system.
Mike didn't need magic. He needed a plan, the right order, and enough patience to treat the interior like a set of materials instead of one big dirty room.
The Foundation of a Flawless Interior
The biggest mistake in DIY car detailing interior work is trying to clean around debris instead of removing it first. That sounds obvious until you watch someone spray cleaner onto a carpet full of grit and then scrub the dirt deeper.
Start with a complete reset of the cabin.
Empty everything you can remove
Take out trash, receipts, charging cables, seat-back items, child-seat accessories, and floor mats. Open the center console. Open every door pocket. Move the seats forward and back.
A professional workflow calls for removing loose items and floor mats before a thorough vacuum because it prevents pushing grit deeper into seams and crevices, and using a soft brush on carpets first helps lift embedded debris for more effective removal, as noted in this guide on removing debris before vacuuming a vehicle interior.
That order matters more than commonly assumed. Dry contamination is abrasive. If it stays in place while you wipe trim or scrub upholstery, you're rubbing that abrasion into the surface.
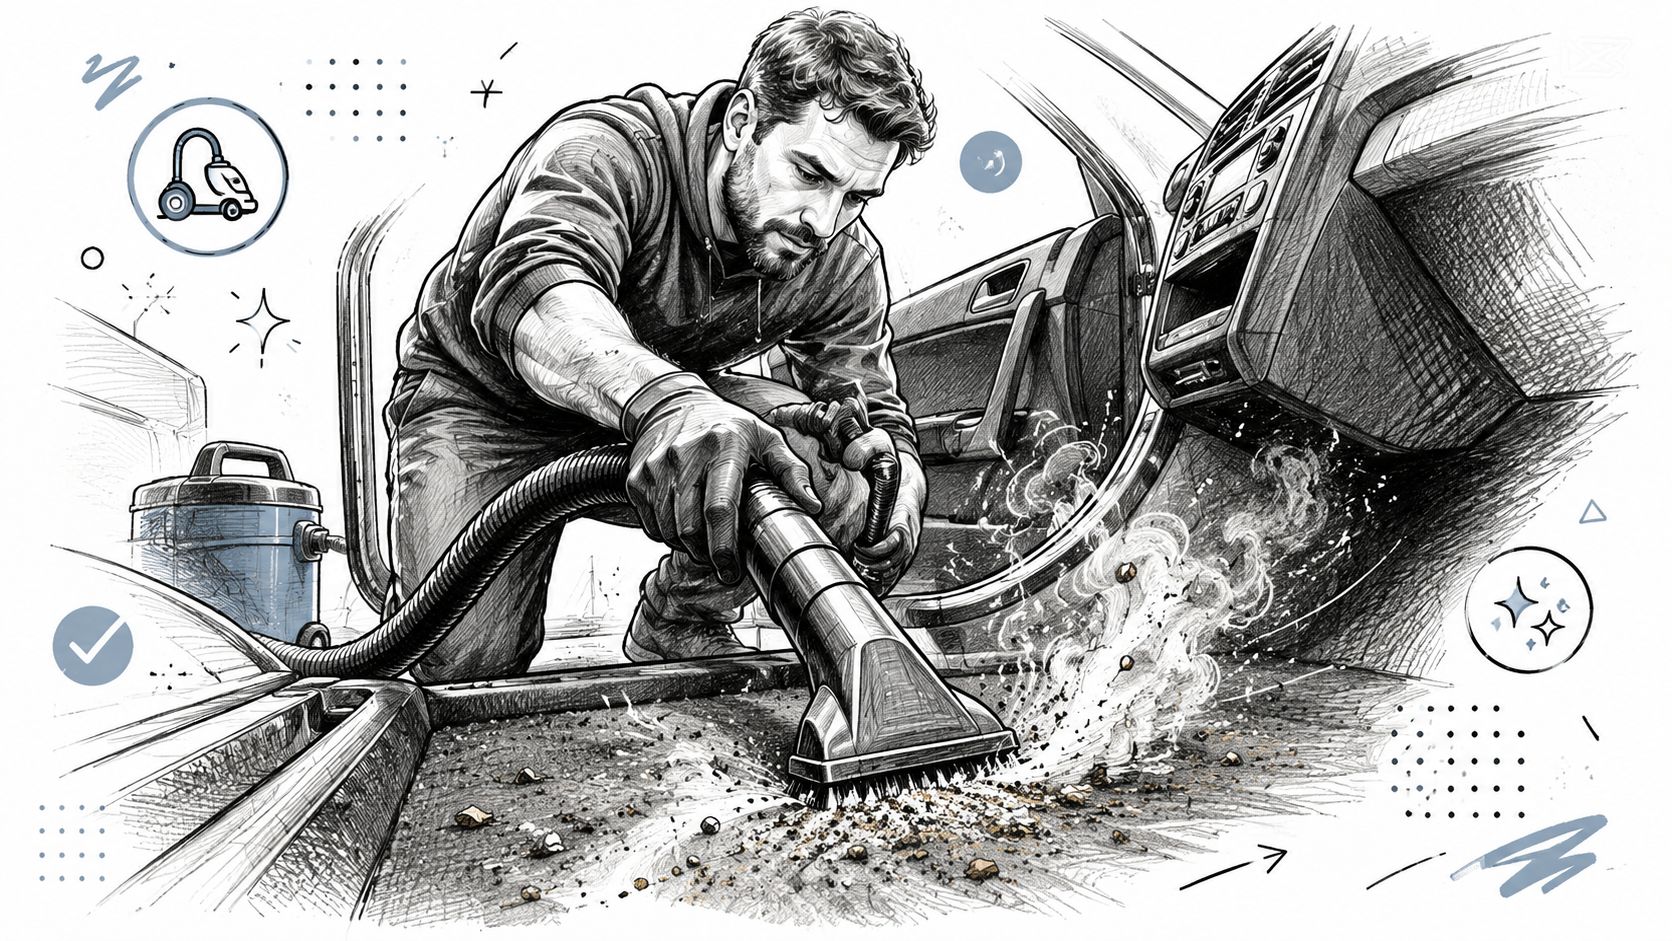
Vacuum like you're uncovering the car, not skimming it
A fast vacuum pass only gets what's obvious. A proper pass gets what's hiding.
Work top down where practical, then move toward the floor. Hit the headliner area carefully if needed, then sun visors, parcel shelf, seat seams, console edges, under-seat rails, carpet edges, and trunk or cargo area. On carpets and fabric mats, agitate first with a soft brush so the fibers release embedded dirt.
Use a crevice tool where the seat meets the backrest. Use a smaller brush around vents and buttons. For vents, badges, stitching, and trim edges, a dedicated set like an auto detail brush kit for interior crevices and vents helps you loosen dust without chewing up delicate surfaces.
Vacuuming first isn't about making the cabin look better. It's about making every wet step safer and more effective.
Know what not to do
The bad habits show up the same way every time:
- Skipping mat removal. Dirt stays trapped underneath, and you miss the heaviest contamination.
- Using stiff brushes on everything. Great way to mar softer trim and leave scuffed-looking plastics.
- Rushing seat tracks and edges. Those spots hold grit that later migrates back onto clean carpet.
- Starting with cleaners. Liquid plus loose soil creates mud, not progress.
If the interior has heavy dry debris, pet hair, or sand, spend more time here than you think you should. This phase doesn't feel dramatic, but it's what separates a clean-looking cabin from one that feels detailed.
A Masterclass in Surface Cleaning
The turning point in any interior detail comes after vacuuming, when the cabin stops fighting you and starts revealing what it needs. I've seen plenty of well-kept daily drivers look tired because every surface had the same film on it: skin oils on the wheel, haze on the glass, dust packed into texture, and light grime on seats that made the whole interior feel older than it was.
Good surface cleaning fixes that, but it also sets up the protection stage later. If residue stays behind now, coatings and protectants will bond poorly, wear unevenly, or trap a dirty look under a fresh layer. Clean surfaces last longer after protection. That is the difference between a quick tidy-up and a preservation-minded detail.
Many modern cabins combine coated leather, soft-touch plastics, touchscreens, textured vinyl, piano-black trim, and fabric in a very small space. One aggressive cleaner can leave glossy patches on matte trim, streak a screen, or dry out a coated seat bolster. The safer approach is simple. Match the cleaner and the towel to the material, then control how much liquid touches the surface.
Fabric and carpet need moisture control
Fabric seats and carpet can take more abuse than glossy trim, but they still punish sloppy technique. The common mistake is flooding the area and calling it deep cleaning.
Use a light mist on the towel or brush, work a small section, and blot suspended soil out as it releases. That keeps water from sinking into padding and seam lines where drying slows down and odors start. On a family car that sees coffee runs, gym bags, and wet shoes, this single change usually makes the interior smell cleaner the next day because the dirt came out instead of getting pushed deeper.
Low-moisture work also gives you better judgment. You can see whether a mark is surface grime, dye transfer, or a true stain before you commit to heavier correction later.
Leather and vinyl reward restraint
Dirty leather rarely needs force. It needs repeatable, controlled passes.
Apply a mild product to a microfiber towel or a soft interior brush, work gently, and wipe the surface dry before cleaner residue flashes off. That matters most on steering wheels, seat bolsters, and armrests, where body oils build up in thin layers and create that shiny, slick look many owners mistake for wear. In many cases, it is contamination.
A purpose-made interior cleaner for car surfaces makes this easier because you are starting with chemistry intended for interior materials instead of gambling on a household spray with unknown additives.
Stop cleaning when the towel comes back clean and the finish looks even. More agitation after that usually adds risk, not results.
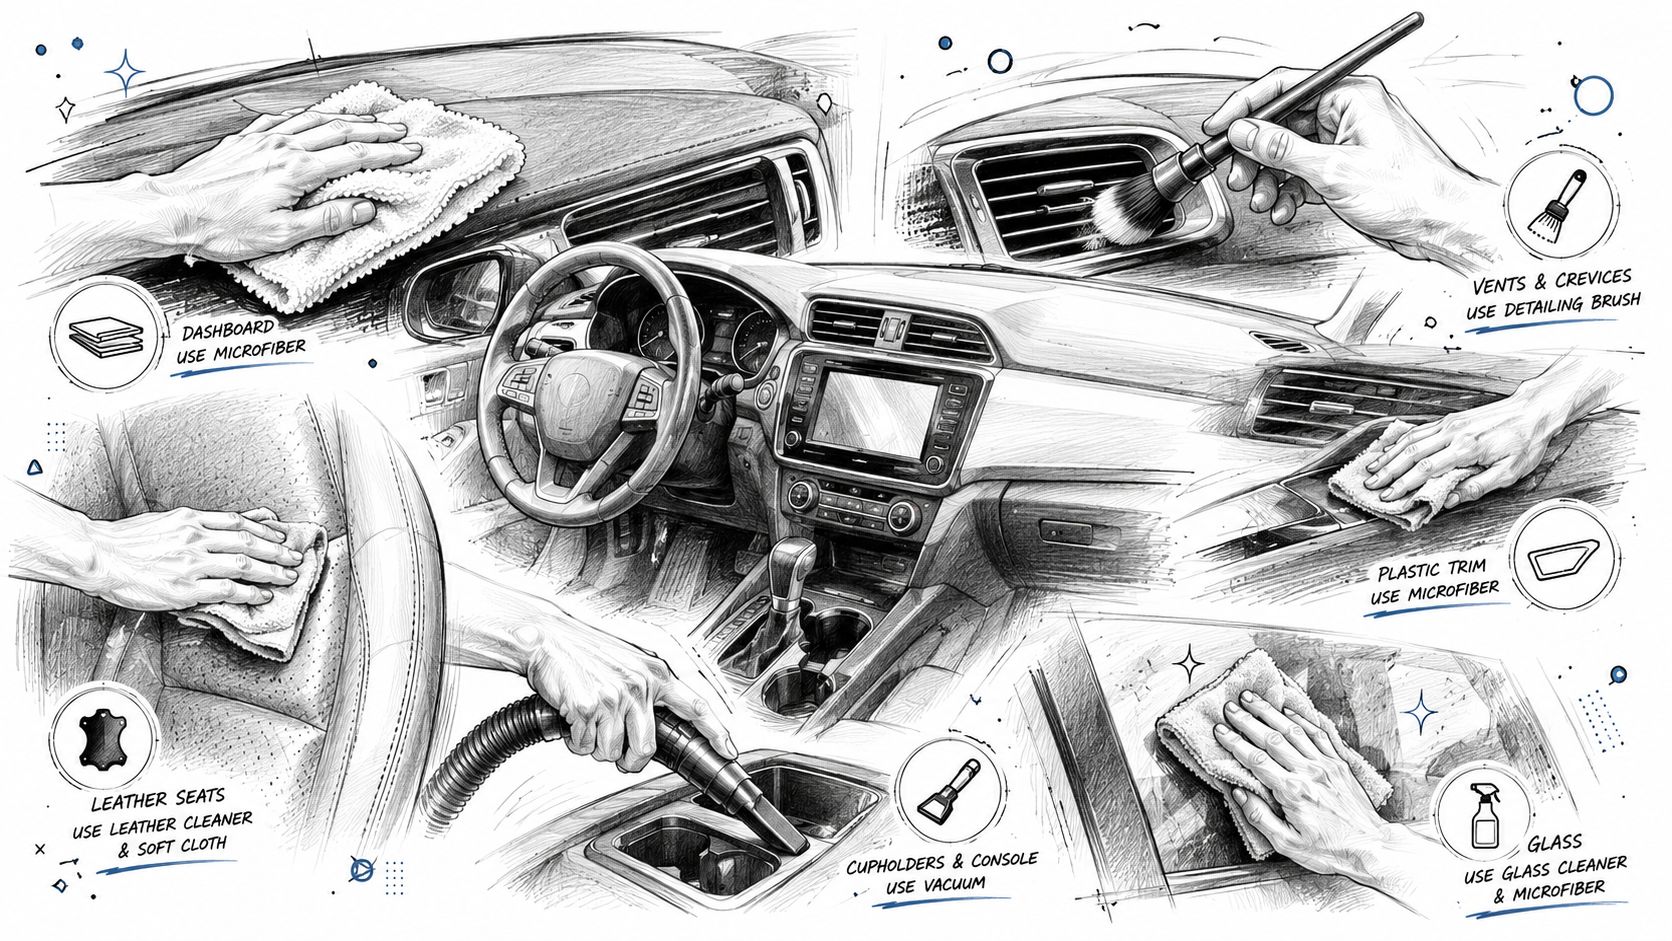
Plastics, screens, and glossy trim need precision
Dashboards and door panels hold onto fine dust and oily residue, especially around grain patterns, switchgear, and cupholders. Clean them with a lightly dampened microfiber first, then use a soft brush only where the texture is holding soil. Follow with a dry towel to level the finish so the surface feels dry, not dressed.
Screens and piano-black trim are less forgiving. Spray the towel, not the part. Use almost no pressure. Fold the towel often so you are always working with a clean face. Fine marring on these surfaces often comes from rubbing dust across them during the first wipe, not from the cleaner itself.
A simple guide keeps you out of trouble:
| Surface | Safer approach | Common mistake |
|---|---|---|
| Touchscreen | Lightly dampened microfiber | Spraying cleaner directly onto screen |
| Piano-black trim | Very soft towel, minimal pressure | Heavy rubbing that creates fine marring |
| Textured plastic | Brush plus towel | Leaving cleaner in grain and seams |
| Steering wheel | Thorough clean, no dressing | Applying slippery protectant |
The steering wheel, shifter, and pedals deserve extra discipline. They should feel clean and dry in the hand. Shine in those areas usually means residue, and residue changes grip.
Glass shows how disciplined the rest of the job was
Interior glass is where rushed work gets exposed. The inside windshield collects film from ventilation, interior off-gassing, fingerprints, and overspray from careless product use around the dash. If the sun hits it at the wrong angle, every missed pass shows up.
Use two microfiber towels. One applies the glass cleaner and loosens the film. The second buffs the glass dry before the cleaner can streak. I also spray the towel instead of the windshield whenever I'm working near headliners, pillars, clusters, or infotainment trim. It keeps drips out of places that are harder to correct than the glass itself.
That lower inside windshield deserves extra attention because it affects visibility, especially if you are already dealing with humidity and HVAC moisture. Clean glass will not solve every fogging problem, but it removes one common contributor. For more on that side of the issue, see this guide to understanding car window fogging.
The best-looking interiors after detailing do not look glossy. They look settled. The grain is clean. The leather feels natural. The trim has an even tone. The glass disappears. Get that right, and the protection stage that follows has a clean foundation to bond to and a much better chance of holding that fresh, showroom look.
Conquering Stains and Lingering Odors
A clean cabin can still feel dirty if one stain remains in your field of vision or one odor survives in the background. That's the point where many DIYers quit too early. They've improved the interior, but they haven't solved it.
Mike's toughest issue wasn't general grime. It was a coffee spill that had dried into the fabric and left a faint sour smell every time the car sat in the sun.
Match the chemistry to the problem
Spot work is where precision matters. For light stain removal, one common DIY mix is 1.5 teaspoons (0.25 ounce) of dish soap per quart of water, while heavily soiled mats may call for an all-purpose cleaner at 4:1 dilution, according to this guide on targeted stain removal and interior cleaner dilution.
That tells you something bigger than the formula itself. Don't use one strength for every problem.
- Drink spills usually need blotting, light agitation, and repeat passes rather than one drenched attack.
- Dirty mats can handle stronger chemistry than delicate seat fabric.
- Unknown stains should always be tested in an inconspicuous area first.
If you spread a stain wider than it began, you used too much liquid or too much pressure.
The right stain method lifts contamination out. The wrong one drives it sideways.
Odors don't need perfume. They need source removal
Odor control fails when people treat air instead of surfaces. Air fresheners may mask a problem for a while, but they won't remove what's causing it.
Check these common odor zones:
- Under seats for food, paper cups, and damp debris
- Floor mats and carpet backing for old moisture
- Cupholders and console seams for sugary residue
- Trunk or cargo area for forgotten items
- Glass and HVAC area if the cabin gets stuffy or hazy
If the windshield fogs repeatedly from the inside, it's worth learning more about moisture and airflow problems. This guide to understanding car window fogging is useful because fogging often overlaps with interior moisture issues, not just visibility.
For seat-specific cleanup, a focused walkthrough like Titan's guide on how to deep clean car seats can help you decide when gentle spot treatment is enough and when you need a more involved cleaning pass.
Odor removal is usually simple in theory and stubborn in practice. Remove the source. Clean the affected material. Dry it properly. Then reassess. If the smell returns, something that caused it is still in the car.
The Titan Shield Applying Next-Gen Protection
The turning point in an interior detail comes after the cleaning is done.
Mike saw it when we stepped back from his car. The coffee haze was gone from the glass, the trim had its natural color back, and the seats finally looked cared for instead of tired. But a clean interior is only half the job. If you leave every surface bare, shoe scuffs, skin oils, UV exposure, and damp weather start wearing it down again the moment the car goes back into daily use.
Protection only works on properly prepared surfaces
Interior protection fails for a simple reason. People apply it over residue.
If glass still has cleaner film, if trim still has dressing in the grain, or if leather still feels tacky from leftover product, the coating bonds to contamination instead of the surface itself. That shortens durability and often leaves the exact problems DIY detailers hate most. Smearing on glass, uneven sheen on trim, and a strange topcoat feel on seats.
For interior glass, I keep the prep method simple. Clean with a low-residue glass cleaner, wipe with one microfiber, then follow with a second dry towel until the glass is perfectly clear. The second towel matters because it catches the faint moisture and film the first pass can leave behind. If the windshield looks clean in the garage but flashes streaks in sunlight, it is not ready for protection.
A properly prepped windshield coating does more than make the glass look sharp. It helps water clear faster in bad weather and cuts down on the grabby, dirty feel that untreated interior glass can develop over time.
Match the protection to the job
Interior surfaces do not all want the same kind of coating. That is where many DIY jobs start looking artificial.
Hard trim needs a product that leaves a dry, factory-looking finish. Leather needs protection that resists dye transfer and body oils without making the seat slick or glossy. High-contact controls need restraint. Steering wheels, pedals, and shifters should stay clean and natural, not coated with anything that changes grip.
I use a simple framework:
| Area | What you want from protection | What to avoid |
|---|---|---|
| Interior glass | Clear finish, easier cleaning, better wet-weather visibility | Residue, haze, missed streaks under the coating |
| Hard interior trim | UV resistance, low-sheen finish, easier wipe-downs | Oily dressings and shiny leftovers |
| Leather surfaces | Resistance to dye transfer, oils, and daily abrasion | Heavy products that change texture or add gloss |
| Steering wheel and pedals | Clean, dry surface with full grip | Any slick protectant |
For seats, a dedicated ceramic leather coating for vehicle interiors makes more sense than a one-product-for-everything dressing. The goal is to preserve the original feel while adding a sacrificial barrier that takes the abuse first.
Durable beats flashy
A professional interior does not announce itself with shine. It feels dry, even, and well kept.
That is why advanced protection belongs at the end of a serious DIY interior detail. It turns the work from a one-time cleanup into a preservation plan. Dust releases easier. Dye transfer is less stubborn. Routine wipe-downs take less effort because the dirt sits on top of the protection instead of digging straight into the material.
Mike noticed that part a week later, not in the driveway. He told me the cabin still looked freshly detailed after commuting, takeout runs, and a rainy afternoon with muddy shoes. That is the true test. A durable finish should survive normal life and make the next cleaning easier, not just look good for one photo.
Maintaining Your Flawless Interior
The owners who keep an interior looking sharp aren't the ones who deep clean constantly. They're the ones who interrupt mess before it compounds.
A simple rhythm works better than ambitious plans that fade after one month.
A routine you'll actually stick with
Use this as a practical maintenance loop:
- After daily use. Remove trash, bottles, and food wrappers before they settle into the cabin.
- On a light upkeep day. Quick vacuum of footwells, seat edges, and mats.
- When touch points start showing oils. Wipe steering wheel, door pulls, center console, and shifter area with a clean microfiber and appropriate interior cleaner.
- After minor spills. Blot immediately, then clean the affected spot before it becomes a stain memory.
For owners who want a fast refresh on compatible hard surfaces during maintenance, Ultra Ceramic Spray from Titan Coatings fits the role of a quick-application protective topper. The key is still restraint. Light application, even wipe, no buildup.
What keeps the cabin looking detailed
A few habits matter more than product variety:
- Keep towels separated. Glass towels should never double as trim towels.
- Use the least aggressive method first. Especially on glossy trim, leather, and screens.
- Watch residue in sunlight. A surface can look clean in the garage and streaked outside.
- Treat protection as maintenance support. Not a substitute for proper cleaning.
A well-kept interior doesn't come from dramatic details. It comes from small corrections made early.
That's the payoff. Once the interior has been corrected and protected properly, maintenance stops feeling like recovery work. It becomes simple upkeep, and the car stays pleasant to drive, easier to clean, and much closer to that freshly detailed look.
If you want to turn a one-time cleanup into lasting interior and glass protection, explore APEX NANO – Titan Coatings. Their coating lineup is built for owners and detailers who want easier maintenance, durable surface protection, and a finish that stays controlled instead of greasy.
0 Comments