
The black SUV looked finished. Paint sharp, glass clear, tires dressed. Then the owner turned the key and got nothing but a weak chatter from under the hood, and the whole job suddenly narrowed to one crusted battery terminal wearing a chalky blue-green ring.
Why Corroded Terminals Sabotage a Perfect Detail
A black SUV can look finished from ten feet away, paint sharp, glass clear, tires dressed. Then the owner turns the key and gets a weak chatter from under the hood. The detail suddenly comes down to one crusted battery terminal with a chalky blue-green ring.
That ring is not just residue. It can leave a freshly detailed vehicle slow to crank, hard to start, or clicking rapidly when the key turns, with dim lights and low-voltage warning lights along for the ride UTI's battery corrosion guide.
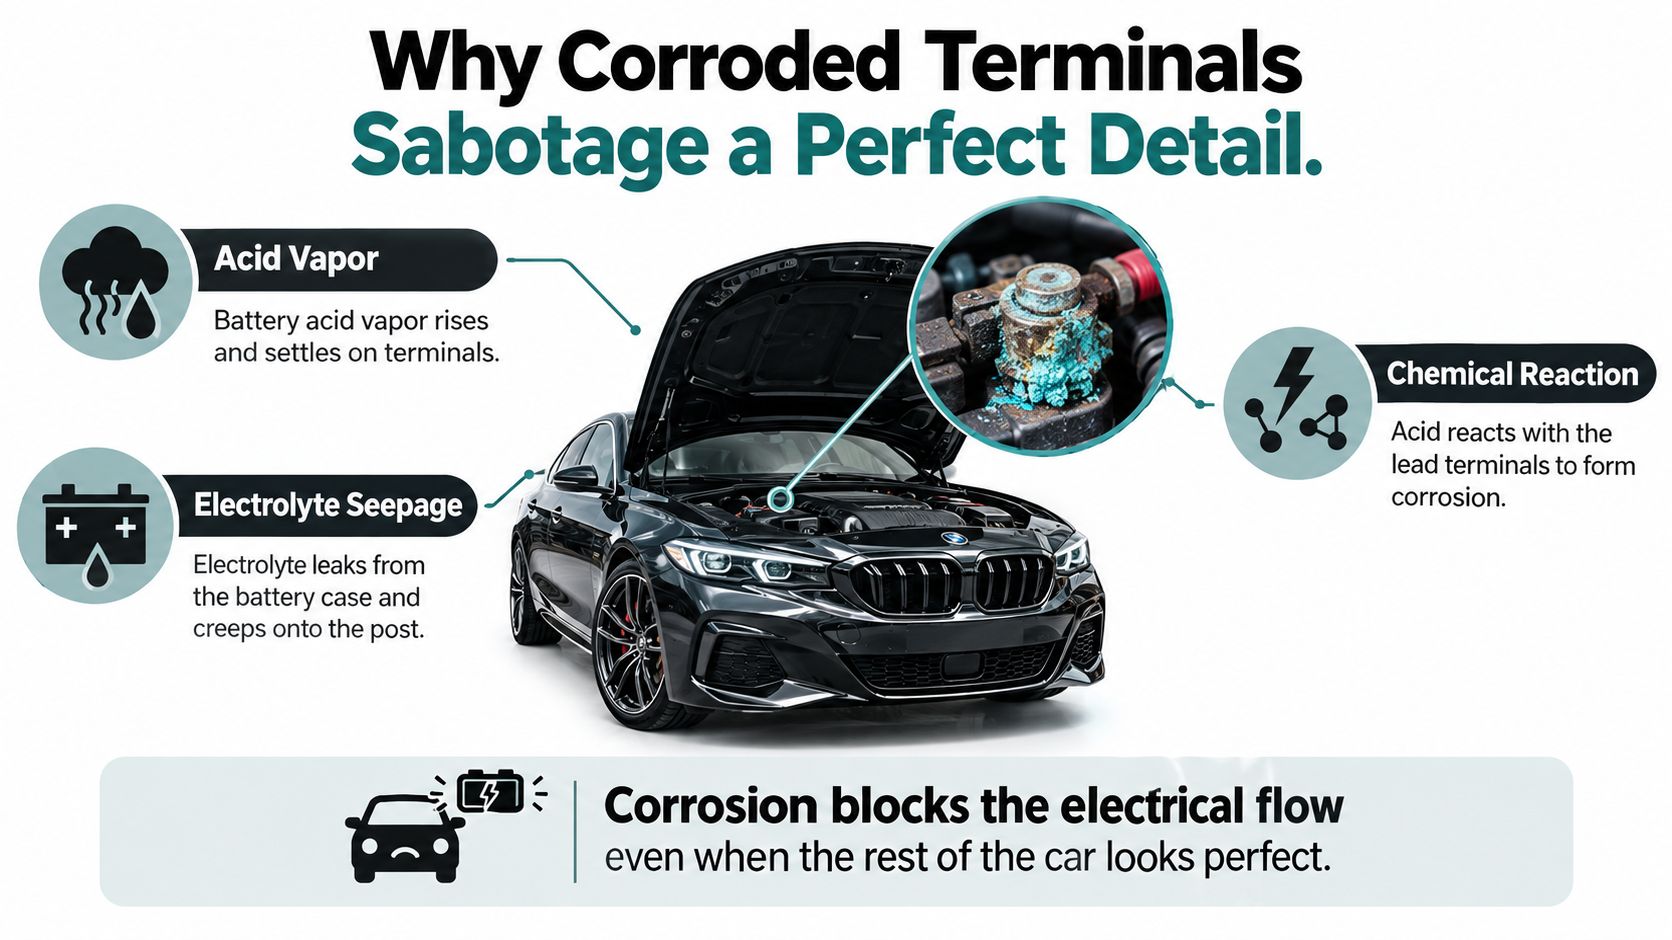
What that crust is doing under the clamp
Under the hood, corrosion builds for ordinary reasons. Acid vapor, electrolyte seepage, moisture, battery overcharging, heat, and contact between dissimilar metals can all create the deposit around the posts and cable clamps. The problem is the resistance it adds at the connection UTI's explanation of terminal corrosion causes and symptoms. The starter does not care how glossy the paint is. If resistance rises at the terminal, current flow falls where the car needs it most.
Practical rule: If the terminal connection is dirty, the detail is not finished. The car has to start clean, not just look clean.
I have seen this on mobile jobs after rain, especially where moisture hangs around the battery tray and the owner notices the obvious stuff first, dusty trim, a spotted windshield, fingerprints on piano black. The battery sits there building resistance until the first cold morning or a short errand run exposes it.
A maintenance habit that saves embarrassment
The useful benchmark is simple. Inspect and clean battery terminals once per year, and in humid environments check them at least twice annually because moisture accelerates corrosion UTI's maintenance guidance. That is a small interval for something that can interrupt starting and alternator charging if it gets ignored.
A clean exterior and a neglected battery create a strange mismatch. The vehicle looks sorted, but the electrical path is not.
That is why learning to clean car battery terminals belongs in the same mindset as wheel-barrel cleaning or glass correction. It is part of finishing the vehicle properly, especially when the owner expects reliability the second they leave the driveway.
Tools and Cleaners Worth Laying Out First
On a mobile detail, the battery gets its own small workstation. I spread a fender cover beside the open hood, place gloves and eye protection where I can reach them, and keep the brush, cloths, wrench, and cleaning solution together. That order prevents a rushed search over exposed terminals and keeps the work controlled.

The kit I want within reach
- Eye and skin protection: Wear both before inspecting or handling a conventional 12-V lead-acid battery, as outlined in NHTSA service bulletin guidance.
- Ventilation: Keep fresh airflow around the battery compartment while you work. It helps prevent vapors from collecting in the work area.
- A nonmetallic or terminal brush: Use it on the posts and the inside of each clamp. The goal is to lift corrosion without gouging the softer metal.
- Damp microfiber cloths: A dry cloth can create static electricity capable of igniting battery vapor. Dampen the cloth before wiping residue, following the warning in the NHTSA guidance.
- A memory saver, when needed: If the vehicle must retain its stored settings, connect the device before disconnecting the battery, following the procedure described in the Interstate cleaning procedure.
A separate underhood job may call for engine parts cleaning solutions, while engine cleaning products can help organize the rest of the service cart. Neither replaces the small brush and careful wiping that terminal work requires.
Baking soda works, but control matters
The cleaning mix should stay on the corrosion, not spread across the battery. Interstate gives one part baking soda to five parts water, while its maintenance instructions also describe a 50/50 mixture of baking soda and water in the Interstate FAQ battery-maintenance instructions. Follow the ratio used by your chosen procedure and apply only enough to neutralize deposits on the posts and cable ends.
A detailer's brush should look busy, not flooded. Keep liquid away from the battery top and surrounding openings. Pouring neutralizer across the battery can allow it to damage the acid inside, so apply it precisely and wipe the residue away with a damp cloth.
On the cosmetic side of the cart, OMNIGUARD – Waterless Wash is a quick sealant for wipe-downs, water-mark removal, UV protection, self-cleaning, and oxidation resistance. It belongs on painted and trim surfaces, not on battery terminals, where the cleaning process and electrical safety come first.
The Safe Disconnect and Reconnect Sequence
Maya, one of the more careful mobile techs I know, always pauses before she puts a wrench on a battery. She has seen enough clean-looking battery tops hide a bad habit underneath. The corrosion may be visible, but the risk usually comes from the order of the work.
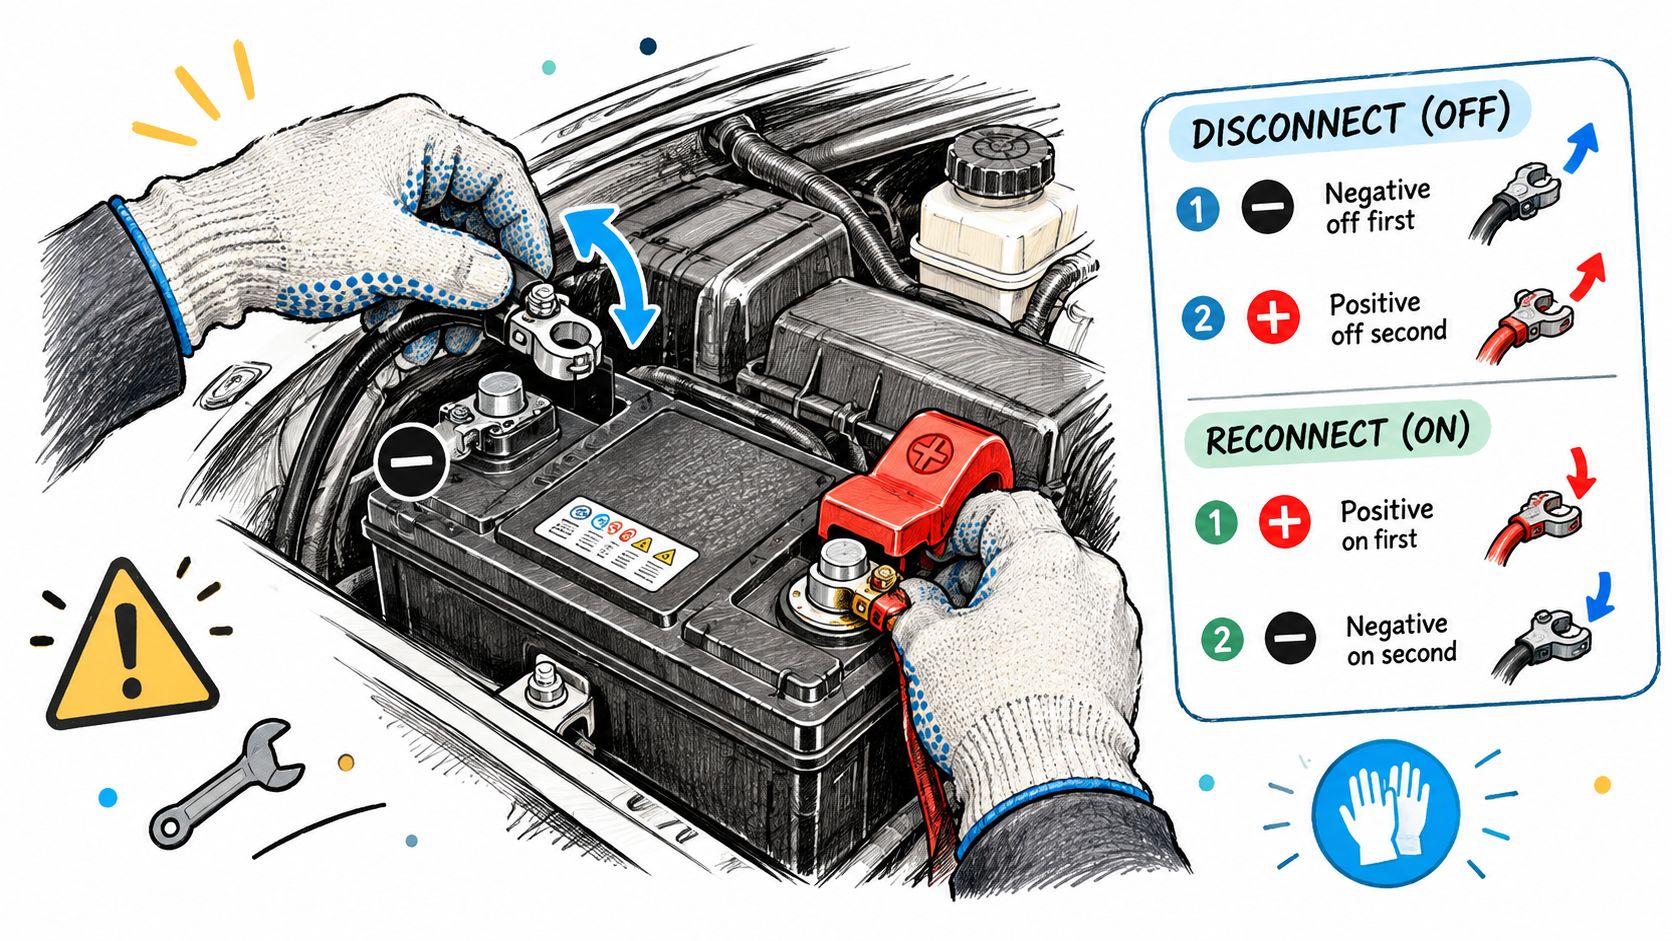
The first cable to touch
The safest disconnect order is negative cable first, then positive, which lowers the chance of a tool creating a short circuit. When the battery goes back in, the order reverses, positive first, then negative AAA battery maintenance guidance. That simple pattern matters most when you are leaning over painted metal with a ratchet in one hand.
Maya treats it like muscle memory. Vehicle off. Key out. Eye protection on. Negative off first. Positive last.
What to inspect before you clean anything
A battery with cracked plastic, bulging sides, or visible leakage needs more than terminal care. AAA advises checking the case for cracks or bulges before cleaning, because those signs can point to a battery problem rather than a simple corrosion issue.
That is the point to slow down.
Look for:
- Case damage: Cracks, bulges, or obvious leakage suggest the battery needs deeper diagnosis.
- Battery-top contamination: Loose corrosion should be brushed away carefully before wet cleaning starts.
- Cable-end condition: If the cable end looks damaged or ill-fitting, cleaning alone will not restore a stable connection.
A bad battery can wear the same crust as a healthy one. The terminal tells part of the story, not all of it.
The cleaning sequence that stays safe
Once Maya knows the case is sound, she loosens the cables, removes the negative first, then the positive. Use a small, stiff brush with a baking-soda-and-water solution to remove corrosion, then rinse with clean water and dry the metal completely before reconnecting. The brush should work the joint, not just the outer ring, so the contact area is clean where current passes.
If a customer cares about radio presets, seat memory, or learned settings, a memory saver earns its place. It is not required for every vehicle, but it keeps a tidy battery service from turning into a reset later.
When everything is clean and dry, Maya reconnects in reverse order. Positive first. Negative second. No drama, no spark, no guesswork.
One more detail matters in the finish work. A terminal that has been cleaned well can still lose protection if the coating on top turns brittle with heat and cold. In a detailer's bay, the better protective products behave more like elastic membrane coatings, flexing with temperature swings instead of cracking like rigid sprays. That kind of finish keeps the cleaned metal covered without fighting the movement of the engine bay.
Getting the Metal-to-Metal Contact Truly Clean
Some terminals fool you. The top looks decent after a quick brushing, the clamp shines at the edges, and the customer thinks the problem is solved. Then the car still cranks lazily because the corrosion was never on the outside where you could admire the cleanup. It was buried between the post and the inside of the clamp, right where the current has to pass.
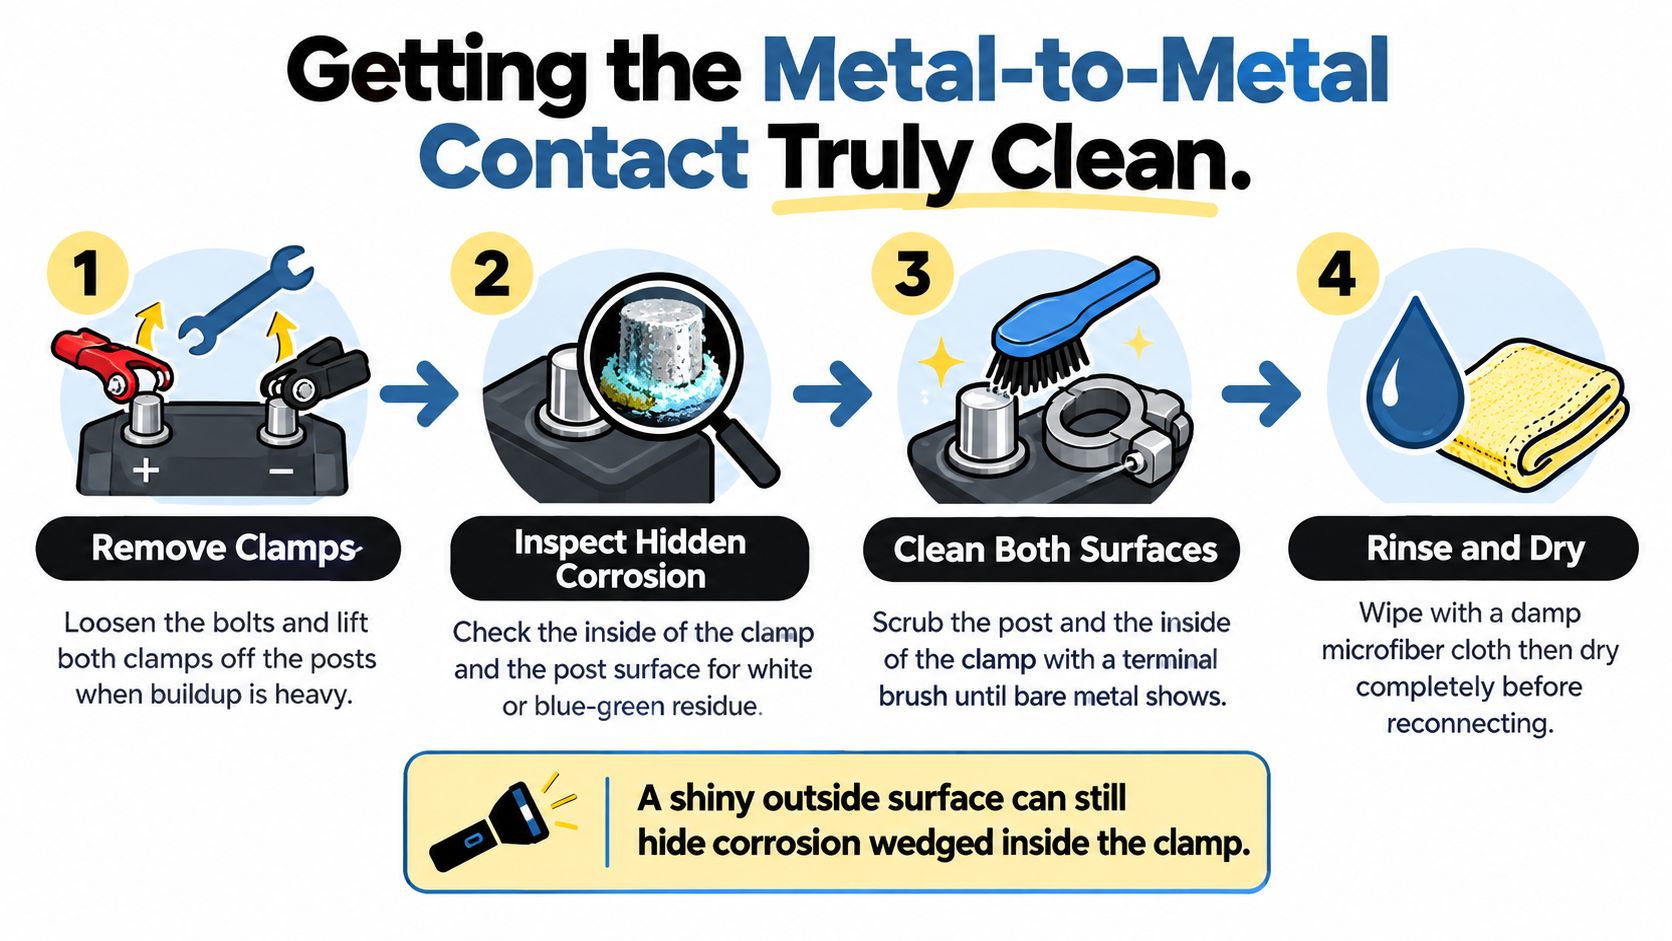
Clean the joint, not just the view
A hood-up job in a detail bay makes the point quickly. The terminal can look bright from above while the actual problem hides inside the clamp, where the post and cable are supposed to touch. For a conventional lead-acid battery, if corrosion has worked into that joint, remove the clamps and clean the posts and clamp interiors with an approved battery-terminal cleaner or a baking-soda solution and a nonmetallic or terminal brush NHTSA terminal-cleaning procedure. Brushing only the visible outer ring leaves the contact area compromised.
The goal is simple and physical, bare, dry metal-to-metal contact.
A methodical deep clean usually looks like this:
- Lift the clamps fully off when buildup has crept inward. Hidden corrosion matters more than the haze on top.
- Brush until clean metal is visible on both the post and inside the clamp.
- Wipe away residue and dry everything completely before reconnecting.
For detailers who also handle underhood work, a guide on how to clean a car engine bay fits the same mindset. Clean the battery area, the tray, and the surrounding surfaces so the job looks finished, not patched together.
Tightness matters, but guessing doesn't
A shiny clamp still is not enough if the joint is loose, distorted, pitted, or hiding damage. After cleaning, inspect for pitting, distortion, looseness, and hidden corrosion, because the exterior can look fine while the contact area is not EnerSys battery maintenance manual.
One industrial manual lists terminal maximums ranging from 60 in-lb (6.8 N·m) for a 3/8-inch side-terminal receptacle to 200 in-lb (22.6 N·m) for a heavy-duty 3/8-16 stud, while warning that both under-tightening and over-tightening can cause trouble. Those values are not universal automotive targets. Use the correct service information for the specific vehicle, especially with AGM, start-stop, hybrid, or auxiliary battery systems.
The clamp should not rotate by hand after reinstalling. If it does, the connection is not ready for protectant.
Verify what your eyes can't see
A useful check after cleaning is a voltage-drop test during cranking, measured directly across the terminal post and cable clamp, not just from battery to starter. If you still see a measurable drop across that joint, resistance remains somewhere in the connection.
Surface shine is not the finish line. Reliable current flow is.
On the glass side of the car, the same detail-first thinking shows up in a hydrophobic coating such as Apex Glass Coating- 50ml, which is built for water-repellent performance on glass, not battery contact surfaces. The finish belongs on the windshield, where a flexible protective layer can move with temperature swings instead of acting like a rigid spray that dries out and fractures.
Choosing a Protective Finish That Flexes With the Engine Bay
The hood is still up, the terminals are bright again, and the easy mistake is reaching for the nearest spray as if shine alone will keep the comeback away. A good finish step is quieter than that. It sits on top of a connection that is already clean, dry, and secure, and it stays out of the actual metal-to-metal contact area where current has to pass freely.
That distinction matters in a detail bay. You can make a battery corner look finished in seconds, but a protectant only earns its place after the clamp is seated properly and the exposed metal is ready for a barrier film. The goal is simple. Keep moisture, road grime, and acid residue off the outer surfaces without sneaking anything between the post and the terminal where it does not belong.
What different finishes are trying to do
Traditional terminal grease and felt washers both aim at the same problem. They help shield exposed lead and hardware from contamination. For many cars, that basic approach is enough, especially when the connection underneath was cleaned thoroughly and tightened correctly the first time.
Rigid spray protectants can do the job too, but engine bays are hard on anything brittle. Underhood heat builds, the car cools overnight, plastic housings shift, cables move, and vibration never really stops. A finish that dries hard and stays hard can lose its edge if it cannot move with those changes.
That is why an elastic-membrane approach makes sense to a detailer. Titan describes its coatings as hard like glass and flexible, with a design meant to move through temperature swings instead of cracking like a rigid shell. In broader corrosion-control terms, the company's page on corrosion-resistant coating solutions gives useful context for that flexible-barrier idea.
Protective Finishes Compared for Battery Terminals
| Finish Type | Stays Flexible | Stands Up to Temperature Swings | Application Difficulty |
|---|---|---|---|
| Terminal grease | Generally yes | Commonly used as a basic barrier | Low |
| Felt washers | Limited | Helps at the base of the post, but depends on fit | Low |
| Rigid spray protectant | Varies | Can form a barrier, but rigidity can be a concern in changing conditions | Low to moderate |
| Elastic-membrane style coating | Yes, by design | Suited to situations where flex through temperature change matters | Moderate |
The comparison is less about picking a miracle product and more about matching the finish to the environment. A garage-kept sedan with mild use may do fine with a simple grease barrier. A vehicle that sees heat soak, winter mornings, vibration, and regular wash cycles asks more from the layer you leave behind.
The same idea shows up elsewhere on the car
Detailers already make this call in other parts of the vehicle. On painted surfaces, Alpha Quartz is presented around the same flexibility-first logic, helping the protective layer handle temperature change and day-to-day wear without turning brittle. On glass, APEX Glass is solving a different problem, water behavior and visibility, but the work habit is familiar.
Prepare the surface correctly. Then choose a finish that suits the conditions around it.
Battery terminals deserve that same discipline. The clean connection does the electrical work. The protective finish supports it by sealing the exposed surfaces with a barrier that can live in a real engine bay, not just look tidy for the handoff.
When Corrosion Keeps Coming Back
Elena knew something was off before she put a wrench on the clamp. The battery had been cleaned on the last visit. The posts were bright, the tray was tidy, and the car left her bay starting cleanly. Now the owner was back with that familiar look, hood up, a fresh green crust at the terminal, and a clamp that felt slightly wrong in the hand. Not loose. Just unsettled.
That kind of comeback changes the job.
A return of corrosion this soon usually means the detail work did its part, but the problem lives deeper than the visible buildup. The useful conversation is no longer about brushing harder or adding another layer of protectant. It is about what the battery and connection are telling you after the clean surface is gone.
Read the comeback like a symptom
Elena slowed down and treated the second visit like a diagnosis, not a redo. She looked at how the clamp sat on the post. She watched for any sign that the case or terminal seal was weeping. She checked whether the cable end still had enough integrity to tighten and stay square. Then she pulled the connection apart and looked at the mating surfaces, because a terminal can look presentable from above while the actual contact area tells a different story.
That is the part customers rarely see. Underhood metal can hide trouble in the joint itself, especially after heat cycles, vibration, and repeated temperature swings. A clean exterior does not guarantee a stable connection. In a real engine bay, that difference matters.
If corrosion comes back fast, treat it like a symptom and not a cosmetic mess.
What to say at the counter
The best explanation is usually the simplest one. Elena does not turn it into a speech. She tells the owner the terminal was cleaned correctly, but the buildup returned quickly, so another quick scrub is unlikely to solve it. The battery or cable connection needs closer inspection, and if the clamp no longer seats properly or the case appears compromised, replacement may be the more honest recommendation.
That approach keeps the detailer in a detailer's lane while still giving the customer clear direction. It also avoids the cycle of making the engine bay look finished while the fault keeps rebuilding underneath.
The same mindset applies to the finishing step. A protective layer should support a sound connection, not hide one that is failing. Broader corrosion protection standards for exposed metal surfaces follow that same logic. Clean substrate first. Stable fit next. Then use a barrier that can live with heat, vibration, and flex instead of turning brittle and letting the problem restart.
Building a Year-Round Terminal Care Routine
A hood-up inspection often happens between the wash mitt and the drying towel. The owner may see a spotless engine bay, while you notice a pale crust forming around one post. Catching it during a routine visit gives you time to clean the connection before a weak start interrupts someone's morning.
A routine that fits real workdays
Use the yearly baseline covered earlier, then adjust the inspection to the vehicle's conditions and service history. Build the check into work already on your schedule:
- At regular washes: Look for fresh white, blue, or green deposits, loose clamps, and moisture around the battery.
- At a deeper service: Disconnect safely and clean the contact surfaces, not just the visible outer edges.
- After the connection is sound: Apply a protective finish to the outside of the clean, dry, properly seated joint.
Seasonal preparation belongs on the same checklist. Before cold weather and long wet stretches arrive, review the battery area, confirm the clamps remain secure, and address buildup before the vehicle faces extra starting demand. Titan's guide to how to winterize your vehicle fits neatly into that pre-season appointment.
The finishing product also deserves a place in the routine. In a working engine bay, temperatures rise and fall, parts vibrate, and metal shifts slightly. An elastic-membrane coating can flex through those changes instead of cracking like a rigid spray, helping the protective layer stay intact around the terminal hardware. Apply it only after the electrical connection is clean and stable.
Think in systems, not one-off fixes
A driver asking how to clean car battery terminals often values careful maintenance elsewhere too. APEX Glass supports clear visibility in rain, Alpha Quartz provides body protection with an elastic-coating angle, and Ultra Ceramic Spray suits quick maintenance top-ups. For a refresher on lead-acid battery basics, the Value Tools Co battery guide offers a useful outside reference.
A hood-up detail shows whether care reaches the parts that affect the drive, not only the surfaces that shine. APEX NANO – Titan Coatings offers coatings for glass and vehicle surfaces that complement a careful underhood maintenance routine. Start with a clean, dry connection, then choose protection that suits the engine bay and the weather your customers face.
0 Comments