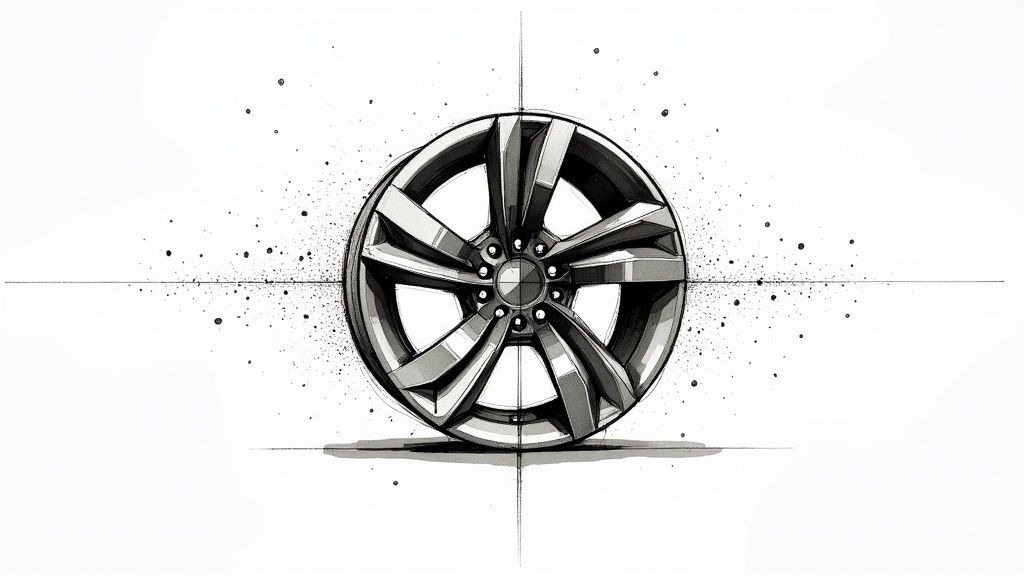
Applying a ceramic coating for rims is hands-down the best thing you can do to protect your wheels. It stops brake dust, road grime, and nasty contaminants in their tracks, which means your wheels stay cleaner for way longer and are a breeze to wash. You’re creating a tough, slick, and heat-resistant barrier that leaves old-school waxes and sealants in the dust.
Why Your Rims Deserve a Ceramic Coating
If you’re into cars, you know the story. You spend a solid chunk of your weekend getting every single spoke and the inner barrel of your wheels spotless. They look incredible. Then you go for one spirited drive, and they’re already caked in that ugly, corrosive brake dust. It’s a losing battle.
This endless cycle of scrubbing just to see your hard work disappear is exactly why we needed something better. Traditional waxes look good for a day or two, but they can’t handle the heat and chemical abuse your wheels go through. They just weren’t built for that kind of punishment.
The Evolution Beyond Brittle Coatings
This is where the real science comes in. At Titan Coatings, we looked at the first-generation ceramic coatings and saw a major flaw: they were hard, but they were also brittle. Think about it—a completely rigid layer on a surface that’s constantly heating up and cooling down is bound to fail. Micro-cracks were inevitable.
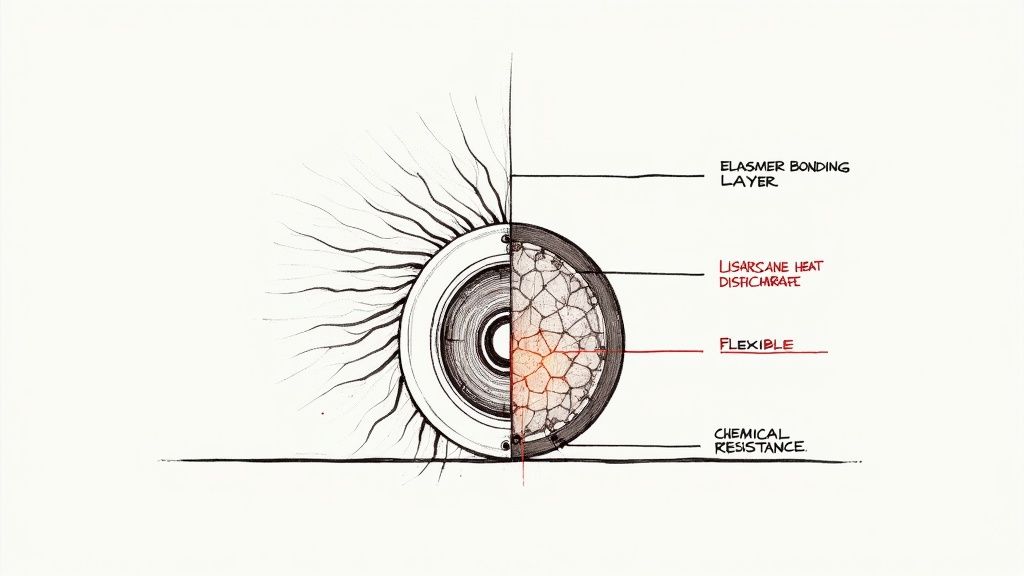
So, we changed the game. As the first company to introduce Elastomer coatings to the market, we pioneered a new path. Using our proprietary nano-tube technology and Dark Matter tech, we created a shield that’s incredibly hard but also flexible.
This elasticity is the secret sauce. Our coatings are hard like glass, yet they remain flexible. This allows the coating to move with the metal as your wheels get scorching hot from braking and then cool down. The result? A bond that won’t crack, peel, or fail, giving you rock-solid protection that lasts. Temperature changes between frozen and hot conditions won’t cause it to crack.
This kind of innovation is why everyone’s talking about advanced wheel protection. The global automotive wheel coating market is already huge and is expected to grow from USD 761.3 million to over USD 1.1 billion by 2034. It’s clear that people want finishes that both look great and can actually withstand the real world.
More Than Just a Pretty Shine
Let’s quickly compare the old way with the new. The difference is night and day.
Traditional Waxes vs Titan Elastomer Ceramic Coatings
| Feature | Traditional Wax/Sealant | Titan Elastomer Coating |
|---|---|---|
| Durability | Lasts weeks or a few months at best. | Lasts for years with proper care. |
| Heat Resistance | Melts away under high braking temperatures. | Engineered to withstand extreme heat. |
| Chemical Resistance | Easily stripped by wheel cleaners and road salt. | Resists harsh chemicals and environmental fallout. |
| Cleaning | Brake dust sticks, requires heavy scrubbing. | Hydrophobic; dust and grime rinse off easily. |
| Protection | Minimal barrier against scratches and etching. | Hard, flexible layer prevents etching and marring. |
As you can see, there’s really no contest.
A top-tier ceramic coating for your rims delivers a whole suite of benefits that make life easier and protect your investment. The deep, wet-looking gloss is the first thing you’ll notice, but the real magic is in how it performs day-to-day. If you want to dive deeper, our guide on the primary ceramic coating benefits covers all the bases.
Here’s what you’ll actually experience:
- Effortless Cleaning: The surface becomes so slick that most brake dust and road film just rinse right off with a pressure washer. No more hardcore scrubbing.
- Chemical Resistance: The coating acts as a shield against aggressive wheel cleaners, corrosive road salts, and other chemicals that would otherwise ruin your rims’ finish.
- Enhanced Gloss and Depth: It adds a stunning richness to any wheel finish, whether you have gloss black, satin bronze, or polished aluminum.
- UV Protection: It stops the sun from fading and oxidizing your powder-coated or painted wheels, keeping them from looking dull and tired.
At the end of the day, coating your wheels isn’t just a cosmetic touch-up. It’s a smart upgrade that saves you an incredible amount of time, protects your investment, and keeps your car looking sharp for years, not just for the weekend after you wash it.
Choosing Your Shield from the Titan Coatings Arsenal
When you’re looking for the best way to protect your wheels, it’s easy to get lost in a sea of options. The real secret to making the right choice is understanding the science in the bottle, because not all ceramic coatings are created equal.
The story of modern coatings really starts with a problem. The first generation of ceramic formulas were incredibly hard, which sounded great on paper. But they were also rigid, and that brittleness was their ultimate downfall, especially on wheels.
Think about it: your wheels go through intense temperature swings. One minute they’re scorching hot from heavy braking, the next they’re rapidly cooling down. Those early coatings couldn’t handle the stress. They’d develop microscopic cracks, creating pathways for brake dust and grime to get underneath and ruin the finish. It was a huge source of frustration for detailers and owners who put in all that work just to see the protection fail.
This is where we changed the game. At Titan Coatings, we saw that weakness as a challenge, and it led us to pioneer the first elastomer coatings. We introduced a totally new concept: a protective layer that’s hard like glass but remains flexible.
The Titan Advantage: Where Strength Meets Flexibility
This engineered flexibility is what truly sets our technology apart. By integrating proprietary nano-tube technology and our Dark Matter tech, we created coatings that can actually expand and contract right along with the wheel’s surface.
Whether your rims are baking in the summer sun or facing a blast of icy winter air, our coatings flex without failing. This unique adaptability prevents the micro-fracturing that plagues older, rigid formulas. The result? A protective shield that stays intact and effective for years, not months.
It’s clear that people are catching on to the value of durable wheel protection. The U.S. automotive wheel coating market was valued at USD 277.9 million and is on track to hit USD 371.5 million by 2035. This shows a massive shift towards investing in solutions that deliver proven, real-world performance. You can dig deeper into the market trends for automotive wheel coatings to see just how quickly this demand is growing.
Your Ultimate Weapon: Titan Graphene Coating HyperQuartz
So, when it comes to picking the absolute best coating for your rims, one product from our lineup stands head and shoulders above the rest for its sheer resilience: Titan Graphene Coating HyperQuartz.
This isn’t just another coating. We engineered HyperQuartz from the ground up to be a specialized shield for the most punishing environments on a car—the wheels and brake calipers.
We fortified the formula with graphene and our signature nano-tube tech to give it unbelievable thermal and chemical resistance.
Graphene is a game-changer for heat dissipation. It actively pulls intense heat away from the wheel’s surface during heavy braking. This not only protects your wheel’s finish but also drastically extends the life of the coating itself.
This incredible thermal management makes HyperQuartz the obvious choice for performance vehicles, track day cars, or any vehicle that puts its brakes through their paces. Beyond heat resistance, it creates an intensely slick, anti-static surface that aggressively repels brake dust, making cleanup almost effortless.
Choosing a coating like HyperQuartz means you’re investing in proven, forward-thinking science. You’re not just adding a temporary layer of gloss; you’re bonding a durable, flexible, and scientifically advanced barrier to one of your car’s most abused components.
To see exactly how our different formulas stack up, check out our coating comparison page. It breaks down the specific strengths of each one, helping you find the perfect match for your vehicle.
The Foundation of Flawless Wheel Prep
The secret to a jaw-dropping, long-lasting ceramic coating finish isn’t in the bottle. Not really. The real magic happens long before you even think about applying that first drop. It’s all in the prep work—the disciplined, almost surgical process of turning a grimy, abused wheel into a perfectly clean slate, ready to bond with the coating on a molecular level.
Think of it like trying to paint a masterpiece on a dusty, greasy wall. The paint would never stick properly, and the result would be a mess. It’s the exact same principle with a ceramic coating for rims. Any lingering brake dust, tar, or oily road film creates a barrier, preventing the coating from forming that tough, permanent bond it needs to protect your wheels for years.
Honestly, skipping these prep steps is the single biggest mistake I see enthusiasts make. It turns a multi-year protective investment into a temporary shine that’s doomed to fail. You have to earn that flawless finish, and it all starts with a deep, chemical decontamination.
Stripping Away the Invisible Grime
Your wheels are under constant attack. Every time you tap the brakes, tiny, hot particles of iron shear off your brake pads and embed themselves into your wheel’s clear coat. You can’t just wash them off; they’re stuck in there, oxidizing and slowly eating away at the finish from the inside out.
This is where a dedicated iron remover becomes your most powerful weapon. It’s not just a cleaner; it’s a specialized chemical designed to react directly with those embedded iron particles, dissolving them into a solution that simply rinses away.
The process is incredibly satisfying to watch. As you spray it on, the clear liquid bleeds into a deep purple or red wherever it finds iron contamination. That “bleeding” effect is your proof that it’s working, safely pulling years of baked-on brake dust out of the pores of the surface. For a truly effective decontamination, you can learn more about how our specialized Titan Coatings Iron Fallout Remover is formulated to tackle this exact problem without harming your wheel’s finish.
But iron is only part of the battle. You’ll also need to tackle:
- Tar and Road Grime: Use a dedicated tar remover to melt away those stubborn black spots of tar and road adhesive that get kicked up onto the wheel face and inner barrel.
- Old Waxes or Sealants: This is crucial. An isopropyl alcohol (IPA) panel wipe is essential for stripping away any residual oils, silicones, or old protective products that would absolutely kill the coating’s bond.
Achieving a Glass-Smooth Surface
Once the chemical deep clean is done, the surface will be free of embedded iron and tar, but it might not feel perfectly smooth. That’s where mechanical decontamination with a clay bar or clay mitt comes in.
Gently gliding a lubricated clay bar over the wheel’s surface will physically grab and pull out any remaining bonded contaminants—things like industrial fallout or tree sap that washing leaves behind. You’re aiming for a surface that feels as smooth as glass. If you can feel any grittiness or drag under the clay, you know there’s more work to do.
A common question we get is, “Do I really need to polish brand-new wheels?” The answer is a resounding yes. Even wheels fresh from the factory have been handled, shipped, and often have a light protective film that must be removed. A light polish does more than just enhance gloss; it gently abrades the surface, creating the perfect anchor pattern for the ceramic coating to lock onto, ensuring maximum durability.
Essential Wheel Preparation Checklist
To make sure you have everything you need for a truly professional-grade prep job, here is a quick checklist of the non-negotiables. Getting these right is half the battle.
| Step | Tool/Product | Purpose |
|---|---|---|
| Initial Cleaning | pH-Neutral Wheel Cleaner & Brushes | Safely remove loose dirt and grime without damaging the finish. |
| Chemical Decon | Iron Remover | Dissolve embedded, corrosive brake dust particles. |
| Chemical Decon | Tar Remover | Eliminate stubborn road tar and adhesive spots. |
| Mechanical Decon | Clay Bar/Mitt & Lubricant | Physically remove any remaining bonded surface contaminants. |
| Surface Polish | Fine Polish & Applicator | Remove minor defects and create an ideal surface for bonding. |
| Final Wipe Down | IPA Panel Wipe | Strip all polishing oils and residues for a pure surface. |
This systematic approach is the bedrock your coating’s performance is built on. Taking the time to properly clean, deaminate, and polish your wheels is the only way to guarantee you’re giving the ceramic coating the best possible chance to perform as it was engineered—delivering years of unbelievable protection and effortless cleaning.
Time to Lay Down the Gloss: Applying Your Titan Coating
Alright, the heavy lifting is done. Your wheels are surgically clean, smooth as glass, and ready for their protective shield. This is the satisfying part—the moment you start building that incredible, water-beading layer of protection.
Let’s get started. Grab your coating and applicator. With a highly concentrated formula like Titan’s, you only need a few drops. Seriously, a little goes a long way. Just draw a single, light line of the product down the suede applicator. You’re not trying to soak it, just prime it for the first section.
The Cross-Hatch: Your Key to Flawless Coverage
The goal here is a perfectly uniform layer. The best way to guarantee that is by using the cross-hatch pattern. It’s a simple but non-negotiable technique.
Pick a small, manageable section—maybe one or two spokes and the lip in front of them. Apply the coating first in straight, overlapping vertical lines. As soon as you’ve covered that spot, immediately go back over the same area with horizontal lines.
This methodical approach eliminates any chance of missing a spot and ensures the coating is perfectly even. It’s absolutely critical on complex, multi-spoke wheels where it’s so easy to overlook a tight corner or an intricate detail. Don’t rush it. Work deliberately, one section at a time.
This sequence is the final step after a thorough decontamination process.
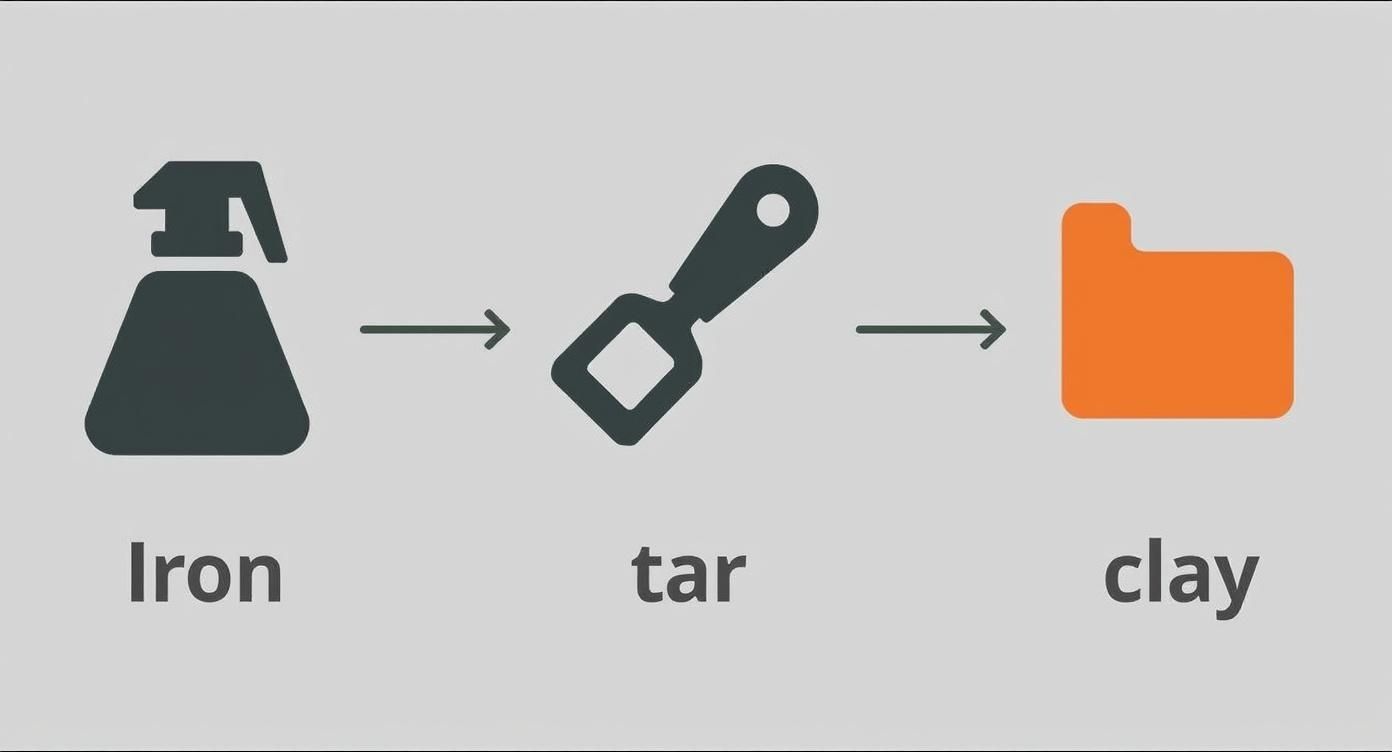
As the diagram shows, you can’t get to this stage without first tackling the iron, tar, and bonded contaminants.
Chasing the Rainbow: When to Wipe
Once the coating hits the surface, the clock starts. You’re now watching for the “flash.” This is your visual cue that the carrier solvents are evaporating, and the coating is ready to be leveled. It’ll look like a faint, oily rainbow effect or a sweaty haze appearing on the wheel.
Flash time isn’t a fixed number; it changes with temperature and humidity. It could be 30 seconds on a hot day or a couple of minutes in a cooler, damp garage. This window is crucial. Wipe too early, and you pull the coating right off. Wait too long, and it gets tacky and turns into a high spot—a detailer’s nightmare.
As soon as you see that rainbow haze, grab a clean, premium microfiber towel. The first gentle wipe is to “level” the coating, removing the bulk of the excess residue. Immediately follow up with a second, perfectly clean microfiber to buff the area to a brilliant, streak-free finish.
My Two Cents: Never, ever try to coat and level the whole wheel at once. It’s a recipe for disaster. Work in small, logical sections. Coat two spokes, watch for the flash, level, and then move to the next section. Control is the name of the game.
Conquering Complex Shapes and Hidden Surfaces
Let’s be real—not all wheels are simple five-spokes. Intricate designs, brake calipers, and inner barrels all throw a few curveballs your way. Here’s how to handle them.
- Intricate Wheel Designs: For those wheels with tons of nooks, crannies, and sharp angles, your standard applicator might be too clumsy. Switch to a smaller one, or even wrap a suede cloth around a foam detailing swab to get deep into lug nut holes and behind spokes.
- Brake Calipers: The same rules apply. Make sure the caliper is spotless and prepped. Apply the coating carefully, but pay extra close attention to the flash time. The dense metal of a caliper can retain heat differently, slightly altering your working window. The incredible heat resistance of a formula like HyperQuartz makes it ideal for this high-temperature zone.
- Inner Barrels: Don’t skip the barrels! This is where 90% of the brake dust lives. A ceramic coating for rims here is a game-changer, making future cleaning almost effortless. A larger applicator works well for these wide-open surfaces, but make sure you have great lighting to spot and level any high spots before they cure solid.
Application is a craft. The more you do it, the better your feel for it becomes. While the scale is different, the core principles are the same whether you’re coating a wheel or an entire car. For another perspective, see how these techniques translate to larger panels in our guide on how to apply ceramic coating to a car.
Take your time, trust the process, and you’ll be rewarded with that professional-grade finish that makes all the prep work totally worth it.
Protecting Your Investment with Proper Aftercare
That final, streak-free buff isn’t the finish line. Far from it. Think of it as the start of a critical transformation where the science really takes over. You’ve done the hard work of applying the ceramic coating for rims, and now it’s time for the coating to do its thing.
For the next 24 to 48 hours, your coating is in its crucial curing phase. On a molecular level, the nanoparticles are cross-linking, weaving themselves into a tight, three-dimensional matrix. This is where our flexible elastomer technology truly comes to life, creating that signature shield that’s both glass-hard and remarkably elastic. To make sure this process goes off without a hitch, there’s one golden rule: keep the wheels bone dry and away from any chemicals.
The First 48 Hours: Rules of Engagement
Protecting the coating while it cures is absolutely non-negotiable. I can’t stress this enough. If moisture or chemicals get in there too early, they can disrupt that cross-linking process. You’ll end up with weak spots that compromise the coating’s durability and kill its hydrophobic properties before it ever had a chance to fully harden.
Think of it like fresh concrete. You wouldn’t walk on it two minutes after it’s poured, right? Same principle applies here.
- No Water: This means no rain, no puddles, and definitely no washing the car. If the wheels get wet by accident, don’t panic. Just gently pat them dry with a clean, soft microfiber. Do not rub.
- No Chemicals: Seriously, nothing. No wheel cleaners, no tire shine, no quick detailers. Just let the coating cure in peace.
- Keep it Clean: If you can, park the car in a garage or under a carport to shield the wheels from morning dew, bird droppings, or tree sap.
Building a Smart Maintenance Routine
Once you’re past that initial curing window, your focus can shift to simple, smart maintenance. The whole point of a top-tier coating isn’t to eliminate cleaning, but to make it ridiculously easy. Your job now is to preserve that slick, protective barrier you worked so hard to create.
Stay away from the harsh, high-pH detergents common in touchless or automatic car washes. They are the enemy of any good coating and will slowly eat away at it, dulling the hydrophobic effect and shortening its lifespan.
The key takeaway here is to be gentle. You’ve created a slick, non-stick surface. There’s no longer a need for aggressive chemicals or stiff-bristled brushes to break brake dust free. Let the coating do the heavy lifting for you.
A proper maintenance wash is incredibly straightforward. All you need is a quality, pH-neutral wheel cleaner and a soft wash mitt or a few dedicated microfibers. Because brake dust now sits on top of the coating instead of etching into the finish, you’ll find it rinses away with almost no effort—often just with a good blast from a pressure washer. This gentle approach is fundamental, and we dive deeper into it in our guide on how to properly maintain a ceramic coating.
This shift towards smarter protective solutions isn’t just a trend; it’s a massive industry movement. The global market for wheel ceramic coatings was recently valued between USD 540 million and USD 784.2 million, which just goes to show how much people want finishes that offer real protection and simpler maintenance. You can dig into more stats about the growing automotive wheel coating market. By sticking to a proper aftercare routine, you’re ensuring your investment performs exactly as it should, delivering that effortless cleanup and stunning gloss for years to come.
Your Ceramic Coating Questions Answered
Diving into the world of a ceramic coating for rims usually brings up a few last-minute questions. It’s totally normal. Getting clear, straightforward answers is the final step before you can feel confident enough to give your wheels the protection they truly deserve.
Let’s run through some of the most common ones we hear.
Can I Apply a Ceramic Coating to Any Rim Finish?
Yes, absolutely. This is one of the best things about modern, advanced formulas. Titan’s versatile elastomer coatings are specifically engineered to form a powerful, lasting bond with a huge variety of surfaces.
We’re talking about:
- Standard gloss and clear-coated finishes
- Durable powder-coated wheels
- Slick anodized aluminum
- Even those tricky matte or satin finishes
For a matte wheel, the coating adds a serious layer of protection and makes cleaning a breeze without adding that unwanted gloss. You get to keep that unique, flat look you love. The universal rule, no matter the finish, is always meticulous preparation. The surface has to be perfectly clean and decontaminated for the coating to bond correctly and give you all its benefits.
How Long Does a Rim Ceramic Coating Actually Last?
The durability of a truly premium coating is measured in years, not months. While the exact lifespan will always depend on things like your driving conditions and how well you maintain the wheels, a top-tier product is a genuine long-term investment.
This is exactly where Titan’s flexible elastomer technology makes a world of difference. Traditional ceramic coatings are often brittle and can develop micro-cracks from the constant, extreme heat cycles from heavy braking. Our coatings, on the other hand, are engineered to be hard like glass but remain flexible, allowing them to expand and contract right along with the wheel’s surface. This built-in resilience is key to preventing premature cracking and failure.
With a simple, smart aftercare routine using pH-neutral cleaners, you can expect 2-3+ years of durable protection and effortless cleaning. Your wheels will repel brake dust and road grime season after season.
If you want a deeper dive into all the factors that impact coating longevity, check out our complete guide explaining how long ceramic coating lasts.
Is Ceramic Coating My Wheels Really Worth the Effort?
Without a doubt. I get it—the initial prep and application do require a few hours of focused work. But the long-term payoff is unbelievable. The single biggest benefit that people rave about is the sheer ease of cleaning.
Brake dust, which normally bakes right on and etches into the wheel’s surface, will instead just sit on top of the slick, hydrophobic coating. In most cases, you can just rinse it away with a pressure washer. A grueling scrubbing session turns into a quick, satisfying task. This saves you a ton of time, prevents permanent damage to your rims, and keeps your wheels looking their absolute best with minimal effort.
What If I Make a Mistake During Application?
This is a common fear, especially for first-timers, but don’t worry—mistakes are usually fixable if you catch them early. The most frequent issue is a “high spot,” which is just a bit of excess coating that wasn’t fully leveled off and has started to cure.
If you spot it within the first hour or two, you can often just apply a small amount of fresh coating right over it. This reactivates the spot, allowing you to immediately wipe it off firmly with a clean microfiber towel. Problem solved.
If the high spot has already fully cured, you’ll need to use a fine machine polish to gently level the area, follow up with an IPA wipe, and then re-apply the coating to that section. This is precisely why working in small, well-lit sections is so critical—it lets you spot and correct any little imperfections right away.
Ready to give your wheels the ultimate, long-lasting protection with a coating that’s both hard and flexible? The Titan Coatings Titan Graphene Coating HyperQuartz is engineered specifically for the extreme environment of wheels, offering superior heat resistance and unparalleled brake dust repellency.
Discover the power of Titan HyperQuartz today
0 Comments