Applying a DIY ceramic coating is arguably the most transformative thing you can do for your vehicle’s paint right in your own garage. Thanks to modern chemistry, you no longer need a professional shop to get that insane gloss, slickness, and durable protection. The power is genuinely in your hands.
Why A DIY Ceramic Coating Is The Ultimate Upgrade
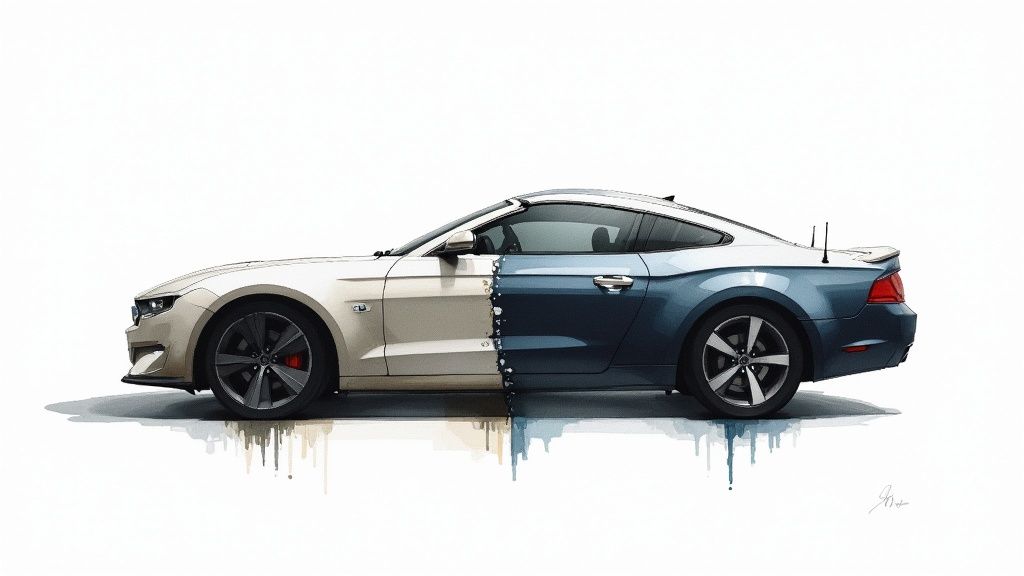
That dripping-wet, mirror-like shine you see at car shows isn’t some secret reserved for high-end detailers anymore. A top-tier DIY ceramic coating empowers you to lock in years of protection and incredible visual depth on your own terms. This isn’t just another weekend project; it’s a fundamental change in how you care for your car’s finish.
The numbers don’t lie. The global ceramic coatings market was valued at USD 12.15 billion in 2024 and is on track to more than double by 2034. A huge part of that explosion comes from enthusiasts like us. In fact, nearly a third of all applications are now done by car owners themselves. This shift is happening because the products available today deliver professional results without the professional invoice.
The Titan Coatings Advantage In Your Garage
Here at Titan Coatings, we develop our products with the hands-on enthusiast at the core of our thinking. Our HyperQuartz® formulas, for example, are specifically engineered to be more forgiving. What does that mean for you? It means you get a longer, stress-free working time to perfect your application and wipe away any excess. They also feature self-leveling properties that dramatically reduce the chance of pesky high spots, ensuring you achieve a silky-smooth, flawless finish with less effort.
The real satisfaction comes from seeing that professional-grade gloss and knowing you achieved it yourself. It’s an investment of time that pays off every time you look at your car.
The payoff is huge. Your wash routine becomes ridiculously easy, and your paint gains a tough-as-nails shield against the elements. The value is immediate and long-lasting. You can dive deeper into the full range of ceramic coating benefits in our detailed guide.
Effort vs. Reward: A Clear Winner
Let’s be honest: applying a ceramic coating correctly takes patience and a sharp eye for detail. The prep work—a thorough wash, decontamination, and paint correction—is non-negotiable. It’s the foundation for a flawless, long-lasting bond and is absolutely essential to unlocking the coating’s true potential.
To put it in perspective, here’s a quick look at what you get for the work you put in.
DIY Ceramic Coating Value vs Effort at a Glance
This table breaks down the fantastic benefits of a DIY coating against the work required to achieve them. As you’ll see, the reward heavily outweighs the effort.
| Benefit | Description | Effort Level (1-5) |
|---|---|---|
| Extreme Gloss & Depth | Creates a slick, liquid-like finish that enhances paint color and clarity. | 3 |
| Superior Hydrophobicity | Water beads and sheets off the surface, making washing easier and keeping the car cleaner. | 3 |
| Long-Term Protection | Forms a durable shield against UV rays, bird droppings, acid rain, and road grime. | 4 |
| Cost Savings | Achieves professional-level results at a fraction of the cost of a detailer’s service. | 2 |
| Personal Satisfaction | The immense pride and knowledge gained from mastering a high-level detailing task. | 3 |
While the initial time investment, especially in the prep stage, is real, the long-term benefits in protection, aesthetics, and ease of maintenance make it one of the most rewarding projects any car enthusiast can undertake.
Gathering Your Essential Coating Toolkit
Let’s be honest: achieving a stunning, long-lasting ceramic coating finish at home comes down to having the right gear. This isn’t just about a bottle of coating and a few towels. It’s about building a well-thought-out arsenal where every single tool has a specific job to do, all leading up to that perfect, glossy result.
The right equipment makes the entire process smoother, sure, but more importantly, it directly affects how well the coating bonds to your car’s paint. When everything from your wash mitt to your final buffing towel is working together, you’re setting the stage for a strong, durable layer of protection. This is where you separate a decent job from a truly professional-looking one.
Core Decontamination and Preparation Gear
Before you even dream of cracking open that ceramic coating bottle, you have to get the paint surgically clean. This first phase is all about removing not just the dirt you can see, but also the invisible gunk that’s bonded to the clear coat. These items are non-negotiable.
- Clay Bar or Clay Mitt: This is your go-to for mechanical decontamination. Gliding a clay bar over a lubricated panel physically pulls out embedded grit like industrial fallout, rail dust, and stubborn tree sap. The goal is to make the paint feel as smooth as glass.
- Iron Remover: This is your chemical weapon against ferrous metal particles that washing and claying just can’t handle. You’ll literally see it work—the liquid turns a deep purple as it dissolves brake dust and other iron deposits, “bleeding” them off the surface.
- Isopropyl Alcohol (IPA) Panel Wipe: This is the final and most critical prep step. A quick wipe with an IPA solution strips away any lingering polishing oils, waxes, or even fingerprints, leaving a perfectly sterile surface for the coating to grab onto.
Here at Titan Coatings, we’ve designed our system to work in perfect harmony. Our prep sprays are formulated to prime the surface specifically for our coatings. The benefit for you is a significantly stronger chemical bond, resulting in a more durable and longer-lasting protective layer. This synergy is a game-changer for any DIYer chasing pro-level results. You can check out our complete line of professional ceramic coating products to build out your system.
Tools for Flawless Application and Removal
With the paint perfectly prepped, your focus now shifts to the actual application. Pay close attention to your towels here. The quality and type of microfiber you use are incredibly important; the wrong towel can leave behind lint or, even worse, mar the delicate, semi-cured coating you just applied.
A rookie mistake is using the same towel for everything. Your initial leveling wipe needs a low-pile, borderless towel for precision. For the final buff, you want a plush, high-pile towel to gently sweep away all residue without leaving a single streak.
Here’s what you need for the main event:
- Foam Applicator Block and Suedes: A simple but brilliant combo. The foam block gives you a comfortable, even grip, and the disposable microsuede cloths wrap around it for a smooth, lint-free application of the coating.
- Dedicated Microfiber Towels: You need at least two different types. Grab a set of low-pile towels (around 350 GSM) for the initial “leveling” wipe, and a separate set of plush, high-pile towels (450+ GSM) for that final, gentle buff to a high-gloss shine.
- Dual-Action (DA) Polisher: Let’s face it, most cars need some paint correction to remove swirls and scratches before coating. For anyone new to polishing, a DA polisher is the safest and most effective tool for getting a defect-free finish you’ll be proud to lock in.
When you’re buying your gear, a little research goes a long way. General advice on finding the best auto parts brands can point you toward quality tools and accessories that won’t fail you halfway through the job. Remember, a good tool isn’t an expense—it’s an investment in your final result.
The Critical Steps for Perfect Paint Preparation
Let’s be clear: that stunning, glass-like finish you’re after with a DIY ceramic coating for cars is almost entirely decided before you even crack open the coating bottle. I can’t stress this enough—90% of your final result comes from meticulous prep work. This isn’t just cleaning the car; it’s creating a perfectly pure, smooth foundation that allows the coating to grab hold and do its job.
Skipping or rushing these steps is like building a house on a shaky foundation. It just won’t last. The whole point is to create a sterile surface, giving the coating a direct, powerful bond with your vehicle’s clear coat. We’ll walk through the three key stages: washing, decontaminating, and correcting the paint.
This infographic breaks down the core workflow you should follow for any successful ceramic coating project.
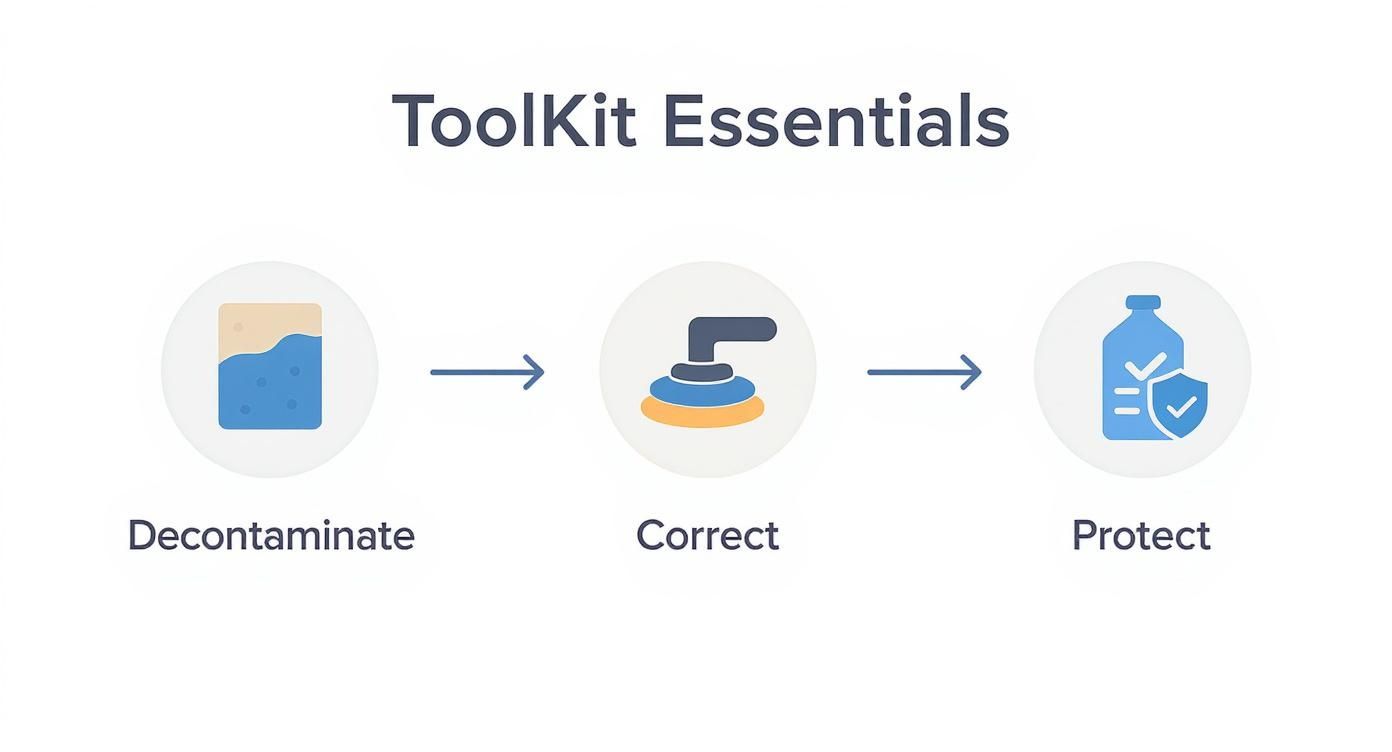
As you can see, it’s a clear progression. Each step builds on the last, and you can’t get to the final protection stage without nailing the first two.
The Foundation: A Meticulous Wash
First things first, we need to get rid of all the loose dirt and grime. This isn’t a job for the drive-through car wash. You need a hands-on approach to ensure you don’t leave anything behind that could cause scratches later on.
The two-bucket wash method is standard practice for pros, and for good reason. You’ll have one bucket with your soapy water and a second with clean rinse water. After washing a panel, dunk your dirty mitt in the rinse bucket before reloading it with soap. This simple discipline keeps you from dragging abrasive grit all over your paint.
Make sure you’re using a high-quality, pH-neutral car shampoo. Harsh, high-alkaline soaps can strip old waxes or sealants and can even fade your trim over time. A gentle, pH-neutral formula cleans effectively without the drama, giving you the perfect starting point.
Decontamination: Removing What’s Stuck On
After a good wash, your car might look clean, but it isn’t—not on a microscopic level. A great way to check is the “baggie test.” Place your hand inside a thin plastic sandwich bag and gently glide it over the paint. You’ll likely feel a rough, gritty texture. Those are bonded contaminants, and a regular wash won’t touch them.
To get rid of them, we use a two-pronged attack: chemical, then mechanical.
Chemical Decontamination with Iron Removers
Your first move is to tackle the iron particles. Tiny flecks of metal from brake dust and industrial fallout embed themselves in your clear coat. Left unchecked, they rust and cause permanent pinpoint damage.
An iron remover spray is designed specifically for this. You spray it on, let it dwell, and watch as it chemically dissolves these particles. The product will turn a dramatic purple color as it works, a sign that it’s “bleeding” the contaminants out of the paint’s pores.
Mechanical Decontamination with a Clay Bar
Next, we physically pull off whatever is left. A clay bar or a clay mitt, when glided across a lubricated surface, shears off stubborn contaminants like tree sap, tar, and old road film. The goal here is a surface that feels perfectly smooth and slick.
This step ensures there is absolutely no physical barrier between the clear coat and the polisher. If you want to dive deeper into this, check out our complete guide on what clay bar treatment involves.
Key Takeaway: A perfectly decontaminated surface isn’t just a suggestion; it’s a non-negotiable requirement. Applying a coating over a gritty, contaminated surface is like putting a screen protector on a dusty phone. The bond will be weak, and you’ll lock those imperfections underneath the coating for years.
Paint Correction: Unlocking True Gloss
Now for the most transformative part of the process: paint correction. This is where we machine polish the clear coat to eliminate imperfections like swirl marks, light scratches, and water spots. It not only creates that flawless, wet-look shine but is also essential for the coating to bond properly.
For any DIYer, a dual-action (DA) polisher is the tool of choice. It’s far safer and more forgiving than a rotary polisher, so the risk of burning through your paint is incredibly low, yet it can still deliver professional-grade results.
It’s crucial to match your approach to the level of defects you’re facing.
Matching Paint Correction to Surface Defects
Before you start polishing, you need a game plan. Take a close look at your paint under good lighting to identify the types of defects you’re dealing with. This table will help you choose the right course of action.
| Defect Type | Severity | Recommended Action | Required Tool |
|---|---|---|---|
| Light Swirl Marks | Minor | A one-step polish with a finishing polish and a light polishing pad. | Dual-Action Polisher |
| Fine Scratches | Moderate | A two-step process starting with a medium-cut compound and pad, followed by a finishing polish. | Dual-Action Polisher |
| Water Spots | Varies | Can often be removed with a one-step polish, but severe etching may require compounding. | Dual-Action Polisher |
| Deep Scratches | Severe | Beyond the scope of DIY correction; may require professional wet sanding. | Professional Service |
Choosing the right pad and polish combination is key to an efficient and effective correction. Always start with the least aggressive method and only step up if necessary.
Once the polishing is done, there’s one last, critical step: an IPA (Isopropyl Alcohol) panel wipe. This final wipe-down strips away all the polishing oils and residues, leaving a completely bare and sterile surface. This is what guarantees the strongest possible chemical bond between your paint and the Titan Coatings formula, locking in that perfect finish for years to come.
Mastering Your Ceramic Coating Application
This is it. The moment where all that painstaking prep work pays off. Applying the coating isn’t about muscle; it’s about finesse, timing, and a steady hand. This is the final, deeply satisfying step that turns your perfectly polished paint into a glassy, hardened shield.
Success from here on out comes down to being methodical. You have to work in small, manageable sections, watch how the coating behaves, and trust the process. It’s totally normal to feel a bit of pressure, but with the right technique, you’ll be in complete control from the first drop to the final buff.
The Advantage of Smart Formulations
Let’s be clear: not all ceramic coatings are the same, especially when you’re the one doing the application. We engineer Titan Coatings products, like our HyperQuartz® line, specifically with the DIY detailer in mind. This means we’ve built in advanced chemistry that directly benefits you during application.
For instance, our formulas feature more forgiving flash times, which gives you a larger, less stressful window to apply, level, and buff the coating without feeling rushed. Our coatings also have self-leveling properties, which is a true game-changer. This technology helps smooth out minor inconsistencies in your application, so you can easily achieve a professional finish free of high spots.
This user-friendly chemistry is your safety net. It allows you to focus on your technique instead of battling a finicky product, building your confidence with every panel you complete.
Your Section-by-Section Workflow
The secret to a flawless finish is breaking the vehicle down into small, logical pieces. A great rule of thumb is to tackle the car in 2×2 foot squares. This simple discipline prevents you from laying down too much product at once, which is a classic recipe for uneven curing.
A solid, repeatable workflow usually looks something like this:
- Start Flat: Kick things off on an easy, flat panel like the roof or hood. This is your training ground to get a feel for the product.
- Divide and Conquer: Mentally map out the panel into smaller sections. A typical hood might be split into four or even six squares.
- One Section at a Time: Fully apply, level, and buff a single 2×2 section before even thinking about the next one. A slight overlap between sections is key for seamless coverage.
- Work Around the Car: Move methodically. I usually go from the roof down to the hood and trunk, then the upper door panels, lower doors, and finish with the bumpers.
Don’t try to coat an entire door or hood in one go. This is, without a doubt, the most common mistake beginners make. Working in small, controlled sections is the single most important technique for achieving a uniform, professional-looking result.
The Cross-Hatch Pattern and Spotting the Flash
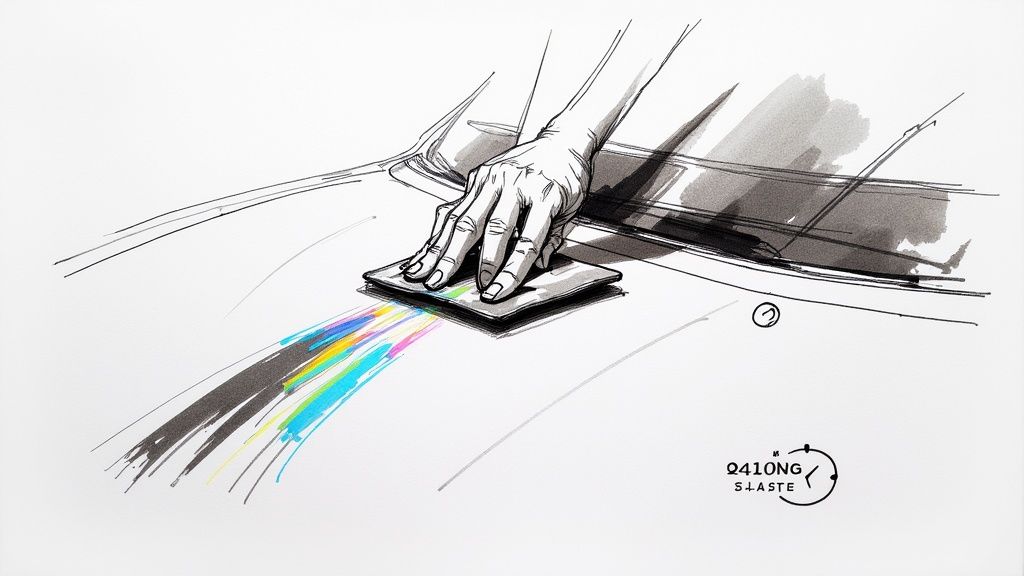
Once you’ve picked your first section, it’s time to apply. Squeeze just a few drops of coating onto your suede applicator—don’t saturate it. A little goes a very long way.
Apply the product to the panel using a cross-hatch pattern. First, glide the applicator across the 2×2 area in straight, overlapping horizontal passes. Immediately follow that up by going over the same area with straight, overlapping vertical passes. This technique is non-negotiable; it guarantees complete, even coverage with no holidays.
Now, you watch. You’re looking for the “flash.” As the solvents evaporate, the surface will start to take on an iridescent, oily look, almost like a rainbow on wet pavement. That’s your signal. The time it takes to see this flash can be anywhere from 30 seconds to a few minutes, all depending on the temperature and humidity in your workspace.
Perfecting Your Leveling and Final Buff
Timing is everything here. As soon as you see that rainbow flash, it’s time to level the coating. Grab a clean, low-pile microfiber towel and gently wipe over the section. You’re not trying to remove the product—you’re just knocking down the high spots to create a perfectly uniform layer.
Right after that initial leveling wipe, switch to a second, plush microfiber for the final buff. With this towel, gently buff the area to a slick, brilliant shine. Get your inspection light and check your work from several angles to make sure every last bit of residue is gone.
If you miss a spot and it cures, you’ll have a dark, streaky “high spot” that is a real pain to remove. This is precisely why working in small sections with a disciplined wipe-off process is so critical.
The industry is constantly evolving to make this process even more user-friendly. Technological innovation is fundamentally transforming the DIY ceramic coating experience through augmented reality integration and improved formulations. Manufacturers are now exploring hybrid formulations that combine traditional ceramic compounds with innovative materials such as graphene, boosting longevity and resilience while making applications more accessible to average consumers. Discover more insights about what to expect in 2025 and beyond in the world of vehicle protection.
Adapting to Your Environment
The conditions in your garage will have a major impact on how the coating behaves. Temperature and humidity are the two big variables that dictate flash time.
- High Temperature / High Humidity: In warm, sticky weather, the coating will flash much faster. You’ll need to shrink your working sections and be ready to level and buff almost immediately.
- Low Temperature / Low Humidity: In cooler, drier air, the flash time will be much longer. This gives you more breathing room, but be careful not to wipe it off too early before it’s had a chance to properly bond.
The ability to read the coating and adjust your timing on the fly is what separates a good job from a great one. Always do a small test spot in an inconspicuous area to gauge the flash time in your specific environment before tackling the main event. Master these techniques, and you’ll have a finish you can be proud of for years.
Post-Application Care: Protecting Your Hard Work
So, you’ve just finished the final wipe-down. The gloss is insane, and you’re feeling pretty proud of yourself. But hold on—the job isn’t quite finished yet. What you do in the next couple of weeks is just as important as the application itself. This is the curing phase, and your patience here will directly impact how well the coating performs and how long it lasts.
Think of it this way: the coating is still a liquid on a molecular level, working hard to create a super-strong, cross-linked bond with your car’s clear coat. This chemical reaction doesn’t happen instantly. Rushing this part is the fastest way to undermine all that effort you just put in.
The First 24 Hours: The “Hands-Off” Rule
For the first 24 hours, the rule is simple and absolute: don’t touch the paint. Seriously. No wiping, no curious prodding, and definitely no driving through a rainstorm. The coating is at its most delicate stage and needs this time to start hardening without any interference.
Ideally, the car should be tucked away in a garage or under a carport, safe from a few specific troublemakers:
- Moisture: Rain, sprinklers, or even heavy morning dew can create water spots. On a fresh coating, these spots can etch into the surface before it has a chance to fully harden.
- Contaminants: Bird droppings and tree sap are your worst enemies right now. Park away from trees to avoid these acidic messes, which can do real damage to a semi-cured coating.
- Chemicals: Keep everything off the paint. That means no quick detailers, no rinseless washes, and definitely no automatic car washes.
I always tell people to think of it like wet paint. You wouldn’t drag your finger across a freshly painted wall, right? Same principle applies here. Give it a clean, dry space to do its thing.
The First Week: Patience Is Still Key
As you move into the first week (or two, depending on the product and climate), the coating is getting much tougher but it’s still not 100% cured. You can relax a little, but don’t get complacent.
If the car gets a little dusty, just leave it. If you absolutely have to remove something like a bird dropping, be surgical about it. Use a very soft, plush microfiber towel and a bit of pure, deionized water or a dedicated ceramic maintenance spray to gently lift the spot. No scrubbing!
The biggest “don’t” for this first week is washing the car with soap. Any kind of detergent, even a gentle pH-neutral car shampoo, can interfere with the final cross-linking process. Wait it out. This careful approach is what ensures the coating achieves its maximum hardness and protective capabilities.
After 7-14 days, you’re finally ready for the first “real” wash. This is a big moment because it sets the precedent for all future maintenance. Always stick to the two-bucket wash method with a high-quality, pH-neutral shampoo. Stay far away from cheap, high-alkaline soaps and touch-style car washes; they’re notorious for slowly breaking down a coating’s defenses and killing its hydrophobic properties.
To keep that slick, just-coated feeling, get into the habit of using a ceramic-infused maintenance spray every few washes. Products like the ones from Titan Coatings are designed to act as a sacrificial layer, which means your coating stays protected longer, and your car’s gloss and water-beading performance remain at their peak. A little bit of smart upkeep is what separates a DIY ceramic coating for cars that lasts a year from one that performs brilliantly for years to come.
Common Questions About DIY Ceramic Coating
Even with the best guide in hand, it’s natural to have questions when you’re tackling a project like a DIY ceramic coating. Let’s clear up some of the most common things people ask before they get started. Getting these sorted out first will give you the confidence to get the job done right.
We’ll walk through the questions I hear most often from enthusiasts and weekend detailers diving into their first coating application.
How Long Does a DIY Ceramic Coating Really Last?
This is the big one, and the honest answer is: it depends. The real-world lifespan of your coating hinges on three things: the quality of the coating itself, how well you prepped the paint, and how you care for it afterward.
A top-shelf consumer coating, like the ones we’ve developed at Titan Coatings, will give you a solid 2-5 years of protection when you follow the process correctly. Our HyperQuartz® technology is specifically designed for a tenacious, long-term bond, so you can enjoy years of gloss and protection without having to reapply frequently. The magic is unlocked when that formula bonds to a perfectly clean surface and is then maintained with simple, smart habits like pH-neutral washes.
A lot of people think the coating does all the work on its own. The reality is, its performance is a partnership between the coating’s chemistry and your commitment to proper prep and aftercare.
Can I Apply Ceramic Coating Over Old Wax or Sealant?
That’s a hard no. This is probably the most critical rule in the ceramic coating playbook. Think of it this way: the coating needs to form a chemical bond directly with your car’s clear coat. It’s a semi-permanent handshake.
Any layer of old wax, sealant, or even residual polishing oils will get in the way, acting as a barrier and preventing that bond from ever happening. The result? The coating will fail, and fast. That final wipe-down with an Isopropyl Alcohol (IPA) solution isn’t just a suggestion—it’s the mandatory step that ensures the surface is totally bare and ready to bond.
How Do I Fix a Mistake Like a High Spot?
High spots happen. They’re those dark, oily-looking streaks you see when you don’t fully level the coating before it starts to flash and cure. First, don’t panic. They’re almost always fixable.
- If you catch it quickly (within an hour or so): The fix is surprisingly simple. Just apply a little more fresh coating right over the high spot. This reactivates the semi-cured layer, allowing you to immediately buff the whole area clean with a fresh microfiber towel.
- If it’s already cured: Once the coating has fully hardened, chemistry is no longer on your side. You’ll need to physically remove it. This means breaking out a light polish with a microfiber or foam pad and carefully leveling just that specific area. Once it’s smooth, you’ll have to do another IPA wipe on that spot before reapplying the coating.
Is It Safe to Apply Ceramic Coating in a Home Garage?
Absolutely, as long as you use some common sense and take the right precautions. A home garage is a great place for this kind of project.
The solvents in the coating will release some fumes as it cures, so good ventilation is key. Crack the garage door, open a window, or run a fan to keep the air moving. Always wear nitrile gloves—you don’t want this stuff on your skin. I also strongly recommend wearing a respirator to avoid breathing in the vapors. A clean, well-lit workspace isn’t just for safety; it helps you spot imperfections and keeps dust from landing in your perfect finish.
At Titan Coatings, we’re all about giving you military-grade polymers and advanced formulas that deliver pro-level results from your own garage. We back our products with the knowledge you need to get it done right. Check out our full lineup of coatings and see what you can achieve at https://www.titancoatings.us.
0 Comments