At its core, buffing out a light scratch means you’ll clean the surface, apply a polishing compound, and gently work it in until the mark vanishes. Deeper scratches are a different beast, often requiring more aggressive compounds or even wet sanding before you can polish the area back to a high gloss.
Your Guide to Flawless Scratch Removal
There’s nothing quite like that sinking feeling when you spot a fresh scratch on your car’s paint. But what if I told you that you could fix it yourself and get a finish that looks like it just rolled off the showroom floor? This guide is your roadmap. I’ll never forget the satisfaction of restoring the paint on my first project car, turning years of tiny imperfections into a flawless, deep shine. It’s an incredibly empowering skill, and you don’t need a professional setup to get it right.
We’ll kick things off by teaching you how to “read” the scratch using the simple fingernail test to gauge its depth. From there, we’ll build out your detailing arsenal, covering everything from the right compounds and microfiber towels to the game-changing tools that make this job so much easier.
Laying the Foundation for a Perfect Finish
I learned this lesson the hard way: prep work is everything. You absolutely cannot get a professional result without starting on a perfectly clean, decontaminated surface. Before a single drop of polish touches your car, the paint must be completely free of dirt, grit, and anything else stuck to it.
If you try to buff a dirty panel, you’re just grinding all those abrasive particles into the paint. You’ll turn one scratch into a frustrating web of new swirls and haze.
This initial cleaning phase isn’t optional. It’s a non-negotiable part of the process and involves a few key steps:
- A Proper Wash: Start with a high-quality, pH-neutral car soap and the two-bucket wash method to avoid reintroducing dirt onto the paint.
- Chemical Decontamination: An iron remover is your best friend here. It dissolves those stubborn bonded iron particles from brake dust and industrial fallout that a normal wash just can’t touch.
- Mechanical Decontamination: This is where the clay bar shines. By gliding a lubricated clay bar over the paint, you physically pull out embedded gunk like tree sap and road tar, leaving the clear coat glass-smooth. If you’re new to this, our guide on what a clay bar treatment is breaks it all down.
A perfectly prepared surface ensures you’re only working on the scratch itself, not fighting a battle against a layer of grit and grime. Skipping this foundational step is the number one reason DIY scratch repairs fail and often make the damage worse.
While this guide is all about restoring your car’s finish, remember that cosmetic care is just one piece of the puzzle. For a complete picture of vehicle upkeep, check out this ultimate car maintenance checklist that covers all the other essential tasks. Now, let’s turn this daunting task into a rewarding project.
How to Read a Scratch: Your First Step to a Flawless Finish
Before you even think about grabbing a polisher, you need to play detective. The single biggest mistake I see people make is using the wrong product for the job. It’s a classic rookie move that can turn a simple fix into an absolute nightmare—like burning right through your clear coat and finding yourself on the hook for a costly respray.
So, let’s slow down. Understanding what you’re up against is everything.
Your car’s paint isn’t just a single coat of color. It’s a sophisticated, multi-layered system built for both looks and protection.
- Clear Coat: This is your first line of defense. It’s the tough, transparent layer that gives your paint its gloss and protects it from UV rays and daily wear. Most light scratches are just chilling here.
- Base Coat: Right underneath the clear is the layer that gives your car its actual color.
- Primer: This is the foundation. It helps the paint stick to the car’s body panels and provides an even surface.
- Metal Panel: The bare steel or aluminum of your car. If you see this, buffing isn’t the answer.
To make it even easier, here’s a quick visual guide to help you figure out the best plan of attack.
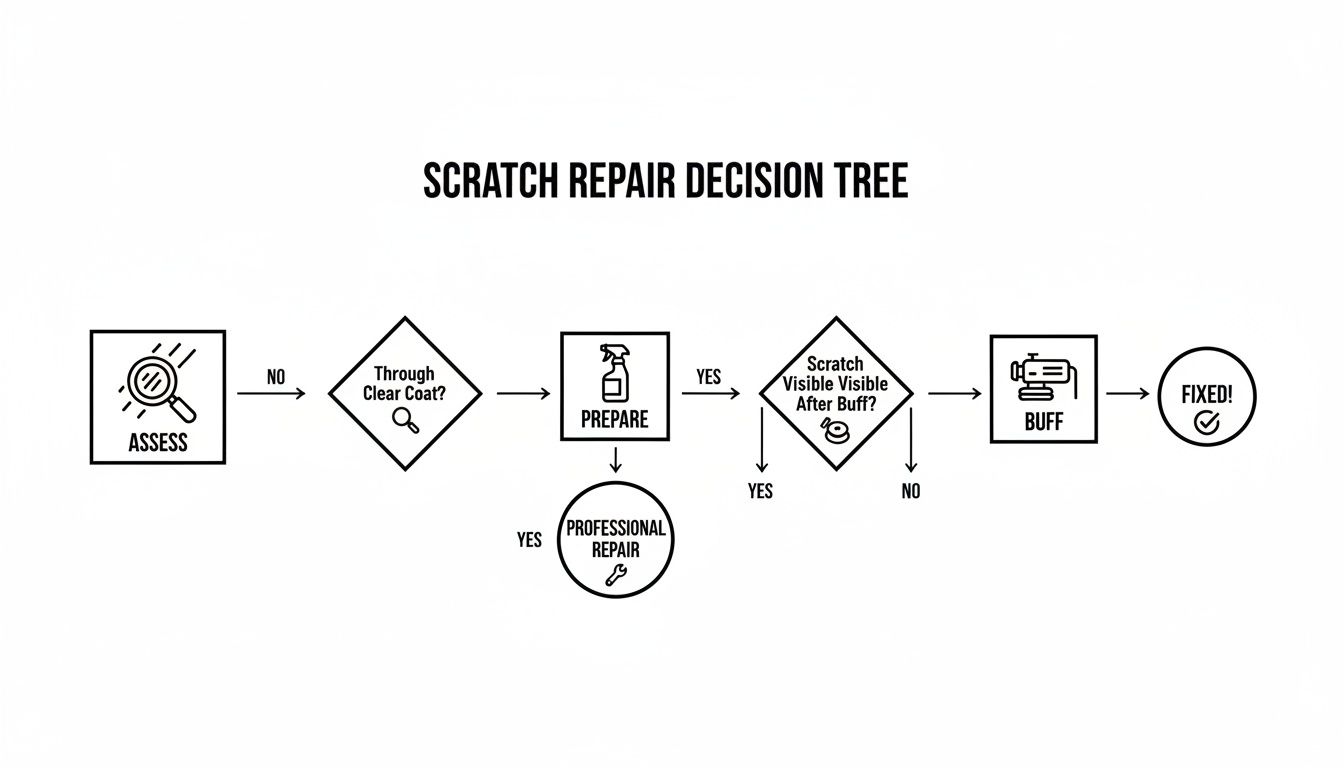
Following a clear diagnostic process like this means you’re matching the right solution to the problem, which is the secret to avoiding more damage.
The Fingernail Test: Your Best Friend in Scratch Diagnosis
Forget fancy tools for a second. The most reliable way to gauge a scratch’s depth is the good old-fashioned fingernail test.
Just run your fingernail gently across the scratch. If it glides right over without catching, you can breathe easy. The damage is almost certainly just in the clear coat, making it a perfect candidate for a light polish.
But what if your nail catches? If it snags even slightly in the groove, the scratch has bitten deeper into the clear coat and may have touched the color layer. This will call for a more aggressive compound. If you can see a different color, like white or grey, you’re down to the primer, and a simple buffing job isn’t going to cut it.
Your Quick Reference Guide to Scratches
Sometimes you just need a straightforward cheat sheet. Use this table to quickly identify the scratch you’re dealing with and see what the pros would do.
Scratch Severity and Recommended Action
| Scratch Level | How to Identify | Repair Method |
|---|---|---|
| Level 1: Clear Coat Scratches | Invisible when wet; fingernail does not catch. Often look like light scuffs or swirls. | Light Polish: Easily removed with a fine polish by hand or with a dual-action (DA) polisher. |
| Level 2: Deeper Clear Coat Scratches | Still visible when wet; fingernail catches slightly. | Compound & Polish: Requires a more abrasive compound first, followed by a finishing polish to restore gloss. |
| Level 3: Base Coat Scratches | The scratch shows the car’s color, but no white or grey primer is visible. | Wet-Sanding or Touch-Up: May require careful wet-sanding before compounding. Touch-up paint might be necessary. |
| Level 4: Primer-Level Scratches | Scratch shows a white, grey, or different underlying color (the primer). | Touch-Up Paint Required: Buffing is not the solution here. This needs professional touch-up paint or a respray. |
| Level 5: Down to the Metal | The scratch exposes the shiny, bare metal panel underneath everything. | Professional Repair: This requires professional bodywork to prevent rust and properly restore the paint. |
Getting this diagnosis right from the start saves you time, money, and a whole lot of frustration.
Here’s the key takeaway: The goal of buffing is to carefully level the clear coat around the scratch until the scratch itself disappears. It’s a process of microscopic abrasion, not filling a gap. Once you get that, you’re on your way to a pro-level repair.
Doing this wrong is shockingly common; some studies show that scratches still plague 40% of vehicles even after a professional detail, leading to expensive annual touch-ups.
This is exactly why we’re so passionate about the next generation of protective coatings. If you want to learn more about the best ways to get those marks out for good, check out our in-depth guide on how to remove scratches from car paint.
The Art of Buffing Scratches by Hand and Machine
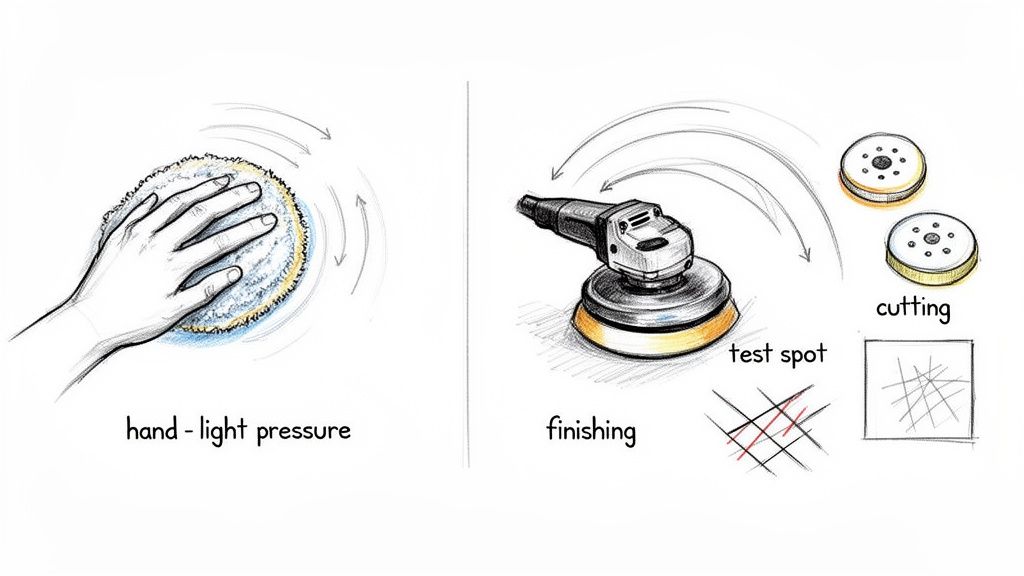
This is where the real work—and the real magic—begins. Whether you’re carefully working out a minor scuff by hand or firing up a dual-action (DA) polisher for some serious paint correction, your technique is what will make or break the final result.
I remember the first time I used a proper DA polisher. The sense of control and the stunning results were a world away from the hours of exhausting hand polishing I’d done before. It was a complete game-changer.
The key is matching the right tool to the job. For the lightest surface scuffs, a hand application with a quality microfiber applicator can be surprisingly effective. It gives you an intimate feel for the paint and is perfect for small, delicate areas.
But for anything more significant, a machine is your best friend. A DA polisher is the safest and most effective tool for beginners and pros alike. Its oscillating motion prevents you from building up too much heat in one spot, which is the number one way people accidentally burn through their paint.
Choosing Your Pad and Product Wisely
Your success is almost entirely dependent on picking the right combination of polishing pad and compound. It’s a lot like using sandpaper—you start with a more aggressive grit to knock down the major imperfections and then switch to a finer grit to smooth everything out. Polishing is the exact same principle.
- Cutting Pad/Compound: These are your heavy hitters. They’re typically made of firm foam, microfiber, or wool and are designed to be used with a cutting compound. This combo is what removes deeper scratches, oxidation, and those nasty heavy swirl marks.
- Polishing Pad/Compound: This is your middle-of-the-road, refining option. A medium-density foam pad paired with a good polish will clean up the surface after compounding, getting rid of any haze and lighter imperfections.
- Finishing Pad/Compound: These are the softest pads in your arsenal. You’ll use this with a fine finishing polish to absolutely maximize gloss and clarity, leaving behind that dripping-wet, mirror-like shine.
For an exceptional finishing polish that brings out incredible depth and clarity, Titan Coatings’ Wipe-Down is a fantastic choice. It preps the surface perfectly, giving you a clean slate for the ultimate shine or for laying down a protective coating. You can see how it stacks up against our other prep products on our comparison page.
Mastering the Correction Process
Before you even think about touching the main scratch, you must do a test spot. This is non-negotiable. Find an inconspicuous area on the car and test your chosen pad and product combination. This lets you dial in your technique and confirm you’re getting the results you want without risking damage to a highly visible panel. I learned this the hard way once—I skipped the test spot in a rush and spent an extra hour correcting the haze I created by starting too aggressively.
Once you’re confident in your approach, apply just a few pea-sized drops of compound to your pad. Work in a small, 2×2 foot section at a time. Use a cross-hatch pattern, moving the polisher side-to-side and then up-and-down to ensure even coverage and consistent correction. Let the machine do the heavy lifting; all you need is light, steady pressure.
A key thing to remember: the paint will often look a little worse before it looks better. During the cutting phase, the compound creates a slight haze as it levels the clear coat. This is completely normal. The “wow” moment comes when you follow up with a finer polish and pad to remove that haze and restore a brilliant gloss.
After a few passes, wipe the area clean with a fresh microfiber towel and inspect your work with a good light source. If the scratch is gone, you can move on to the polishing stage. The process is identical, but you’ll switch to your less aggressive pad and polish.
This refinement step is what separates a good job from a professional one. It’s especially critical for getting rid of the fine swirls that love to show up on dark-colored cars. For a deeper dive into that specific battle, our guide on how to remove swirl marks from a car has the targeted techniques you’ll need.
Protecting Your Hard Work with Advanced Coatings
You’ve done it—the scratch is gone, and the paint looks absolutely incredible. But your job isn’t finished just yet. Leaving freshly corrected paint exposed is like an open invitation for future damage, which can undo all the effort you just put in.
I’ll never forget a client of mine, Mark, who spent an entire weekend perfecting his black SUV. He was so proud. Then he took it through an automatic car wash just once and came back to me, horrified, to find the finish covered in a fresh web of swirl marks. This is exactly where modern protection makes all the difference, moving far beyond traditional waxes that offer little real defense and only a temporary shine.
Beyond Wax: A New Generation of Defense
This is where Titan Coatings completely changes the game. As the first company to introduce Elastomer coatings using nanotube technology and our proprietary Dark Matter Tech, we’ve created a totally different kind of shield for your vehicle. What makes our coatings so unique is that they’re elastomeric—they are engineered to be hard like glass but remain remarkably flexible.
This groundbreaking elasticity allows the coating to absorb minor impacts and resist the kind of cracking that plagues lesser coatings during extreme temperature shifts. Whether you’re facing freezing winters or blistering summer heat, our flexible coatings won’t break down because that flexibility prevents cracking.
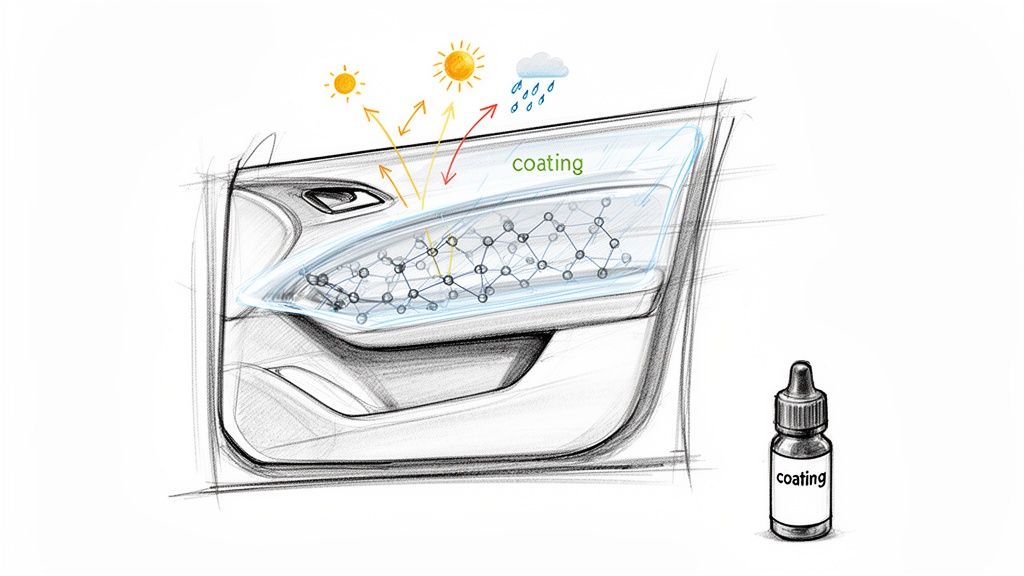
It’s a durable, resilient barrier that locks in the results of your hard work, ensuring that your perfect, scratch-free finish lasts for years, not just a few weeks. For those ready to apply this next-level protection, our guide on applying ceramic coating to a car provides a detailed walkthrough.
The Power of Advanced Technology
The market for auto scratch repair agents is projected to surge from $2.5 billion in 2023 to $4.8 billion by 2032, yet so much of it relies on outdated methods. Our Dark Matter Technology®, born from defense-grade polymers, uses self-healing nanoparticles that can close micro-scratches by 90% on the first application. In harsh climate abrasion tests, it outperforms standard agents by a factor of 2.5x.
This is the kind of technology that allows DIYers to avoid the massive $73.9 billion U.S. car body shop industry for minor imperfections.
Choosing the right protection isn’t just about shine; it’s about preserving the integrity of your paint. An elastomeric coating offers a durable, self-healing shield that actively works to keep your finish looking flawless day after day.
For those looking to achieve a professional-grade finish, our Titan Coatings Vulcan Hyper-Gloss Graphene Coating is an excellent choice. It delivers an unbelievable gloss while providing the robust, flexible protection that defines our brand.
Common Buffing Mistakes and How to Avoid Them
Learning how to buff out scratches isn’t just about technique—it’s about knowing the pitfalls that can turn a simple fix into a bodyshop bill. I’ve seen it all, and the most common mistakes are surprisingly easy to avoid once you know what to look for.
The absolute number one error? Trying to buff a dirty car. Think about it: you’re using an abrasive pad to level the paint. If that paint is covered in dust, grit, or road film, you’re essentially turning your polishing pad into sandpaper. You’ll just be grinding more swirls and scratches right back into the finish.
Before a machine ever touches your paint, a thorough wash and decontamination is a must. Our guide on how to decontaminate car paint walks you through this crucial prep work. Don’t skip it.
Sidestepping Common Buffing Traps
Another classic mistake is going in too hot with a compound that’s way too aggressive for the job. This is a surefire way to haze the paint, leaving a dull, cloudy mess that looks worse than the original scratch. The golden rule is to always start with the least aggressive method that gets the job done. You can always step up to a stronger compound, but you can’t undo overly aggressive polishing.
Also, be mindful of your environment. Working in direct sun or on a hot panel will bake the polish onto the surface before you can work it in, creating a sticky, stubborn residue and a blotchy finish.
Here are a few more traps to watch out for:
- Applying too much pressure: Let the machine and the pad do the work. Leaning on the polisher is how you burn through the clear coat, a costly mistake that often requires a professional respray to fix.
- Using dirty pads or towels: A single piece of trapped grit can create a nest of new scratches. Always use fresh, clean pads and have a stack of clean microfiber towels ready for wiping off residue.
- Trusting “miracle” fillers: Be wary of those all-in-one scratch removers you see on TV. Most are just thick oils and silicones that fill the scratch temporarily. They look good for a day or two, but they wash right out, and your scratch reappears.
Remember, true paint correction is about controlled, microscopic abrasion. You are carefully leveling the clear coat around the scratch until it disappears. It’s not about filling a gap. Once you grasp that concept, you’re on the path to a permanent, flawless repair that genuinely restores your car’s finish.
Your Scratch Removal Questions, Answered
Jumping into paint correction for the first time? You’ve probably got questions. Let’s tackle some of the most common ones I hear from car owners to clear things up before you get started.
How Long Will This Actually Take?
Honestly, it depends entirely on the scratch and your own experience. A light little scuff that you can barely see? You might be able to knock that out with a hand polish in 15-20 minutes. Simple.
But if you’re dealing with a scratch deep enough to catch your fingernail, you need to set aside more time. You’ll have to properly wash and prep the area, then work through a full compounding and polishing process. Realistically, plan for at least 1-2 hours for a single, deeper scratch. Don’t rush it—patience is the secret ingredient for a finish that looks like it never happened.
Does Car Color Make a Difference?
Good news: yes, you can buff scratches out of any car color. The process is the same whether your car is black, white, red, or anything in between. Why? Because you’re not working on the color itself; you’re leveling the clear coat, which is the transparent protective layer on top.
That said, some colors are easier to work with than others. Black and other dark colors are notoriously unforgiving—they act like a mirror, showing every tiny flaw. If you don’t follow your compounding step with a meticulous finishing polish, you’ll be left with a hazy, swirled mess. On a dark car, that final polishing stage is non-negotiable for a flawless, deep shine.
What’s the Real Difference Between a Compound and a Polish?
This is a fantastic and critical question. The easiest way to think about it is like sanding wood.
- Compounding is your heavy-hitter, like using coarse-grit sandpaper. It contains larger abrasives designed to cut through the clear coat and level out more significant defects like scratches, swirls, and oxidation. It does the hard work but often leaves its own fine scratches, creating a hazy finish.
- Polishing is all about refinement, like switching to fine-grit sandpaper. It uses much smaller, gentler abrasives to smooth out the haze left by the compound. This is the step that restores that incredible gloss, clarity, and depth to your paint.
You almost always follow up compounding with polishing. It’s a two-step dance to get that perfect result.
“A huge mistake I see people make is stopping after the compound. They see the main scratch is gone and call it a day. But the real magic happens in the polishing stage. That’s what separates a ‘good enough’ repair from a truly invisible one.”
Why Bother with a Coating After All That Work?
After spending hours making your paint look perfect, the last thing you want is for it to get damaged again next week. Freshly corrected paint is raw and exposed, making it incredibly vulnerable to UV rays, bird droppings, and—you guessed it—new scratches.
Leaving it unprotected is just asking for trouble. This is where a high-quality ceramic or graphene coating comes in. Something like Titan’s PYRO Professional Graphene Coating isn’t just a wax that sits on top; it forms a durable, chemical bond directly with your paint. It uses our unique Dark Matter Tech to create an elastomeric layer that’s both rock-hard and surprisingly flexible.
That flexibility is the key to its long-term survival. Your car’s panels expand and contract with temperature swings, from freezing winters to blazing hot summers. Our coating flexes right along with it, which prevents the micro-cracking that causes so many other coatings to fail prematurely. It’s a resilient shield that will protect all your hard work for years, not weeks.
Ready to lock in that perfect finish with protection that lasts? See what makes our technology different at Titan Coatings. Find out how the PYRO Professional Graphene Coating can give your vehicle a durable, flexible, and ultra-glossy shield against the elements.
0 Comments