To truly decontaminate your car’s paint, you need to think beyond a simple wash. It’s a two-stage process: first, you dissolve contaminants like iron and tar with chemical removers, and then you physically lift away what’s left with a clay bar. This is the only way to get back that perfectly smooth, glass-like finish that a normal wash just can’t touch.
Why Your Car’s Paint Still Feels Rough After a Good Wash
Think back to when your car was brand new. The paint was so slick a microfiber towel would just fall right off the hood, right? Over time, though, a gritty, almost sandpaper-like texture starts to build up, no matter how often you wash it. It’s frustrating. I see this all the time with customers who are meticulous about their cars but can’t figure out why the deep gloss is gone and the paint feels rough, even right after a fresh wash.
They eventually learn what every seasoned detailer knows: a standard wash only handles surface-level dirt. The real issue comes from microscopic contaminants that have physically bonded to your clear coat.
The Invisible Grime Clinging to Your Paint
These bonded troublemakers are just an unavoidable part of driving. Every day, your car is bombarded with stuff that embeds itself so deeply into the paint that simple soap and water won’t budge it.
The usual suspects are:
- Iron Particles: These are tiny, sharp bits of metal from brake dust—from your car and everyone else’s—plus industrial fallout. They dig into the paint, rust, and create those ugly little orange specks that can eventually lead to clear coat failure.
- Road Tar: You know those stubborn black dots that show up along your rocker panels, especially in the summer? That’s asphalt and road oils getting kicked up by your tires.
- Industrial Fallout: This is a catch-all for airborne pollution from factories, construction zones, or railways that settles on your car and bonds to the finish.
- Tree Sap & Bug Guts: These organic messes are a classic problem. If you let them sit, they can actually etch into your clear coat, making them a nightmare to remove safely.
This layer of embedded grime doesn’t just make your car look dull. It acts as a barrier, preventing waxes, sealants, or ceramic coatings from properly bonding to the paint. It’s a huge problem, and people are starting to catch on. In fact, research shows that around 78% of vehicles in cities pick up significant iron fallout in just three to six months. This makes regular decontamination a must-do for modern paint care. For a deeper dive, you can find plenty of research on environmental effects on vehicle surfaces.
I’ve seen it countless times. Someone thinks their washing routine is solid, but all they’re doing is cleaning the loose dirt off the top. Underneath, the embedded junk just keeps building up. They’re essentially trying to apply wax to a surface that feels like 2000-grit sandpaper.
The answer isn’t to scrub harder or wash more frequently. It’s to work smarter by using a pro-level strategy. You need that one-two punch: chemical decontamination to dissolve the invisible stuff, followed by mechanical decontamination to gently pull out whatever is left. This is the secret to getting that impossibly slick finish back, and it’s non-negotiable before applying any kind of long-term protection.
Let Chemicals Do the Heavy Lifting First
Before you even think about grabbing a clay bar, let’s talk strategy. The smartest, safest way to start any paint decontamination project is to let chemistry do the hard work for you. This is your first strike, a crucial chemical phase that dissolves the worst of the gunk without you ever having to scrub the paint.
Why is this so important? Because it massively reduces the risk of grinding those contaminants into your clear coat and creating a mess of new scratches. This isn’t just a pre-wash; it’s a non-negotiable step if you’re chasing a truly flawless finish. We’re mainly targeting two things here: embedded iron particles and nasty, sticky road tar—the stuff a normal wash just won’t touch.
The goal is to melt them right off the surface, which makes the next phase of physical decontamination infinitely easier and safer.
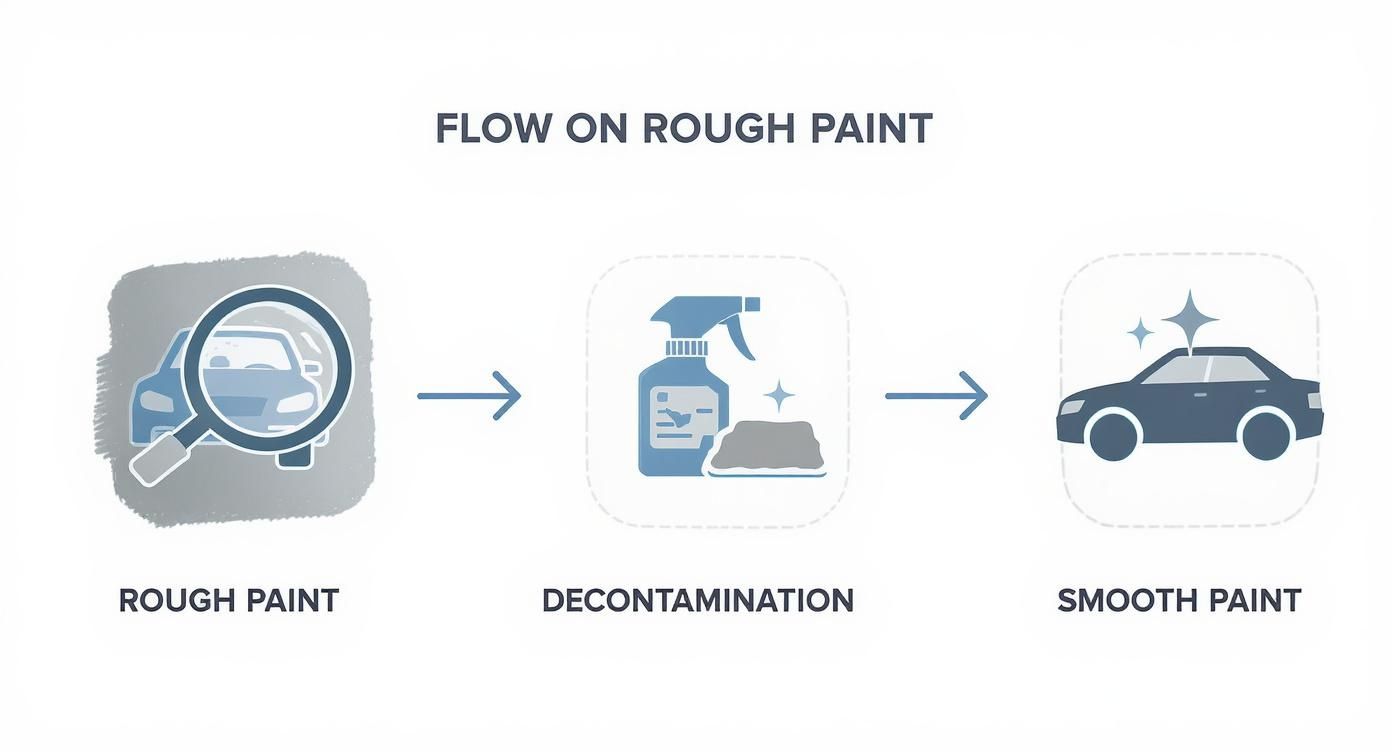
As you can see, getting from a gritty, contaminated surface to a perfectly smooth one is a one-two punch. You need both the chemical attack and the mechanical follow-up to get the job done right.
Targeting Iron Fallout with a “Bleeding” Effect
Iron fallout is everywhere, especially if you live or drive in urban areas or near railways. These are tiny, sharp metal fragments—mostly from brake dust—that embed themselves in your paint. Over time, they rust, creating those tell-tale orange specks that are a sign of your clear coat being slowly eaten away.
This is exactly what a dedicated iron remover is for. These products are engineered to seek out and react with ferrous (iron) particles, dissolving them on contact. The best part? You get to see it happen in real-time. The chemical turns a deep, dramatic purple as it works its magic, an effect we call “bleeding.” There’s no better visual proof that you’re pulling damaging contamination out of your paint.
A good iron remover can dissolve and lift up to 85-95% of these embedded particles in just 5-10 minutes. If you want a deeper dive, you can learn more about how a professional-grade iron fallout remover works its magic to save your paint.
Breaking Down Stubborn Tar and Sticky Adhesives
Next up: road tar. You know what I’m talking about—those ugly black and brown specks splattered all over your lower panels, behind the wheels, and across the bumper. It’s oily, it’s sticky, and soap and water won’t make a dent.
For this, you need a proper tar remover. These are solvent-based products made specifically to break down petroleum-based gunk like tar, bug guts, and tree sap without damaging your clear coat. Don’t reach for an aggressive all-purpose cleaner; use the right tool for the job.
Application couldn’t be simpler:
- Spray it directly onto the tar spots.
- Let it sit for about 30-60 seconds (always check the bottle’s instructions).
- You’ll actually see the tar start to melt and run down the panel.
- Gently wipe the gunk away with a clean microfiber towel.
Two crucial tips here: never let these chemicals dry on the surface, and always work in a well-ventilated area, out of direct sunlight. Heat makes the solvents evaporate too quickly, killing their effectiveness and potentially leaving an unbelievable residue. A thorough rinse after you’re done is a must to neutralize the panel.
To make it easier to choose the right product, here’s a quick breakdown of the chemical agents you’ll be using.
Chemical Decontamination Agents Compared
| Contaminant Type | Chemical Agent | How It Works | Pro Tip |
|---|---|---|---|
| Iron/Brake Dust | Iron Remover | Uses a chemical reactant (like thioglycolic acid) to bond with and dissolve ferrous particles, turning purple in the process. | Apply to a cool, dry surface for maximum dwell time and effectiveness before rinsing thoroughly. |
| Tar & Adhesives | Tar Remover | A solvent-based formula that breaks down petroleum-based substances, softening them for easy removal. | For thick deposits, let the product dwell for a minute, then re-apply to dissolve deeper layers before wiping. |
| Bug Guts | Bug & Grime Remover | An enzyme-based cleaner that breaks down acidic proteins in bug splatter, neutralizing them and preventing etching. | Use it as a pre-soak during your initial wash. Never let it dry on the paint, especially in the sun. |
| Tree Sap | Isopropyl Alcohol (IPA) / Tar Remover | Solvents dissolve the sticky resins in tree sap, allowing it to be wiped away without scrubbing. | Use a 50/50 IPA/water mix for light sap. For hardened sap, a dedicated tar remover often works better. |
Choosing the right chemical for the job isn’t just about efficiency; it’s about protecting the paint from unnecessary abrasion.
By letting these specialized chemicals do the initial work, you are preserving the integrity of your clear coat. You’re not just cleaning the paint; you’re performing a necessary procedure that sets the stage for a perfect finish and a stronger bond for your protective coatings.
I’ll never forget a customer, Alex, who was frustrated because his freshly washed car still felt like sandpaper. The first time he sprayed an iron remover on his white paint and saw it “bleed” purple, he had a total lightbulb moment. He realized he’d only been cleaning the surface of the paint. This chemical step was the missing key to getting his paint truly clean and ready for a high-performance coating.
Using a Clay Bar for a Glass-Smooth Surface
With the iron and tar dissolved, we’ve won the chemical battle. Now it’s time to get physical. This is the mechanical decontamination stage, where we physically lift away any stubborn bonded contaminants to get that unbelievably slick, glass-smooth finish that defines a professionally detailed car.
This is where the magic really happens, and it’s a process I’ve walked hundreds of enthusiasts through. I’ll never forget one client, Mark, who brought in his meticulously kept black sedan. He was certain his paint was perfect until I had him feel the surface through a thin plastic bag. The shock on his face was immediate. “It feels like sandpaper!” he exclaimed. That gritty texture is exactly what we’re about to eliminate.
Choosing Your Mechanical Decontamination Tool
Your primary weapon here is detailing clay. Originally an industrial tool, clay was adapted for automotive use to shear off and pull out embedded grit without aggressive polishing. Today, you’ve got a few options, and each one has its place.
- Traditional Clay Bars: The classic choice. Nothing beats them for feel and feedback—you can literally sense the moment a panel is perfectly clean. The downside? You have to knead them constantly to expose a clean surface, and if you drop one, it’s toast. Throw it out immediately.
- Clay Mitts and Towels: These are the modern alternative, with a clay polymer layer bonded to a microfiber surface. They’re way faster on large panels, reusable, and you can just rinse them clean if dropped. The trade-off is that you get a little less tactile feedback than you do with a traditional bar.
For a first-timer, a clay mitt is often the most forgiving and efficient way to go. But for targeting pockets of heavy contamination, the precision of a traditional clay bar is still king. If you really want to master the technique, you can dive deeper into our guide on what a clay bar treatment really involves.
The Art of Flawless Claying Technique
Technique is everything here. Get it right, and you’ll be rewarded with a perfect surface. Get it wrong, and you can easily introduce fine scratches called marring. The secret is lubrication, lubrication, lubrication.
Never, ever glide a clay bar on a dry surface. You need a dedicated clay lubricant or a high-quality quick detailer to create a slick barrier between the clay and your paint. This lets the clay glide effortlessly while grabbing onto all that gunk.
Here’s how to do it right:
- Work in small, manageable sections, about 2×2 feet at a time.
- Generously spray the section with your lubricant. Seriously, don’t be shy with it.
- Gently glide the clay over the surface in straight-line motions—first north-to-south, then east-to-west.
- You will actually feel and hear the clay working as it pulls up contaminants. As the surface gets smoother, the noise and friction will fade away.
- Wipe the section dry with a clean microfiber towel and move on to the next area.
If you’re using a traditional clay bar, remember to fold and knead it after each small section. This exposes a fresh, clean portion and stops you from dragging the grime you just picked up all over the next panel.
Pro Tip: Don’t apply heavy pressure. Let the clay do the work. Imagine you’re gliding an ice cube over a warm countertop—that’s the gentle force you should be using. Pushing too hard is the number one cause of clay-induced marring.
The Satisfying Result: A Perfectly Prepped Surface
Once you’ve clayed the entire vehicle, do that plastic bag test again. The difference will be night and day. The gritty, bumpy texture is gone, replaced by a slickness that feels like polished glass. This is the true clean your paint has been missing all along.
This surgically clean surface is now perfectly prepped for whatever comes next, whether that’s polishing out minor swirls or moving directly to apply a high-performance protective layer like a ceramic coating. Without this crucial mechanical step, any wax, sealant, or coating would just be sitting on top of a layer of grit, which would kill its durability and ruin the final look.
After claying, I always recommend giving the car a final rinse or a quick waterless wash to remove any leftover lubricant. This ensures the surface is absolutely pristine and ready for protection—a perfect foundation that allows cutting-edge coatings to bond properly and perform at their peak.
Prepping Your Paint for Ultimate Protection
So, you’ve done the hard work. You dissolved the iron, melted the tar, and clayed away every last bit of grit. Your car’s paint is now surgically clean, probably smoother than it’s been since it left the factory.
But here’s the thing: in this state of absolute purity, your paint is also completely naked. The job isn’t finished. In fact, you’re at the most critical stage of the entire process.
This final prep step is all about creating a sterile canvas for whatever protection you’re about to apply. It’s the non-negotiable bridge between decontamination and protection, ensuring your efforts weren’t just for a temporary shine but for long-lasting defense. Any lingering oils from clay lubricants, chemical removers, or even your own fingerprints can prevent your sealant or coating from properly bonding to the surface.
Think of it like painting a wall. You wouldn’t slap a fresh coat of paint over a dusty, greasy surface and expect it to stick, right? It’s the same principle here, but a failed bond means your protection will break down prematurely, leaving that perfectly clean paint exposed all over again.
The Final Wipe-Down for a Perfect Bond
To guarantee your paint is truly ready, you need to perform a final wipe-down with a panel prep spray or a diluted isopropyl alcohol (IPA) solution. This step zaps any and all residual substances, leaving behind nothing but pure, unadulterated clear coat.
- Isopropyl Alcohol (IPA): A classic choice. A 15-25% dilution of IPA with distilled water is all you need. It’s incredibly effective at stripping oils without being too aggressive on the paint.
- Panel Prep Sprays: These are purpose-built products, often blending specific solvents to tackle polishing oils and other residues while being perfectly safe for your finish. I tend to prefer these as they’re formulated for this exact job.
The process itself is simple. Mist the solution onto a section of paint and gently wipe it away with a clean, high-quality microfiber towel. Flip the towel to a dry side for a final buff. You’re looking for that squeaky-clean feel and sound as you lightly drag the towel across the surface—that’s how you know it’s ready.
This isn’t just a “nice-to-have” step; it’s the foundation for durability. Studies on coating adhesion have shown that surfaces completely free of organic residue can achieve up to 60% greater bond strength and longevity compared to surfaces that were only washed. This wipe-down is the key to unlocking the full potential of your protection.
Unlocking Next-Generation Protection
Once your surface is sterile, it’s finally ready to accept an advanced form of protection. This is where all that prep work pays off. The decontamination you just performed has prepared your vehicle for something far beyond a traditional wax—it’s ready to bond with a next-generation coating, like those from Titan Coatings.
I remember a client, a true enthusiast, who spent an entire weekend following this process to the letter on his pride and joy. When he finished the IPA wipe-down, he said the paint looked so clean it was practically dripping wet. He was applying Titan’s Vulcan TX155, and he told me later the application was unbelievably smooth because the coating had a perfect surface to fuse with.
That’s the secret. As the first company to introduce Elastomer coatings using nano-tube technology and our own Dark Matter tech, Titan’s groundbreaking formulas don’t just sit on top of the paint. They’re engineered to create a powerful, semi-permanent bond directly with the clear coat. A clean, decontaminated, and oil-free surface is the only way this fusion can happen. The entire process of how to apply a ceramic coating to a car hinges on this flawless preparation.
Why Decontamination Matters for Elastic Coatings
The benefits of perfect prep are amplified when you’re using a truly advanced coating. Unlike the brittle, old-school ceramics, Titan’s elastic technology gives you a unique advantage. These coatings are hard as glass but remain flexible.
This elasticity is a game-changer. Your car’s body panels are constantly expanding and contracting with temperature swings, from freezing nights to scorching summer days. Rigid coatings can develop micro-cracks under this stress, which compromises their integrity. But because Titan’s elastic coatings flex with the surface, they resist cracking and last significantly longer. This means extreme temperature changes, from frozen to hot, won’t affect the coating.
Your meticulous decontamination work creates the ideal foundation for this flexible shield to perform at its peak. It ensures the coating bonds perfectly, protecting that glass-smooth finish for years, not just months. The decontamination wasn’t just about making the paint feel nice for a week—it was about preparing it for a level of protection that can actually withstand the real world.
What Can Go Wrong? Avoiding Common Decontamination Mistakes
Even seasoned pros had to learn the ropes somewhere, and the decontamination process has a few classic traps that can catch anyone off guard. One small slip-up can turn a satisfying detail into a frustrating mess, and I’ve seen just about every mistake you can imagine over the years.
The goal here isn’t to scare you, but to arm you with the experience to sidestep these common pitfalls. Think of this as a troubleshooter’s guide, built from real-world lessons learned in the bay.
Letting Products Dry on the Surface
This is, without a doubt, the number one mistake I see. You get focused, the sun peeks out, and before you know it, that iron remover you sprayed on has dried into a streaky, blotchy mess. These chemicals are incredibly effective, but they have to stay wet to work.
Once they dry, they can leave behind residues and stains that are a real pain to remove. The fix is simple: always work in the shade on panels that are cool to the touch. If a product does happen to dry, don’t grab a towel and start scrubbing. Just re-mist the area with the same chemical to reactivate it, let it sit for a moment, and then rinse it off completely with a strong stream of water.
The Dreaded Dropped Clay Bar
A client of mine was meticulously claying his pride and joy when his hand slipped, and the clay bar plopped right onto his driveway. He instinctively picked it up, gave it a quick rinse, and was about to go right back to work when I caught him. This is a critical moment where the right decision saves you from a world of hurt.
A dropped clay bar is a dead clay bar. It instantly picks up sharp grit and debris that will act like sandpaper on your clear coat. There are no exceptions to this rule—throw it away immediately and grab a new one.
The price of a new bar is a tiny fraction of what it costs to correct a panel full of deep, ugly scratches. This is a non-negotiable rule in professional detailing. Clay mitts and towels are a bit more forgiving here; you can often rinse them thoroughly and inspect them, but a traditional bar is done the second it hits the floor.
Skimping on Lubrication
Being cheap with your clay lube is a guaranteed way to inflict damage. The whole point of the lubricant is to create a slick, protective film that lets the clay glide effortlessly while it grabs onto embedded junk. When you don’t use enough, you’re just dragging a sticky, abrasive surface across your paint.
The result? Clay marring. It looks like a hazy, scuffed-up finish full of tiny scratches. You should always see a generous layer of liquid on the panel. If you feel the clay start to drag or hear it squeaking, stop right there and spray more lube. Seriously, you can’t use too much.
Ignoring the Chemical Decontamination Step
I get it, you’re eager to get to the “action” part of claying the car. But jumping straight to the clay bar and skipping the chemical stage is a massive mistake. When you do this, you’re asking that little bar of clay to do all the heavy lifting—pulling out sharp iron particles and thick, sticky tar.
This not only overloads the clay and clogs it up almost instantly, but it dramatically increases the risk of scratching your paint. The iron and tar removers are designed to safely dissolve 80-90% of the worst contamination before you ever touch the paint. Let the chemicals do their job first. It makes the mechanical claying process safer, quicker, and far more effective.
Sometimes, even when you do everything right, you can run into a snag. Here’s a quick-reference table for solving some of the most common issues that pop up during the decontamination process.
Troubleshooting Decontamination Problems
| Problem | Cause | Solution |
|---|---|---|
| Stubborn Streaks After Rinsing | Chemical product dried on the surface or was not fully rinsed away. | Re-apply the same product to the affected area to reactivate the residue, then immediately rinse thoroughly with high pressure. |
| Hazy or Scuffed-Looking Paint (Marring) | Insufficient lubrication during the mechanical claying stage. | Apply more clay lubricant. For existing marring, the panel will require a light polish with a finishing polish and pad to remove the fine scratches. |
| Clay Bar Isn’t Picking Anything Up | The paint was already clean, or the chemical decontamination was so effective that no bonded contaminants remain. | This is a good thing! It means your paint is clean. Perform the “plastic baggie test” to confirm. If it’s smooth, move on to the next step. |
| Tar Remover Isn’t Working | The product is not being given enough dwell time, or the tar deposits are extremely thick and old. | Allow the tar remover to dwell for its maximum recommended time (without drying). For thick spots, apply the product to a microfiber towel and gently agitate the spot. |
Think of this table as your cheat sheet. Most problems have a simple solution if you catch them early and know what to look for.
Your Decontamination Questions Answered
Even with a solid game plan, you’re bound to have questions. The world of detailing is full of them, and when you’re talking about a process as critical as decontamination, you want to get it right. Let’s tackle some of the most common things people ask, so you can move forward with total confidence.
How Often Should I Decontaminate My Car Paint?
There’s no magic number here. The real answer depends entirely on where and how you drive.
If you’ve got a daily driver that battles city traffic, sits near industrial areas, or racks up highway miles, you’ll want to decontaminate every six months. Those environments are just loaded with brake dust and fallout. On the flip side, if you have a garage queen that only sees the sun on weekends in a quiet suburb, you can probably get away with doing it just once a year.
The best way to know for sure? The good old “plastic bag test.” After a good wash, slip a thin sandwich bag over your hand and lightly glide your fingers across the paint. If you feel any grit or tiny bumps, it’s time to break out the decon products.
Can This Process Damage My Clear Coat?
When you do it right, decontaminating your paint is one of the best things you can do for it. The risk doesn’t come from the process itself, but from sloppy technique.
Stick to these simple rules, and you’ll be perfectly safe:
- Always use quality, pH-neutral chemical removers.
- Never, ever let a chemical product dry on the paint.
- When it’s time for mechanical decon, drown the surface in a good clay lubricant.
Nearly every horror story you hear comes from someone using too much muscle with the clay, skimping on the lube, or—the ultimate sin—dropping their clay bar and then trying to reuse it. Follow the steps we’ve laid out, and your paint will thank you.
Is Polishing Necessary After Using a Clay Bar?
While it’s not strictly mandatory, I highly recommend polishing after you clay if you’re aiming for that flawless, show-car look. Here’s why: even with perfect technique, the physical act of claying can inflict some microscopic marring on the clear coat. You might not see it under a street light, but it’s there, and it’s dulling the shine.
A quick pass with a light finishing polish will wipe that fine marring away, making the gloss, clarity, and color pop like you wouldn’t believe. It’s the step that takes your finish from just “clean” to truly perfect. It also creates the absolute best surface for a sealant or coating to bond to.
Think of decontamination as the deep clean and polishing as the final refinement. One removes what’s embedded in the paint, while the other perfects the surface of the paint. Together, they create the ultimate foundation for protection.
Can I Use a Clay Bar on Glass and Wheels?
You bet. The same gunk that sticks to your paint loves to bake onto your glass and wheels, too. Claying your windshield, for example, can get it unbelievably clean and help your wipers glide smoothly, which is a huge plus in the rain.
But a big word of caution on the wheels. They get hammered with the worst, most abrasive brake dust imaginable. For that reason, you must use a separate, dedicated piece of clay for them. You do not want that gritty mess anywhere near your car’s paint. And as always, make sure you’re using plenty of lubricant.
With your paint now perfectly smooth and free of contaminants, it’s primed and ready for real protection. Don’t let all that hard work go to waste. Locking in that pristine surface is the final, most important step.
At Titan Coatings, we created our advanced Elastomer coatings for exactly this moment. Products like our Vulcan TX155 and Alpha Quartz, which is built on nano-tube technology, do more than just protect—they form a flexible, glass-hard shield that becomes part of your paint. This elasticity lets the coating expand and contract with heat, which prevents the micro-cracking that kills so many traditional ceramics. Give your perfectly prepped vehicle the durable, long-lasting defense it deserves.
0 Comments