If you want to get bugs off your car for good, you need the right game plan and the right tools. It’s all about acting fast. The best method I’ve found is to hit the splatters with a dedicated bug remover to break them down, then follow up with a gentle wash using a quality microfiber towel and a good pH-neutral car soap. This combo lifts the gunk without grinding it into your paint.
Why Bug Splatter Is Your Paint's Worst Enemy
We've all been there. You spend hours getting your car looking perfect, only for one trip down a country road at sunset to completely cover your bumper, hood, and mirrors. It looks bad, sure, but the real problem is far more sinister than just a cosmetic annoyance.
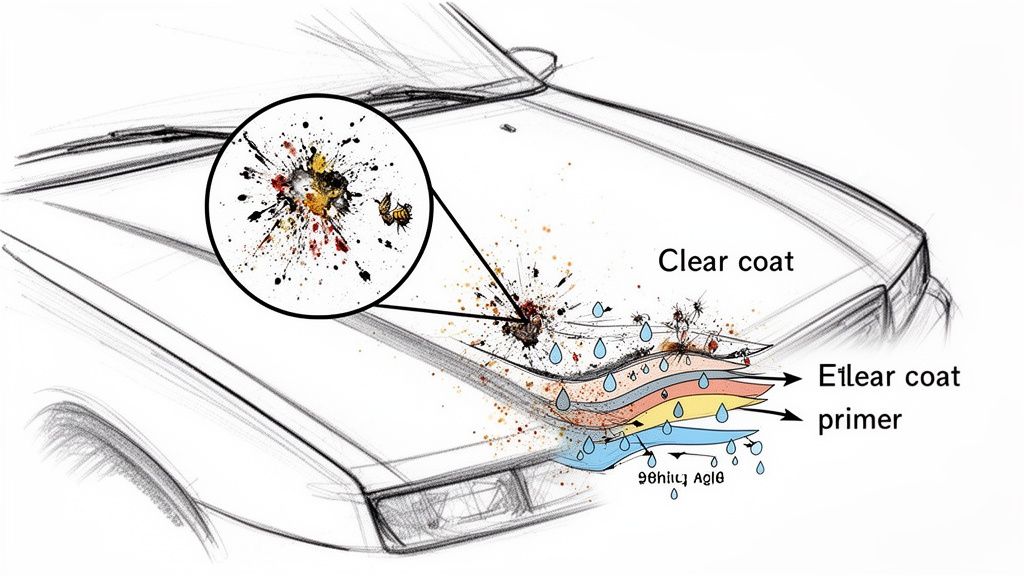
Bug splatter is, quite literally, a chemical assault on your vehicle’s clear coat.
Each one of those splats is a tiny, acidic time bomb. The guts of insects are packed with complex proteins and enzymes that become incredibly corrosive when they dry on your paint, especially under the hot sun. This nasty cocktail immediately starts eating away at the clear coat, the crucial protective layer over your car's color.
Leave them on, and this process—known as etching—carves microscopic pits and craters into the finish. At first, you might not even notice them, but over time they destroy the paint's gloss, leaving permanent blemishes that no amount of washing can fix. It’s aggravating, and it turns a simple cleanup job into a potential paint correction nightmare.
The Science of Splatter Damage
Heat is the real accelerator here. On a hot day, the chemical reaction between the bug residue and your clear coat goes into overdrive. Permanent etching can happen in as little as 24-48 hours. The sun is basically baking those acidic compounds right into your paint.
This is exactly why getting them off quickly is so critical. What starts as something sitting on the surface rapidly bonds to, and then compromises, the integrity of your finish. It's a race against chemistry and the clock. This is where understanding how to properly decontaminate car paint becomes so important, because bug guts are one of the most aggressive contaminants your car will ever face.
It’s interesting how modern car design actually makes this problem worse. Those sleek, aerodynamic shapes that give us better gas mileage also create high-pressure zones that funnel insects directly into the front bumper, grille, and the leading edge of the hood.
One study I read pointed out an unbelievable trend: even though some insect populations are declining, today’s aerodynamic cars are far more efficient at hitting the bugs that are left compared to old, boxy designs. It makes every single splat a more concentrated threat. The full details are in a survey they call ‘Bugs Matter’.
Beyond Aesthetics: The Real Cost of Neglect
Ignoring bug guts isn't just about your car looking messy—it's about protecting its value. Permanent paint etching can seriously tank your car’s resale or trade-in value. Appraisers and potential buyers see it as a clear sign of poor maintenance.
Think of your paint as armor. Once the clear coat is breached, the color coat and primer underneath are left wide open to UV rays, moisture, and road grime. That’s how you end up with fading, peeling, and eventually, rust.
This is why prevention is always the best strategy. A high-quality protective layer, like an advanced elastomer coating, creates an impenetrable barrier between the bugs and your paint. Instead of etching into the clear coat, the residue just sits on top of the coating, wiping away with almost no effort. It completely changes the game from a desperate scrubbing match to a simple, stress-free cleanup.
Gathering Your Bug Removal Arsenal
Before you even think about touching your car’s paint, let's talk tools. The difference between a flawless finish and a paint job riddled with fine scratches often comes down to what you use. We're not just grabbing a sponge from under the kitchen sink here; we're building a specialized kit to safely take down corrosive bug guts.
Your first line of defense is always a high-quality, dedicated bug and tar remover. These aren't just fancy soaps. They’re specifically formulated to break down the acidic proteins in bug remains without stripping your wax, sealant, or damaging a ceramic coating. Using generic all-purpose cleaners or dish soap is just asking for trouble—they're often too harsh and can compromise your car’s finish. If you're curious about the specifics, it's worth reading up on the safety of common cleaning agents like dish soap to see why automotive-specific products are always the smarter bet.
Choosing Your Cleaning Tools
Once you've got your chemical solution, you need the right tool to physically lift the softened bug residue. This is where a lot of well-meaning car owners make a costly mistake.
Plush Microfiber Towels: These should be your workhorse. Their soft, looped fibers are designed to trap and lift grime and bug particles away from the paint, which is key to preventing scratches.
Bug Scrubber Sponges or Pads: For those stubborn, baked-on messes, a dedicated bug scrubber is a lifesaver. Look for ones made with a special netting or honeycomb microfiber material. They give you a little more cleaning power than a standard towel but are still gentle enough for your clear coat. Never, ever use a kitchen scouring pad or a coarse sponge—they will instantly leave noticeable swirl marks on your paint.
To wrap things up, you’ll need a great car wash soap for the final clean-up. A pH-neutral formula is non-negotiable here. It cleans effectively without harming any of the protective layers on your paint. For a closer look at what to buy, our guide on the best soaps for cars with coatings has some great recommendations for keeping that perfect finish.
A common myth is that more elbow grease is better. The truth is, you want the chemical to do the heavy lifting. The best method is to saturate the bug splatters, let the remover dwell for a few minutes to dissolve everything, and then gently wipe it away. Patience is your most effective tool.
Here's a quick look at the essential items you'll want to have on hand before you get started.
Bug Removal Toolkit At-a-Glance
| Tool/Product | Primary Use | Pro Tip |
|---|---|---|
| Bug & Tar Remover | Dissolving acidic bug proteins | Apply to a cool surface out of direct sunlight for maximum dwell time. |
| Plush Microfiber Towels | Gently wiping away softened residue | Use one side for wiping and a clean side for a final buff. |
| Bug Scrubber Pad | Tackling stubborn, baked-on spots | Use with light pressure and plenty of lubrication from your cleaner. |
| pH-Neutral Car Soap | Final wash to remove all residue | Two-bucket wash method is always best to prevent cross-contamination. |
| Two Buckets with Grit Guards | Safe washing and rinsing | Keeps dirt at the bottom of the bucket, away from your wash mitt. |
Having these items ready makes the whole process smoother and, more importantly, safer for your car's paint.
A Quick Note on Coated Surfaces
Finally, think about what you're working on. Is your car protected by a basic wax, a sealant, or something more advanced? If your vehicle has a high-end ceramic or elastomer coating, like one of our Titan products, your job just got a whole lot easier. You can see the differences between products on our comparison page.
These advanced surfaces are incredibly slick and durable, meaning bug guts struggle to get a strong grip in the first place. What would be an aggressive scrubbing session on an unprotected car often turns into a simple, effortless wipe-down. This is where you really see the value of next-generation protection—it saves you time and prevents damage before it even happens.
The Professional Method for Flawless Bug Removal
Alright, you’ve gathered your supplies. Now it’s time to tackle those bugs like a seasoned pro. This isn't about brute force or scrubbing until your arm aches; it’s about working smarter. The secret is a multi-step attack that dissolves, lifts, and cleans away the mess without harming your paint.
Think of it as a tactical mission. First, you soften the target. Then, you gently extract it. Finally, you clean up the scene, leaving it looking like nothing ever happened. Following this process ensures you’re actually eliminating the bug guts, not just smearing them around.
Phase One: Pre-Soaking the Problem Areas
If you take one thing away from this guide, let it be this: patience is the most critical tool you have. Before a wash mitt or towel ever touches your car’s paint, you need to let your bug remover do its job. We call this "dwell time," and it's non-negotiable for getting great results.
Generously spray your bug and tar remover directly onto all the splattered areas. I'm talking about the front bumper, grille, hood, and the leading edge of your side mirrors—the usual victims. You want to completely saturate the bug remains. A light mist just won't cut it. You need enough product on there to rehydrate those dried-up, acidic proteins and start breaking them down.
Let the product sit and work its magic for at least 3-5 minutes, but always defer to the instructions on the bottle. It's absolutely crucial to do this in the shade on a surface that’s cool to the touch. If a strong chemical cleaner dries on hot paint in direct sun, you’ll trade a bug problem for a chemical staining problem. You’ll know it’s working when you see the bug splatters start to loosen and even run down the panel. That’s the cleaner doing the heavy lifting for you.
To see what I mean, this graphic boils it down to the core actions.
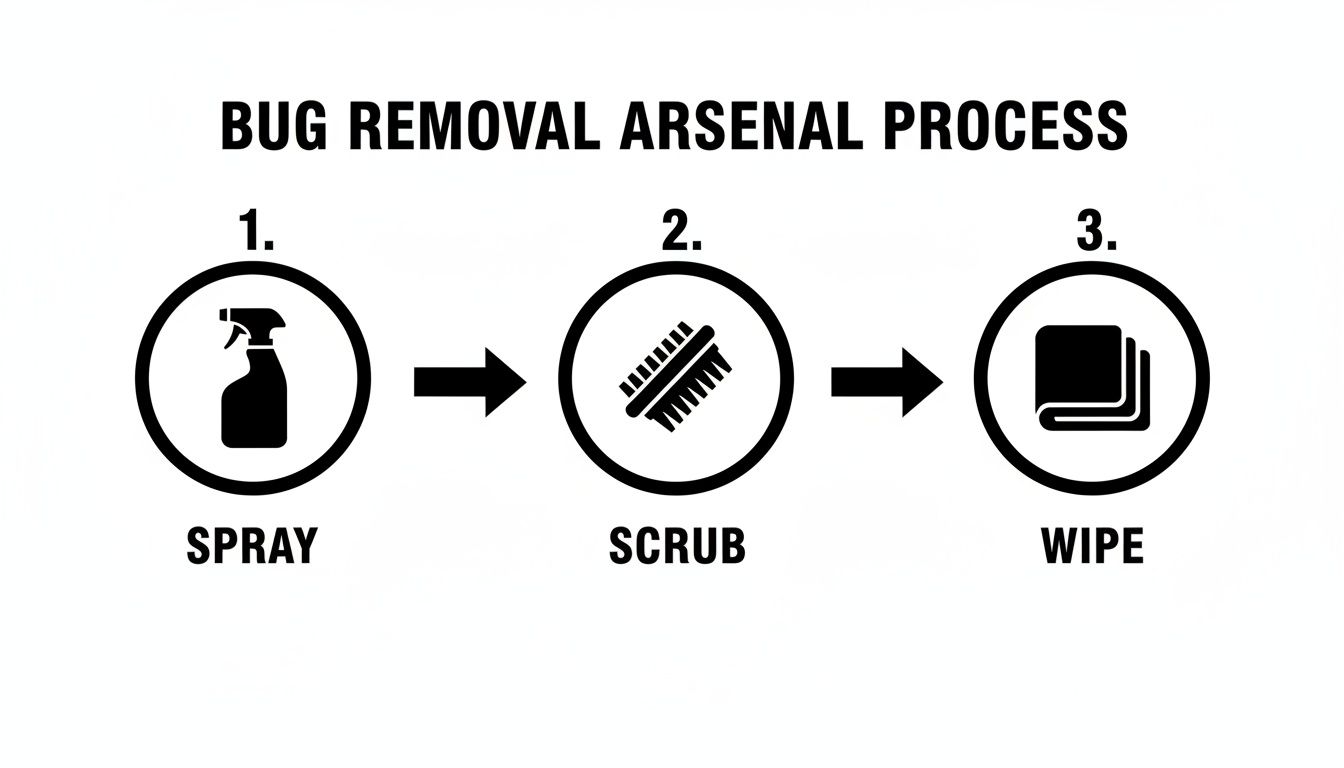
This simple flow—spray, gently agitate, and wipe—is the foundation for removing bugs safely and effectively.
Phase Two: The Safe and Gentle Wash
Once the bug remover has had enough time to work, it’s time for the first wash-off. Start by just rinsing the pre-soaked areas with a good, steady stream of water from your hose. You’ll be surprised how many of the loosened bug remains just slide right off without you ever touching the car.
Now, move on to a proper two-bucket wash. One bucket is for your car soap, the other for clean rinse water. After washing a small section, dunk your dirty mitt in the rinse water bucket first to release all the grime and bug bits. Then, and only then, go back to your soap bucket. This little habit is what stops you from dragging abrasive particles all over your car’s finish.
Using a plush microfiber wash mitt, gently wash the areas you pre-treated. I always recommend using straight-line motions, not circles. Let the combination of the softened bug guts, your quality car shampoo, and the soft mitt do the work. If you hit a really stubborn spot, fight the urge to scrub harder. We’ll deal with that in the next phase.
And if you think you have a lot of bugs, you're not wrong. Over a single Memorial Day weekend in the US, drivers are projected to splatter a mind-boggling 3.07 billion insects. One biologist even estimates that cars globally are responsible for the demise of 228 trillion bugs every year. To deal with this onslaught, experts recommend the exact method we're using: pre-treating with a potent spray and using gentle friction. You can read the full 2025 Bug Splatter Report to really understand the scale of the problem.
Phase Three: Targeted Cleaning for Stubborn Remnants
After the main wash, you might still spot a few stubborn remnants or a faint outline where a particularly nasty bug met its end. This is normal, and it’s where targeted cleaning comes in. For these last few holdouts, grab your bug remover and a bug scrubber pad or a dedicated microfiber towel.
Spray just the stubborn spot again, let it dwell for a minute, and then use your bug scrubber with light pressure. Make sure the area is well-lubricated. The special netting on the scrubber provides just enough extra bite to lift what’s left without being abrasive enough to mar the paint.
Expert Tip: For extremely persistent bug "etching"—where the acids have started to eat into the clear coat—you may need to step up your game. After washing and drying, these spots often require a clay bar to physically pull the embedded contaminants out of the paint's pores. It's a deeper level of decontamination.
If you run your hand over the paint and still feel some roughness, learning what clay bar treatment is is the perfect next step toward getting that perfectly smooth finish.
Once every last trace is gone, give the area a final rinse and dry it completely with a clean, plush drying towel. Your paint should now be totally free of bug splatter, looking clean and feeling glass-smooth to the touch.
Shifting from Cleaning to Permanent Protection
Let’s be honest: scrubbing bug guts off your car is a miserable job. It’s a battle you can never really win, especially in the thick of summer. But what if you could change the rules? Instead of constantly reacting to the mess, what if you could stop it from ever becoming a real problem in the first place? That’s the whole idea behind moving from endless cleaning to deploying a permanent, proactive defense for your vehicle's paint.
Imagine a world where bug removal isn't a dreaded, arm-aching chore anymore. Picture it being as simple as a quick, satisfying wipe. This isn't some far-off dream; it's the reality that modern protective coatings make possible.
A Detailer's Story of Frustration and Discovery
I know a professional detailer, Alex, who used to be driven to distraction by bug damage on his clients' high-end cars. He’d spend hours meticulously removing the splatters, only to discover the faint, ghostly outlines of etching already burned into the clear coat. It was a detailer's nightmare. He tried every wax and sealant on the shelf, but nothing was tough enough to stop the acidic assault from bugs baked on by the sun.
His hunt for a real, lasting solution eventually led him to Titan Coatings. He was skeptical, of course, but what really grabbed his attention was our unique elastomer coating technology. This wasn't just another hard candy shell like the traditional ceramic coatings he was used to. This was something entirely different.
The Power of Elasticity and Advanced Tech
The secret is in how our coatings are engineered. We're the first company to bring elastomers to the auto detailing market by combining nano-tube technology with our own proprietary Dark Matter tech. This creates a surface that’s both incredibly hard—think glass—and remarkably flexible.
Here’s a simple way to picture it: a standard, rigid ceramic coating is like laying a thin sheet of glass over your paint. When a bug smacks into it at 70 mph, that force can be enough to cause tiny micro-fractures. Our elastic coatings, on the other hand, have a slight "give." They can absorb that impact energy without cracking or chipping. It’s the difference between something that shatters and something that flexes.
This elasticity is a total game-changer. It means the coating can handle the constant barrage of road debris and bug impacts day in and day out. Even more importantly, it stands up to extreme temperature swings, from freezing winters to scorching summers, without becoming brittle and failing—a common weak point for lesser coatings.
Introducing Titan Alpha Quartz
For Alex, the product that changed everything was our Titan Alpha Quartz. It’s the perfect embodiment of this elastic, hard-as-glass principle. Once applied, it cures into a slick, non-porous barrier over the paint. Now, when a bug hits a car treated with Alpha Quartz, the acidic guts can’t penetrate the surface. They can't etch the clear coat because they can't even get to it.
The residue just sits right on top of the coating. What used to be an aggressive scrubbing job for Alex turned into a simple wipe with a damp microfiber towel. The bugs came right off, leaving a perfect, unblemished surface behind. It saved him hours of labor and gave his clients a level of protection they’d never seen before.
The market for cleaning products is absolutely massive, which tells you just how many people are fighting this battle. The global car cleaning products market is valued at around $25 billion, and you might be surprised to learn that bug and tar removers alone make up a $1 billion slice of that. Pros often resort to harsh chemicals and intense hand-brushing, but that’s just a reactive fix. A coating like Alpha Quartz makes that entire category of products pretty much obsolete for your car.
If you’re tired of the endless cycle of cleaning and stressing about paint damage, it’s time to look into the world of protective car paint coatings and see how this technology can completely change your car care routine. You can browse our full range of products on the Titan Coatings shop page. This is the ultimate upgrade—a true solution, not just another temporary fix.
Keeping Your Windshield Crystal Clear, No Matter the Weather
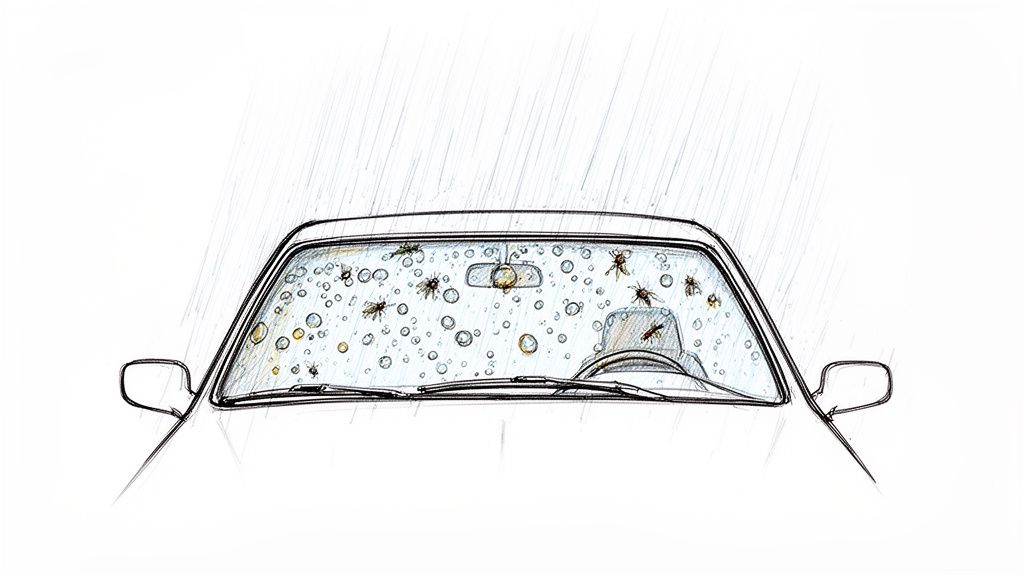
Bug splatters aren't just an issue for your paint. Honestly, when it comes to your windshield, they're a much bigger problem. A single well-placed bug can create a frustrating blind spot. Then, the moment you hit the wipers during a rainstorm, that one spot turns into a greasy, vision-blurring film that spreads across your entire line of sight.
That's not just annoying; it's a real safety hazard. When you can't see clearly, your stress levels shoot up and your reaction time plummets. It turns a normal drive into a nerve-wracking experience. Having a clear view isn't a perk—it’s absolutely essential for safe driving. The key isn’t just about cleaning, but about changing how your glass deals with water and grime in the first place.
The Problem with Bare Glass
Even perfectly clean factory glass has a surface that water loves to cling to. During a storm, rain sheets across the windshield, forcing your wipers to work constantly just to keep up. Now, throw some bug guts into the mix. That sticky, protein-filled mess combines with the water, creating that awful, blurry smear that’s especially dangerous at night against oncoming headlights.
You end up stuck in a constant battle against this film. But what if you could stop it from ever forming? This is exactly where a quality glass coating completely changes the game, transforming your windshield into a defensive barrier against the elements.
Make Rain and Bugs Vanish
Picture this: you're driving through a downpour, but you barely even need to touch your wiper stalk. That's the magic of a super-hydrophobic coating. We engineered our Titan Apex Glass Ceramic Coating for this very purpose. It bonds to your glass, creating an incredibly slick and durable barrier you can't even see.
Once it's applied, water can't cling to the glass anymore. It’s forced into tight, perfectly round beads. As you pick up speed, the airflow alone is enough to send these beads flying right off the windshield, taking dirt and bug residue with them. At highway speeds, the glass essentially cleans itself. It’s this self-cleaning effect that makes driving in the rain feel effortless and stress-free again.
That smeary mess you used to dread becomes a mesmerizing show of water beading and rolling away. It’s not only safer, but it also dramatically reduces the wear and tear on your wiper blades.
Get Lasting Clarity with a Simple Application
One of the best parts about Apex Glass is just how easy it is to apply. You don’t need to be a pro to get a professional-grade result. The entire process is incredibly straightforward.
First, you need to thoroughly clean the glass. Get rid of every trace of oil, dirt, or old cleaner. Then, just apply a small amount of the coating to an applicator and wipe it onto the glass using a back-and-forth, cross-hatch motion to ensure you don’t miss any spots.
You'll let it sit for a moment until it "flashes," which just means you'll see a faint haze appear. The final step is to take a clean microfiber towel and buff off the residue. What's left is a perfectly clear, protected finish.
That’s all it takes. A few minutes of work gives you months of durable protection, so you have a perfect view no matter what the weather—or the bugs—throw your way. You can dive deeper into the science behind windshield ceramic coatings on our site. It's time to stop fighting the smears and start enjoying the drive.
Answering Your Top Bug Removal Questions
Even after you've got the right tools and a solid plan, you're bound to run into a few tricky situations. Let's be honest, bug guts are one of the most stubborn and disgusting messes a car owner has to deal with. Over the years, I've heard just about every question in the book, so let's tackle the most common ones.
Can I Just Grab Windex or Dish Soap?
I get this one all the time, and the answer is always a firm "no." Please, step away from the kitchen sink. Using household cleaners on your car is one of the fastest ways to cause bigger problems. Dish soap is designed to obliterate grease, which means it will strip off every last bit of wax or sealant, leaving your paint totally naked and defenseless.
And Windex? It's even worse. The ammonia in most glass cleaners is brutal on automotive surfaces. It can damage your window tint, dry out and crack rubber seals, and even fade plastic trim over time. Always, always stick to products made for cars. A quality, pH-neutral bug remover is formulated to dissolve bug proteins without dissolving your car's protection.
How Long Do I Really Have Before Bugs Damage My Paint?
Time is not on your side with this one. When it's hot out, the acids in bug splatter can start to permanently etch your clear coat in as little as 24 hours. The sun essentially bakes that corrosive goo right into the finish.
You might get a few extra days in cooler weather, but why risk it? The best defense is a good offense—get them off as soon as you notice them. If you can't do a full wash right away, at least do a quick spot clean with a dedicated bug remover and a soft microfiber towel. It's the best way to stop the damage before it starts.
Does a Coating Like Titan Alpha Quartz Actually Make a Difference?
It's not just a difference; it's a complete game-changer. Think of your car's clear coat like a sponge with microscopic pores. Bug guts sink in, bond, and force you to scrub them out. Our elastic coatings, especially Titan Alpha Quartz, flip that script entirely by creating a slick, non-porous shield over your paint.
Because the surface is so smooth and chemically resistant, bugs and grime can't get a grip. They just sit on top of the coating. Most of the time, you can literally wipe them away with a damp microfiber—no harsh chemicals or scrubbing needed. Its nano-tube technology also gives it a unique flexibility, so it resists cracking from impacts or extreme temperature changes between frozen and hot, a common failure point for more brittle coatings.
What's the Best Way to Clean Bugs Off Plastic Grilles and Trim?
This is where a little finesse comes in handy. The process is similar to paint, but you need to be gentler. For those intricate, textured plastic grilles, spray your bug remover and use a soft-bristled detailing brush to gently work the cleaner into all the nooks and crannies. This will lift the gunk out without scratching the plastic.
On delicate surfaces like chrome or piano-black trim, avoid brushes altogether. Douse the area with your bug remover for lubrication and use a plush microfiber towel with light pressure. The goal is to avoid swirls at all costs. Just like with paint, getting a protective coating on these areas beforehand will make your life a whole lot easier next time.
Preventing bug damage is always better than repairing it. We developed Titan Coatings' Alpha Quartz specifically for this kind of real-world abuse. Its unique elastomer technology is built to provide that ultimate shield, turning a frustrating scrubbing session into a simple wipe-down.
Stop fighting with bug splatter and see what a true professional-grade coating can do. Explore Titan Alpha Quartz on our website and make etched-in bug guts a thing of the past.
0 Comments