The process of erasing swirl marks is what we in the detailing world call paint correction. It’s all about using specialized compounds and polishes to ever-so-gently level out the clear coat, effectively smoothing away those fine scratches. You can tackle very minor swirls by hand, but for a truly deep, uniform shine, a machine polisher is your best friend.
The Frustration of Swirl Marks and the Quest for a Flawless Finish
There’s a special kind of gut-punch every car owner feels. You’ve just finished washing your car, it looks amazing in the shade, but then you pull it out into the direct sun. Instead of that deep, liquid shine you were picturing, you’re met with a distracting spiderweb of fine, circular scratches. That, my friend, is the dreaded swirl mark—the arch-nemesis of a perfect paint job.
It’s an all-too-common story. You spend a weekend carefully washing and pampering your ride, only to find you’ve accidentally inflicted the very damage you were trying to avoid. These marks are just thousands of tiny micro-scratches in your car’s clear coat, and they’re usually caused by the simplest missteps.
So, What’s Really Behind These Scratches?
Almost every time, these imperfections are a direct result of improper washing and drying habits. Think about it: every time you drag a gritty wash mitt or a low-quality towel across your paint, you’re creating the potential for these tiny scratches to form.
Here are the usual suspects:
- Those drive-thru automatic car washes with their giant, spinning, often-dirty brushes.
- Wiping down a dusty car with a dry towel (a classic mistake).
- Using just one wash bucket, which means you’re just rubbing trapped dirt and grit back into the paint.
- Drying with old, rough bath towels instead of clean, plush microfiber towels.
This is a massive issue for car owners everywhere, and it has created huge demand for real solutions. In fact, the global market for car scratch removers is expected to skyrocket to $3.25 billion by 2025. That number alone tells you how many people are desperately looking for a way to restore their car’s finish. You can dig deeper into these automotive care market trends and see the projections for yourself.
But don’t get discouraged. Those frustrating swirl marks are not a life sentence for your car’s paint. With the right approach and the right tools, you can absolutely learn how to remove swirl marks from your car and, more importantly, learn how to keep them from coming back. The path to a mirror-like finish starts right here, and this guide is your map to getting that jaw-dropping, better-than-new shine you’ve been craving.
Getting a Read on the Damage and Gearing Up
Before you even think about picking up a polisher, you’ve got to play detective. Seriously. The single biggest mistake I see people make is grabbing the most aggressive compound they can find and going to town without understanding the problem. You can’t fix what you haven’t properly diagnosed.
The best way to see what you’re really up against is with intense, direct light. Forget trying to spot swirls in your garage with the overhead light on. Pull the car out into the sun or, even better, grab a high-quality LED inspection light. Scan it across the panels from multiple angles—you’ll be amazed (and probably a little horrified) at what shows up.
Sizing Up the Enemy: Swirls vs. Scratches
As you inspect the paint, you’re looking for a few things. Swirl marks look like a fine, spiderweb-like pattern of scratches, and they live in the very top layer of your car’s clear coat. They’re the classic sign of improper washing and drying techniques.
Then you have deeper scratches. A good rule of thumb is the fingernail test: if you can gently run your fingernail across the scratch and it catches, you’re likely dealing with something too deep for a simple polish. Those might require more intensive work, but the swirls are your main target for now.
Create a mental map. Is the hood worse than the doors? Are the swirls light and consistent, or are some areas a total mess? This quick assessment will guide every decision you make next.
Building Your Swirl-Busting Toolkit
With a clear picture of the job, it’s time to gather your supplies. Nothing is more frustrating than having to stop mid-process because you forgot something. A successful paint correction is all about preparation. You can find a complete line of professional-grade products on the Titan Coatings shop page.
Here’s a rundown of what you absolutely need:
- Prep & Decon Gear: Start with the basics—two wash buckets (one for soap, one for rinsing), a good pH-neutral car shampoo, and a stack of clean microfiber wash mitts. The non-negotiable item here is a clay bar. You must remove the embedded grit and grime from the paint before you start polishing. If you’re unfamiliar, our guide on what clay bar treatment is and why it’s crucial breaks it down perfectly.
- The Polishing Setup: Now for the main event. Are you going by hand or machine? Hand polishing can work for very light swirls, but for serious results, a dual-action (DA) polisher is the gold standard. It’s safer and far more effective than trying to do it all by hand.
- Compounds, Polishes, and Pads: You’ll need at least two liquids: a compound to do the heavy lifting (the “cutting” stage) and a polish to refine the finish and bring out that deep gloss. These get paired with foam pads—a firmer cutting pad for the compound and a softer polishing or finishing pad for the polish.
- Finishing Touches: Grab a roll of painter’s tape to mask off plastic trim, rubber seals, and panel edges. You’ll also need a stockpile of clean, plush microfiber towels and a spray bottle with an isopropyl alcohol (IPA) and water solution (usually a 15-25% mix) to wipe down panels and inspect your work.
Once your arsenal is assembled, you’re ready to move from diagnosis to action. This is where the real transformation begins.
Erasing Swirl Marks: The Four-Stage Method to a Flawless Finish
This is where the real transformation happens. Getting rid of those frustrating swirl marks isn’t about some miracle product; it’s about a methodical, disciplined process. I’m going to walk you through the four distinct stages that take your paint from a spiderweb of scratches to a flawless, mirror-like surface.
Stick with this process, and you’ll achieve results you never thought were possible in your own garage.
And you’re not alone. The desire for a perfect finish has created a massive community of DIY detailers. That enthusiasm is driving huge growth in the car polisher market, which was valued at a whopping $338 million in 2024 and is expected to climb to $538 million by 2032. It just goes to show how many people are successfully taking paint correction into their own hands. You can dig into these automotive tool market insights to see just how powerful the enthusiast community has become.
Stage 1: Decontamination
Let’s get one thing straight: you wouldn’t paint a dirty wall, so you absolutely cannot polish contaminated paint. This first stage is non-negotiable if you want to avoid making things worse.
Even after a good wash, your car’s paint is covered in bonded contaminants—tiny, sharp particles of industrial fallout, rail dust, and tree sap that a wash mitt simply can’t remove. If you skip this step and start polishing, you’re just grinding that grit right into your clear coat and creating a ton of new scratches.
The only way to do this right is with a clay bar treatment after washing. Grab a quality clay bar and some lubricant, and gently glide it across every panel. You’ll literally feel—and hear—the surface go from rough and gritty to perfectly smooth. The clay pulls every last embedded particle out, leaving you with a truly clean slate for polishing.
Stage 2: The Cut (Compounding)
With a perfectly clean surface, it’s time to go after the swirls. This is the “cutting” stage, where we get a bit more aggressive. You’ll need a compound, which is a more abrasive liquid, paired with a firm foam cutting pad on your polisher.
The goal here isn’t to “fill” the swirls. Instead, we’re precisely leveling the clear coat.
Picture your clear coat as a landscape full of tiny valleys—those are the swirls. The compound’s abrasives gently remove a microscopic layer from the surrounding “peaks,” bringing the entire surface down to the bottom of the deepest scratch. This erases the defects, but it will leave behind its own fine haze or micro-marring. Don’t panic; that’s completely normal for this stage.
Pro Tip: When you’re using a dual-action polisher, work in small, 2×2 foot sections. Put 3-4 pea-sized drops of compound on your pad and use slow, overlapping passes with light to moderate pressure. The machine is designed to do the work, so don’t force it.
Stage 3: The Polish (Refining)
The compounding stage did all the heavy lifting, but this polishing stage is where the magic happens. It’s where you bring out the deep gloss and clarity. After compounding, the paint will look a thousand times better, but it will lack that deep, wet shine we’re all after.
Now, you’ll switch to a softer foam polishing pad and a much finer abrasive liquid—the polish. This step refines the surface, clearing away the haze left from the compound and burnishing the clear coat to a brilliant, high-gloss shine. The technique is pretty much the same as compounding, but you’ll generally use less pressure and a slightly faster arm speed. This is the step that separates a good detail from a spectacular one.
Stage 4: The Moment of Truth (Panel Wipe and Inspection)
Alright, this is your final check. The oils in compounds and polishes are tricky; they can temporarily fill in fine scratches, making you think the surface is perfect when it’s not. To see your true results, you have to strip those oils away.
Get a spray bottle and mix a solution of isopropyl alcohol (IPA) and distilled water—a 15-25% IPA concentration is perfect. Lightly mist a clean microfiber towel (not the panel directly) and gently wipe down the area you just polished.
This “panel wipe” removes all the residue, revealing the true condition of the paint. If you still see some faint swirls, you might need to repeat a stage. If it looks flawless, you’re ready to lock in that shine with protection. For any deeper imperfections that might still be there, our detailed guide on how to handle different types of car scratches can help you out.
From Corrected to Protected: The Ultimate Defensive Strategy
Let me tell you a story I’ve seen play out a hundred times. A guy named Alex spends his entire weekend meticulously polishing his black car, getting the paint to look like a flawless, liquid mirror. He’s incredibly proud. But just a few weeks later, he’s washing it and sees them—faint, new swirl marks already creeping back in. His heart just sinks. This is a frustratingly common cycle, and it highlights a critical truth: removing swirls is only half the battle.
After you’ve poured all that time and elbow grease into paint correction, the surface is pristine but also completely vulnerable. You’ve stripped away any old waxes or sealants, leaving the clear coat exposed to the elements and, more importantly, to the very washing and drying habits that caused the swirls in the first place. This is where protection becomes everything.
The Superior Defense of Elastomer Coatings
You need a shield that’s tougher and smarter than a traditional wax or sealant. This is where Titan Coatings brings a real game-changer to paint protection. As the first company to introduce Elastomer coatings to the market, we utilize proprietary nano-tube structures and Dark Matter tech to create a truly revolutionary defense for your paint.
It’s all about a systematic approach.
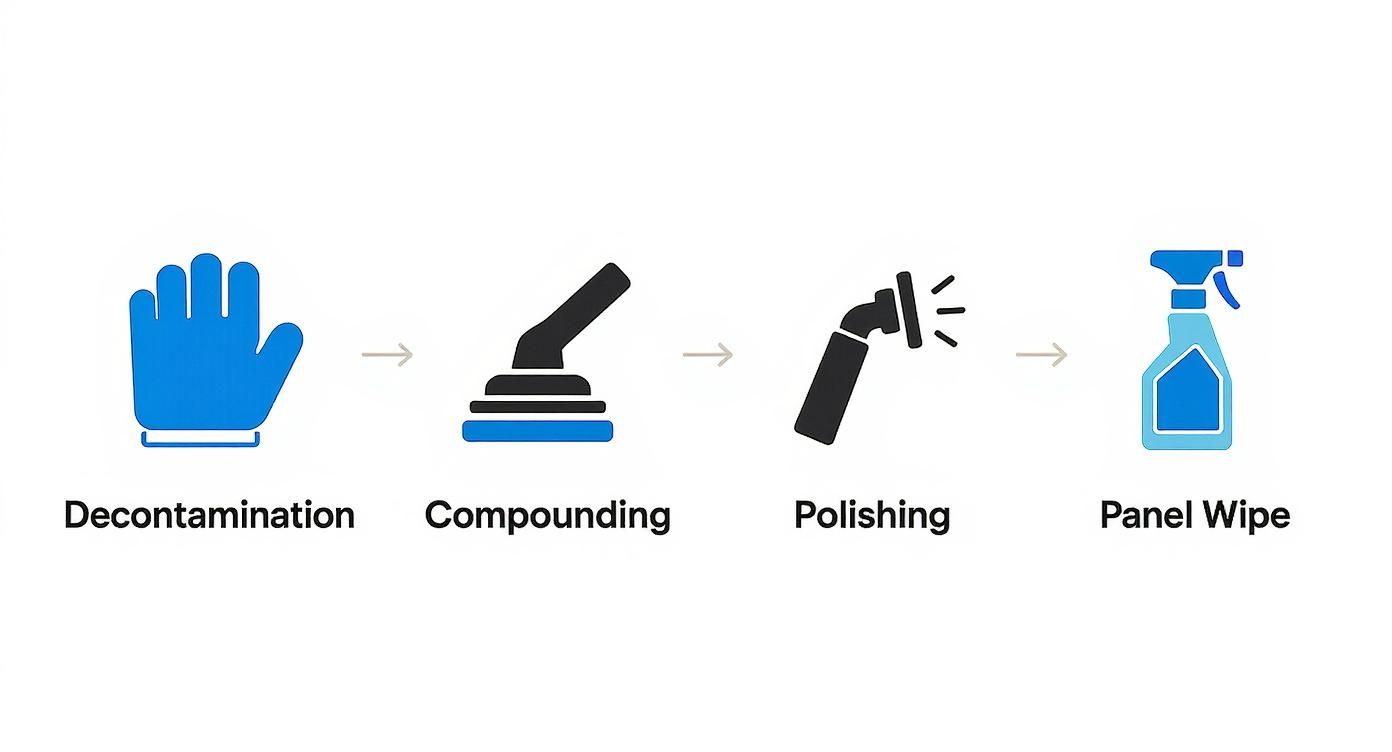
This visual breaks down the journey from a contaminated, swirled surface to one that is perfectly clean and refined—primed and ready for that final, crucial step of protection.
Why Flexibility Equals Unbeatable Durability
For a freshly corrected car like Alex’s, the ideal defensive layer is Titan Coatings Vulcan TX155. What sets Vulcan TX155 and our other elastomer coatings apart is something old-school ceramics just can’t match: flexibility. While traditional ceramic coatings cure into a rigid, glass-like shell, our elastic coatings are just as hard but remain pliable.
This elasticity is the secret to longevity. It allows the coating to expand and contract with the metal panels during intense temperature swings—from scorching summer heat to freezing winter nights. Rigid coatings can become brittle and develop micro-fractures under this stress, but Titan’s flexible shield remains intact, providing uninterrupted protection.
This durable flexibility creates a resilient barrier that actively resists the micro-scratches that turn into swirl marks. It’s a long-term solution that ensures your hard work lasts for years, not just weeks. You can see how our products stack up against the competition on our coating comparison page.
You can dive deeper into modern protection options in our guide on Paint Protection Film vs. Ceramic Coating. By choosing the right protection, you turn a weekend of hard work into a lasting investment in your car’s beauty, ending the vicious cycle of correction and re-swirling once and for all.
Mastering the Art of Swirl-Free Maintenance
You’ve poured hours into getting that perfect, mirror-like finish. The last thing you want is to undo all that hard work with a few careless washes. The truth is, achieving flawless paint is one thing; keeping it that way is another skill entirely. But it’s not complicated. It’s about shifting your mindset and treating your weekly wash as the most important step in protecting your investment.
The good news is that keeping a car pristine is easier than ever. The demand for better swirl removers and maintenance gear has exploded, pushing the market forward. We’re seeing everything from sophisticated dual-action polishing kits to innovative waterless wash formulas. To get a sense of where things are headed, you can check out some of the latest innovations in the car care product market and see how technology is simplifying swirl-free care.
The Two-Bucket Wash Method
This is the cornerstone of safe washing. It’s a dead-simple, incredibly effective technique that stops you from dragging the dirt you just removed right back across your paint.
- Bucket One (Wash Solution): This one gets your pH-neutral car shampoo and water.
- Bucket Two (Rinse): This bucket is just for clean, plain water.
- The Process: Wash one panel at a time. Before you even think about getting more soap, dunk your dirty wash mitt into the rinse bucket. Swish it around vigorously to knock out all the trapped grit and grime. Then you can dip it back into the soapy water and move to the next panel. This one tiny habit makes a massive difference.
Upgrading Your Tools and Techniques
The gear you use is just as critical as your method. It’s time to throw out those old sponges and raggedy bath towels. Seriously. They are two of the biggest offenders when it comes to causing micro-scratches.
Your paint is most vulnerable when it’s being touched. That’s why high-quality microfiber towels are non-negotiable. Their long, plush fibers are specifically designed to lift dirt particles up and away from the surface, which dramatically cuts down the risk of scratching. The same logic applies to your wash mitt.
Drying is the final hurdle where so many people stumble. Stop rubbing your car dry like you’re scrubbing a floor. A far better way is to use a leaf blower or a dedicated car dryer to blast the majority of the water off without ever touching the paint. For what’s left, gently blot the surface with a large, ultra-plush microfiber drying towel. No rubbing, just patting.
Maintaining Your Protected Finish
If you went the extra mile and applied a ceramic coating, your maintenance gets a whole lot easier, but you still need to use the right stuff. Harsh, high-alkaline soaps will slowly eat away at your coating, diminishing its protective qualities.
Stick with a quality, pH-neutral shampoo made for coated vehicles. A product like our specially formulated Ceramic Car Wash is designed to clean powerfully without stripping away that precious protective layer. By adopting these professional habits, you’re not just washing your car—you’re preserving that swirl-free shine for the long haul.
Your Questions About Swirl Mark Removal Answered
Even with the best guide, you’re bound to have questions once you get your hands on the car. Paint correction is one of those things where theory meets reality fast. Let’s walk through some of the most common questions I hear to get you over those hurdles and on your way to a flawless finish.
Do I Need a Machine or Can I Do This by Hand?
Look, you can technically remove very light swirls by hand. I’ve seen it done. But I’ll be honest with you—it’s an absolute killer workout, and getting a consistent, even finish across an entire vehicle is next to impossible.
For anything beyond the faintest, most superficial haze, you need a machine. A good dual-action (DA) polisher is the only way to go. It provides the consistent speed, pressure, and pad rotation that your arm just can’t match. This consistency is what allows the abrasives in your products to break down properly and do their job. It’s not just about saving you hours of sweat; it’s about achieving a professional-level result.
What Is the Difference Between a Compound and a Polish?
The easiest way to think about this is like liquid sandpaper. They exist on a spectrum from aggressive to fine.
- Compound: This is your heavy hitter. It’s packed with more aggressive abrasives designed to “cut” through the clear coat and level out more significant defects like moderate swirl marks and light scratches. It does the tough work but will often leave its own fine haze behind.
- Polish: This is your finishing touch. It uses much finer abrasives to refine the surface after compounding. Its job is to remove that haze, boost clarity, and bring out that deep, wet-looking gloss we’re all after. You almost always follow a compound with a polish.
How Do I Know If Swirls Are Too Deep to Fix?
Here’s a trick that never fails: the fingernail test.
Gently slide your fingernail across a scratch. If your nail snags or gets caught in the groove, that’s bad news. It means the damage has likely gone past the clear coat and into the paint itself.
Swirl marks are almost always shallow defects living in that top layer of clear coat, which is why we can safely polish them away. But a scratch that catches your nail is too deep to be polished out. Trying to remove it would mean burning through your entire clear coat in that spot, causing permanent damage. Those kinds of defects need professional attention or a proper touch-up job.
Will a Ceramic Coating Hide My Swirl Marks?
This is a huge misconception that needs to be cleared up. A quality ceramic coating is amazing, but it’s not a filler product. It will not hide or fill in swirl marks.
In reality, it does the exact opposite. Because a coating adds such a high level of gloss and reflectivity, it will actually magnify any underlying imperfections. You’ll be locking those ugly swirls under a beautiful, durable layer of protection, making them even more noticeable.
Paint correction must come first. You need to create a flawless canvas before you apply any long-term protection. This ensures the coating bonds correctly and delivers that stunning, mirror-like finish you expect. If you’re weighing the pros and cons, our guide exploring if ceramic coatings are truly worth the investment is a great resource.
Once you’ve put in the hard work to perfect your paint, protecting it is non-negotiable. Don’t let all that effort go to waste. At Titan Coatings, our advanced elastomer coatings are designed to provide a tough, flexible shield that goes beyond traditional options, offering a unique combination of glass-like hardness and resilience against future damage.
0 Comments