If you’ve ever meticulously washed a car only to feel a gritty, rough texture on the paint, you’ve encountered bonded contaminants. These are the stubborn particles that a standard wash just can’t touch. This is where a clay bar treatment becomes an indispensable tool in a detailer’s arsenal, transforming a rough surface into one that’s as smooth as glass.
This process uses an engineered resin compound—the clay bar—to physically lift and pull embedded contaminants off the vehicle’s clear coat. It’s the secret to achieving that perfectly clean slate needed for any serious paint correction, wax, or coating application.
Unlocking a Flawless Finish
Think of it like a deep-cleansing facial for your car’s paintwork. Those microscopic particles of industrial fallout, tree sap, and rail dust stubbornly cling to the surface, dulling the finish and preventing waxes or sealants from bonding correctly.
A clay bar, combined with a quality lubricant, glides over the paint. Its unique tacky consistency gently but firmly grabs onto anything protruding from the surface, pulling it away without scratching. The result is a level of clean that you can both see and feel.
What Contaminants Does a Clay Bar Remove?
This treatment is incredibly effective against a whole host of stubborn impurities that ruin a vehicle’s finish. Proper decontamination is the only way to ensure high-performance products, like Titan Coatings, can deliver the long-lasting, brilliant finish your clients expect.
A clay bar targets and removes:
- Industrial Fallout: Tiny airborne metal particles that embed in the paint and can begin to rust.
- Tree Sap and Tar: Sticky, stubborn residues that regular washing leaves behind.
- Brake Dust: Fine iron particles that settle on paint and can cause pitting if left untreated.
- Paint Overspray: Mist from nearby painting projects that dries onto the car’s clear coat.
Done correctly, a clay bar can remove up to 90-95% of bonded surface contaminants, making the paint feel incredibly slick and look noticeably brighter. If you’re looking to dive deeper, you can find great resources on the fundamentals of paint decontamination from industry veterans.
Clay Bar Treatment At a Glance
To quickly get a handle on what a clay bar is for, this table breaks down its core function and what it’s not designed to do.
| Capability | What It Achieves | What It Does NOT Do |
|---|---|---|
| Decontamination | Lifts and removes embedded particles (fallout, sap, overspray) from the surface. | Will not remove or “fill in” scratches, swirl marks, or water spots. |
| Surface Prep | Creates a perfectly smooth, clean foundation for polishing, waxing, or coating. | Is not a substitute for polishing; it doesn’t correct paint defects. |
| Adhesion | Ensures sealants and coatings can bond directly and securely to the clear coat. | Does not add any protection, gloss, or shine to the paint itself. |
Essentially, its role is to purify the surface, not to perfect it.
Clarifying Its Purpose and Limitations
It’s absolutely critical to understand that a clay bar’s job begins and ends with decontamination.
A clay bar treatment is not a solution for fixing scratches, swirl marks, or oxidation. It is purely a preparatory step designed to create an ultra-clean foundation. True paint correction, such as polishing, must be performed after claying to address any surface imperfections.
By stripping away that layer of embedded grime, you’re creating the ideal canvas for what comes next. For professional detailers, this is a non-negotiable step before applying an advanced ceramic coating. Products like our Titan Coatings with proprietary Dark Matter Technology® require a perfectly pure surface to achieve a true molecular bond, which is the key to unlocking the extreme durability and gloss your clients expect.
How a Clay Bar Makes Paint Feel Like Glass Again
At first glance, a clay bar doesn’t look like much. But don’t let its simple appearance fool you. This isn’t the kind of clay you find in a garden; it’s a specially engineered resin compound that’s both pliable and tacky, designed to do one very specific job on your vehicle’s paint.
Think of your car’s clear coat as a perfectly smooth pane of glass. Over time, it gets bombarded by tiny particles—brake dust, rail dust from train tracks, and industrial fallout—that embed themselves into the surface. They’re like microscopic splinters. A regular wash will get the surface dirt off, but those bonded contaminants are left behind, creating that rough, gritty feeling you can detect with your fingertips.
This is where the clay bar comes in. It acts like a magnet for those stubborn impurities. As you glide the clay across a well-lubricated panel, its tacky surface grabs onto the tops of these embedded particles. The gentle forward motion you use then simply plucks them out of the paint, trapping them safely within the clay.
It’s All About Abrasive Action (The Right Way)
The real magic here is in the clay’s controlled abrasive action. The clay itself is too soft to scratch your hard clear coat. The problem is, the contaminants it’s pulling out are abrasive. This is why your technique is everything.
If you tried to use clay on a dry surface, you’d just be dragging those sharp little particles across the paint, causing a mess of fine scratches and marring. The lubricant is what makes it all work, creating a slick, frictionless barrier between the clay and the paint. This thin layer lets the clay glide effortlessly over the panel, ensuring it only makes contact with the contaminants poking up from the surface.
The lubricant is the unsung hero of any clay bar treatment. It’s what prevents marring by making sure the clay never touches dry paint, allowing it to safely lift contaminants instead of dragging them.
This is exactly why pros always work in small, manageable sections, constantly keeping the surface wet. The goal is to lift the grime away, not grind it into the finish.
From a Detailer’s Secret to an Industry Standard
This whole process isn’t some new fad. Clay bars were a massive leap forward in automotive detailing, dramatically improving how a car looked and how long its finish lasted. It quickly became the essential first step before any polishing could begin.
By the early 2000s, this method had gone mainstream. Major players like Ford, General Motors, Toyota, Lexus, Hyundai, and Nissan all wrote clay bar treatments into their official detailing standards for dealerships. That industry-wide seal of approval cemented its role as a must-do step for anyone serious about getting a truly clean surface. You can dive deeper into how this simple tool revolutionized the detailing industry.
Creating the Perfect Canvas for Protection
At the end of the day, a clay bar treatment is all about prepping the paint for what comes next. By stripping away that layer of embedded grime, you’re creating a perfectly smooth, pure canvas. This isn’t just a good idea—it’s a non-negotiable step before you even think about applying long-term paint protection.
Why is this step so critical before applying a coating?
- It Guarantees a Strong Bond: High-end products, like our Titan Coatings, are designed to form a powerful molecular bond directly with the clear coat. Contaminants get in the way, blocking that bond from ever forming properly.
- It Ensures a Flawless Look: If you apply a ceramic coating over a contaminated surface, you’re just sealing all that grit underneath. The result is a bumpy, imperfect finish that looks and feels terrible.
- It Maximizes Durability: A weak bond means a weak coating. The protection won’t last as long, and you’ll lose the gloss and water-beading properties your clients are paying for.
Running a thorough clay bar treatment is how you ensure our exclusive coatings can grab hold of the paint with maximum adhesion. This meticulous prep work is what unlocks their full potential, delivering the incredible durability and shine that defines a professional-grade result.
How to Do a Professional Clay Bar Treatment
Getting a perfectly smooth, decontaminated surface isn’t about brute force. It’s all about a careful, methodical technique. A professional clay bar treatment is a systematic process that safely lifts those stubborn, bonded contaminants, giving you a flawless canvas for polishing or coating. Let’s break down the entire procedure, step-by-step, so you can get pristine, mar-free results every single time.
First things first: you have to prep the vehicle properly. This is probably the most critical part of the whole process. You absolutely must start with a squeaky-clean and dry surface. Any loose dirt or grit left on the paint is a recipe for disaster, as the clay bar will just drag those particles across the finish and create scratches.
A thorough wash is non-negotiable. For the best outcome, stick with a high-quality, pH-neutral soap that won’t strip any existing waxes or sealants. To get a better handle on the right products for this initial wash, check out our guide on the best ceramic car wash methods. Once it’s washed, rinse the vehicle completely and dry it off with clean, plush microfiber towels.
Preparing Your Tools and Workspace
With the car clean, it’s time to get your gear ready. Don’t even think about trying to clay the entire car in one shot. Instead, break each panel—the hood, a door, the trunk lid—into smaller, more manageable sections. A 2×2 foot area is a good rule of thumb.
Working in small zones like this is key. It ensures you can keep the surface slick with lubricant and focus on getting every last contaminant out before the lube has a chance to dry up. You’ll also need to pick the right grade of clay for the job.
- Fine Grade Clay: Perfect for cars with light contamination or for routine upkeep. It’s the safest bet if you’re new to this and is far less likely to cause any micro-marring.
- Medium Grade Clay: This is your all-rounder, a solid choice for most daily drivers that have a moderate amount of bonded grime. It strikes a great balance between cleaning power and gentleness.
- Heavy Grade Clay: Save this one for the tough jobs. We’re talking cars with severe contamination like heavy industrial fallout or paint overspray. This grade is much more aggressive and will almost always require a light polish afterward to clean up the finish.
Once you’ve chosen your clay, break off a fresh piece—about a quarter of the bar is plenty. Knead it and flatten it in your palms until it’s a soft, pliable patty roughly the size of your palm. This warms it up and gets it ready to go.
The Claying Process, Step by Step
Alright, now for the main event. If you remember one thing, let it be this: lubrication, lubrication, lubrication. A dry surface is the number one reason people end up with marring from a clay bar.
- Get Lubricant on the Surface: Spray your clay lube generously over that first 2×2 foot section. You want the surface to be visibly wet, creating a slick cushion for the clay to glide on.
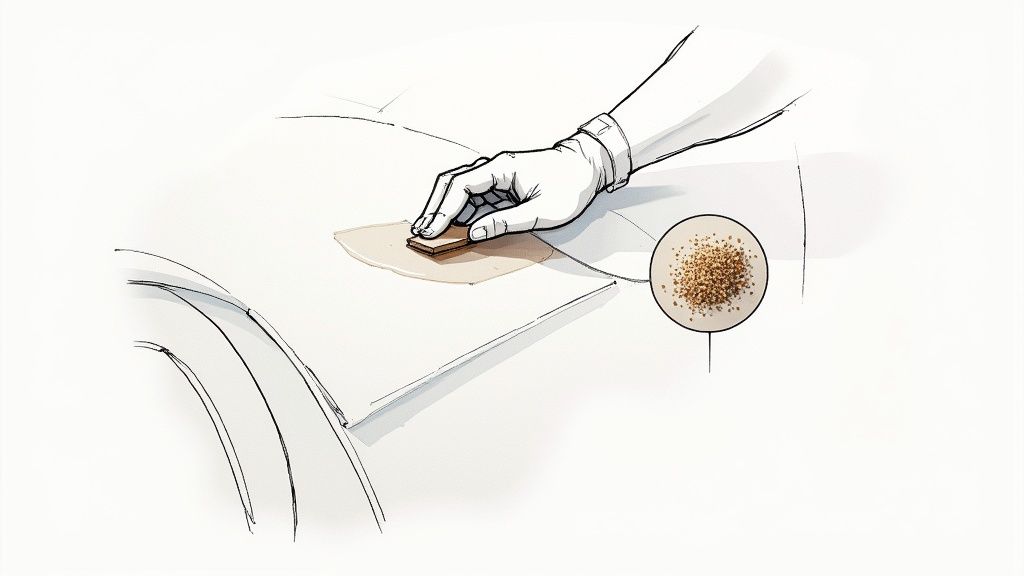
- Use Gentle, Straight-Line Motions: Place the flattened clay patty on the lubricated area. Using just your fingertips for pressure, gently glide the clay back and forth in straight lines. Steer clear of circular motions—they can create nasty swirl marks if you pick up any larger debris.
- Feel for the Grime: As you work, you’ll actually feel and hear the clay grabbing onto contaminants. It will feel a little rough or gritty at first. Keep gliding the clay over the section until it moves silently and smoothly. That’s how you know the surface is clean.
This infographic shows exactly what’s happening to the paint surface during this process.
Seeing the paint go from contaminated to perfectly clean really drives home why proper lubrication and a gentle touch are so important for that glass-like finish.
Inspecting and Finishing the Job
What separates a pro from an amateur is constant inspection—of both your tool and your work. After each small section, take a look at the surface of the clay. You’ll see tiny, dark specks of all the grime it just pulled off the paint.
Once the clay looks dirty, fold it in on itself and knead it until you have a fresh, clean surface. This is crucial to avoid rubbing the contaminants you just removed right back onto the paintwork.
When the clay gets so full of dirt that you can’t find a clean side anymore, toss it. It’s done. Start with a fresh piece. And whatever you do, never use a piece of clay that has been dropped on the ground. It’s now loaded with abrasive particles that will absolutely shred your car’s paint.
After you finish a panel, wipe the lubricant residue off with a fresh microfiber towel. Now for the moment of truth: the “plastic bag test.” Put your hand inside a thin plastic sandwich bag and lightly run your fingertips over the paint. The plastic makes your sense of touch way more sensitive, and you’ll immediately feel any tiny bumps that are left. If it feels as smooth as glass, you’re good to move on. This final check is your guarantee that you have a truly pristine surface, ready for whatever detailing step comes next.
Unlocking Maximum Coating Performance
When it comes to high-end paint protection, a perfectly decontaminated surface isn’t just a friendly suggestion—it’s the absolute baseline. Think of it this way: the meticulous work you put in with a clay bar is what separates a decent job from a jaw-dropping one. It is the critical step that allows your clients to experience the full benefits of Titan Coatings’ advanced protective technologies.
Our coatings are built with proprietary technologies that don’t just sit on top of the paint; they form a powerful molecular bond directly with the vehicle’s clear coat. This creates a truly integrated shield. But if bonded contaminants are in the way, they act as a physical barrier, preventing that all-important connection from ever happening.
The Science of Adhesion and Why It Matters
Ever tried to put a screen protector on a dusty phone? No matter how great the protector is, those tiny dust specs create air bubbles and prevent it from sticking properly. The result is a mess. It’s the exact same principle when applying a professional-grade coating to a car.
Those microscopic bits of industrial fallout, brake dust, and tree sap that survive a wash are called bonded contaminants. They effectively create thousands of tiny “high spots” on the surface. When you apply a coating over them, it can’t make flat, uniform contact with the clear coat. This directly leads to a weaker, less durable protective layer with poor water beading and a flawed finish.
A proper clay bar treatment is the only way to physically shear off these barriers. By doing this, you guarantee our coatings can achieve maximum adhesion across 100% of the surface area, which is how you deliver the insane gloss, longevity, and protection your clients are paying for.
Maximizing Titan Coatings Technology
The exclusive formulas in Titan Coatings, like our HyperQuartz® and Dark Matter Technology®, are designed for one thing: peak performance. But that performance is completely dependent on the purity of the surface they’re applied to. A clay bar treatment is what truly unlocks their potential, empowering you to deliver unparalleled results to your clients.
A pristine, decontaminated surface allows for a complete covalent bond between the coating and the clear coat. This is the mechanism that delivers the extreme durability, chemical resistance, and self-cleaning properties that define a professional-grade coating application.
If you skip this step, you’re hamstringing the coating from the start. The finish won’t last as long, it won’t bead water as well, and it won’t deliver the level of protection we promise. For any serious detailer, cutting this corner undermines the value and integrity of your work.
From Good to Flawless: The Role of Prep Work
The difference between an average coating job and an exceptional one is always in the prep. Once a surface has been properly clayed, applying a ceramic coating is a dream. The product glides on more evenly, and the final result is that flawless, glass-like finish that’s uniform in both looks and protection. To get a better handle on how these layers work, our guide on what ceramic coatings are offers a deeper dive into the science behind the shine.
Proper surface preparation leads to these critical outcomes for your client’s vehicle:
- Enhanced Gloss and Clarity: Removing embedded grime lets the true depth and color of the paint shine through, which the coating then amplifies.
- Superior Hydrophobic Performance: A perfectly smooth surface allows the coating to form an unbroken layer of high surface tension. This is what creates those dramatic water beads.
- Guaranteed Durability: The lifespan of a coating comes from its molecular bond. A contaminated surface means a weak bond, which leads to premature failure.
Ultimately, any professional discussion about clay bar treatment has to focus on the end game. This process isn’t just about cleaning paint; it’s about enabling advanced protective technology to do its job. It’s the essential first move in delivering a finish that stands the test of time and leaves clients speechless.
Comparing Decontamination Methods
When it comes to getting a vehicle’s paint perfectly smooth, the classic clay bar has long been the hero. But today, we have more than one way to get the job done. Understanding the real-world pros and cons of clay bars, clay mitts, and chemical removers is the key to picking the right tool for the vehicle in front of you.
Ultimately, our goal is always the same: create a perfectly clean surface so that advanced products like Titan Coatings can bond properly and perform at their peak. It’s not just about removing the gunk; it’s about doing it safely and efficiently. Each method has its place, whether you’re doing a quick maintenance wash or a full-blown paint correction and coating.
The Classic Clay Bar: Precision and Feel
There’s a reason the traditional clay bar is still a staple in every serious detailer’s arsenal: you can’t beat the feedback. As you glide that bar over a lubricated panel, you can literally feel the gritty contaminants being pulled from the paint. That direct connection tells you exactly when a section is perfectly clean.
This kind of precision is absolutely critical when you’re prepping a car for a professional coating. It’s your guarantee that no stray particle is left behind to interfere with the adhesion of our HyperQuartz® technology, ensuring your client receives the full benefit of its protective power.
- Pros: Delivers unmatched tactile feedback, allowing you to meticulously decontaminate specific trouble spots.
- Cons: It’s a slower, more deliberate process and requires good technique to avoid marring the paint.
- Best For: Essential pre-coating preparation where a flawlessly clean surface is non-negotiable.
The Efficiency of Clay Mitts and Towels
For detailers who need to balance perfection with the clock, clay mitts and towels are a fantastic alternative. These tools have a polymer clay face on a mitt or towel, letting you decontaminate large panels quickly as part of the wash process. They cover a lot of ground fast and are reusable, which makes them a cost-effective choice for regular maintenance jobs.
But that speed comes with a trade-off. You lose that direct tactile feedback, making it tougher to know for sure if you’ve removed everything. They can also trap larger bits of debris, which can easily cause scratches if you aren’t rinsing the mitt constantly.
While great for routine upkeep, clay mitts and towels just don’t offer the surgical precision needed for high-level coating prep. Think of them as the right tool for maintaining a clean car, not for restoring a heavily contaminated one.
The Targeted Power of Chemical Decontamination
Chemicals bring a totally different strategy to the table, dissolving specific contaminants without you ever having to touch the paint. Iron removers, for example, are engineered to react with and dissolve ferrous metal particles from industrial fallout and brake dust. You can actually see them working as they “bleed” a deep purple color. Tar removers do the same for stubborn, sticky road tar and adhesives.
This chemical approach is brilliant for safely tackling widespread, specific issues. It’s especially effective on the mineral deposits left by hard water, which are notorious for interfering with coating performance. To get a better handle on that particular problem, check out our expert guide on using an auto hard water spot remover.
To help you decide which tool to grab, here’s a quick breakdown of how these methods stack up against each other.
Paint Decontamination Method Comparison
| Method | Pros | Cons | Best For |
|---|---|---|---|
| Traditional Clay Bar | Unmatched tactile feedback for precision work. Ensures every last contaminant is gone. | Can be slow and methodical. Dropping it on the ground means it’s done for. | The final, critical step before applying a ceramic coating or paint protection film. |
| Clay Mitt/Towel | Fast and efficient for covering large areas. Reusable and cost-effective. | Lacks the “feel” of a bar. Higher risk of marring if not rinsed obsessively. | Routine maintenance washes on vehicles that are already in good condition. |
| Chemical Removers | Completely touchless and safe. Extremely effective at dissolving specific contaminants like iron or tar. | Only works on its intended target; won’t remove things like tree sap or paint overspray. | The first step in a deep decontamination to safely remove heavy iron or tar buildup. |
Each method has its moment to shine, but the real secret to a perfect finish is knowing how to combine them.
Creating the Ultimate Hybrid Approach
For truly professional results—especially before applying a coating from the Titan lineup—one method is rarely enough. The most thorough and effective process involves a smart combination of chemical and physical decontamination.
A great strategy is to start with a chemical spray-down. An iron remover will dissolve the worst of the metallic fallout before you even touch the paint. This simple first step does a ton of the heavy lifting, meaning your clay bar has much less work to do. Less work for the clay means a much lower risk of causing any marring.
After the chemical wash, you can follow up with a fine-grade clay bar to gently lift any remaining organic grit like tree sap. This one-two punch leaves the clear coat perfectly pure—a blank canvas ready for our Dark Matter Technology® to form an unbreakable bond and deliver that legendary protection your customers deserve.
Questions We Hear All The Time From Detailers
Even if you’ve been detailing for years, there are a few questions about claying that always seem to pop up. Nailing down the answers is key to perfecting your process, managing what your clients expect, and making sure every car you touch is flawlessly prepped for a high-performance coating. Let’s clear up some of the most common ones.
Can a Clay Bar Scratch or Mar a Client’s Paint?
Yes, it definitely can, but only if you use it the wrong way. The clay itself is softer than your clear coat, but the junk it’s pulling out is anything but. When you see scratches or micro-marring, it’s almost always from one of three classic mistakes that involve dragging those sharp bits across the paint.
Watch out for these common errors:
- Not Enough Lube: This is the #1 culprit, hands down. Without a slick surface, the clay will grab and skip, dragging that embedded grit around instead of lifting it out safely.
- Using Dropped Clay: If a piece of clay hits the floor, it’s done. Throw it out. It’s now loaded with abrasive particles that will act just like sandpaper. Don’t even think about trying to save it.
- Too Much Muscle: Let the clay and your lubricant do the work. Jamming the clay into the panel with heavy pressure just grinds contaminants deeper into the paint. You want to gently glide it and let its tackiness coax the particles out.
Because even a pro with a delicate touch can sometimes leave behind the faintest of marring, the best practice is to follow up with a light polish. This step erases any minor imperfections and gets the paint optically perfect before you lay down any protection.
How Often Should a Car Be Clayed?
This isn’t about a calendar schedule; it’s about the car’s condition. Think of claying as a serious deep-clean, not a regular wash-and-wax task. A daily driver might need it once or twice a year, but the real answer comes down to what the car is exposed to.
A clay bar treatment is non-negotiable before any real paint correction, polishing, or coating application. You’re creating a perfectly clean slate so that everything you do next can deliver maximum impact without bonded grit getting in the way.
A weekend car that lives in a garage might go years without feeling rough. On the other hand, a car parked near a factory or under a sappy tree could need a clay treatment every six months. The ultimate decider is the “plastic bag test”—if it feels like sandpaper through the bag, it’s time.
Do I Really Need to Clay a Brand-New Car?
One hundred percent yes. This is something you’ll probably have to explain to your clients. A “brand new” car is only new to them. That car has been on a long, dirty journey before it ever saw a showroom floor.
Think about it. During transit on trains and trucks, that fresh paint gets hammered with rail dust—tiny, sharp iron particles that embed right into the clear coat. Then it sits in a storage lot, collecting industrial fallout and other pollutants. Claying a new car is absolutely critical to get that embedded junk out from day one.
This initial decontamination is vital for getting a true, strong bond when you apply long-term protection like Titan Coatings. Our exclusive technologies, HyperQuartz® and Dark Matter Technology®, need to bond directly to a pure, uncontaminated clear coat to provide your client with the durability and gloss they expect from day one. If you skip this step on a new car, you’re just sealing in all those factory-to-dealer imperfections, compromising the coating’s performance and lifespan right from the start.
A truly jaw-dropping finish is impossible without a perfectly decontaminated surface. At Titan Coatings, our military-grade polymers are engineered for the ultimate defense, but they demand a pristine canvas to do their job.
0 Comments