Applying a ceramic coating is all about the process. It's a liquid polymer that, when carefully applied to your car's exterior, chemically bonds with the paint and creates an incredibly durable, protective shield. The real secret to a stunning, long-lasting result, though, isn't just in the application—it’s in the painstaking preparation that comes before it.
Why Flawless Prep Is Your Most Important Step
Everyone wants that unbelievable, liquid-glass shine, but let's get real for a moment. Most guides gloss over the most critical part: the magic isn't just in the bottle you buy. A successful, professional-grade ceramic coating job is 80% preparation. The final look is a direct reflection of the work you put in before the coating even touches the paint.
Think about spending a whole weekend on this project, only to step back and see a hazy, blotchy mess because a small prep step was missed. It's a gut-wrenching and expensive mistake, but it's completely avoidable. This isn't just about getting the car "clean." It's about creating a surgically pure surface that the coating can molecularly bond to. Without that perfect canvas, even the best coating in the world is set up to fail.
The Non-Negotiable Prep Stages
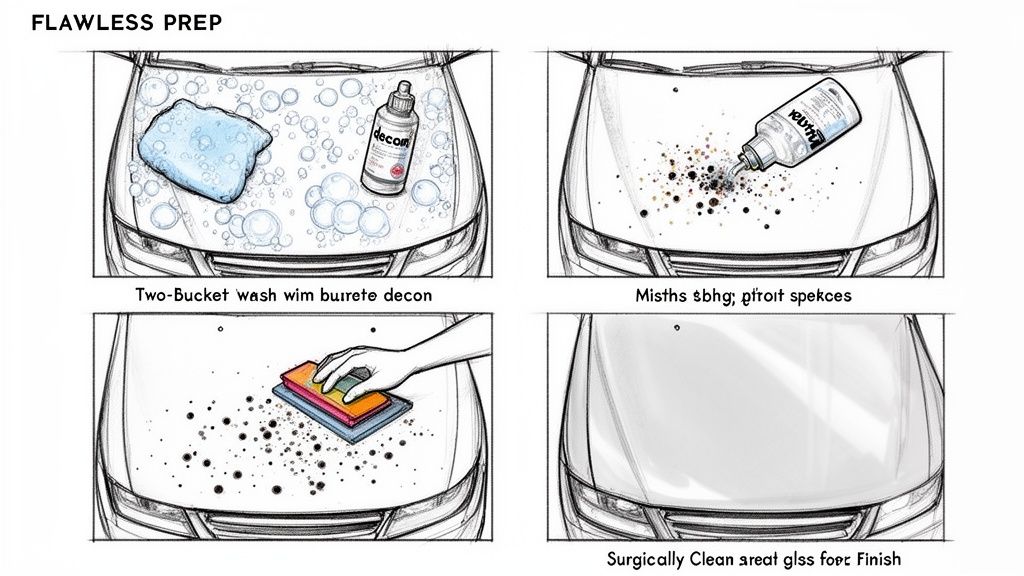
To get the kind of results you see in professional shops, there are three core stages of prep you absolutely cannot skip. Each one builds on the last, creating the ideal foundation for your coating to grab onto.
- A Thorough Wash: This means more than a quick drive-through. A proper two-bucket hand wash is non-negotiable. It’s the only way to get rid of loose dirt and grime without grinding it back into the paint and causing new scratches. One bucket for your soapy water, one for clean rinse water for your mitt. It’s a simple technique that makes a world of difference.
- Chemical Decontamination: Your car's paint is a magnet for invisible gunk. Tiny iron particles from brake dust and industrial fallout embed themselves in the clear coat, making the surface feel gritty. An iron remover spray is your secret weapon here. It dissolves these particles on contact, often turning a dramatic purple to show you it’s working.
- Physical Decontamination: Even after the chemical wash, stubborn contaminants like tree sap, road tar, and overspray will still be clinging to the paint. This is where the clay bar comes in. Gliding a lubricated clay bar across the surface physically lifts and pulls these impurities out, leaving the paint feeling unbelievably smooth. If you're new to this, we've got a full breakdown right here: how to clay bar your car.
The Critical Role of Paint Correction
Now for the step that separates the amateurs from the pros. If you apply a ceramic coating over paint that’s covered in swirls, scratches, or oxidation, you're essentially putting a high-definition magnifying glass over every single flaw. Paint correction—the process of machine polishing the clear coat to remove these defects—is absolutely vital.
A ceramic coating will not hide scratches or swirl marks. In fact, its high-gloss nature makes them even more obvious. Polishing the paint first ensures you're locking in a perfect finish, not permanently sealing in flaws.
Even a brand-new car fresh off the lot can have minor imperfections from transport and dealership handling. A light, single-stage polish can be the difference between a "good" result and a truly jaw-dropping one. This step guarantees you get that deep, uniform gloss you're after and helps your coating perform as advertised for years, not just a few months.
This is especially true when working with advanced coatings. Take Titan’s Alpha Quartz, one of our signature elastomer coatings. It’s engineered for next-level longevity. As the first company to introduce elastomer coatings using nano-tube technology and our proprietary Dark Matter tech, we designed it to be hard like glass yet flexible. This elasticity allows it to flex with temperature changes, which prevents the micro-cracking that plagues older, more rigid ceramic formulas. But to get the full benefit of that flexible, durable shield, the surface underneath has to be absolutely perfect. Taking the time to prep right ensures this cutting-edge protection has a pure, stable foundation to bond with.
Gearing Up: Your Essential Ceramic Coating Toolkit
Let's be blunt: trying to apply a professional-grade ceramic coating with the wrong tools is setting yourself up for failure. You wouldn't paint a masterpiece with a kid's watercolor set, and the same logic applies here. The quality of your finish is directly linked to the quality of your gear. This isn't just about having something to use; it's about building an arsenal that guarantees a flawless, mirror-like finish.
The right equipment allows you to work smarter, not harder. Honestly, the line between a jaw-dropping result and a streaky, frustrating mess often comes down to the small stuff—like the specific towels you grab or the applicator you choose.
The Core Application Arsenal
First things first, let's cover the absolute must-haves. These are the tools that will prevent the most common DIY mistakes right out of the gate, ensuring the coating goes on smoothly and evenly.
Here's a quick rundown of what you'll need and why it matters.
| Tool/Supply | Purpose | Pro-Tip from Titan Coatings |
|---|---|---|
| Suede Applicators & Block | For applying a thin, even layer of coating without waste. | A quality suede applicator doesn't soak up the product. It lets the coating glide over the paint, giving you 100% transfer for a smooth, uniform layer. |
| High-Quality Microfiber Towels | For wiping off coating residue (leveling) and final buffing. | Get two types: a shorter-pile (~350 GSM) for the initial wipe and a plush, edgeless towel (500+ GSM) for the final buff. Cheap towels are a primary cause of swirl marks. |
| Inspection Lighting | To spot "high spots" (uneven coating) before they cure. | A good headlamp or a dedicated detailing light is your best friend. It reveals imperfections the naked eye would miss, saving you a massive headache later. |
| Nitrile Gloves | To protect your skin and prevent oils from contaminating the surface. | Always wear them. The oils from your skin can interfere with the coating's bond to the paint, creating weak spots in the finish. |
| Safety Glasses | To protect your eyes from splashes. | It’s a simple step, but a crucial one. You only get one set of eyes, so protect them. |
These tools aren't just accessories; they are fundamental to the process. They ensure you can execute each step with the precision required for a professional outcome.
Remember, you're applying a protective layer that can be as thin as 0.5 to 1 micron. Every tool you use should be chosen to protect the perfectly prepped paint and ensure the coating bonds exactly as it's designed to.
Choosing Your Coating Wisely
Of course, the star of your toolkit is the coating itself. With so many options out there, the sweet spot for any enthusiast is a product that delivers professional-grade results without a maddeningly difficult application process. This is where modern formulas have really changed the game.
Take Titan's Ultra Ceramic Spray, for example. It was specifically engineered to bridge that gap. Instead of fumbling with a tiny dropper bottle, its spray format makes getting an even layer across a panel incredibly fast and simple, delivering great results with ease. It's a lifesaver for anyone who wants that hard-as-glass protection without the steep learning curve of old-school professional coatings.
This kind of user-friendliness is fueling a huge market shift. The high-performance ceramic coatings industry is on track to hit USD 12.63 billion by 2026, largely because products are making pro-level tech accessible to everyone. You can see the market trends for yourself here. Products from Titan, which are battle-tested in extreme defense applications, now offer that same unbelievable scratch resistance in a bottle you can confidently use in your own garage.
And don't stop at the paint! A dedicated glass coating is one of the most satisfying additions to your toolkit. A product like Titan's APEX Glass Ceramic Coating is dead simple to apply but completely transforms how you drive in the rain. Water just beads up and zips right off the windshield, dramatically improving visibility and taking the stress out of a downpour. It’s the finishing touch that completes the protective shield around your entire vehicle.
Mastering Your Coating Application Technique
Alright, this is it. We’ve reached the moment of truth—when the coating finally meets the paint. This is where all your prep work pays off, and where precision and patience become your most valuable tools. It can feel a little nerve-wracking, but if you stick to a methodical process, you can get a finish that looks like it rolled right out of a high-end detail shop. The secret isn't about speed; it's all about control and consistency.
I’ll never forget my first solo coating job. My hands were practically shaking as I put the first few drops on the applicator. I was so worried about messing up that I tried to coat half the hood in one pass. The result? A frantic, sweaty scramble to level the coating before it turned into a streaky, high-spotted disaster. I learned a huge lesson that day: work in small, manageable sections. That single piece of advice is the bedrock of a flawless application.
This diagram lays out the essential flow of your toolkit during the application, from the moment you apply the product to the final polish.
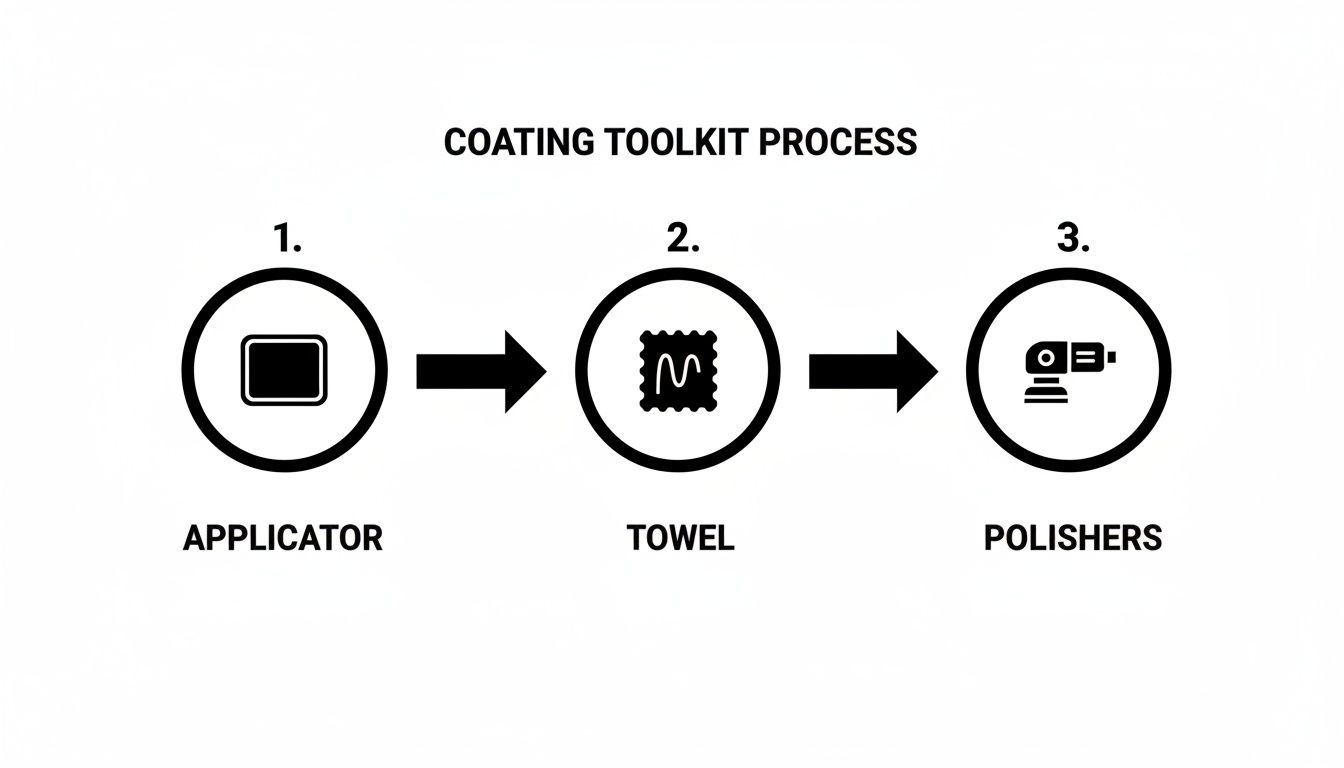
Keeping your tools—applicator, towels, and polisher—ready and in order is your best defense against mistakes. It keeps the whole process moving seamlessly from one step to the next.
The Crosshatch Method: Your Key to Even Coverage
The goal here is simple: lay down a perfectly even, thin layer of product. The undisputed best practice for achieving this is the crosshatch pattern. You’ll start by applying the coating in straight, overlapping lines, moving north-to-south across a small 2×2 foot section. Once you've covered that area, immediately go back over it with east-to-west passes.
This method is non-negotiable because it guarantees you don't miss any spots and that the product is distributed uniformly. It prevents the dreaded thick and thin patches, which is absolutely critical for a consistent, level finish.
Spotting the Flash: The Critical Visual Cue
As soon as the coating hits the panel, the clock starts ticking. The solvents in the liquid begin to evaporate, a process we call "flashing." This is arguably the most crucial moment of the entire job. Spotting the flash tells you exactly when the coating is ready to be leveled, or wiped off.
So, what are you looking for?
- The Rainbow Effect: You'll see an iridescent, oil-on-water shimmer appear on the surface. This is the tell-tale sign.
- Sweating or Beading: As the solvents gas off, the coating might look like it's sweating, with tiny beads forming on the paint.
The time it takes to flash can vary wildly, from 30 seconds to several minutes, depending heavily on the temperature and humidity in your workspace. This is precisely why you have to watch the panel like a hawk instead of just setting a timer.
Wiping too soon means you’re just removing the very layer you're trying to apply. But wait too long, and the coating hardens into stubborn "high spots" that are a nightmare to remove without aggressive polishing—potentially forcing you to start that section all over again. This is why working small is the only way to go.
Introducing Titan Alpha Quartz: A More Forgiving Formula
Let’s be honest, traditional ceramic coatings can be incredibly unforgiving. Their rigid, glass-like structure cures fast and makes fixing a high spot a real battle. This is where Titan Coatings' elastomer technology completely changes the game.
We developed our Alpha Quartz coating because we knew there had to be a better way. Using our proprietary nano-tube and Dark Matter technology, we created a coating that’s as hard as glass but remains flexible. This unique elasticity makes the application process significantly more user-friendly, giving you a slightly longer window to work and making high spots much easier to level.
Even better, this flexibility translates into incredible real-world resilience. A traditional coating can become brittle and develop micro-cracks from the stress of a car going from a frozen winter morning to a blazing summer afternoon. Alpha Quartz’s elastic properties allow it to expand and contract right along with the panel, ensuring it won’t crack under pressure from temperature swings or even minor impacts, like a bug hitting the car at highway speed. This is how we guarantee a longer-lasting, more durable bond.
Final Steps: Leveling and Buffing
Once you see that flash, it's go-time.
- The Initial Wipe (Leveling): Grab a clean, short-pile microfiber towel and gently wipe over the section. This isn't about muscle; you're just knocking down the excess product.
- The Final Buff: Immediately follow up with a second, plush microfiber towel. Buff the area to a brilliant, streak-free shine.
Remember to flip your towels to a clean side often. The last thing you want is to drag semi-cured coating across a fresh panel. If you want to dive deeper into getting that perfect finish, check out our guide on choosing the right buffing compound for car paint.
Getting this right is crucial. With the automotive sector projected to drive 32% of the entire ceramic coatings market by 2035, the demand for professional-level results is exploding. To get there, you need precision. Apply coatings in temperatures between 50-80°F with 40-60% humidity for the best results. Shake the bottle well, then use 3-4 drops for a 2×2 ft section. Wiping off the excess after the 1-5 minute flash time is critical; buffing too early can slash a coating's hydrophobic properties by up to 40%. It’s all about nailing the details.
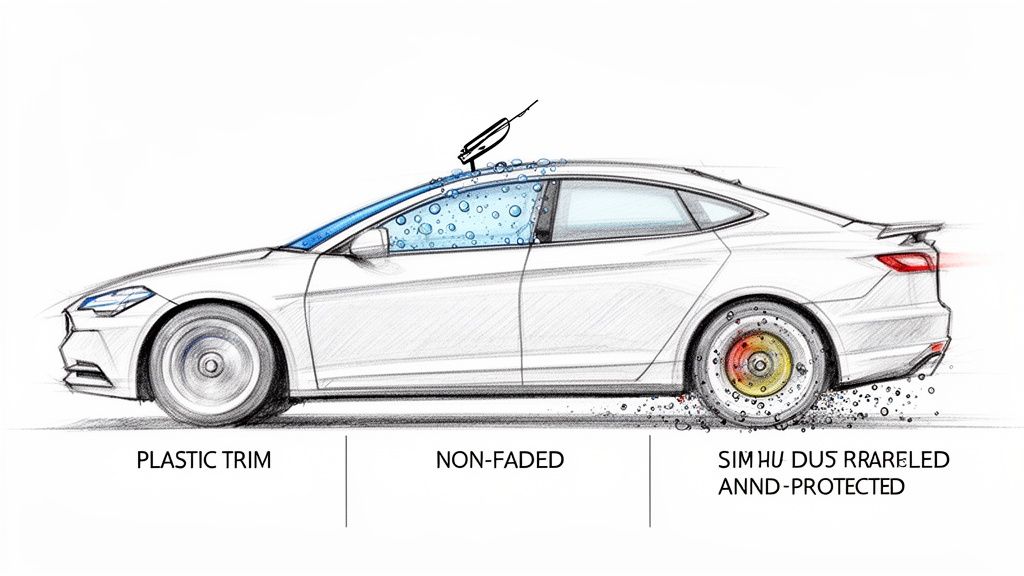
Protecting Your Glass, Trim, and Wheels
A truly top-tier detail doesn't stop at the paint. To get that full, 360-degree shield, you have to give the same love to the glass, trim, and wheels. These areas are just as exposed to the elements, and honestly, they can make or break the final look.
Picture this: you're on the highway at night when a surprise downpour hits. It's coming down hard. The cars around you are slowing to a crawl, wipers smearing a blurry mess across their windshields. But you're perfectly calm. The rain on your glass instantly forms into tiny, perfect beads and zips right off, leaving your view almost completely clear. That’s not a fantasy—it’s the very real safety benefit you get from a quality glass coating.
This kind of protection isn't just for show cars; it's a practical upgrade for any daily driver. A small amount of product delivers a massive improvement in driving safety and convenience, making it one of the most impactful things you can do for your vehicle.
Making Rain Stress-Free with APEX Glass Coating
This is exactly why we developed Titan’s APEX Glass Ceramic Coating. The application itself is dead simple, but the results are anything but. It creates an intensely hydrophobic barrier that forces water to bead up and literally fly off the windshield, which seriously improves visibility and makes driving in a storm so much less stressful. As a bonus, cleaning becomes a breeze, since dirt, bugs, and grime just can't seem to get a grip on the slick surface.
Applying it is a lot like coating paint:
- Deep Clean: Start by giving the glass a serious cleaning with a good glass cleaner. Then, grab a clay bar to pull out any bonded contaminants you can't see.
- IPA Wipe: Do a final wipe-down with an IPA (isopropyl alcohol) solution. This gets the surface perfectly sterile and ready for the coating.
- Apply and Buff: Put a few drops on a suede applicator and work it into the glass using a tight crosshatch pattern. Wait for it to flash, then buff it off to a crystal-clear finish.
The difference it makes when you're driving is unbelievable. Once you get up to highway speeds, you often won’t even need to touch your wipers. The airflow over the car does all the work, sweeping the water away and giving you a much safer, clearer view of what's ahead.
Shielding Your Wheels and Trim
Let's be honest, your wheels and plastic trim take a constant beating. Wheels get caked in corrosive brake dust, and trim gets faded and oxidized by the sun. Protecting them is absolutely essential for keeping that "just detailed" look long-term.
Coating your wheels turns the miserable job of scrubbing off baked-on brake dust into a thing of the past. The slick, protected surface stops those metallic particles from embedding, so most of the grime just rinses off with a pressure washer. If you want a full breakdown of the process, you can learn more about ceramic coating for rims in our dedicated article.
The same goes for plastic trim. Applying a coating brings back that deep, black finish and shields it from the UV rays that turn it grey and chalky. It's a simple step that preserves the sharp contrast and richness of your vehicle's look for years. By taking the time to treat these key areas, you're not just making things look good—you're adding serious, long-lasting protection to every single part of your vehicle's exterior.
Curing and Maintaining Your New Coating
You’ve done it. After all that hard work, the car looks incredible, and that slick, mirror-like gloss you were aiming for is finally a reality. It's a fantastic feeling, but don't drop your guard just yet—the job isn't quite finished.
The next 24 to 48 hours are absolutely crucial. This is when the coating polymerizes, cross-links, and hardens into that durable, protective shield you worked so hard to create. I know the temptation is to take it for a victory lap, but resisting that urge is the final, and most important, test of patience.
Think of it like fresh concrete. It might look solid on the surface, but it needs time to gain its full structural strength. The same principle applies here. Hitting the coating with water or chemicals too early can mess with the chemical bond, compromising its integrity and longevity right from the start.
The Critical First Week
What you do (and don't do) in the days immediately following the application sets the stage for years of protection. This period is all about a hands-off approach, letting the coating cure completely undisturbed.
Here’s a simple timeline to stick to:
- First 24 Hours: This is a strict "no water" zone. Keep the vehicle garaged and away from rain, sprinklers, and even heavy morning dew. Any moisture at this stage can cause water spots that get permanently etched into the semi-cured coating. Trust me, you don't want that.
- First 7 Days: Avoid washing the car completely. That means no soaps, no chemicals, and do your best to avoid things like bird droppings. If you absolutely must remove a contaminant like a bird bomb, use a plush microfiber towel with a gentle lifting motion—absolutely no scrubbing. The coating is still hardening.
After this initial week, the coating is finally ready for the real world. Your focus can now shift from curing to proper long-term care, which is far simpler than the application but just as important for keeping that unbelievable gloss and water-beading action alive.
Building a Sustainable Maintenance Routine
The beauty of a ceramic-coated car is how easy it is to maintain, but it does require a slight change in your old washing habits. The name of the game is cleaning the surface without harsh chemicals or abrasive methods that could wear down the coating over time.
For starters, say goodbye to automatic car washes with their gritty, paint-swirling brushes and recycled water. A quality, pH-neutral car soap is now your best friend. These soaps are designed to clean effectively without stripping away the protective layer. If you pair this with a proper two-bucket wash method, you’ll avoid dragging grit back across the paint—the number one cause of swirl marks.
Applying a ceramic coating the right way can dramatically extend the life of your vehicle's paint. A professional-grade coating can easily last up to 5-7 years under normal conditions, a massive leap from traditional waxes that are gone in a few months. That longevity starts with meticulous prep and application, but it's locked in during the cure, which can take up to 48 hours. We've seen real-world tests on our coatings show 95% gloss retention after three years.
To keep the coating performing at its absolute peak, I always recommend using a maintenance spray or ceramic topper every few months. A product like Titan's Ultra Ceramic Spray is perfect for this. Think of it as a sacrificial booster layer that refreshes the hydrophobic properties and adds even more slickness and gloss. It’s a quick and simple way to ensure your coating delivers elite performance, year after year.
This easy, sustainable routine is all it takes to keep your vehicle looking like it was just detailed. If you want to dive deeper into the specifics of that initial curing phase, you can learn more about how long ceramic coatings take to cure in our detailed guide.
Your Questions, Answered
Even the best guides can't cover every single question that pops up when you're in the middle of a project. So, I’ve put together some of the most common things people ask, whether they're seasoned pros or first-time DIYers. Getting these cleared up beforehand is the best way to walk into your project with total confidence.
How Long Is This Whole Thing Really Going to Take?
This is always the first question, and the honest answer is: it depends. The actual part where you're applying the coating is surprisingly quick—figure 1-2 hours for an average car. But that’s not where the time goes. The real work, the part that makes or breaks the job, is in the prep.
- Wash & Decon: You'll spend a solid 1-2 hours here if you're doing it right.
- Paint Correction: This is the big variable. A brand new car that just needs a light, one-step polish might only take 2-3 hours. But a daily driver with years of swirl marks could easily eat up 8 hours or more for a proper multi-stage correction.
For a typical weekend project on a car that's in decent shape, block out a full day. A sedan might run you 4-6 hours from start to finish, while a bigger truck or SUV could easily push past the 8-hour mark. Whatever you do, don't rush the prep. It will show in the final result, every single time.
Help! What Do I Do If I Get a High Spot?
High spots are the most common mistake, and they look like dark, oily, or streaky patches where you left a bit too much coating behind. Don't panic. If you catch it within a few minutes, you can usually fix it by dabbing a little more fresh coating onto your applicator, wiping it over the high spot to re-liquefy it, and then immediately buffing the area clean.
If you find it hours later after it’s fully cured, your only option is to break out a machine polisher with a light finishing polish to gently level the spot. This is exactly why we stress working in small, manageable sections under great lighting—it lets you catch these little issues before they become a bigger headache.
This is one area where Titan's Alpha Quartz really shines. Its unique elastomer technology makes it more forgiving than many ultra-rigid coatings. You get a slightly longer window to work with the product, making it much easier to level out any high spots before they lock in. It’s a genuine stress-saver.
Can I Put on a Second Layer of Coating?
Absolutely! In fact, for some coatings, a second layer is a great way to boost the overall thickness, which adds to the durability and deepens the gloss. The key is to follow the timing instructions for the specific product you're using.
As a general rule, you’ll want to wait 1-2 hours between coats. This gives that first layer just enough time to tack up so the second layer can chemically bond to it. If you try to apply another coat right away, you'll just end up pushing the first layer around and making a mess.
What If I Don’t Have a Garage?
Applying a ceramic coating outdoors is a huge gamble, and I really don't recommend it. You absolutely need a controlled space for a few critical reasons:
- Contamination: Dust, pollen, leaves, you name it—if it’s floating in the air, it can land on the wet coating and get permanently entombed in your car’s finish.
- Direct Sun: The sun will make the coating flash (dry) almost instantly, giving you zero time to level it properly. This is a one-way ticket to a streaky, high-spotted disaster.
- Climate Swings: Temperature and humidity have a massive impact on how a coating cures. You need a stable environment to ensure it bonds correctly and performs as it should.
If a garage isn't an option, look into renting a small self-storage unit for the weekend. As a last-ditch effort, a pop-up car shelter on a calm, overcast day is better than nothing, but it's still a risk.
What's the Real Difference Between a Spray and a Dropper Bottle Coating?
The classic ceramic coatings you see pros use come in those little dropper bottles. They're highly concentrated, incredibly durable, and require a very deliberate, panel-by-panel application process.
Spray coatings, like our Titan Ultra Ceramic Spray, are designed from the ground up to be more user-friendly. You get a huge dose of the same slickness, hardness, and water-beading magic, but in a format that’s much faster and simpler to apply. While a pro-grade bottle coating like Alpha Quartz will give you the ultimate in long-term performance, a spray version offers an amazing sweet spot between pro-level results and DIY accessibility.
And if you're curious about how coatings fit in with other products, check out our guide on whether you can you wax over ceramic coating. It’s a deep dive into how different layers of protection work together.
Ready to see what the next generation of surface protection can do? With Titan Coatings, you aren't just applying another product—you're working with advanced elastomer technology that delivers a finish that’s tough, flexible, and stunningly glossy.
0 Comments