Wet sanding is a technique we use to gently level out a car's clear coat, tackling those stubborn imperfections like orange peel or deep scratches that regular polishing just can't touch. It's a meticulous process, no doubt, but it's the key to creating a truly flat surface. Once that's done, we follow up with a multi-stage machine polish to bring out a deep, mirror-like gloss that's simply on another level. This is how the pros get that jaw-dropping, show-car finish.
Unlocking a Perfect Finish Through Wet Sanding

Have you ever seen a car with a finish so smooth and reflective it almost looks like liquid glass? That flawless depth is what separates a good detail from a truly masterful one. It’s a level of perfection that standard buffing and polishing can rarely achieve on their own. The secret weapon for professionals trying to eliminate stubborn orange peel, deep scratches, and tiny dust nibs is the art of wet sanding.
The word "sanding" makes a lot of people nervous, picturing an aggressive process that strips paint. But when it's done right, it's actually a very controlled technique for gently leveling the outermost layer of the clear coat. Think of your car's finish as a landscape with tiny peaks and valleys. Buffing just polishes the tops of those peaks, leaving the underlying texture. Wet sanding, however, carefully shaves those peaks down to create a perfectly flat plane.
The Foundation for Ultimate Gloss and Protection
When you create a perfectly flat surface before you polish, you unlock a level of gloss and clarity that is simply stunning. Light stops scattering off that textured "orange peel" and instead reflects uniformly, producing that deep, wet look every car lover is after. This process is about more than just looks; it's a critical part of a comprehensive approach to paint correction.
This foundational prep work is also what allows advanced protective coatings to perform at their absolute best. A perfectly smooth surface gives the coating maximum surface area to bond to, ensuring a stronger, more durable layer of protection.
My own journey into professional detailing really took off with a classic black muscle car. No matter how much I polished it, the finish always had this subtle waviness under direct light. It wasn't until I learned how to properly wet sand the clear coat that I finally achieved that true, jet-black mirror I was chasing. That car taught me that perfect prep is everything.
Preparing for Advanced Coating Technology
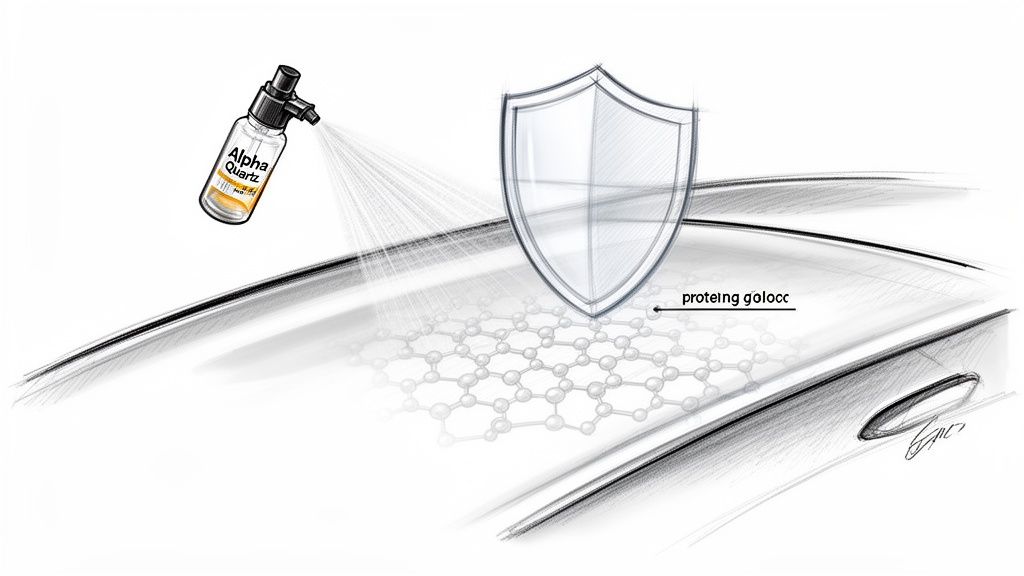
This is where the science behind modern protection really shines. For instance, the first time I applied a Titan Coatings product, it was on a vehicle I had just finished wet sanding. The elastomer coating, developed with nanotube and Dark Matter tech, bonded to that perfectly prepared surface in a way that was just unbelievable to see.
That’s because Alpha Quartz isn't like a traditional, brittle ceramic. As the first company to introduce Elastomer coatings to the market, Titan pioneered a formula that’s hard like glass but stays flexible. This unique property allows it to absorb impacts from bugs or road debris and handle drastic temperature changes—from freezing cold to scorching heat—without cracking. That flexibility ensures the amazing shine you worked so hard to create is protected for the long haul, making every hour of meticulous sanding completely worth it.
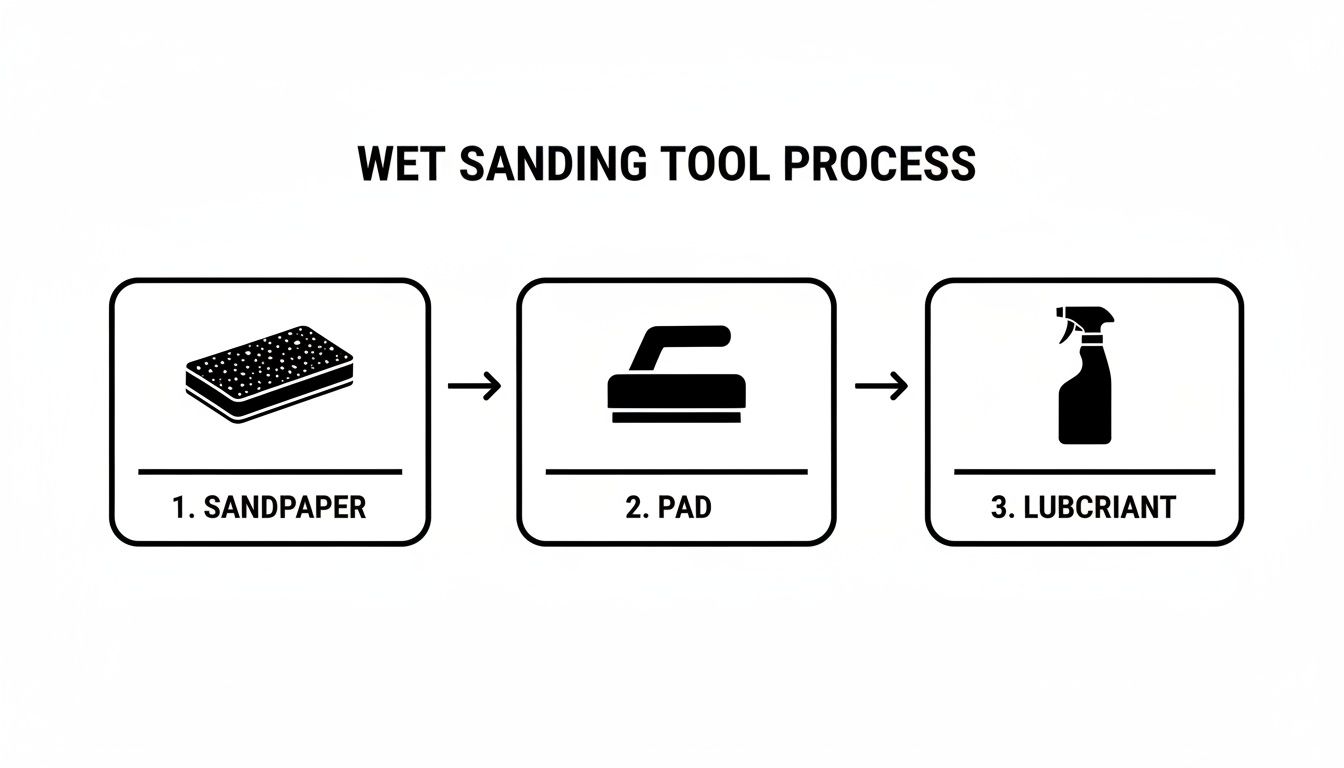
Your Essential Wet Sanding Toolkit
Before a single drop of water touches your vehicle's paint, getting your gear in order is the most important move you can make. I learned this the hard way years ago on a project car. I jumped in with cheap sandpaper and no backing pad, thinking I could just "feel" my way through it. The result was a mess of uneven scratches and finger marks that took twice as long to polish out.
Don't make my mistake. The right supplies are your best insurance against frustration and having to fix your own fix. This isn't just about grabbing any sandpaper off the shelf; it’s about having a full arsenal and knowing what each tool does. The whole process of wet sanding a clear coat hinges on a careful progression of abrasive grits, each with a specific job.
Choosing Your Sandpaper and Tools
The heart of your toolkit is high-quality wet/dry sandpaper. Those numbers on the back aren't just suggestions; they're the roadmap to a glass-smooth finish.
- 1500-Grit Sandpaper: This is your heavy hitter, the starting point for more serious defects like deep orange peel or noticeable runs in the clear coat. Use it with extreme caution and only on the problem areas.
- 2000-2500 Grit Sandpaper: This is the real workhorse for most jobs. It’s got enough bite to level out moderate imperfections but is fine enough that you aren't leaving behind deep, nasty scratches.
- 3000-5000 Grit Sandpaper: This is your finishing step. After leveling with a lower grit, you'll switch to these ultra-fine papers to remove the sanding marks from the previous step. This makes the final polishing stage dramatically faster and easier.
A quality backing pad or sanding block is completely non-negotiable. Your fingers apply all sorts of weird, uneven pressure, creating high and low spots that are a nightmare to correct later. A soft, flexible block spreads the pressure out perfectly, ensuring you're only leveling the clear coat itself.
Your spray bottle is one of the most important tools you'll use. Fill it with clean water and just a single drop of pH-neutral car soap. This simple mix acts as a crucial lubricant, lifting away the sanding residue and letting the paper glide smoothly. This is what prevents the deep, random scratches that can ruin a panel.
Wet Sanding Grit Progression Guide
Here's a quick reference for selecting the right sandpaper grit. The golden rule is to always start with the least aggressive grit you think you can get away with for the job. You can always get more aggressive if needed, but you can't undo deep scratches.
| Sandpaper Grit | Primary Use Case | Best For Removing |
|---|---|---|
| 1500 Grit | Heavy Defect Removal | Deep scratches, significant orange peel, paint runs |
| 2000-2500 Grit | General Leveling | Moderate orange peel, light-to-medium scratches |
| 3000-5000 Grit | Refining & Finishing | Removing finer scratches from previous sanding steps |
Using this progression ensures you're efficiently removing the defect without creating unnecessary work for yourself in the polishing stage.
Essential Safety and Support Gear
Beyond the abrasives, a few other items are critical for both your safety and your success.
First, always wear nitrile gloves. They do more than just keep your hands from getting waterlogged; they prevent the natural oils on your skin from contaminating the paint surface.
Good lighting is your best friend here. You can't fix what you can't see. Use a powerful, diffused light source like an LED work light or a dedicated detailer's inspection lamp. You need to be able to see the panel from multiple angles to spot the subtle texture of orange peel and track your progress accurately.
Finally, your most important "tool" is a small, hidden test spot. Before you ever touch a major panel like the hood or a door, find an out-of-the-way area—like the very bottom of a rocker panel—and test your entire process. This is your chance to confirm your technique and grit choice are right without risking a highly visible mistake.
Once you’ve got the surface perfectly prepped, you'll be ready to move on to compounding and polishing. If you're new to that, you can learn more by checking out our guide on the best car polisher for beginners. Proper prep like this is what sets the stage for a flawless finish and makes sure your final protective layer looks its absolute best.
Mastering the Wet Sanding Process Step by Step
This is where all that prep pays off and the real work begins. We’re about to turn that textured, imperfect surface into a flawless, level canvas. This isn't just scrubbing paint; it's a controlled, delicate procedure that, when done right, delivers an unbelievable finish.
Think of it like a story. One of my first major wet sanding jobs was a classic sports car in a deep, dark blue. The owner wanted a finish so perfect you felt like you could dive into it. The pressure was on, but breaking the process down into manageable stages—just like we're about to do—made all the difference. It all started with meticulous prep, and that's exactly where you need to begin.
Setting the Stage for Flawless Results
Before a single piece of sandpaper touches the paint, your prep work has to be flawless.
Start by giving the vehicle a thorough wash to get rid of any loose dirt and grime. Follow that up immediately with a good clay bar treatment. The clay is critical—it yanks out all the embedded contaminants from the clear coat, ensuring you don't accidentally drag a tiny piece of grit across the panel and create a deep, frustrating scratch.
Once the surface is surgically clean, grab your painter's tape. You’ll want to carefully mask off any adjacent panels, plastic trim, emblems, and especially any sharp body lines or edges. Clear coat is notoriously thin on edges, and it’s shockingly easy to sand right through them if you aren't careful. This tape is your safety net. Don't skip it.
Finally, get your sandpaper ready. Let it soak in a bucket of clean water with just a single drop of pH-neutral car soap for at least 15-20 minutes. This softens the paper and its backing, which helps it conform to the panel’s curves and keeps the paper's sharp edges from digging into the finish.
The flow here is simple: sandpaper, a backing pad for even pressure, and plenty of lubricant. Each element is part of a system designed to work together for a smooth, controlled cut.
The Art of the Sanding Motion
With your sandpaper soaked and wrapped around a quality sanding block, you’re ready to go. Liberally spray your soapy water solution onto a small, manageable section—think no larger than 2×2 feet. The absolute key here is to keep the surface perpetually wet. If it starts to dry out, you risk creating deep, chaotic scratches.
Now, start sanding with light, consistent pressure. Here’s the most critical part of the technique: always sand in straight lines, either horizontally or vertically. Never, ever use a circular motion. That's how you get pigtail-shaped scratches that are an absolute nightmare to polish out later.
Let the sandpaper do the work. You aren't trying to scrub the orange peel away; you're just gently "shaving" the highest peaks of the clear coat. After a few passes, grab a squeegee, dry the area, and inspect it with your light. What you're looking for is for the glossy "low spots" of the orange peel to slowly vanish, being replaced by a uniform, dull haze.
Progressing Through the Grits
This is where your patience is rewarded. Let's say you started with 2000-grit paper to knock down the initial texture. Once that entire section has a uniform, matte look with no shiny spots left, you're ready to refine your work.
Here’s the pro tip: change your sanding direction with each grit. If you sanded horizontally with 2000-grit, switch to vertical passes when you move to your 3000-grit paper. This simple trick makes it incredibly easy to see when you've fully removed the deeper scratches from the previous, more aggressive step.
The goal of each subsequent grit isn't to level the paint more. It's simply to remove the sanding scratches from the grit before it. When you switch from 2000 to 3000, you're just replacing 2000-grit scratches with much finer 3000-grit scratches, which are far easier to remove with a polisher.
Remember to clean the panel and your sandpaper often. The slurry of clear coat and abrasive particles that builds up can clog the paper and make it less effective. Continue this process, maybe even moving to a super-fine 5000-grit, until the surface has a smooth, satin-like sheen. The finer you go with your sanding, the less time you'll spend fighting with the machine polisher.
Once you’re done sanding, the next challenge is restoring that brilliant shine. You can find everything you need to know in our complete guide on how to polish car paint.
It’s worth noting that about 90-95% of all wet sanding is done on fresh paint jobs, not on factory finishes. Factory clear coats are notoriously thin—often just 1.5-2 mils thick—which doesn't leave much room for error. Fresh paint from a body shop, on the other hand, is usually thicker (3-4 mils), a bit softer right after curing, and perfect for sanding to that show-car level.
Restoring Gloss and Preparing for Protection
After your final sanding pass, the paint will look hazy but feel incredibly smooth to the touch. It's time to bring back the gloss.
Using a machine polisher with a quality cutting compound, work the area to remove all those fine sanding marks. Once the haze is gone, follow up with a finishing polish to really amp up the clarity and reflection.
The result of your hard work is a perfectly flat, flawless surface. This is the ideal canvas for a high-performance protective coating. Applying a product like Titan's Alpha Quartz at this stage is the ultimate final touch. Its advanced elastomer technology, born from nanotube research, creates a bond with the paint that’s as hard as glass but also remarkably flexible. That flexibility is what allows it to resist cracking from temperature changes and absorb small impacts, preserving that unbelievable finish you just worked so hard to create.
Common Wet Sanding Mistakes to Avoid
Even the most seasoned pros can make a mistake that ruins an otherwise perfect finish. Wet sanding a clear coat is all about precision—patience and a light touch will get you much further than speed and aggression. The road to that glass-like surface has plenty of potential traps, but knowing what they are is half the battle.
Think of this as advice from someone who’s been in the trenches and seen the mistakes firsthand. I once watched a detailer rush a job, leaning into the sanding block on a car's hood. He burned right through the clear coat on a sharp body line, instantly turning a simple correction into a very expensive trip to the paint booth. That one slip-up drove home a lesson I'll never forget: you can always sand more clear coat off, but you can never put it back on.
Applying Excessive Pressure
This is, without a doubt, the most common and damaging mistake I see. It’s almost a natural reaction to want to "scrub" at a defect to make it disappear faster, but that’s the opposite of what you should do. The sandpaper is the tool doing the work, not the force from your arm.
Pushing down too hard is a recipe for disaster:
- It forces the abrasive to dig deep, creating uneven gouges that you'll have a tough time trying to polish out later.
- It skyrockets your risk of burning through the clear coat, especially on high-risk areas like edges, curves, and body lines where the paint is thinnest.
- It creates too much heat and friction, which can warp and distort the finish.
Pro Tip: The right amount of pressure is simply the weight of your hand resting on the sanding block. Let it glide. If a defect isn't budging, you need to step down to a more aggressive grit, not press harder.
The Dangers of Improper Lubrication and Motion
Running a dry panel is another critical error. Your soapy water or sanding lubricant is the lifeblood of this entire process. If the surface even starts to dry, the sanding residue—all those tiny particles of clear coat—gets trapped under the paper. These act like little rocks, gouging the finish and leaving deep, unpredictable scratches. The panel must stay flooded with lubricant, always.
Your sanding motion is just as crucial. Never, ever sand in circles. That's a one-way ticket to creating "pigtails"—nasty little spiral scratches that are a nightmare to remove. Stick to a disciplined, straight-line pattern. Go back and forth horizontally, then switch to a vertical pattern when you change to your next finer grit. This cross-hatching technique creates a uniform scratch pattern that's easy for you to see, refine, and ultimately polish away.
Of course, if you're dealing with outright damage like delamination, wet sanding isn't the fix. That's a whole different ballgame. You can find out more in our guide on how to fix clear coat peeling.
The demand for perfect paint isn't just in our heads; the global car clear coat market is expected to hit over USD 51.51 billion by 2032. Solvent-based clear coats still hold a massive 43.8% market share, largely because they flow out so well, making them more forgiving to correct. No matter the type, soaking a sheet of 2000-grit paper for about 15 minutes before you start is a great habit—it softens the paper and helps prevent stray deep scratches, preserving that precious 2-3 mil clear coat thickness. Once you've nailed that perfect surface, our military-grade ceramic coatings can lock it in with scratch resistance rated at a 9H hardness.
Overlooking Contamination
Finally, never underestimate how much damage one tiny piece of grit can do. If you're not constantly cleaning your sandpaper, your block, and the panel, you're asking for trouble. The slurry that builds up is a mix of water and clear coat dust, but it can easily trap a harder piece of contaminant.
Make it a habit to dunk and rinse your sandpaper in a clean bucket of water after every few passes. Wipe the panel clean, too. This simple step ensures you aren’t accidentally dragging a piece of debris across the very surface you’re trying to perfect.
Locking In Your Flawless Finish for the Long Haul
You've poured hours into meticulous sanding, compounding, and polishing to get here. The result is a flawless, mirror-like surface. But as perfect as that paint looks, it's also completely exposed. This next step is where you either lock in that hard work or risk watching it all go to waste.
A freshly corrected surface is the absolute best canvas for a high-performance coating. The clear coat is now perfectly flat, creating a pristine foundation for a protective layer to grab onto and form an incredibly strong, durable bond. This is where advanced coating technology truly shines.
The Titan Coatings Advantage
My own journey in detailing taught me a hard lesson: not all protection is created equal. I’ll never forget a grueling wet sanding job I did on a black muscle car. I got the finish to a level I was immensely proud of and applied a well-known ceramic coating. Just a few months later, the owner was back with new swirl marks and small chips from daily driving. The protection just couldn't hang.
That experience sent me on a mission to find something better. It’s what led me to Titan Coatings, the first company to introduce Elastomer coatings to the market. We engineered our coatings, like Alpha Quartz, with a fusion of nanotube technology and our proprietary Dark Matter tech. The result is a product that’s as hard as glass but remains remarkably flexible.
That flexibility is the game-changer. Traditional ceramic coatings are rigid, which can make them brittle and prone to micro-cracking under stress. Our elastic coatings, on the other hand, can actually absorb impacts and withstand extreme temperature swings, from freezing cold to blistering heat.
This unique property means your perfect finish is shielded against the very things that would normally ruin it.
Choosing Your Shield
A freshly wet-sanded surface provides the best possible adhesion for our coatings. Your hard work has prepared the clear coat to bond with advanced nanomaterials, maximizing the durability of whatever you apply next. You can check out our full shop to see all the options or use our comparison page to find the perfect fit.
At Titan Coatings, we offer different levels of protection to suit your goals:
Alpha Quartz: This is our flagship elastomer coating. It leverages nanotube technology to deliver unmatched durability. Its flexibility helps it absorb the energy from bug impacts and small rock chips, and it prevents cracking from temperature changes. For long-term, top-tier protection, this is the one.
Ultra Ceramic Spray: Looking for a simpler yet still incredibly effective option? Our Ultra Ceramic Spray is perfect. It gives you long-lasting, professional-grade protection with a simple spray-and-wipe application. You get that amazing hydrophobicity and gloss without the intensive install of a full coating.
For anyone serious about going the full nine yards, our guide on applying ceramic coating to your car is a must-read.
Don't Neglect the Glass
Protection shouldn't stop at the paint. After you’ve achieved that perfect body finish, streaky and unclear glass can ruin the entire look—and, more importantly, compromise your safety.
Applying Apex Glass Ceramic Coating to your windshield is a quick final step that pays huge dividends. It creates a super-slick, hydrophobic surface that makes rain bead up and fly right off as you drive. This drastically improves visibility in a downpour, cuts down on glare, and makes driving far less stressful. It’s an easy application that completes the protective bubble around your vehicle, ensuring every surface is shielded and performing at its best.
Got Questions About Wet Sanding? You're Not Alone.
Jumping into a project like wet sanding always brings up a few questions, no matter how detailed the guide is. It's a process that rewards precision and patience, so getting your head wrapped around the finer points is what separates a good result from a jaw-dropping one. Let's clear up some of the most common questions I hear from people learning to wet sand clear coat.
Can I Really Wet Sand My Car's Factory Paint?
This is probably the most frequent—and most critical—question I get. The short answer is maybe, but you have to be incredibly careful. It’s a risky move because factory clear coats are shockingly thin, usually only 1.5 to 2 mils thick. That's thinner than a Post-it Note.
Frankly, wet sanding is much better suited for the thicker clear coats you find on high-quality resprays or custom paint jobs. If you're dead set on touching up a factory finish, you absolutely must use the finest grit possible (think 3000-grit or even higher), let the paper do the work with zero pressure, and constantly measure your progress with a paint depth gauge. One wrong move and you can burn right through it, and there's no coming back from that.
What’s the Real Difference Between Wet Sanding and Compounding?
It helps to think of them as two totally different tools for two different jobs, even though they both work to perfect your paint.
Wet sanding is the heavy-lifting, the surgical procedure. You're using abrasive paper to physically level the clear coat, knocking down serious defects like deep scratches, runs, or that bumpy "orange peel" texture. It's a subtractive process that flattens the surface.
Compounding is what comes after. It’s the first step in refining that freshly sanded surface. You use a machine polisher and a liquid abrasive to remove the fine sanding scratches you just created. You can't have one without the other; sanding removes the big flaws, and compounding (followed by polishing) removes the sanding marks to bring back the shine.
Your goal with wet sanding is to end up with a perfectly uniform, hazy finish across the panel. You'll know you're done when the original shiny "low spots" of the orange peel or scratch are completely gone. Squeegee the area dry every few passes to check your work—the second that defect disappears, stop. You want to preserve every micron of clear coat you can.
Do I Have to Ceramic Coat After Wet Sanding?
"Have to?" No. "Should you?" Absolutely, 100%. Skipping protection after all that hard work is like winning a marathon and then tripping before you cross the finish line. After sanding and polishing, your paint looks incredible, but it's also raw and completely exposed to the elements.
Applying a top-tier ceramic coating is the only way to properly seal the deal and protect your investment. This is where a coating built with advanced elastomer technology, like Titan's Alpha Quartz, really shines. Its flexible properties create a resilient shield that offers superior, long-lasting defense against new scratches, bird droppings, and UV damage. It ensures that mirror finish you just spent hours creating actually stays that way for years to come.
Ready to give your freshly perfected paint the durable, flexible protection it deserves? Explore the science behind Titan Coatings and see how our Alpha Quartz elastomer coating can preserve your flawless finish.
0 Comments