When you hear "buffing a car," what comes to mind? For pros, it’s about a meticulous process of paint correction. We're using a machine polisher, specific pads, and carefully chosen abrasive compounds to remove microscopic layers of the clear coat. This isn't just about covering things up; it's about erasing imperfections like swirl marks and fine scratches for good. The goal is to level the paint surface, revealing a true, lasting shine that looks like it just rolled off the showroom floor.
Unlocking Your Car's True Shine Potential

Think about your car's paint. Not just clean, but with a deep, liquid gloss that reflects light with stunning clarity. That's the real reward when you master how to buff a car. It's a craft that goes way beyond a quick wax job—it's about restoring the paint to its absolute best.
This guide will break down the entire process of paint correction. We'll show you how we carefully remove those ultra-thin layers of clear coat to get rid of years of damage. I'm talking about the nagging swirl marks from tunnel washes, light scratches from everyday use, and that hazy look from oxidation.
From Faded to Flawless: A Story of Revival
I'll never forget a faded red sports car that came into the shop. It was a classic, but years of sun and neglect had turned its once-vibrant finish into a dull, almost pinkish hue. The owner thought it was a lost cause, but he'd heard about what we could do. With a patient, methodical buffing process, we brought it back to life. We didn't just make it shiny; we restored its character. That deep, fiery red re-emerged, and you could see the pride flood back into the owner's face. That’s the real power of proper paint correction.
Once you’ve done all that work to get a perfect finish, the last thing you want is for it to fade away again. Buffing creates the ideal foundation, but you need to lock in that flawless surface with serious, long-term protection.
The Ultimate Shield: Titan Coatings Elastomer Technology
After perfecting the paint, it needs a shield tough enough for the real world. That’s exactly where Titan Coatings' incredible technology enters the picture. As the first company to introduce Elastomer coatings to the market using advanced nano tube technology and our proprietary Dark Matter Tech, we redefined paint protection. Our Alpha Quartz isn't just another ceramic coating; it's a revolutionary elastomer, which puts it in a whole different league.
What’s the secret? Our Elastic coatings are hard like glass yet remain flexible. This unique characteristic allows them to handle extreme temperature swings—from freezing winters to scorching summers—without the risk of cracking, a common failure point for traditional, brittle ceramics.
This elasticity also makes the coating far more resilient to bug splatters and road debris impacts. It’s more than a coating; it’s a durable, flexible shield for your paint. And for those who want outstanding results with a simpler application, our Ultra Ceramic Spray offers a direct path to top-tier protection. It proves that professional-grade results are within reach for anyone passionate about their vehicle's finish. By preparing the surface correctly, you're creating the perfect canvas for these next-generation protective solutions.
Preparing The Surface For A Flawless Correction
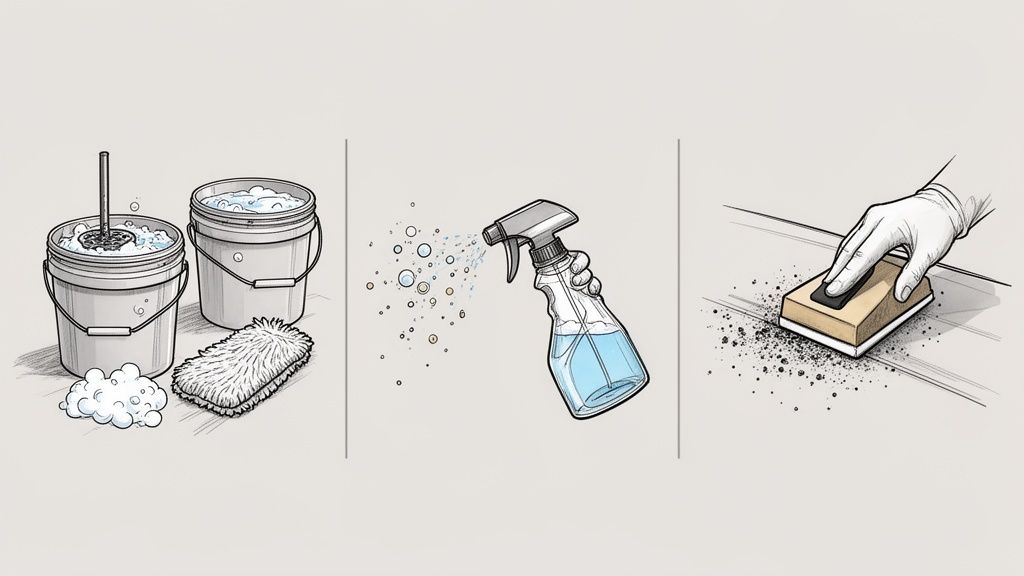
Let's get one thing straight: jumping right to the buffer without properly cleaning the surface is the fastest way to turn a paint correction into a paint disaster. I've seen it happen. The hard truth is that 80% of a jaw-dropping finish is earned long before you ever turn on the polisher.
This isn't just about washing the car. It's about creating a surgically clean canvas.
Think of it this way: any tiny speck of grit left on the paint becomes sandpaper the moment your buffing pad hits it. Instead of removing swirls, you'll be grinding in deeper, more frustrating scratches. This is precisely why a pro never skips the prep work.
Your Two-Pronged Decontamination Attack
Your first mission is to remove every last trace of contamination—both the loose stuff and the gunk that’s bonded to the paint. This calls for a one-two punch using both chemical and physical methods to ensure nothing gets left behind.
We’ll walk through the process with this quick checklist to make sure every base is covered.
Paint Decontamination Checklist
| Step | Tool/Product | Purpose |
|---|---|---|
| Wash | Two-Bucket Method, pH-Neutral Shampoo | Safely removes loose dirt and grime without scratching. |
| Chemical Decon | Iron Remover Spray | Dissolves embedded ferrous particles (brake dust, rail dust). |
| Physical Decon | Clay Bar or Clay Mitt with Lubricant | Shears off bonded contaminants like tar, sap, and overspray. |
| Final Rinse | Deionized Water (Optional but Recommended) | Prevents water spots and mineral deposits. |
Following these steps in order sets you up for a much smoother, safer, and more effective buffing session.
Breaking Down The Process
The whole thing kicks off with a thorough two-bucket wash. This simple technique is a game-changer for preventing the swirl marks that come from dragging grit across the paint. One bucket is for your soapy water, and the other is for clean rinse water for your wash mitt. Easy.
Next, you move on to chemical decontamination. An iron remover is non-negotiable here. It’s designed to dissolve embedded iron particles—tiny bits of brake dust and industrial fallout—that have burrowed into your clear coat. You’ll see the product "bleed" purple as it works. It’s a very satisfying sign that it's melting away contaminants that a regular wash can't even touch.
After the chemicals do their job, it's time to break out the clay. Whether you use a traditional clay bar or a modern clay mitt, this is how you achieve a surface that’s truly as smooth as glass. The clay glides over the lubricated paint and gently shears off any stubborn bonded contaminants like tree sap, road tar, and paint overspray.
A professional finish lives or dies in the details. Skipping the clay bar is like trying to paint a masterpiece on a dirty canvas—the final result will always be compromised by what's hiding underneath.
Once you're done claying, the paint should feel completely slick. This perfectly smooth surface is what allows your polisher pad to glide evenly, letting the abrasives in your compound get to work on the defects, not on leftover grime. If you really want to master this part, our full guide on how to clay bar your car has all the details.
The Final Steps: Masking And Inspection
With the paint perfectly clean, the last prep steps are drying and masking. Grab a few high-quality microfiber drying towels and get every drop of water off the surface without introducing new scratches. Pay extra attention to panel gaps, mirrors, and trim, because water loves to hide there and drip out later, right in the middle of your polishing.
Finally, take the time to carefully mask off any sensitive areas with automotive painter's tape:
- Plastic Trim: Unpainted plastic can get stained or even "burned" by polishes.
- Rubber Seals: This protects your window and door seals from getting caked with residue.
- Emblems and Badges: It’s almost impossible to clean polish out of tight crevices, so just cover them up.
- Sharp Panel Edges: Paint is always thinner on an edge, so taping them off provides an essential buffer.
This meticulous prep is what separates a professional job from an amateur one. It’s a reflection of the high standards driving the global automotive paints and coatings market, which is projected to grow to over USD 44 billion. Taking this level of care is simply what it takes to produce work that stands out.
Choosing Your Polisher and Pad Combination
When you're staring at a wall of polishers, it’s easy to get overwhelmed. But really, it all comes down to two main players: the Dual Action (DA) polisher and the Rotary polisher. Figuring out which one is right for you is the first real step in learning how to buff a car without making a costly mistake. The choice hinges entirely on your experience and how bad the paint really is.
For anyone who isn't a seasoned pro, the DA polisher is your best friend. Its head doesn't just spin in a circle; it also jiggles in a random orbital pattern. This quirky movement is a built-in safety feature, spreading out the heat and dramatically lowering the risk of burning through your clear coat. If you’re fighting light swirls, annoying water spots, or that dull haze from oxidation, a DA is the safest, most reliable tool for the job.
Dual Action vs. Rotary: A Deep Dive
Then you have the rotary polisher. This is the beast of the detailing world. It’s a direct-drive tool, meaning the pad spins on one, and only one, axis. All that focused power generates a ton of heat and friction, which lets it chew through deep scratches and severe paint defects with incredible speed.
But all that power demands respect. In the wrong hands, a rotary can burn paint, leave behind ugly buffer trails (holograms), or scorch an edge in the blink of an eye. This is the go-to machine for professionals who need to perform heavy-duty paint correction, and they’ve spent years mastering it.
For anyone new to paint correction, starting with a DA polisher isn't just a suggestion—it's essential for building confidence and skill without risking costly damage to your vehicle. You can absolutely get a show-car finish with a DA; it just takes a bit more time.
If you're still weighing your options, our guide on picking the best car polisher for beginners can help you make a smart investment.
Pairing Compounds and Pads for Perfect Results
Your machine is just one part of the puzzle. The compound and pad you grab are just as important. Think of it as a team—the machine provides the power, but the pad and liquid do the actual work. The game plan is simple: use aggressive combos for heavy cutting and gentle ones for that final, flawless finish.
- The Cutting Stage: To knock down deeper scratches, you’ll want an aggressive cutting compound teamed up with a firm pad—think foam, microfiber, or even wool. The pad’s stiff structure gives the compound the bite it needs to level out the paint.
- The Polishing/Finishing Stage: Once the major defects are gone, it's time to bring out the gloss. This means switching to a fine-tuned polish and a soft foam finishing pad. This pairing erases any faint haze from the cutting step and amps up the paint's clarity and shine.
A Real-World Scenario: The Neglected Daily Driver
I’ll never forget this dark blue sedan that had seen one too many automatic car washes. The paint was a disaster zone of deep swirls and cloudy oxidation. There was no way a light polish was going to touch it.
I started with the heavy hitter: a rotary polisher with a wool cutting pad and a serious cutting compound. This let me methodically erase the worst of the damage.
After that initial assault, the paint was flat and level, but it had zero gloss. So, for phase two, I grabbed my trusted DA polisher, a medium-cut foam pad, and a quality finishing polish. This refined the surface, clearing up any micro-marring left by the rotary and coaxing out an unbelievable, liquid-like shine.
That two-step process is a perfect example of why the right combo is everything. By matching the tool, pad, and liquid to the task at hand, we took a car that looked tired and worn out and made it look incredible. The final touch, of course, was a layer of durable coating to protect all that hard work.
Mastering The Buffing Technique Like A Pro
Alright, the prep work is done. This is the moment where all that effort pays off and the real magic happens. We're moving from theory to actually putting the machine on the paint, and this is where you'll learn the movements and instincts that separate a decent job from a truly professional finish.
First things first, let's prime that pad correctly. Grab a fresh, dry foam pad and squeeze out four dime-sized dots of your polish. You're not trying to soak the thing; you just need enough product to lubricate the surface and get the abrasives working right from the first pass.
Setting Up Your Workspace
With the pad primed, press it flat against the paint before you flick the polisher's switch. Trust me, this little habit will save you from slinging polish all over the garage. Start the machine on its lowest speed and just spread the product evenly over your work area. I always stick to a 2-foot by 2-foot square—any bigger and you lose control.
Working in small, manageable sections is the key to quality. It focuses the machine's power, gives the abrasives time to break down and do their job, and stops the polish from drying out prematurely. It also keeps you from feeling overwhelmed and helps you lay down a consistent finish across the whole car.
This chart is a great way to visualize which machine you should be reaching for.
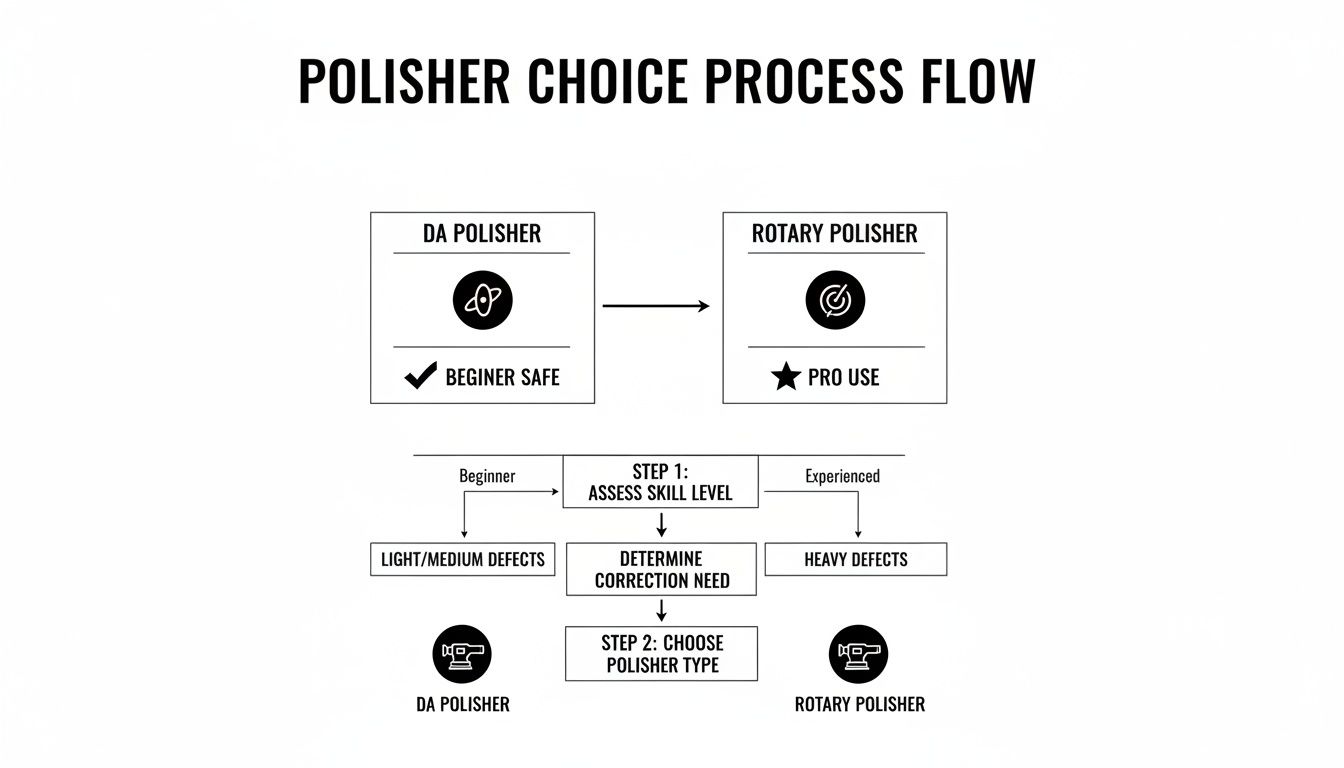
It clearly lays out the difference between the forgiving DA polisher and the high-powered rotary, making it easy to see which tool fits your experience level and the job at hand.
Executing The Perfect Pass
Once the polish is spread, it's go-time. Bump the speed up to a medium-high setting—usually a 4 or 5 on most DA polishers—and start moving in a deliberate cross-hatch pattern. Think slow and steady. Go side-to-side, then up-and-down, making sure to overlap each pass slightly. This guarantees you hit every square inch of the section.
Apply just enough pressure to keep the machine working, about 5-10 pounds. You're guiding it, not forcing it. The idea is to let the pad spin and oscillate freely. If you lean on a DA polisher too hard, you’ll stall the pad, and the correction stops dead. Let the machine, pad, and polish do the work for you.
The most critical piece of advice I can give you is this: keep the buffing pad completely flat against the paint at all times. The second you tilt it, you're focusing all that heat and friction onto a tiny edge, which is a fast track to holograms, buffer trails, or even burning right through the clear coat.
After a few cross-hatch passes, you’ll see the polish residue change from a thick, opaque haze to a thin, almost clear film. That's your cue. It means the abrasives have fully broken down and corrected the paint. Now you can grab a clean microfiber towel, wipe away the residue, and inspect your work.
Pro Tips For A Flawless Finish
Beyond the basic movements, a few habits I've picked up over the years can make a huge difference in your results and efficiency.
- Cord Management: Drape the power cord over your shoulder. Always. This keeps it from dragging across the panel you just spent 10 minutes perfecting and scratching it all over again.
- Keep Your Pads Clean: After every single section, clean your pad. Caked-on polish and paint residue kill its cutting ability. A quick scrub with a pad brush or a blast of compressed air is all it takes.
- Get an Inspection Light: Your overhead garage lights lie. They hide fine swirls and haze. A good LED inspection light is non-negotiable for seeing the true state of the paint and confirming the defects are actually gone before you move on.
- Work With the Curves: On contoured panels, let the machine follow the body lines, always keeping that pad flat. You’ll probably need to shrink your working section size to get into tight curves properly.
Getting these techniques down is all about practice, but the payoff is that flawless, mirror-like finish we’re all chasing. If you want to dive deeper into the products making this possible, check out our article on the vital role of a quality buffing compound for car paint. With your paint now perfect, the next step is locking in that shine with a coating that’s worthy of all your hard work.
Locking In Perfection With Next-Generation Protection
After all those hours of painstaking work, your car's paint is finally perfect. The swirls are gone, the gloss is deep, and the reflections are so sharp you could shave in them. But what now? How do you keep it looking that way?
This is where the real work begins, and it's just as critical as the paint correction itself.
I've seen it a thousand times. A client is over the moon with their freshly buffed car, but a few months later, they're back, frustrated by new swirls and a dulling finish. The culprit is almost always a short-lived wax or a basic sealant that just couldn't handle the real world. This is exactly where modern coating technology completely changes the game.
Beyond Wax: The Elastomer Revolution
Forget everything you think you know about traditional carnauba waxes and even those early, brittle ceramic coatings. To truly protect the masterpiece you just created, you need a shield designed for the harsh realities of the road. That's where Titan Coatings' advanced Elastomer technology comes in, creating a whole new class of protection.
Our Alpha Quartz coating, built with our proprietary Dark Matter Tech and a unique nanotube structure, forms a flexible and incredibly resilient barrier over your paint.
- Hardness Meets Flexibility: Old-school ceramics can be rigid and prone to micro-fracturing under stress. Our Elastomer coatings, on the other hand, are hard like glass but remain elastic.
- Temperature Immunity: This flexibility is huge. It means the coating can handle extreme temperature swings—from freezing winter nights to blistering summer days—without cracking or failing.
- Impact Resistance: Its elastic nature lets it absorb the energy from bug splatters and small road debris, which dramatically cuts down on the risk of chips and etchings.
This screenshot gives you a peek into the advanced science behind Titan's Alpha Quartz coating.
You can see how it creates a durable, high-gloss layer that essentially shrink-wraps your hard work in a protective shell.
Why Your Buffing Work Deserves Superior Protection
Think about it like this: you just spent a weekend renovating a room, getting the walls perfectly smooth and applying a flawless coat of paint. Would you just leave them exposed, or would you seal them with a durable, washable topcoat to preserve all that effort? Your car's paint is no different.
Sealing your freshly buffed paint with a product like Alpha Quartz isn't just an optional finishing touch. It's the final, crucial step of the entire paint correction process. It’s what turns your hard work from a temporary shine into a long-term, protected investment.
This isn't just another coating; it's a military-grade shield engineered for your paint. It ensures the deep gloss and swirl-free finish you just slaved over remains locked in, defending against UV rays, harsh chemicals, and the daily abuse of the road.
With the right protection, you won't have to break out the buffer again for years. For a deep dive into the full application, check out our guide on applying ceramic coating to your car.
Now that the paint is perfect and protected, there's one more surface that can elevate the entire look—and safety—of your vehicle.
Don't Forget the Glass: The Final Touch for a Flawless Finish
You’ve spent hours, maybe even days, dialing in that paint to perfection. It's glowing. So why would you stop there and leave the glass untreated? A truly professional job isn't complete until the glass is just as stunning and protected as the paint.
Think about it: what good is a flawless finish if your view of the road is smeared and hazy the second it starts to rain?
The Difference is Crystal Clear
Driving in a downpour with a treated windshield is a completely different, stress-free experience. You’ll see water bead up and literally fly off the glass, to the point where you barely even need your wipers. That's not just a cool effect—it's a massive safety upgrade.
This is exactly what Titan's APEX Glass Ceramic Coating was made for. It’s a dead-simple, highly effective way to create an intensely hydrophobic surface on all your automotive glass, enhancing visibility and making your drive much safer and more comfortable.
This is the stuff that makes that magic happen.
We engineered this formula to go on easy and hold up through whatever the weather throws at it.
Applying APEX does more than just repel water. It boosts your visibility day and night, cuts down on annoying glare, and makes scraping off ice or bug guts almost effortless. It’s the perfect complement to our Elastomer coatings, which protect your paint. While Alpha Quartz is keeping your paint safe, APEX is keeping your vision clear.
A clean, coated windshield isn't just about looks. It’s a real safety feature that can improve your reaction time in bad weather. It's a non-negotiable step for any complete detail.
By treating your glass, you’re locking in that final piece of the puzzle, enhancing both the look and the safety of the vehicle. Want to dive deeper into the science behind it? Check out our guide on what makes a quality ceramic coating for glass.
Your Top Car Buffing Questions, Answered
Jumping into paint correction for the first time can feel a bit overwhelming. You've got the gear, you've read the steps, but a few nagging questions are probably still bouncing around in your head. That's perfectly normal. Let's tackle some of the most common questions I hear from guys just starting out, so you can move forward with confidence.
How Often Should I Buff My Car?
Here's the most important thing to understand: buffing is a major surgical procedure for your paint, not a routine check-up. Because it physically removes a tiny layer of clear coat, a full paint correction should be a rare event—think every few years, at most.
The real professional's mindset isn't about how often to buff, but how to buff it right once and then protect that finish so well you won't have to do it again.
I've got a buddy, Mark, who was obsessed with his black sedan. He was out there polishing it every six months, chasing that last 1% of gloss. I had to be the one to show him his paint was getting dangerously thin. We did one last, careful correction and locked it in with Titan’s Alpha Quartz. That tough, flexible elastomer shield stopped new swirls from even starting. He hasn't touched his polisher since. That’s the goal: perfect it, then preserve it.
Can I Just Buff My Car By Hand?
You can certainly apply a wax or sealant by hand, and that's great for protection. But for true paint correction—removing swirls, scratches, and oxidation—a machine is non-negotiable.
A good dual-action or rotary polisher is what creates the consistent speed and energy needed to work the abrasives in a compound or polish. This action levels the clear coat and restores clarity. Trying to do this by hand just doesn't generate the force required for anything beyond the absolute lightest haze, and you'll often end up with an uneven, patchy finish.
What's The Real Difference Between Buffing, Polishing, And Waxing?
People throw these terms around all the time, often incorrectly. Let's clear it up once and for all.
- Buffing is the umbrella term. It just means using a machine to work on the paint.
- Compounding is the heavy-lifting stage of buffing. You use an aggressive compound to remove serious defects like deeper scratches and heavy swirl marks.
- Polishing is the finishing step. It’s a much finer abrasive process that refines the surface after compounding, cleans up any haze, and really amps up the gloss and clarity.
- Waxing (or Sealing/Coating) is the final, non-abrasive step. This is all about protection. You’re laying down a barrier—be it a wax, sealant, or a high-tech elastomer coating—to protect the beautiful finish you just created.
What Happens If I Burn Through The Paint?
This is the big one. Burning through the paint is the cardinal sin of buffing. It means you've gone right through the clear coat and exposed the color coat or, even worse, the primer underneath. The only way to fix this is a full repaint of the panel, and that gets expensive, fast.
This is a real risk with high-powered rotary polishers, which is exactly why we steer beginners toward the much more forgiving DA polisher.
To stay safe, always keep the machine moving smoothly across the panel. Never let it sit in one spot. Use light to moderate pressure and be extra careful around sharp body lines and panel edges where the paint is naturally much thinner.
After investing all that time and effort to get your paint looking flawless, don't let it go to waste. Protect your hard work and your crystal-clear glass with the best technology on the market. Titan Coatings offers next-generation protection engineered to keep your car looking incredible for years.
See what a true professional-grade finish looks like with Titan Coatings' Alpha Quartz and APEX Glass Ceramic Coating.
0 Comments