So, you’ve noticed your car’s paint doesn’t have that pop it used to. It looks dull, chalky, and frankly, a little sad. That’s oxidation. At its core, removing it means carefully stripping away that damaged top layer to reveal the healthy, vibrant paint underneath. The go-to arsenal for this job typically includes a clay bar, a quality polishing compound, and a machine polisher.
This process is about more than just a deep clean; it’s a full-on restoration that brings back the original color and gloss you thought were gone for good.
Bringing Your Car's Faded Paint Back to Life
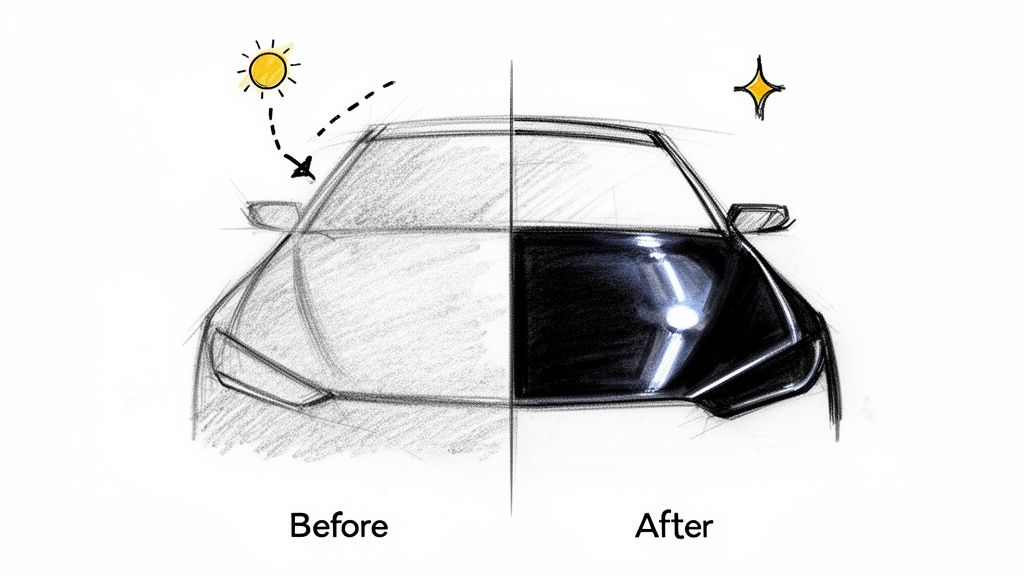
It’s a familiar sight for any detailer: a car rolls in looking tired, its once-vibrant finish now hazy and lifeless under the sun. That’s oxidation, the result of a constant battle between your paint's clear coat and the elements—harsh UV rays, acid rain, and all the grime the road can throw at it.
I'll never forget a classic muscle car I worked on. The owner, Mark, was convinced its faded red paint was a lost cause and that a costly repaint was the only answer. He had spent years taking it to car shows, but lately, he felt embarrassed by the dull, chalky finish. This guide is for Mark, and for anyone who thinks their car’s finish is beyond saving. It’s not.
We’re going to walk through the exact professional process to reverse that damage, step-by-step.
This Isn’t a Quick Fix—It’s a Real Solution
This isn't about slapping on a product for a temporary shine. We're talking about a permanent restoration. You’ll learn how to correct the existing damage and then lock in that finish with modern protection that keeps the gloss from fading away again.
Restoring faded car paint takes patience and a sharp eye for detail, but the payoff is immense. You’re not just making the car look good; you're preserving its value and restoring a sense of pride every time you look at it.
Key Takeaway: Correcting oxidation is a restoration process, not just a cleaning one. It involves removing the damaged top layer of paint to reveal the fresh, vibrant color underneath and then protecting it from future damage.
Whether you're a pro detailer looking to refine your technique or a weekend warrior ready to tackle a big project, this guide will give you the confidence you need. We'll get into the specific tools and methods that deliver those jaw-dropping, professional results. You can find more details on this process here: https://titancoatings.us/how-to-restore-faded-car-paint/
Of course, the best offense is a good defense. Understanding what maintenance your car needs is crucial for preventing future issues like oxidation from even starting.
Once we've brought that paint back to life, the final step is to make sure it stays that way. We'll cover how to protect your hard work with protection that goes way beyond what old-school waxes and sealants can offer, ensuring that brilliant finish lasts for years.
Diagnosing Your Paint Before You Polish
Before a single drop of polish even touches the paint, you have to play detective. I can't stress this enough. Jumping in with the wrong correction technique can quickly turn a fixable problem into a very expensive mistake.
I learned this the hard way early in my career. I mistook the first signs of clear coat failure for simple oxidation on a client's car and went at it with a compound. Big mistake. That experience taught me that proper diagnosis isn't just a step—it's the most critical part of the entire job.
This isn't some rare issue, either. Oxidation from UV exposure affects millions of cars. In fact, studies show that up to 70% of cars over five years old have visible signs of it. Ever since clear coats became standard in the 1990s, we've seen this problem grow, with untreated paint losing up to 50% of its gloss in just a few years under the sun.
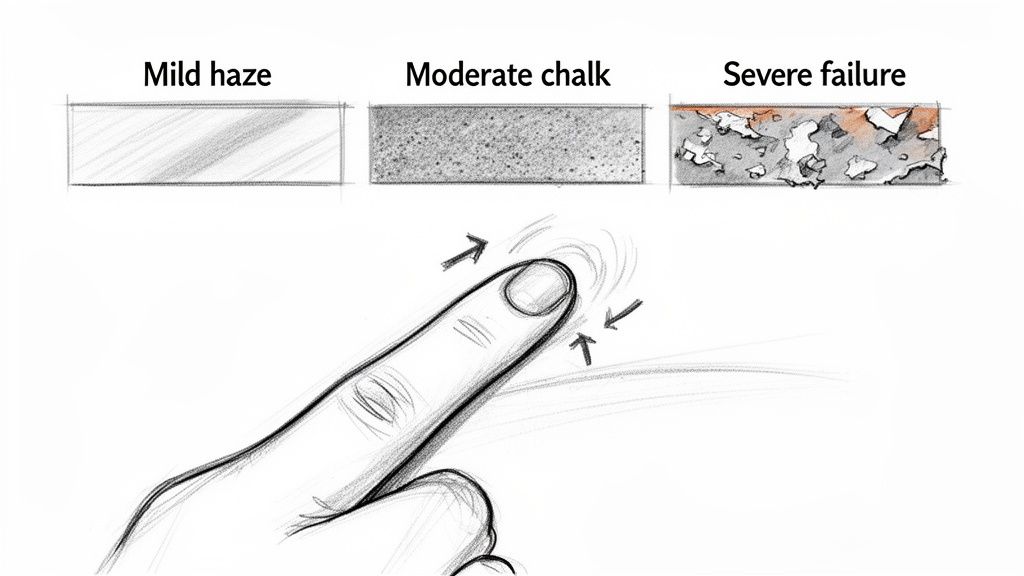
Reading the Signs: Three Levels of Oxidation
To build the right game plan, you need to know exactly what you're up against. Oxidation usually shows up in three distinct stages, and each one demands a different approach.
- Mild Haze: This is the first warning sign. The paint has lost some of that deep, reflective quality and just looks a little dull, especially in direct sunlight. If you run your hand over it, it still feels pretty smooth.
- Moderate Chalkiness: Now things are getting more serious. The finish feels dry and might even leave a light, powdery residue on your fingers. The color is noticeably faded, and there’s no real depth or shine left.
- Severe Failure: This is the point of no return for polishing. The clear coat is visibly compromised—it feels rough, looks discolored, and might even be starting to flake or peel. At this stage, the protective layer is gone.
The Fingertip Test: Your Go-To Diagnostic Tool
Sometimes, the best tool you have is your own sense of touch. After you've properly washed and dried a small test section, just gently run your fingertips across the paint.
If the surface is slick and smooth, you're probably looking at mild oxidation that a light polish will knock right out. But if it feels gritty or rough, you're likely dealing with embedded contaminants on top of moderate oxidation. That's going to require a more involved decontamination process. For more on that, check out our guide on how to decontaminate car paint.
But here’s the crucial part: if the surface feels uneven, has rough patches, or you can actually feel the edges of peeling paint, stop immediately. That’s clear coat failure. Polishing will only make it worse by stripping away what little protection is left.
Getting this initial assessment right is everything. It ensures you choose the right products and techniques, preventing you from using a heavy-handed approach on healthy paint or, just as bad, wasting time with a weak one on a severely damaged finish. This is the foundation for a successful restoration.
Assembling Your Paint Restoration Toolkit
When it comes to stripping away years of oxidation and bringing paint back to life, your success rides on the tools you bring to the fight. This isn’t about just grabbing a bottle of polish and a rag. It’s about building a system where each tool plays a specific, critical role in getting that flawless, factory-fresh shine.
I’ll never forget a guy who tried to restore his faded red sedan using nothing more than dish soap, an old t-shirt, and a cheap can of spray wax. The result was an aggravating, blotchy mess that honestly looked worse than when he started. That’s a classic case of good intentions gone wrong because of the wrong gear. A small investment in the right tools made his second attempt look like a professional respray. That’s the power of a proper toolkit.
Must-Haves for Any Oxidation Removal Job
To avoid that kind of disaster, there are a few non-negotiables you absolutely need. These aren’t just products; they're the foundational pieces that work together to safely remove that dead, chalky layer of paint without touching the good stuff underneath.
- pH-Neutral Car Shampoo: Your prep starts here. Harsh soaps and detergents will strip any existing protection and can actually dry out the paint, making your job harder. A quality pH-neutral soap cleans thoroughly without causing more harm.
- Clay Bar or Clay Mitt: A wash only gets you so far. A clay treatment is what truly decontaminates the surface, pulling out embedded grit, rail dust, and industrial fallout. You can’t get a smooth finish by polishing a gritty surface—it’s like trying to sand a table that’s covered in gravel.
- Polishing Compound & Pads: This is the muscle of the operation. You need a good compound to gently cut away the oxidized layer, paired with a set of foam or microfiber pads. Having a range from a heavier cutting pad to a soft finishing pad gives you control over the process.
- Isopropyl Alcohol (IPA) Solution: After polishing, you need to see what you’ve really accomplished. An IPA wipe-down removes all the polishing oils and fillers, revealing the true state of the paint and ensuring your wax, sealant, or coating will bond properly.
Before you start cutting and polishing, it's smart to know what you're working with. Below is a quick rundown of the gear you'll need, separating the absolute essentials from the pro-level upgrades that can save you time and deliver even better results.
Oxidation Removal Toolkit Essentials vs Upgrades
| Tool/Product | Essential (DIY/Beginner) | Professional Upgrade |
|---|---|---|
| Polisher | Quality Dual-Action (DA) Polisher | High-Torque DA or Rotary Polisher |
| Compounds | All-in-one compound/polish | Dedicated cutting and finishing compounds |
| Pads | Basic foam pad kit (cutting, polishing) | Microfiber and wool cutting pads, finishing foam pads |
| Decontamination | Standard clay bar with lubricant | Clay mitt/towel for speed, iron remover spray |
| Surface Prep | Isopropyl Alcohol (IPA) solution | Dedicated panel prep spray |
| Lighting | Bright sunlight or strong garage light | Professional detailing inspection light (swirl finder) |
Ultimately, starting with the essentials is perfectly fine. But as you gain experience, you'll see how upgrading to professional-grade tools not only speeds up your workflow but also elevates the quality of your finish.
Your Most Important Tool: The Polisher
Look, you can polish a car by hand. You can also dig a foundation with a shovel. A machine polisher is the tool that separates a decent weekend job from a truly professional restoration.
For anyone just starting out, or for mobile detailers who need versatility and safety, the dual-action (DA) polisher is the undisputed king. Unlike a high-speed rotary polisher, which can generate enough heat to burn through clear coat in seconds in the wrong hands, a DA polisher is incredibly forgiving.
Its random orbital motion keeps heat down and spreads the polishing action over a wider area. This design practically eliminates the risk of holograms and buffer trails, letting you focus on your technique instead of worrying about damaging the paint.
Getting comfortable with a machine is a game-changer. If you want to dive deeper into what makes a great machine and which one is right for you, check out our guide on finding the best car polisher for beginners. Building your toolkit is the first real step toward mastering paint correction.
The Complete Paint Correction Process
Alright, you've got your tools laid out and a solid game plan. Now it's time to roll up your sleeves and bring that dead paint back to life. This is where the real work—and the real magic—happens.
Picture this: a moderately oxidized black sedan pulls up. Under the sun, it looks more like a dusty gray. The owner is attached to the car, but that chalky, faded finish is a real eyesore. Let's walk through how I'd tackle this job, step by step, from a pro's perspective.
My first move, always, is a full-on decontamination wash. This isn't your average weekend car wash. We're talking about a meticulous process to pull out embedded iron particles, road tar, and all the gunk a regular wash can't touch. A truly clean surface is a safe surface—it stops you from grinding those nasty contaminants right back into the paint during the correction stage.
Once the wash is done, the clay bar comes out. Even after a deep clean, you can often feel a slight grittiness on the paint's surface. A good clay bar treatment, with plenty of lubrication, lifts those bonded contaminants away, leaving the paint feeling slick and smooth as glass. Don't even think about skipping this part; it's non-negotiable if you want a flawless finish.
Diving into Polishing and Correction
Now for the main event. The car is prepped, dried, and all the sensitive trim is taped off. Time to choose our weapons. For this black sedan with moderate oxidation, I’m reaching for a medium-cut foam pad and a quality compound on my dual-action (DA) polisher. The idea is to remove the damaged, oxidized layer without getting too aggressive right out of the gate.
Working in small, manageable sections is the key to success. I'll stick to a two-foot-by-two-foot area at a time. Good lighting is your best friend here; it lets you see the oxidation literally disappear as the true color starts to pop with each pass. I’ll make several slow, overlapping passes—first side-to-side, then up-and-down—letting the machine do the heavy lifting. After each section, a quick wipe with a clean microfiber towel reveals the progress.
The flow chart below breaks down this restoration workflow into its core stages.
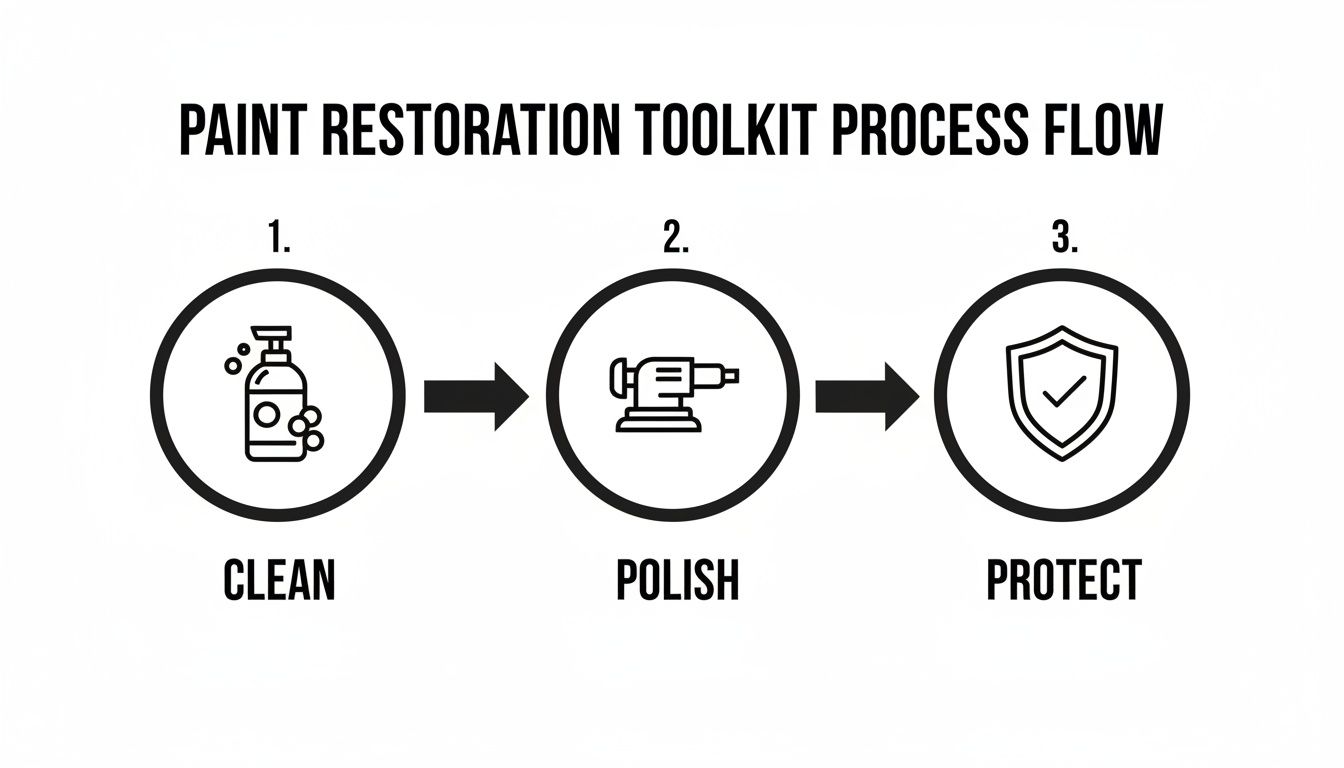
This simple progression—clean, polish, protect—is the backbone of every single successful paint restoration I've ever done.
Refining the Finish for Maximum Gloss
After the compounding stage, the oxidation is gone and the paint looks a thousand times better. But up close, you might notice a slight haze or some micro-marring from the cutting process. This is where the artistry really comes into play.
I’ll switch over to a soft finishing pad and a fine polish to refine the surface. This second step is all about dialing in the clarity and depth, removing any trace of the compounding stage. On a dark color like black, this is what creates that deep, dripping-wet gloss that makes people stop and stare.
The final step before protection is a thorough Isopropyl Alcohol (IPA) wipe-down. This strips away all the polishing oils, leaving a perfectly clean, raw surface that's ready to bond with a wax, sealant, or ceramic coating. For a deeper dive, check out our complete guide on how to paint correct a car.
Pro Tip: Always start with the least aggressive pad and compound combo you think might get the job done. You can always step up your game if it's not enough, but you can't put paint back on if you start too strong.
This methodical approach isn't just my opinion; it's backed by results across the industry. For deeper oxidation, especially on high-end vehicles, proper compounding techniques can achieve a 95% restoration rate. In places with brutal weather, mobile detailers have found that using the right products can even slash their labor time by up to 45% without compromising on quality.
Now that we’ve perfected the paint, it’s time to make sure it stays that way.
Locking in That Shine for the Long Haul
You've put in the hours and the sweat to strip away years of oxidation. The paint is finally back to its former glory, dripping with gloss and depth. Now comes the most critical part of the entire process: protecting that hard-earned finish. A simple carnauba wax just isn't going to cut it anymore.
Remember Mark and his faded red muscle car? After we completed the paint correction, he was amazed. The color was deep and vibrant again. But he was worried about how long it would last. This time, we went with Titan’s Alpha Quartz. A year later, it still looked like it had just rolled out of the bay. He was back to winning awards at car shows, and the pride he had in his vehicle was completely restored.
That's the power of modern protection. It’s not just about a temporary shine; it’s about creating a durable, long-lasting shield against the very elements that caused the oxidation in the first place. Titan was the first company to introduce Elastomer coatings to the market, pioneering the use of nano-tube and Dark Matter technologies to create something truly revolutionary.
The Elastomer Advantage Over Traditional Coatings
So, what makes a product like Alpha Quartz so different? It all comes down to Titan's groundbreaking Elastomer technology. For years, the industry standard has been rigid ceramic coatings. They're hard, sure, but that rigidity is also their biggest weakness. Extreme temperature swings—from a frozen winter morning to a blistering summer afternoon—cause them to develop microscopic cracks.
Those tiny fractures become gateways for moisture, UV rays, and contaminants to once again attack the clear coat. Elastomer coatings, on the other hand, are engineered to be both hard as glass and remarkably flexible.
This elasticity means the coating won't crack under temperature changes and can even absorb the impact from bugs hitting the car's surface. It literally moves with your vehicle's body, providing a superior, resilient defense that simply outlasts old-school options. This makes Alpha Quartz perfect for both DIY enthusiasts and mobile detailers looking for an easy-to-install product with incredible results.
This resilience isn't just a marketing claim; it's a proven reality. Think about it: more than 52% of oxidation catalyst applications are tied directly to automotive use, which just shows the massive need for effective, long-lasting surface protection. While most of us pros use a 3-step removal process, the job can fail surprisingly quickly without a truly robust protective layer. The difference in durability is staggering; some of these modern coatings can boost it by as much as 400%, according to third-party tests. You can dig into more of the market trends on oxidation catalysts at Straits Research.
Beyond the Paint: Total Clarity for Your Glass
Protecting your vehicle doesn't stop at the paint. Your windshield is your window to the world, and keeping it perfectly clear is a huge safety issue, especially in nasty weather. Driving through a downpour is stressful enough without water sheeting across the glass and your wipers struggling to keep up.
This is exactly where a specialized glass coating makes a world of difference. Titan’s APEX Glass Ceramic Coating is designed to create an intensely hydrophobic—or water-fearing—surface on your windshield and windows. It's incredibly easy to use, delivering professional-grade results for anyone.
What does that really mean for you and your clients?
- Stress-Free Rain Driving: Once you're going over 35-40 mph, rainwater just beads up and flies right off the glass. Often, you don't even need to turn your wipers on.
- Enhanced Visibility: The coating fills in the microscopic pores of the glass, creating a perfectly smooth surface that cuts down on glare and improves clarity, day or night.
- Easy Application: Unlike some fussy products, this is a simple wipe-on, wipe-off application that gives you months of solid protection.
By treating the glass, you’re not just making the car easier to clean—you're making it fundamentally safer to drive. It’s a small step that delivers a massive improvement to the whole driving experience.
Your Top Paint Oxidation Questions, Answered
Even when you've done your homework, every paint correction job has its own quirks. Let's tackle some of the most common questions that pop up when you're in the trenches, removing oxidation and trying to protect that new finish.
Can I Really Get Rid of Heavy Oxidation by Hand?
Honestly? No. If you're dealing with a whisper of surface haze, you could technically polish it by hand, but you'll be putting in a heroic amount of effort for a result that's likely to be blotchy and uneven.
For anything beyond the absolute lightest oxidation, a machine polisher isn't just a luxury—it's a necessity. A good dual-action (DA) polisher is your best friend here. It gives you the power and consistency to safely cut through that dead, chalky paint, turning a days-long manual nightmare into a few hours of focused work.
My Clear Coat Is Actually Peeling. Will This Process Help?
This is a crucial distinction to make before you ever touch the paint. Polishing will not fix a peeling clear coat. In fact, it will make it much, much worse.
Peeling, flaking, or seeing those tell-tale cracks means the clear coat has failed. The bond between the clear and the base coat is gone. Trying to compound or polish this will just rip more of it away, guaranteed. If you're seeing this kind of damage, the panel needs a repaint. End of story. We've got another guide that goes deep into how to fix clear coat peeling if you need to understand that process better.
What's the Real Difference Between an Elastomer Coating and a Standard Ceramic?
Think of it like this: traditional ceramic coatings are like a sheet of glass—incredibly hard, but brittle. They're great at resisting scratches, but they can develop micro-cracks over time from the constant expansion and contraction of the metal panels in changing temperatures or from small rock chips.
Titan’s Elastomer coatings, like Alpha Quartz, are a whole different ballgame. They use advanced nano-tube technology to create a shield that is both incredibly hard and flexible. This elasticity means it can absorb small impacts and flex with the body panels, preventing those micro-cracks and giving it far superior durability and a longer lifespan.
What's the Easiest Way to Protect My Paint After Polishing?
After all that hard work, you want protection that’s both tough and easy to apply. This is where Titan's Ultra Ceramic Spray really shines. It’s perfect for anyone who wants serious protection without the learning curve of a full professional coating.
Once you’ve finished polishing and wiped the panel clean, you just spray it on and wipe it off with a clean microfiber towel. That's it. You get a durable, slick, hydrophobic layer that provides real-deal protection from the elements and makes washing the car a breeze. It’s pro-level results without the complex install, making it a go-to for enthusiasts and mobile pros alike.
Ready to lock in that freshly polished shine with a simple, yet powerful solution? Titan Coatings' Ultra Ceramic Spray is your answer. Discover the easy way to protect your hard work on our website.
0 Comments