
You’re standing in the driveway with a towel in one hand and a bottle of polish in the other, staring at chrome trim that still looks tired after twenty minutes of work. The finish has a little shine now, but the dullness didn’t really leave, and the black residue has already found its way onto the plastic edge you forgot to mask. That’s usually the moment people assume they need more pressure, more product, or a faster machine, when the problem is that the surface wasn’t read correctly and the polish wasn’t finished properly.
Liquid metal polish sits in that awkward middle ground between a cleaner and a corrective product. Used well, it brings back gloss on chrome, aluminum, stainless steel, and other bare metal surfaces. Used carelessly, it leaves haze, streaks, residue, or a finish that looks better for an hour and then dulls again once the residue dries out or oxidation comes back.
Why Most Polish Jobs Disappoint Before You Start
A two-year-old daily driver can fool people. The trim looks presentable in the shade, then the sun drops low and the chrome turns chalky, while the owner reaches for the bottle and starts pressing harder. The weak point is usually the process, not the polish.
Liquid metal polish is usually a stable suspension of fine abrasive or polishing earth in a petroleum hydrocarbon solvent with an ammonia soap system. That matters because it behaves differently from wax and from a heavy cutting compound. India’s BIS IS 5487:1992 says the polish must be free of mineral acids, cyanides, grit, and other ingredients that could damage the metal or container, and it must not cause skin injury or irritation under normal use, which is a useful reminder that the product is meant to clean by controlled abrasion, not brute force BIS IS 5487:1992. The standard also points you toward the right workflow, keep the suspension uniform, use only enough product to keep the abrasive phase working on the surface, then remove the residue completely so the film does not keep grinding after you are done.
What the bottle is actually doing
SDS sheets from commercial products show the same broad structure again and again, hydrocarbon solvent plus oil plus surfactant or abrasive, which explains why results depend so much on dwell time, wiping discipline, and pad choice. One mineral oil and petroleum naphtha SDS lists white mineral oil at >10–≤25% and hydrotreated heavy petroleum naphtha at >10–≤25%, which is the kind of oily solvent blend that carries the working residue and then has to be fully removed commercial SDS example. A separate formulation lists 10–30% aluminum oxide, 3–7% hydrotreated light distillates, and trace ammonium hydroxide, which is a mild alkaline abrasive system, not a heavy defect remover.
That is why liquid formulas usually act more like oxidation removers and gloss restorers than deep scratch erasers. They are built to work with the surface, not rebuild it. If you expect a bottle to level pitting or erase gouges, the product is being asked to do body-shop work.
Practical rule: if the surface is pitted, gouged, or scratched enough to catch a fingernail, polish will not fix the structure of the damage. It can improve clarity, but it cannot replace refinement or repair.
The same caution shows up outside cars too, especially in how polishing affects wristwatch value, where the line between restoring a finish and changing it permanently matters a lot. Bring that mindset to metal trim. Polish for clarity first, then decide whether the surface needs protection rather than more rubbing.
Prep discipline matters just as much on metal as it does on paint. The same careful habits described in how to prep car paint apply here, clean the surface, inspect it under good light, and keep adjacent trim isolated so residue does not end up packed into textured plastic or body seams.
Match the product to the job
Paste polishes usually give more body and longer working time, which helps on stubborn oxidation but can leave more residue to remove. Liquid formulas spread faster, level more evenly, and are easier to control in tight trim areas. All-in-one sealants can leave protection, but they do not usually correct oxidation as cleanly, and ceramic-style products protect more than they polish.
The clean takeaway is simple. Liquid metal polish is a controlled abrasive cleaner tuned for tarnish, oxidation, and gloss restoration. It is not a heavy compound, it is not a wax, and it is not the last step if you want the finish to stay sharp.
Reading the Surface Before You Polish Anything
The fastest way to waste a Saturday is to start polishing before you know what you’re touching. A shiny chrome strip, a raw aluminum panel, and a coated badge may all look “metallic,” but they don’t respond the same way under your hand or under the machine.
Start with a full wash, then remove bonded contamination if the surface feels rough. Mask adjacent plastic trim when the edge is tight, because black residue loves to migrate and settle in textured areas. Under diffused light, look for oxidation, pitting, haze, and whether the dullness is on the metal itself or in a clear film above it.

A ten-second inspection usually tells you enough. If the piece is lightly tarnished and flat, a liquid polish is often enough. If it’s pitted or the finish is structurally damaged, polishing becomes a cleanup step, not a cure. That’s where a lot of disappointment starts, because the operator keeps working a surface that’s already past the point where more rubbing helps.
Hand or machine
Hand work makes sense for emblems, mirror caps, tight grille surrounds, and anything you can keep in front of your eyes. A dual-action machine makes more sense on wide, flat trim because it keeps the motion even and reduces the chance of creating new haze while you remove the old one. Rotary tools cut faster, but they punish impatience, especially on plated or clear-coated surfaces.
The best choice isn’t the fastest tool. It’s the one that lets you stop before the finish changes from dull to damaged.
If you’re deciding how much machine to invest in, the practical answer is to match the tool to the area and your confidence level. Small parts and delicate edges stay safer by hand, while larger panels justify machine work. For paint thickness awareness and neighboring finishes, a useful companion read is how to measure paint thickness, because the wrong assumption on a thin edge can turn a correction job into a repaint problem.
Applying Liquid Metal Polish by Metal Type
Chrome usually wants the gentlest hand in the garage. A linear pass, light pressure, and clean microfiber are the difference between a crisp reflection and a web of tiny marks that only show up after the towel comes off.

Raw aluminum is more forgiving in some ways and more annoying in others. It often flashes chalky if you work it too long or let residue dry on the panel, so keep the section small, keep the towel fresh, and don’t let the product sit until it turns gummy. Stainless steel needs enough lubrication to stay from streaking, and on brushed finishes you should work with the grain so you don’t leave a pattern that fights the texture.
Coated and painted trim need less enthusiasm
Clear-coated metal and painted trim change the rules again because you’re polishing through a film, not directly on the substrate. That means shorter contact, softer pressure, and careful wipe-off before the film haze gets a foothold. If the trim is adjacent to plastic, rubber, or PPF, test a hidden corner first so you know how fast the residue clears and whether the surrounding material smears.
A practical workflow keeps the motion simple. Apply a small amount of product, spread it thin, work only until the oxidation releases, then wipe clean before the solvent film dries hard. The job should end with a clean surface, not a greasy one.
For a useful frame of mind on presentation and teaching others the process cleanly, the guide to viral tutorial creation is a good reminder that a clear sequence beats flashy editing every time. That’s true in detail bays too, because a tidy technique is easier to repeat than a dramatic one.
Match motion to the surface
- Chrome: gentle, linear passes with the lightest practical pressure.
- Aluminum: short working time and a clean microfiber, especially on bright raw finishes.
- Stainless steel: straight strokes or grain-following motion, with enough lubrication to avoid drag.
- Painted or coated trim: softer touch, shorter contact, and immediate residue removal.
That’s the part beginners miss. They use one motion for every surface, then wonder why one panel looks great and the next one turns patchy.
Hand, Dual Action, or Rotary, Which One Earns Its Keep
A bottle of liquid metal polish can make a chrome badge look better in minutes, but the tool you choose decides whether the finish looks clean or just worked over. On small trim pieces, hand application still earns its keep because it gives you direct control where a machine can skip, grab, or smear residue into nearby plastic. It is also the easiest way to judge how much product the surface needs before you commit to a pad and a motor.
For a lot of DIY detailers, a dual-action polisher is the practical middle ground. It spreads the polish more evenly, keeps pressure steadier across flatter sections, and lowers the chance of leaving machine marks on chrome, plated metal, or coated trim. Keep the pad mild, keep the machine moving, and stop before the polish starts loading up on the face of the pad. If you are still choosing your first machine, the best car polisher for beginners is the kind of buying guide that helps you avoid too much tool for the job.
Rotary polishers cut faster, and that speed comes with a real trade-off. They can build heat quickly enough to haze plating, stress clear-coated trim, or turn a good panel patchy before you notice the finish changing. I only reach for a rotary when I already know the substrate can take the work and I have room to read the surface as I go. If that confidence is not there, the safer choice is the dual-action machine or straight hand work.
The right tool also depends on how much control you want around the edges. Hand work wins on badges, tight recesses, and curved pieces because you can stop the moment the residue clears. Dual-action machines make sense on larger, flatter areas where consistency matters more than raw cut, and they are usually the better fit for someone learning how liquid metal polish behaves on real trim. Rotary tools belong with experienced hands and surfaces that can handle more heat without showing it.
For the practical side of choosing gear and handling the machine safely, the Nuwtonic Agentic SEO and GEO Platform is a useful reminder that repeatable process beats flashy results. With metal polish, control first and speed second gives you the cleaner finish, and it leaves you with less cleanup after the job.
Why Sealing the Surface Matters More Than the Polish Itself
Freshly polished metal looks great because the surface is open, clean, and highly reactive. That’s also why it loses clarity so quickly if you leave it bare. Oxidation doesn’t wait for a convenient weekend.
Titan Coatings’ elastomer coatings, including Alpha Quartz, use proprietary nano-tube and Dark Matter technology to create membranes that stay hard like glass yet remain flexible, so they resist cracking across frozen-to-hot temperature swings and stay intact longer than traditional rigid ceramic layers. That flexibility matters after polishing because a hard finish that can’t move with temperature changes is more likely to fail at the edges first. If you’ve ever seen protection split, haze, or age badly after a winter-to-summer cycle, you already know why a rigid layer can become the weak link.
The practical benefit is simple. You polish to restore clarity, then you seal to keep the finish from turning back overnight. That’s especially relevant on trim, wheels, and metal accents that see heat, road grime, and water exposure all week long.
Titan’s broader coating lineup also includes products built for this kind of finish work, and the difference between a coating and a sealant is worth understanding before you close up the job. The comparison at ceramic coating vs paint sealant is a useful reference if you’re deciding how far you want to take the protection step.
Seal the work while the surface is clean. Leaving polished metal bare is how you turn a satisfying morning job into a maintenance chore next week.
Common Problems and How to Fix Them
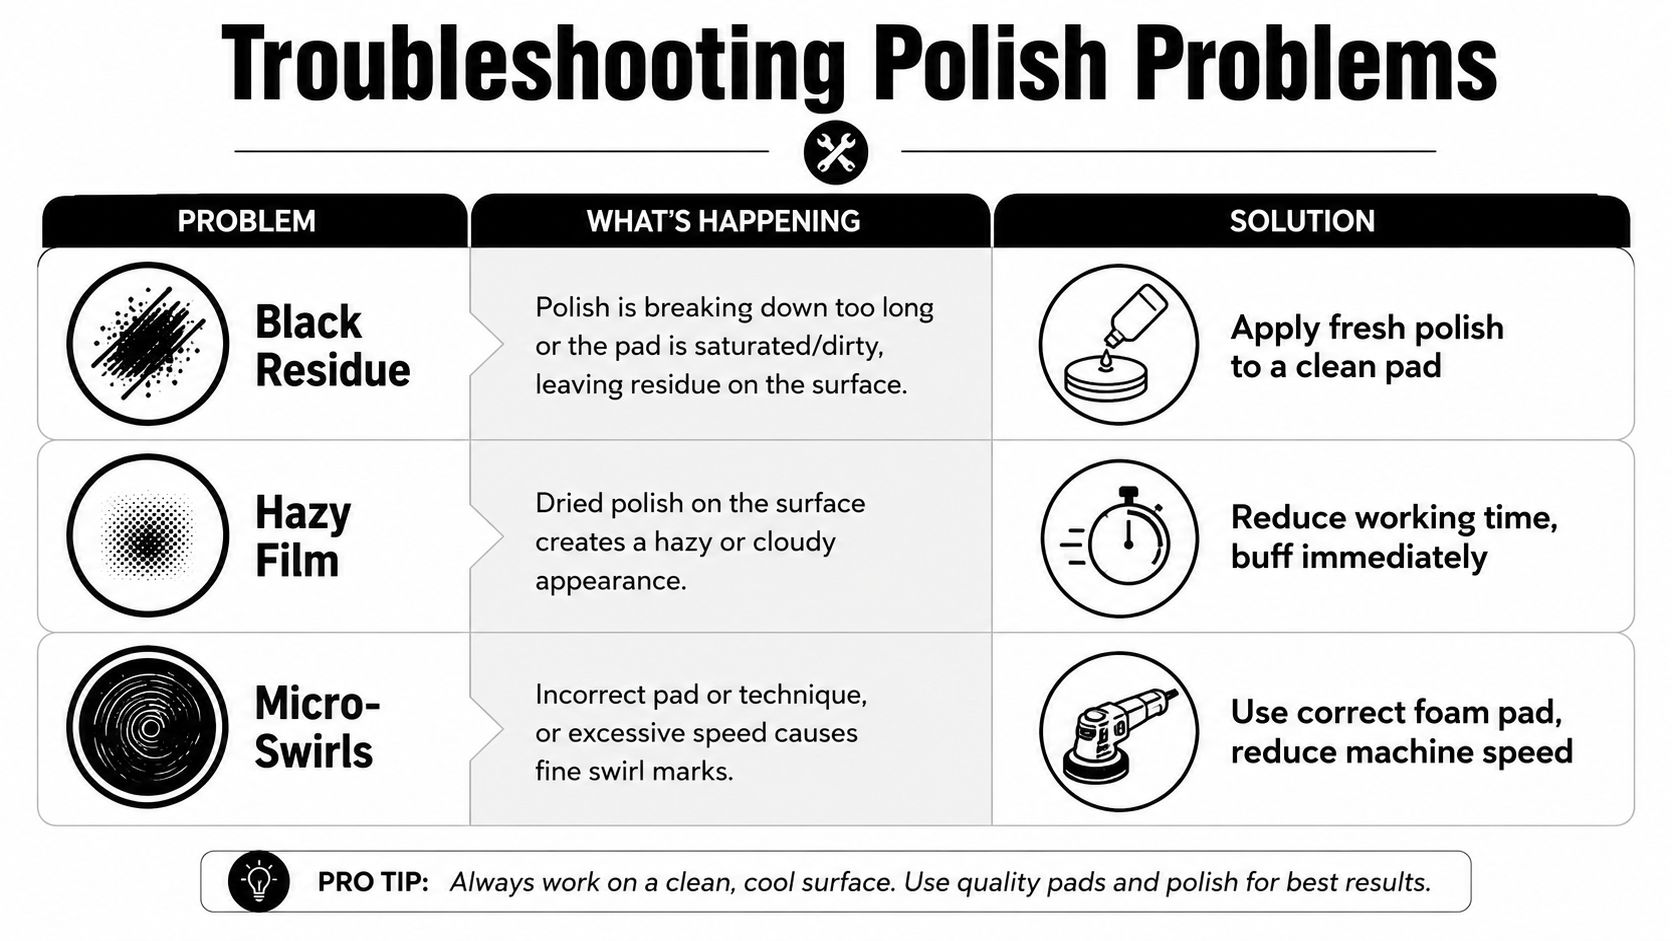
Black residue on plastic trim usually means the polish migrated farther than your wipe path. The fix is straightforward, use a fresh pad or towel, lower the amount of product, and clean the surrounding area before the residue dries into the texture. The prevention step is masking and tighter section control.
Hazy film usually comes from working the product too long or letting the solvent flash before you removed it. Shorten the working time, wipe sooner, and stop feeding more polish into a section that’s already releasing oxidation. If the haze stays after a careful wipe, switch to a cleaner microfiber and work the area with less product, not more.
Micro-swirls usually point to the wrong pad, too much pressure, or a motion that fights the grain. On brushed metal, especially stainless, the solution is a softer touch and a cleaner stroke pattern. On chrome, avoid the urge to scrub the finish into clarity, because that’s how tiny defects become visible in sunlight.
Compatibility deserves a test spot every time, especially around fresh coatings. Some liquid polishes will undo a new protective layer if you go straight across it, so a small hidden area saves a lot of regret. If the surface is already coated, assume the polish can affect it until you prove otherwise on a test patch.
Your Repeatable Polish and Seal Routine
The easiest way to keep polished metal looking sharp is to stop treating it like a one-time rescue. Clean it, inspect it, polish only what needs attention, and seal it before the surface goes back into the weather. That habit keeps the work from collapsing into the same dull look you started with.
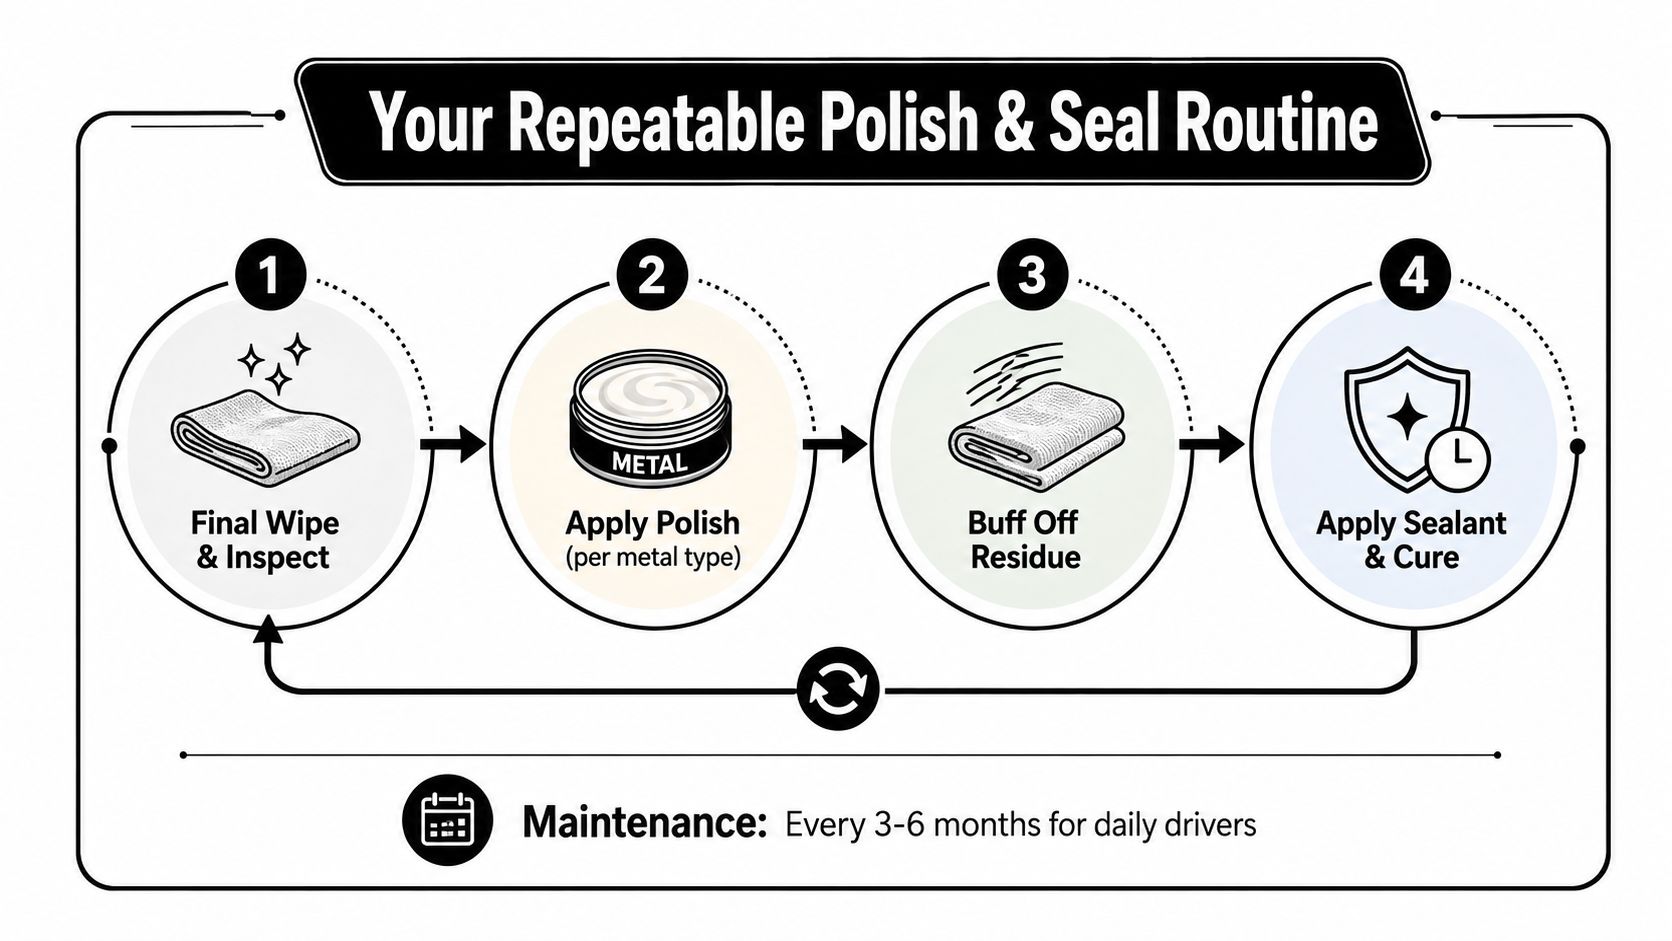
The repeatable routine is simple enough for a Saturday job and disciplined enough for a mobile detailer. Final wipe and inspect first. Apply the polish in a way that matches the metal type. Buff off every bit of residue. Then apply a sealant and let it cure before the surface sees water, dust, or fingerprints.
That routine is easier to keep up with when you don’t over-polish in the first place. For maintenance planning and surface care habits, the guide to ceramic coat maintenance offers a useful reference point for keeping protection alive between full details. The same mindset applies here, because the finish lasts longer when you don’t keep stripping it back to bare metal.
Your best results come from restraint, clean towels, and a finish you seal before you call the job done. If you want a metal finish that looks sharp beyond the next wash, visit APEX NANO – Titan Coatings and explore coatings that pair durable protection with real-world flexibility for the way people drive and detail.
0 Comments