A black car rolled into the bay one afternoon looking sharp under shade and dull under honest light. By the time the sun hit the hood, every shortcut in the prep showed itself.
That's how most paint jobs fail. Not at the coating stage, but hours earlier when someone decided “clean enough” was good enough.
Why a Perfect Finish Begins Long Before the Coating
A lot of people think gloss comes from the last product that touches the paint. It doesn't. Gloss comes from the condition of the surface under that product.
Two cars can leave a driveway looking equally shiny after a wash. The next morning, one shows swirls, old water spots, edge marks, and patchy reflection. The other looks deep and calm from every angle. The difference is almost never luck. It's prep.
I've seen this play out most often on black, blue, and dark gray paint because those colors don't forgive anything. If contamination is still on the panel, if sanding marks weren't refined properly, if polishing oils are still hiding defects, the coating won't rescue the finish. It will preserve what's underneath.
Prep decides whether protection works
A proper surface doesn't just look cleaner. It gives the next layer something stable to bond to. That principle applies across finishing trades, which is why even outside automotive work, resources like Neasden Hardware's wood prepping tips stress the same core idea. Clean first, refine the surface, then protect it.
That logic matters even more with modern coatings. Titan's flexible elastomer approach has a different value proposition than old-school brittle protection. The coating is designed to stay hard on the surface while remaining flexible enough to better handle temperature swings without the same tendency to crack as rigid films. But even advanced chemistry needs disciplined prep. A poor foundation wastes good material.
Practical rule: A coating can amplify clarity, slickness, and protection. It can't hide lazy preparation.
If you're serious about how to prep car paint, start by treating the job like surface engineering, not a quick cleanup. Wash, decontaminate, level, refine, inspect, wipe down, and only then protect.
For anyone building a full workflow, Titan's guide on how professionals detail a car is useful because it frames prep as part of the whole finish, not an isolated chore.
The finish you admire was built in layers
The best-looking coated cars usually have something in common. Their owners slowed down where others rush. They cleaned door edges, checked the paint under direct light, corrected defects before locking them in, and did a final wipe when they were already tired of working.
That's the trade secret. The flawless finish starts long before the coating bottle is opened.
The Critical First Look and Paint Assessment
Before touching a wash mitt, inspect the paint like you're diagnosing a repair. The panel is already telling you what it needs.
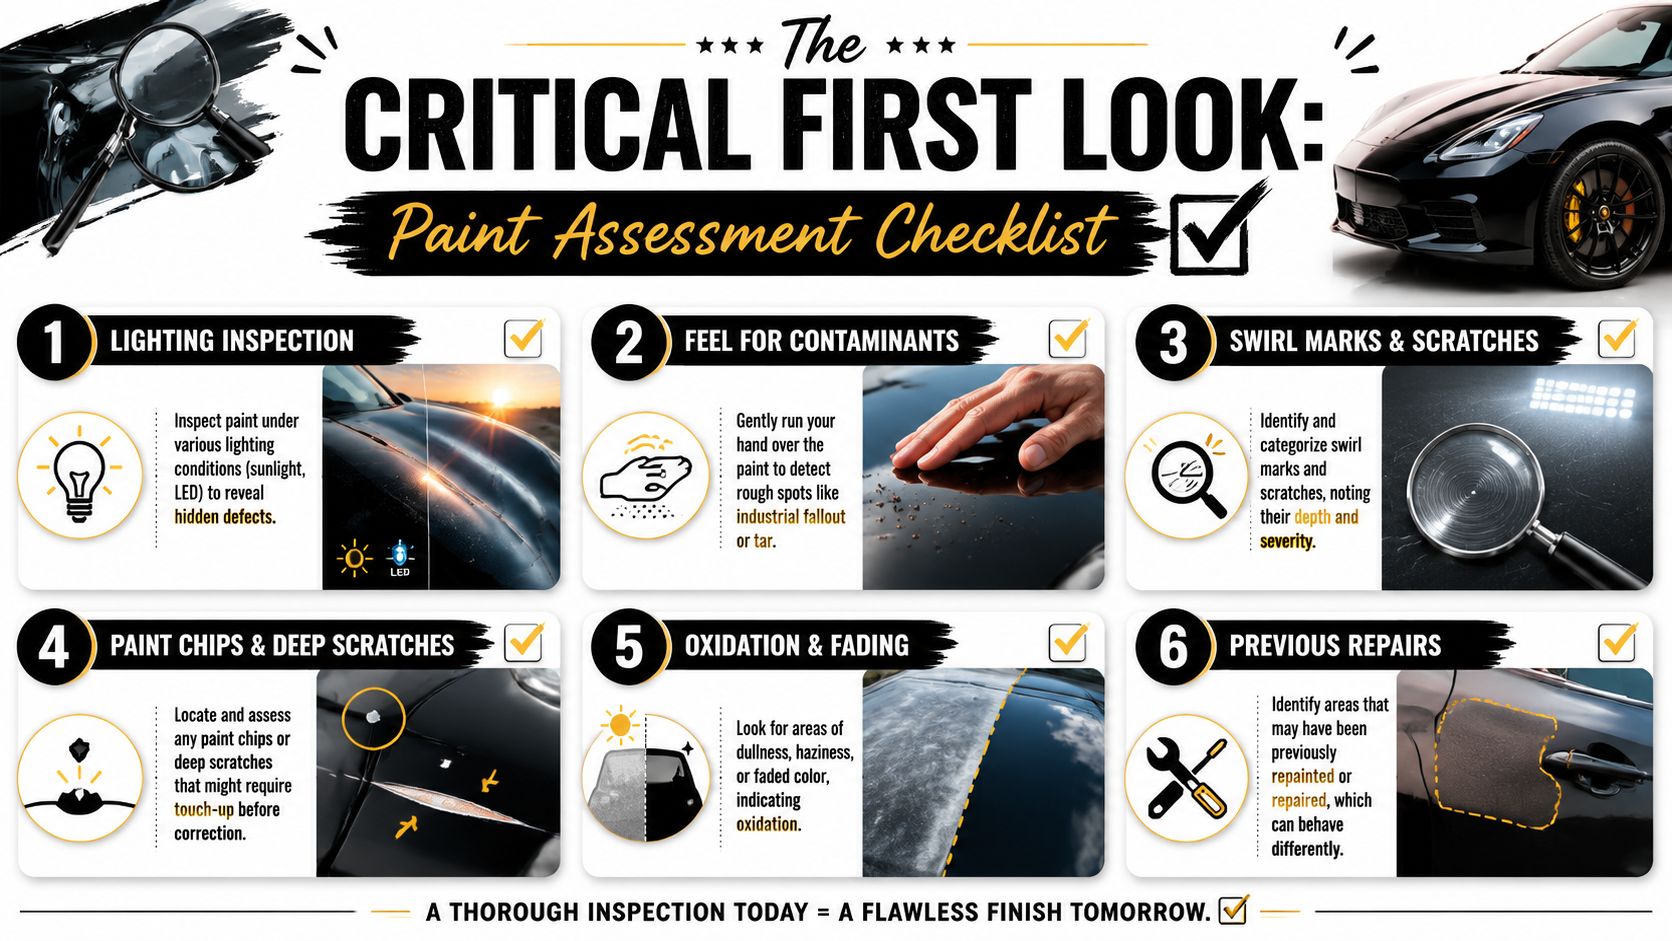
Use light that exposes the truth
Overhead garage lighting misses a lot. Walk the vehicle in daylight. Then use a focused LED or even your phone flashlight at an angle across the panel. Swirls, random isolated scratches, haze, and previous repair transitions will jump out much faster under directional light.
Run your hand lightly across the paint after the first rinse or on a known clean section. If it feels rough, you're dealing with bonded contamination, not just dust.
A few things deserve special attention:
- Swirl marks: Usually point to wash-induced marring or improper drying.
- Straight scratches: Often come from brushes, bags, or careless contact.
- Etching: Water spotting, bird droppings, and chemical fallout can leave craters or stains that won't wash away.
- Dull patches: Can indicate oxidation or prior aggressive polishing.
- Odd texture changes: Often reveal previous bodywork or refinishing.
Check what was repaired before you owned it
A panel that's been repainted can behave differently from factory paint. It may correct faster, mar easier, or react differently to solvents and polishing heat. Look for tape lines, slight color shifts, sanding pigtails near edges, or texture differences between adjacent panels.
If you want a more disciplined correction plan, it helps to understand film build before polishing or sanding. Titan's article on how to measure paint thickness is worth reviewing before you push harder on unknown panels.
Some of the biggest mistakes happen when people assume every panel on the car has the same history.
Decide whether you need bare metal or not
Many DIY jobs go sideways at this stage. Some people strip far more than necessary. Others paint over problems they should have removed.
Guidance from Autobody Toolmart on paint prep decisions highlights a point that deserves more attention: stripping to bare metal is much more time-consuming, but leaving a sound OEM finish in place can be acceptable when the goal is adhesion rather than a complete restoration. That choice depends on substrate condition, corrosion, and the coating system you're planning to use.
Use this practical split:
| Condition | Better direction |
|---|---|
| Stable factory paint, no corrosion, cosmetic refresh | Scuff and refine the existing finish |
| Rust spots, lifting edges, failing paint | Remove unstable material and address substrate issues |
| Old repairs with uncertain adhesion | Inspect carefully and test before building over them |
| Full restoration with major defects | More aggressive removal may be justified |
If the existing finish is sound, you usually don't gain anything by stripping everything. If the paint is failing, no coating or polish will save it. Assessment comes first because it controls the whole workflow.
The Deep Cleanse for a Contaminant-Free Start
The car can look clean and still be carrying enough residue to sabotage the rest of the job. I see this all the time on daily drivers. The paint looks presentable under shop lights, then the wash water starts pulling road film, old sealant, traffic fallout, and greasy buildup out of the pores and edges.
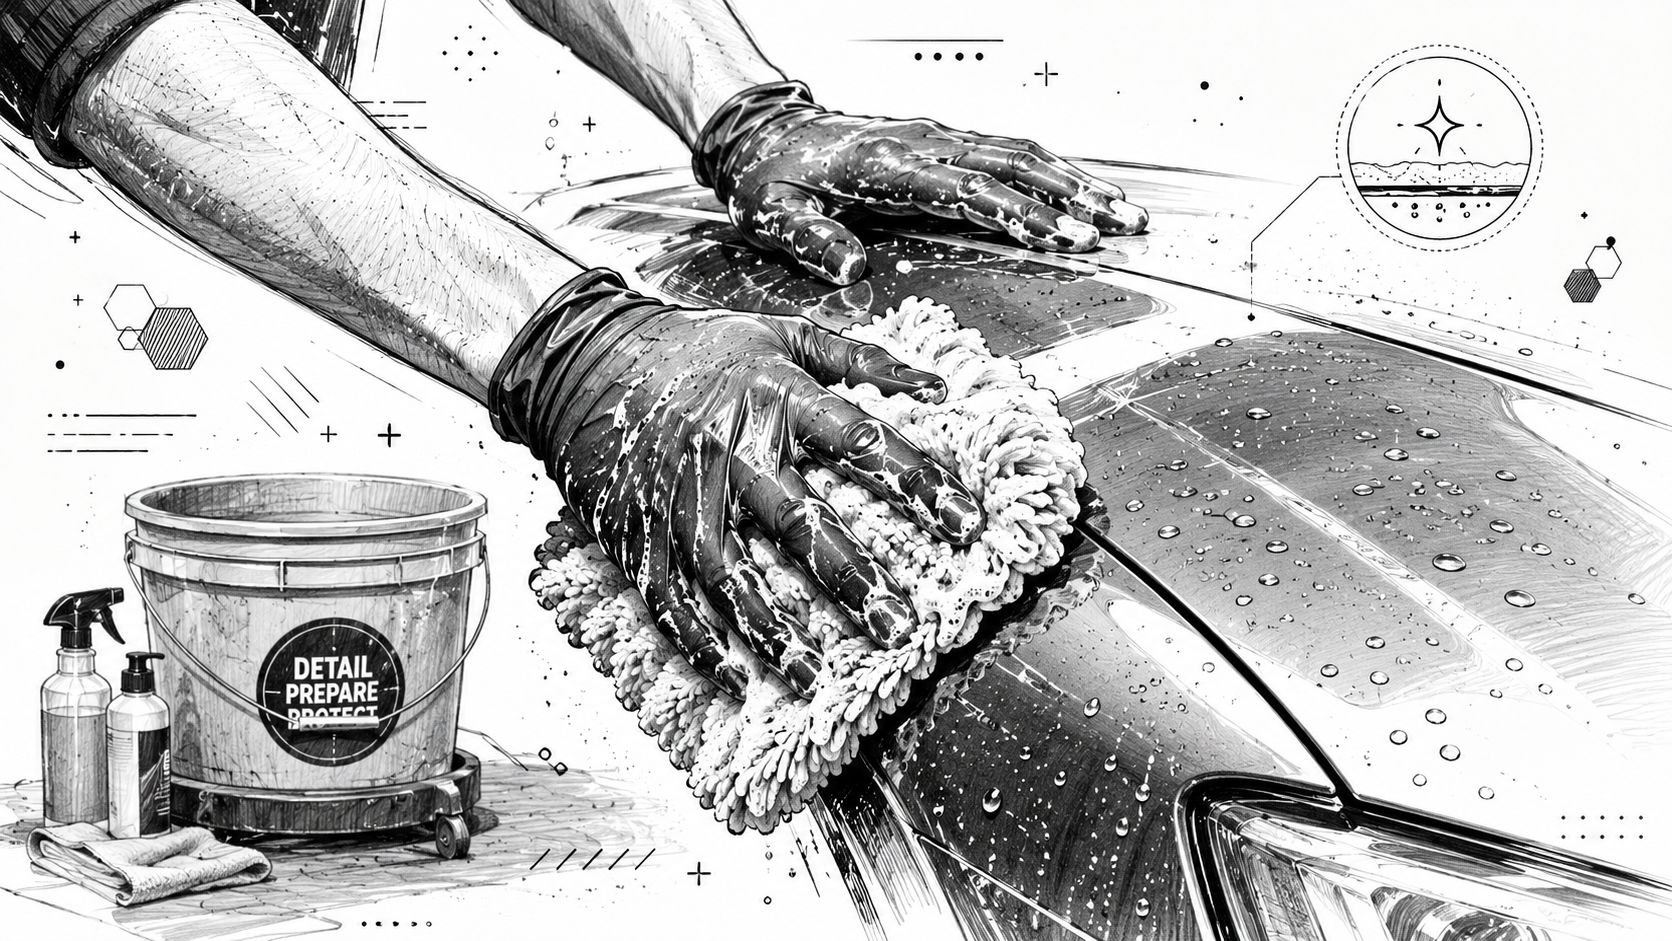
That matters even more with advanced flexible elastomer coatings. These products need a surface that is chemically clean, not just visually clean. If wax residue, silicone, tar, or oily film stays behind, you get inconsistent wetting, uneven bonding, and more guesswork during correction.
Wash for bare honesty, not gloss
Use a shampoo that leaves nothing behind. Skip wash-and-wax soaps, gloss boosters, and anything designed to enhance shine. Prep work needs plain cleaning strength so the paint tells the truth.
Start with a strong rinse to remove loose grit from the upper panels, mirrors, lower doors, and bumper faces. Then wash top to bottom with clean media and a rinse bucket. The two-bucket method still earns its place here because adding wash marring before correction is wasted work.
A proper prep wash pays attention to the places that contaminate fresh polishing pads and towels later:
- Door jambs and fuel-filler areas: grime creeps out during machine work
- Badges, trim edges, and panel gaps: trapped residue slings onto clean paint
- Rocker panels and rear bumpers: road film loads these areas heavily
- Around handles and mirrors: skin oils and old product build up fast
Titan's guide on how to decontaminate car paint before correction or coating lays out the full sequence if you want the wash stage dialed in.
Use targeted chemicals before you touch abrasives
Soap handles loose dirt. It does not remove everything that interferes with sanding, polishing, or coating adhesion.
Tar behind the wheels needs a tar remover. Adhesive residue needs a solvent that can break it down without smearing it across the panel. Iron fallout needs a dedicated fallout remover. Keep those jobs separate. Apply one product for one type of contamination, give it time to react, then rinse thoroughly before the next step.
That slower approach avoids two common mistakes. The first is rubbing bonded debris deeper into the paint. The second is mixing strong chemicals on the panel and creating residue that takes more work to remove.
Clean paint looks ready. Properly decontaminated paint behaves ready.
Treat degreasing as part of surface prep
This step is where modern coating prep separates itself from an ordinary detail. Flexible elastomer coatings rely on intimate contact with the surface. Any oily film between the coating and the paint can weaken that bond.
Dressings, polishing residue from old work, silicone from trim products, bug remains, diesel mist, and fingerprints all matter here. On neglected vehicles, I often wash once, decontaminate, then wash again or follow with a dedicated panel-safe cleaner because the first round exposes what was buried under the grime.
A slow, methodical cleanse saves time later. Pads stay cleaner. Defects read more clearly. Correction becomes more consistent. The coating lays down on paint that is prepared for a modern protection system, not paint that only looked clean from six feet away.
Achieving a Glass-Smooth Surface with Clay or Chemicals
After the deep wash, run clean fingertips over the hood or upper doors. If the paint feels gritty, the surface still isn't ready.
That roughness usually comes from bonded contamination. Overspray, fallout, sap residue, and stubborn environmental debris embed themselves into the paint film. Washing removes what sits on top. This stage deals with what's stuck in it.
When clay is the right answer
A clay bar or clay mitt physically shears contamination off the surface. It works well when the paint has obvious roughness and you want immediate feedback. Done right, the panel goes from gritty to slick in a few passes.
The key is lubrication. If the surface isn't well lubricated, clay can mar the paint and create extra correction work. Keep the panel wet, use light pressure, and check the clay often so you're not dragging removed debris back across the paint.
Clay is usually the better fit when:
- The paint feels rough everywhere: You need broad mechanical removal.
- You suspect overspray: Clay often handles this better than wash chemicals alone.
- You want tactile feedback: You can feel the surface improve panel by panel.
Titan's walkthrough on how to clay bar your car is a good companion if you want a more visual process before doing it by hand.
When chemicals make more sense
Modern chemical decontamination can dissolve certain bonded particles with less physical contact. That's useful on softer paint, heavily contaminated lower panels, or vehicles where you're trying to minimize extra marring before polishing.
Chemical methods aren't always a total replacement for clay. They're often the first reduction step. You dissolve what chemistry can remove, then decide whether the remaining contamination needs mechanical action.
This is the trade-off in simple terms:
| Method | Strength | Limitation |
|---|---|---|
| Clay bar or mitt | Strong physical removal, very effective on stubborn bonded debris | Can mar the finish if lubrication or technique is poor |
| Chemical decon | Less contact, helpful on reactive contamination | May not remove every bonded contaminant on its own |
Choose based on paint condition, not habit
If the vehicle has delicate paint and only moderate contamination, start with chemicals. If the surface still feels rough afterward, clay lightly. If the paint is heavily contaminated and headed for correction anyway, clay may be the more direct route.
Don't chase a perfectly smooth panel by grinding harder with clay. If contamination isn't releasing, reassess your lubrication, your media, or whether a targeted chemical step should happen first.
The reason this matters is simple. Any contaminant left behind can interfere with polishing, get caught in pads, or drag under an applicator. A slick panel isn't just satisfying. It's safer to correct and easier to coat.
Refining the Canvas Through Paint Correction
I've seen plenty of cars washed, decontaminated, and ready on paper, then fall flat under coating because the paint was never properly refined. Advanced flexible elastomer coatings do not hide poor prep. They mirror it. If the surface carries haze, rotary trails, oxidation, or random deeper scratches, the coating preserves that texture and gloss pattern instead of correcting it.
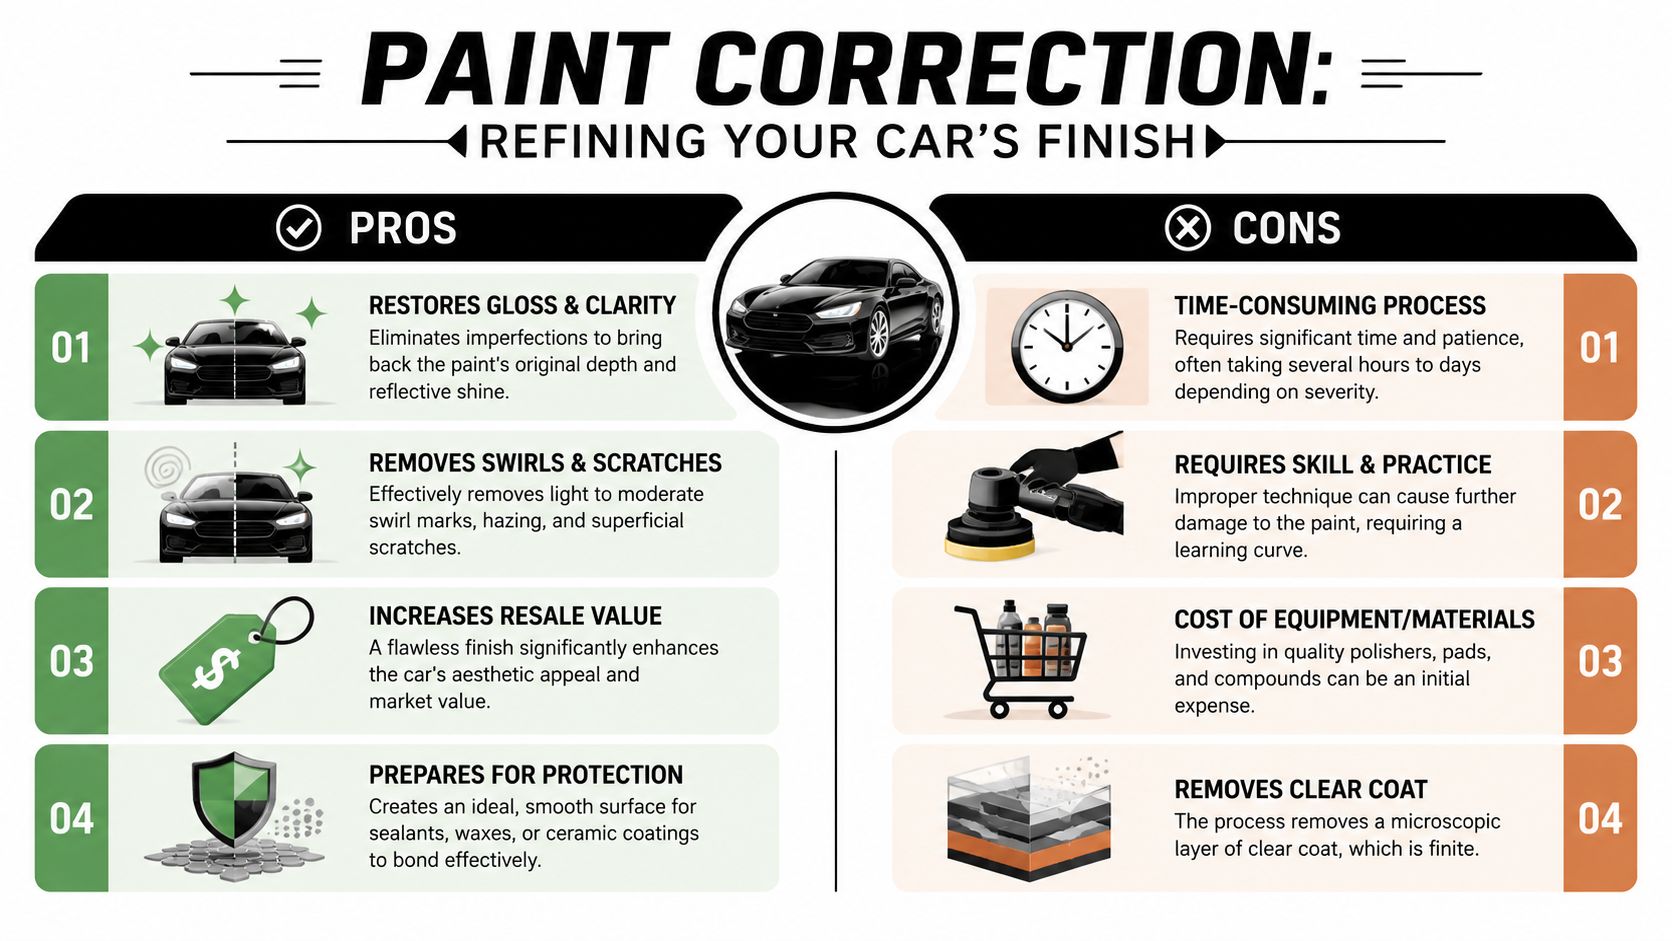
Paint correction is controlled leveling of defects in the upper portion of the finish. The goal is not maximum material removal. The goal is a surface that is optically clean, uniform under inspection lighting, and properly prepared for the coating system that follows. That distinction matters with modern protective products, because a flexible coating performs best on paint that is both clean and consistently refined.
Correct only as much as the paint can afford
Start with a test spot and build the process from there. A one-step polish may clear wash marring on a well-kept daily driver. Harder paints or deeper defects may need a compound first, then a refining polish to restore clarity. Soft paint often cuts quickly but also hazes easily, so the finish step matters more than people expect.
A few habits keep correction honest:
- Test before committing: One section tells you far more than assumptions about paint type.
- Match the defect to the approach: Some scratches are too deep to remove safely and should be softened, not chased.
- Treat edges and body lines carefully: Film build is lower there, and mistakes happen fast.
- Clean or swap pads often: Saturated pads stop finishing cleanly and can add their own marring.
The best correction job is the one that improves the finish without spending clearcoat you cannot replace. For a coating install, that usually means removing the defects that disrupt gloss and leaving the paint healthy enough to hold up long term. Titan's guide to paint correction before ceramic coating does a good job of tying that refinement step to real coating performance.
Sanding and heavy defect removal need a plan
For isolated defects, repaint work, or texture leveling, sanding only works when the grit progression matches the substrate and the next product in the system. Coarse paper removes damage quickly but leaves a deeper scratch pattern. Finer steps reduce that pattern until it fits the primer, sealer, base, or clear you plan to apply.
That is why experienced painters and detailers do not sand by habit. They choose a starting grit based on the defect, then refine in stages so the next layer has the right profile to bond and level properly.
Autobody101's restoration prep discussion lays out that logic clearly, with substrate-specific sanding steps, solvent cleaning before the next stage, and flash time before primer or paint. The exact sequence changes with the job, but the principle stays the same. Every abrasive step leaves a pattern, and the next step should refine it without creating unnecessary work or weakening adhesion.
A smoother panel is not always a better panel
This is one of the easiest mistakes to make. Detailers chasing gloss and painters chasing adhesion are not always aiming for the same finish.
Empire Abrasives' prep guidance warns against over-refining bodywork before paint because adhesion can suffer if the surface profile is too fine. That matters here because modern coating prep is more than making paint look clean. It is about creating the right finish for the exact layer that comes next. Polished OEM clear headed for a coating needs clarity and residue-free paint. Primer and repaint work need tooth that matches the system. Mix those goals up and the result suffers.
For filler shaping and repair areas, Grassroots Motorsports on preparation and paint technique offers a practical reminder that blocking technique, crosshatch sanding, and working the material within its usable window all affect how flat the repair stays after paint.
Good correction makes the surface look better and behave better. That is the standard. On a car receiving an advanced elastomer coating, this stage is where gloss, adhesion readiness, and long-term appearance start to line up.
The Final Lockdown Masking and Surface Wipe
When the paint is corrected and the finish looks right under inspection lighting, the job still isn't ready for coating. The last steps are small, but they decide whether the application stays clean and predictable.
Mask what you don't want to fix later
Use proper automotive masking tape around sensitive trim, rubber, textured plastics, emblems, and edges that can trap polish or coating residue. Don't use bargain tape that leaves adhesive behind or lifts awkwardly.
Masking also forces you to slow down and look at details one more time. You'll spot dust in cracks, polish residue around badges, and dried product in seams that looked invisible a minute earlier.
This is also the right time to prep glass if you're treating it separately. A dedicated windshield or glass coating can improve water behavior and visibility in rain, but only if the glass is cleaned as seriously as the paint. Titan's Apex Glass Coating is one example people use for that purpose because it's designed for glass application and simple wipe-on workflows.
The final wipe has one job
Polishing oils, fingerprints, light dust, and residue can sit on a panel even after correction looks finished. That's why a panel wipe matters. Use an appropriate paint prep spray or a careful IPA-based wipe-down to strip those leftovers from the surface before coating.
Work methodically:
- Fold clean microfiber towels so you always have a fresh side.
- Wipe one small section at a time.
- Follow immediately with a dry towel so residue doesn't smear back onto the panel.
- Recheck under direct light.
A bodywork-oriented prep process also supports the idea of a final cleaning stage before topcoating. The verified guidance notes final solventborne cleaning and dry or waterborne cleaning to remove tar, oils, and sanding residue before the next layer is applied.
The last wipe isn't busywork. It's the moment you remove everything that can interfere with direct contact between surface and coating.
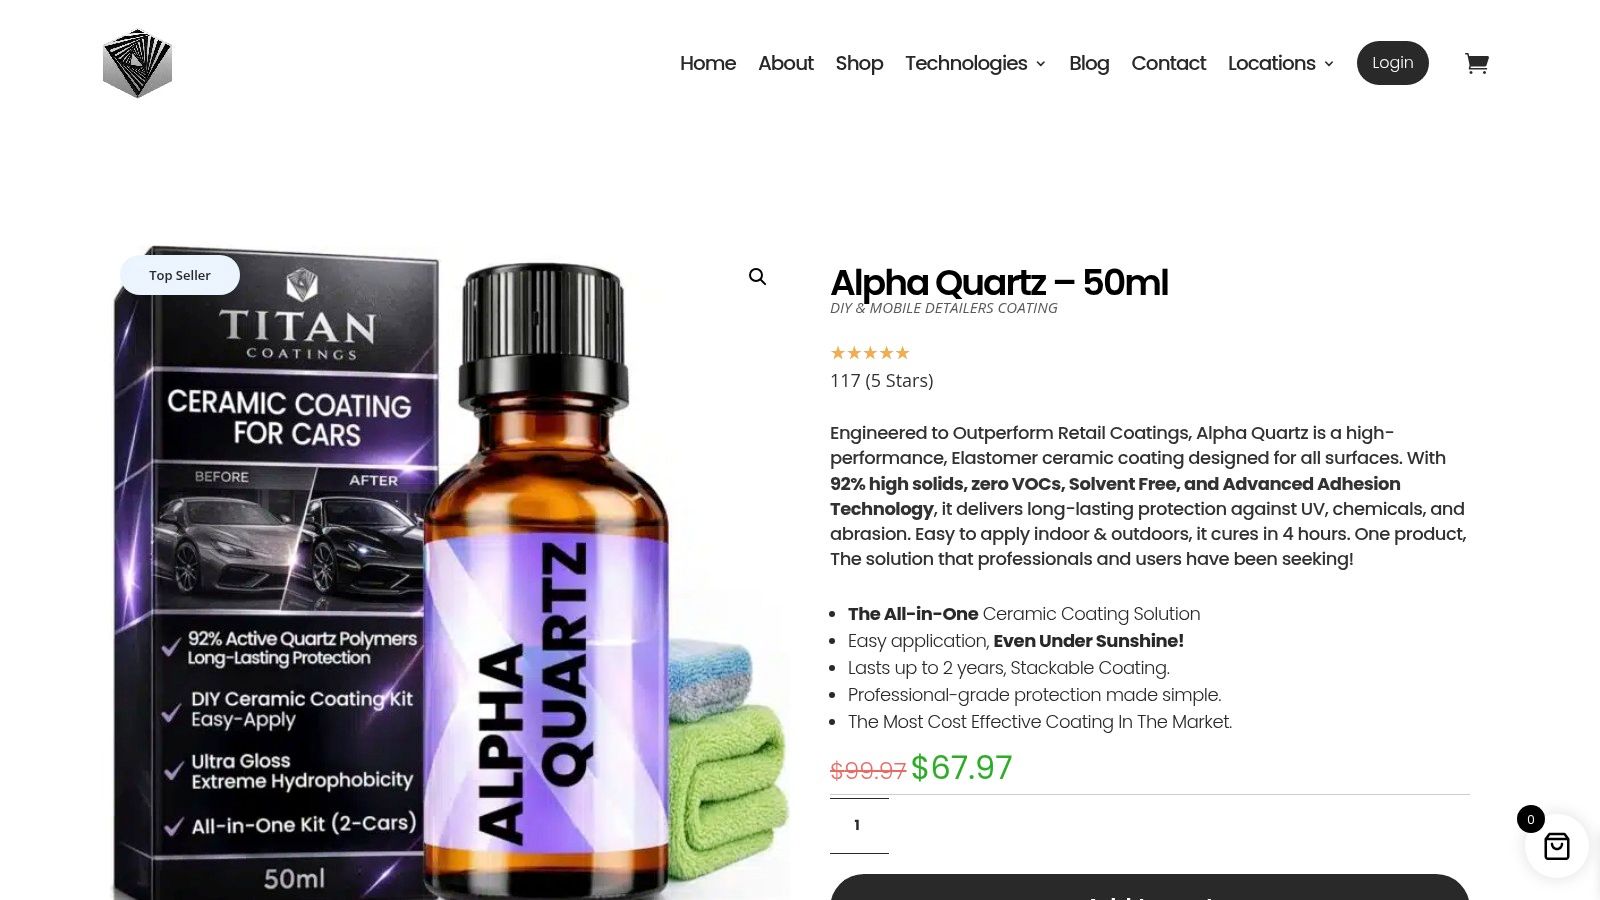
If the paint is now clean, corrected, dry, and fully stripped of residues, that's when coating makes sense. For people who want a flexible elastomer option that's approachable for DIY or mobile detailing work, Alpha Quartz from APEX NANO – Titan Coatings is one coating designed around that kind of final prepared surface. The relevant point here isn't hype. It's fit. Advanced coatings perform better when they're applied to paint that has been properly prepped.
Common Questions and Your Printable Prep Checklist
The most common prep questions usually come from the same place. People want to know where they can save time without hurting the result.
The honest answer is that some shortcuts are harmless and some aren't. Skipping a second towel during panel wipe might only slow you down later. Skipping decontamination or inspection can ruin the whole job.
Questions detailers and DIYers ask most
Can I prep and coat outside?
You can do parts of the prep outside, especially washing and decontamination, but correction and final wipe-down are easier in controlled conditions. Wind, dust, and changing light make mistakes harder to catch.
Does a brand-new car still need prep?
Usually yes. New paint can still have bonded contamination, dealership wash marring, adhesive residue, or light defects that a coating would preserve.
Do I always need to strip to bare metal?
No. If the existing finish is sound and the goal is adhesion rather than full restoration, working over stable paint can be the smarter route. If corrosion or failing paint is present, unstable material has to go.
Should I sand as fine as possible before coating?
No. Smoother is not automatically better. The right profile depends on the system you're applying next.
Ultimate Paint Prep Checklist
| Step | Task | Notes |
|---|---|---|
| 1 | Inspect the paint in sun and focused light | Look for swirls, scratches, etching, dullness, and prior repairs |
| 2 | Decide your repair level | Keep stable finish if appropriate, remove failing material if needed |
| 3 | Wash with non-wax soap | Clean thoroughly, including jambs, trim lines, and lower panels |
| 4 | Remove tar, residue, and fallout | Use targeted chemistry before mechanical decon |
| 5 | Decontaminate bonded surface contamination | Clay or chemical method based on paint condition |
| 6 | Correct defects | Start with the least aggressive method that gets the result |
| 7 | Sand only as needed for the system | Match grit progression to substrate and next layer |
| 8 | Mask trim, edges, and sensitive materials | Prevent staining and simplify application |
| 9 | Perform final panel wipe | Remove polishing oils, dust, and fingerprints |
| 10 | Reinspect before coating | If it looks wrong now, coating will preserve it |
A clean car isn't always a prepped car. A glossy car isn't always a ready car. If you follow the checklist with patience, you'll know the difference the moment the coating flashes across a properly prepared panel.
If you want to pair careful prep with a coating system built for modern surfaces, explore APEX NANO – Titan Coatings. Their lineup covers paint, glass, and spray-applied protection options, including flexible elastomer-based coatings that are designed for real-world temperature swings and long-term surface protection when the prep is done right.
0 Comments