
A car rolls into the bay with a dull roof, a few wash swirls in the hood, and that tired gray look that tells you the paint has been cleaned, but not really corrected. In the first ten seconds, a working detailer checks the reflections, the edges, the trim, and how much life is left in the clear coat before a machine ever leaves the rack. That’s the job of professional car polishing, removing controlled defects, managing paint depth, and setting the surface up for protection that can hold.
The trade has come a long way from hand-applied shine products. Historical markers like Menzerna in 1888, Frank Meguiar Jr. in 1901, the first commercial polymer sealant in 1969, and ceramic coating’s move into the mainstream after 2007 show how polishing evolved into a material-science discipline, not a hobbyist shortcut (IBISWorld industry history). Today, the market around detailing and polishing is mature, recurring, and driven by paid service use, which is why the craft rewards process, restraint, and the right finish system.
What Professional Car Polishing Really Is
A customer can call it a buff, a shine, or a cleanup. In the bay, it’s paint correction. The difference matters because polishing isn’t just moving product around, it’s removing a very thin layer of clear coat to reduce swirl marks, light scratches, oxidation, and water spots, then protecting the result right away because polishing strips prior protection (detailing explanation).
The first look tells you the job
I’ve had cars arrive looking clean enough from a distance, then the overhead light exposes a web of marring across the black hood. That’s where the professional mindset starts, not with a pad choice, but with knowing whether the paint needs enhancement, correction, or just refinement. If you want a clean explanation of that distinction, the difference between correction and polish is worth keeping in your back pocket.
The consumer idea of polishing usually stops at gloss. The pro view goes further, because every pass changes the paint underneath, and that means the work has to be deliberate. You’re not chasing shine for its own sake, you’re deciding how much material to remove, how much clarity to recover, and what protection will lock in the result.
Practical rule: If the panel still shows haze after a pass, you don’t have a “shine” problem. You have a correction and refinement problem.
That mindset also changes how you sell the job. A polished panel that goes unprotected is a short-lived win. A polished panel that’s cleaned, inspected, and sealed becomes part of a system, and that’s where professional work separates itself from weekend buffing.
Assessing Paint and Preparing the Surface
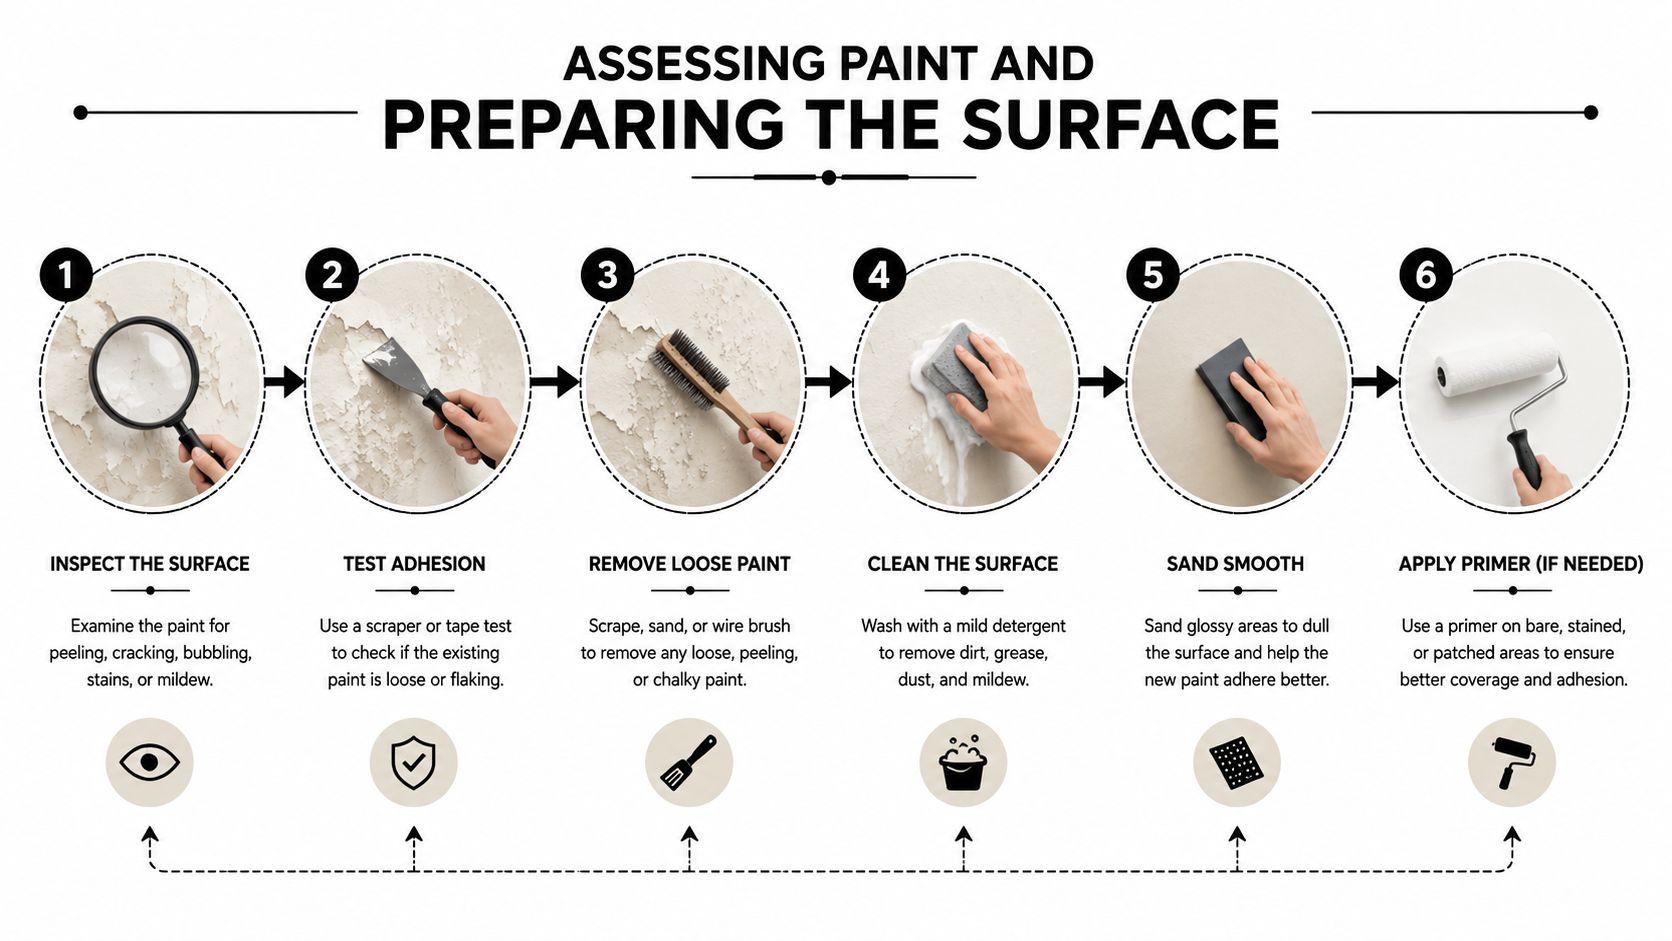
Preparation is where bad polishing jobs are usually prevented, or created. The goal is simple, get the paint as neutral and clean as possible before any pad touches it, then map the job so you don’t guess your way through clear coat. A real prep workflow starts with washing, decontamination, masking, and a test spot, not with product on the pad.
Clean the panel before you correct it
A proper wash removes loose grit, but that’s only the beginning. After that, bonded contamination has to come off, because clay work matters when the surface still has tar, fallout, and embedded grime that would otherwise drag under the pad. Trim, emblems, seams, rubber edges, and protrusions need masking because the edges are where pad drag, staining, and accidental burn-through tend to show up first.
The main thing to avoid is rushing into the machine with a dirty or half-prepped panel. That’s how you end up chasing defects that were partly created by the correction itself. The preparation guide at how to prep car paint fits this stage well because the discipline is the same, neutralize the surface before you start changing it.
Test a small area before the whole car
A test spot tells you more than a long guess. Start on an inconspicuous section, choose a pad and compound, then inspect whether that combo clears the defect or leaves haze behind. If it works, you’ve got a lane for the rest of the vehicle. If it doesn’t, you adjust before you turn the whole car into a lesson.
On older or repainted panels, paint thickness matters because polishing is cumulative. You’re working with a limited clear-coat margin, so the smart play is to measure where needed, especially before heavier correction. The same caution shows up in the internal workflow for how to measure paint thickness, because the paint meter isn’t decoration, it’s a safeguard.
A detailer who skips prep is usually trying to save ten minutes and ending up spending an hour fixing avoidable haze.
Choosing Compounds, Pads, and Machine Types
The best setup isn’t the most aggressive one. It’s the one that matches the defect and leaves the least amount of cleanup behind. In practice, that means balancing pad type, product cut, and machine behavior instead of assuming every job needs a hard-cut combination.
The shop link for polishing buffing pads makes sense at this stage because pad selection is where the result starts to tilt toward either correction or refinement. Foam is the default for a lot of finishing work, microfiber earns its place when you need more bite, and wool is usually reserved for stronger correction where clarity can be restored in later steps.
Pad and compound pairings for common defects
| Pad Type | Compound or Polish | Best For | Finish Left Behind |
|---|---|---|---|
| Foam polishing pad | Finishing polish | Light haze, gloss recovery, final refinement | Clean, clear, high gloss |
| Microfiber cutting pad | Cutting compound | Heavier swirl marks, stronger correction | More correction, more likely to need refinement |
| Wool pad | Heavy-cut compound | Stronger defect removal on neglected paint | Fast cut, rougher finish, almost always followed by polish |
Dual-action machines are friendlier and more forgiving, especially when the goal is control and consistency. Rotary polishers cut harder and faster, but they punish sloppy technique with heat and visible holograms if the operator gets careless. That’s the trade-off, not power versus speed, but learnability versus aggression.
Match the tool to the panel, not your habit
If a panel only needs gloss recovery, jumping to heavy cut just burns margin. If a hood is badly marred, starting too soft wastes time and leaves the defect untouched. The working rule is to choose the least aggressive combo that moves the paint, then step up only when the test spot says you need it.
For deeper scratch conversation, the scratch repair insights with RedAppy are useful as a reference point because polishing isn’t the answer to every mark. Some defects are correction-friendly, and some aren’t.
Shop rule: Start with the pad and compound that can solve the problem cleanly, not the combo that feels impressive in your hand.
Polishing Technique and Defect Removal Progression
The machine work itself should look boring when it’s done right. That’s because the result comes from repeatable control, not drama. The sequence matters, the section size matters, and pad loading matters more than most new techs want to admit.
Work small and let the pad do the cut
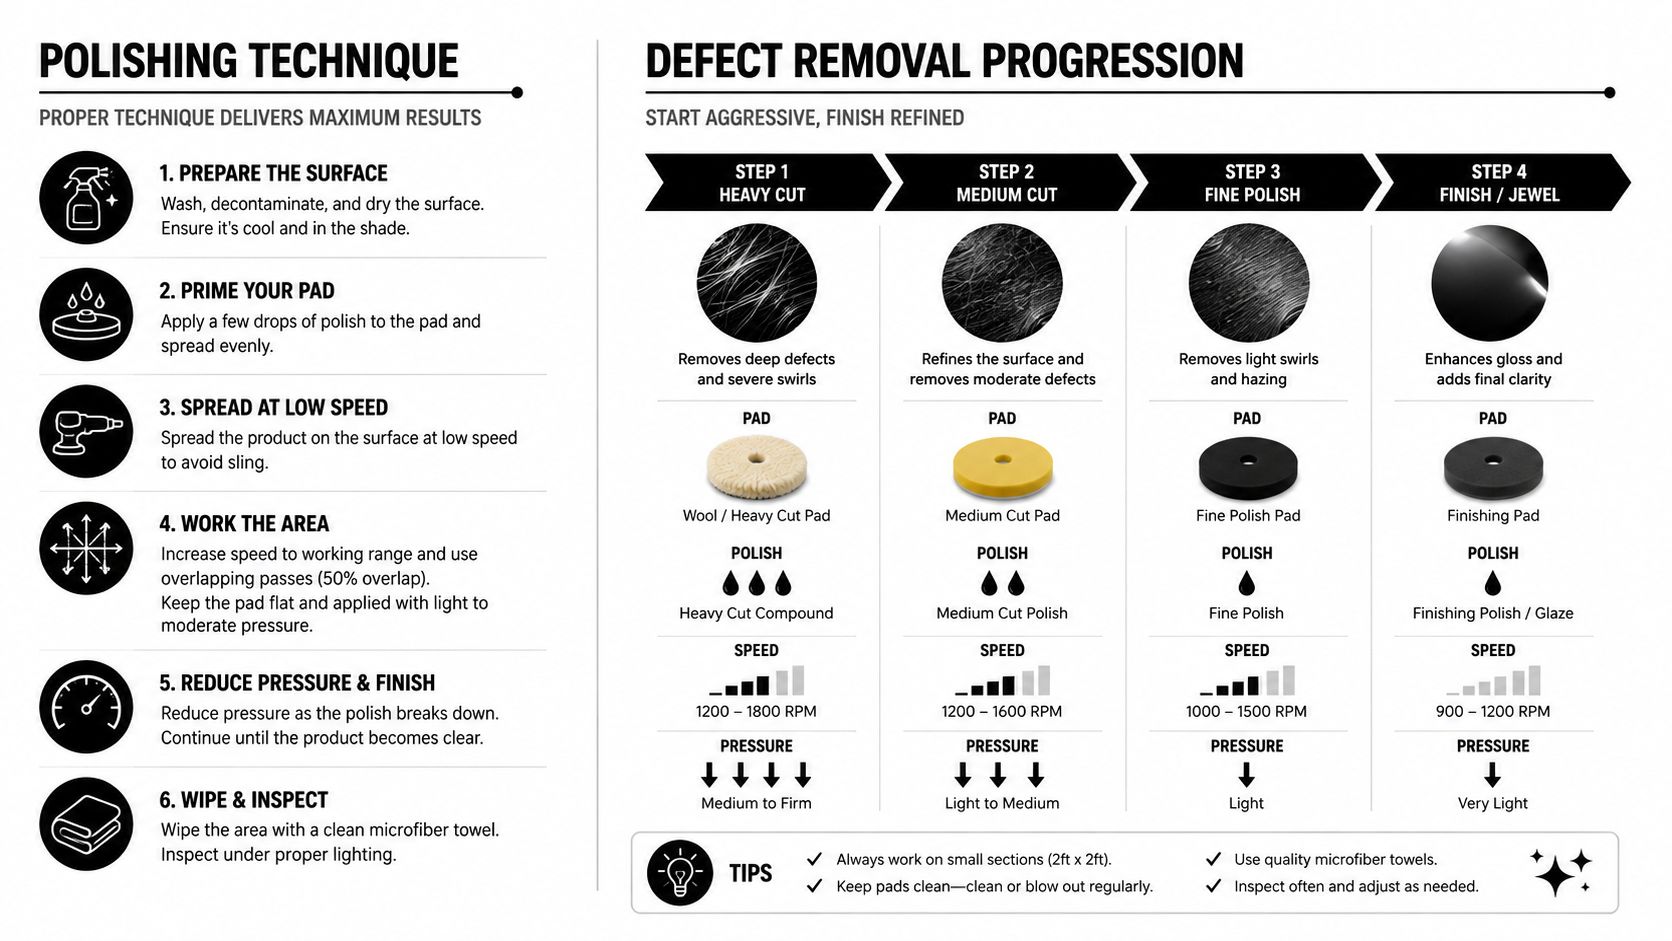
A good working section is around 2’x2′. That keeps the product active, the pad controlled, and the panel cool enough to read what’s happening. You spread at low speed first, then bring the tool up to working speed and use overlapping passes aligned with the body lines so the correction stays even.
Pressure is where a lot of operators get themselves in trouble. Leaning on the machine doesn’t create better correction, it usually creates heat, pad stall, or marring that has to be polished out later. The pad and compound should do the work, while your hands guide the path.
Use progressive abrasion, not one aggressive swing
The typical correction sequence is compound first, then finishing polish. That order lets you attack the defect, inspect the result, and clean up the haze or micro-marring the cutting stage may leave behind. It’s the same logic that shows up in auto scratch repair near me conversations, because not every scratch deserves the same approach.
Pad management is part of the technique, not an afterthought. Start with a clean, unused pad, then refresh or replace cutting pads frequently. One professional guide advises changing cutting pads about every six square feet, because a loaded pad keeps cutting deeper instead of refining, which raises haze and over-correction risk (full-car polishing checklist).
Keep the sequence disciplined
A top-down order helps keep contamination off finished panels, and it also keeps your head in the job. Roof and horizontal surfaces first, then pillars, trunk, hood, and side panels, with lower areas and front features saved for last. That pattern controls dirt transfer and gives you a cleaner read on the finish as you move through the car.
The auto detail buffer resource fits neatly here because machine behavior is only half the story. The other half is knowing how the pad, the section, and your passes interact under pressure.
Finishing Polish and Inspection
The finishing stage is where the work becomes visible. Cutting may remove the defect, but finishing restores the clarity that tells you the panel is really done. If the cut stage leaves a little haze, the finishing polish and a softer pad bring the surface back to a clean, sharp reflection.
Inspect under the right light
Bright, diffused light is the sweet spot because it shows haze without making every reflection lie to you. Check from multiple angles, wipe the panel with a proper paint prep solution, and look again. Oils from polish can hide micro-marring, so a panel wipe is the difference between “looks good” and “is good.”
That’s also where you stop guessing. If the finish is clean after the wipe, and the reflections hold from different directions, the panel is ready. If not, you refine the exact area that still needs attention instead of reworking the whole section on habit alone.
The finish stage also ties into the earlier discussion of clear-coat margin. You don’t keep polishing because the lights in the bay make you feel ambitious. You stop when the panel has clarity, uniform gloss, and no obvious haze left to chase.
Inspection rule: Wipe, re-light, and re-check. If you don’t expose the true finish under residue, you’re judging oil, not paint.
A panel that has been refined properly gives you a stable base for protection. That’s the point where the surface moves from correction into preservation, and that transition matters more than a few extra minutes of polishing ever will.
Preparing Polished Paint for Ceramic and Elastomer Coatings
A freshly polished surface is the right canvas for protection because the coating bonds to what’s on the paint, not to old wax, old sealant, or leftover contamination. A proper wipe-down with IPA or a panel prep solution strips polishing oils and exposes the true surface, which is what you want before any coating goes down. If the panel is still carrying residue, the coating is being asked to bond to leftovers instead of clear coat.
Polish less, protect more intelligently
One mistake I see is the belief that every paint issue needs heavy correction before coating. It doesn’t. If the paint is already healthy, a lighter polish plus a solid protection layer can be the smarter business outcome because it preserves more clear coat and still gives the customer a sharp finish. The paint correction before ceramic coating workflow matches that logic well.
Titan’s Elastomer coating approach belongs in this conversation because it’s built around a coating that’s described as hard like glass and flexible. That flexibility is the practical part, because a coating that can move with temperature swings has less reason to crack under changing conditions. In the bay, that means the polished surface you just created becomes a stable base for a finish that’s meant to hold up instead of only looking good on delivery day.
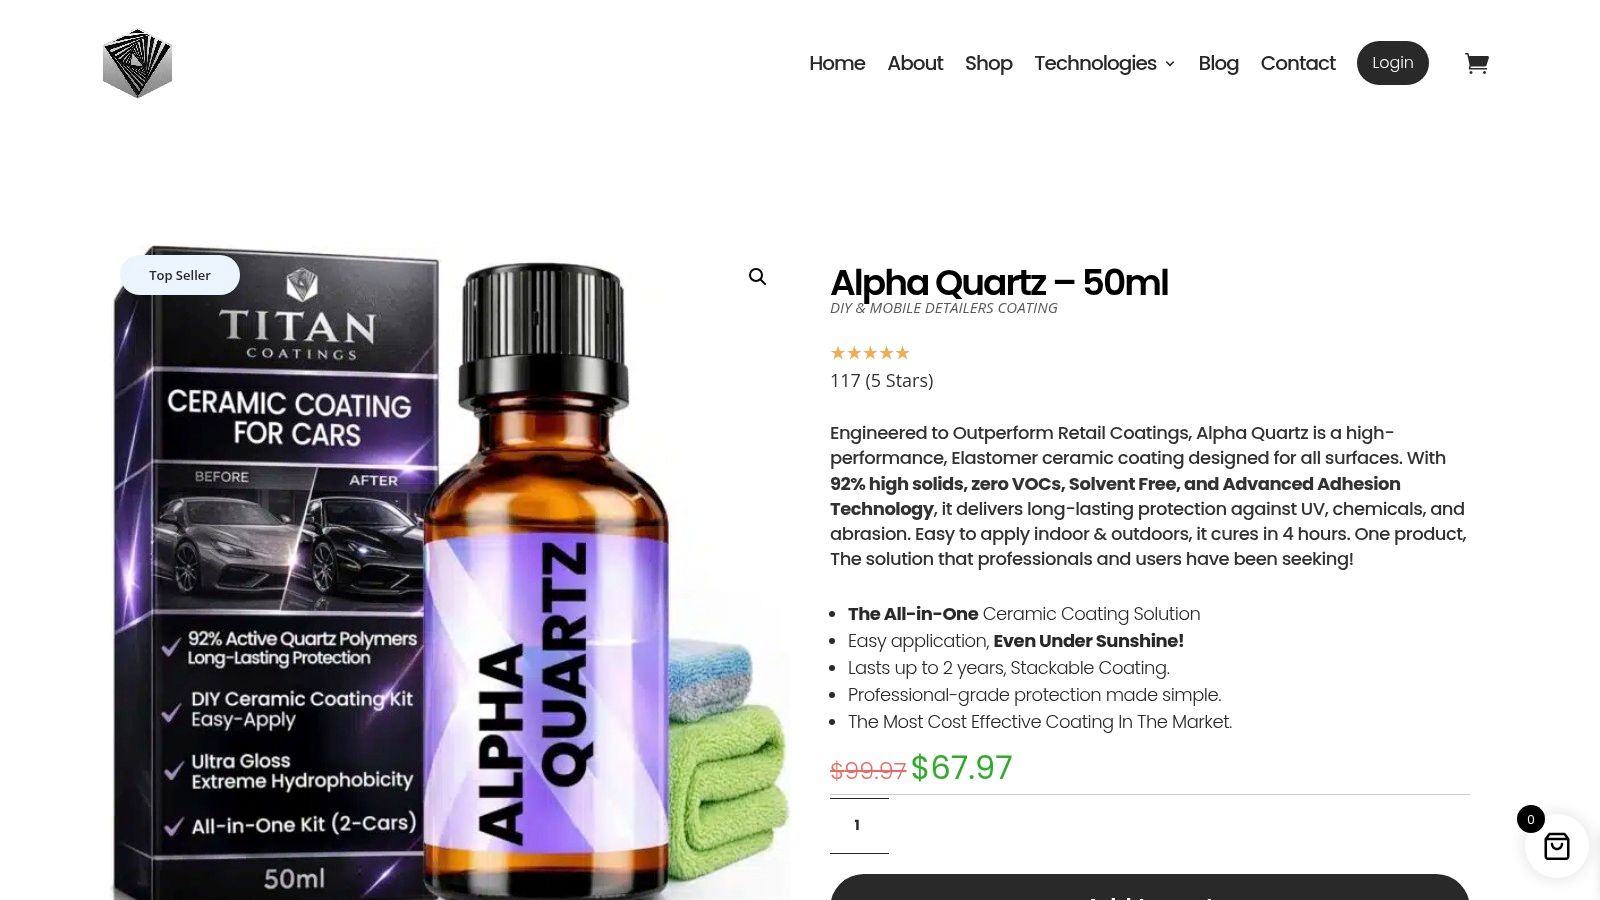
For paint, Alpha Quartz fits as an elastomer ceramic option in this kind of workflow. For glass, Apex Glass is the better match when the job is about windshield visibility and rain behavior. For maintenance, Ultra Ceramic Spray gives you a lighter topper option when the vehicle already has a corrected base and needs easier upkeep.
The product line matters less than the sequence. Polish, clean, inspect, prep, then coat. That order gives the coating a proper substrate and keeps you from locking imperfections under a layer of protection.
Safety, Maintenance, and Smart Polishing Decisions
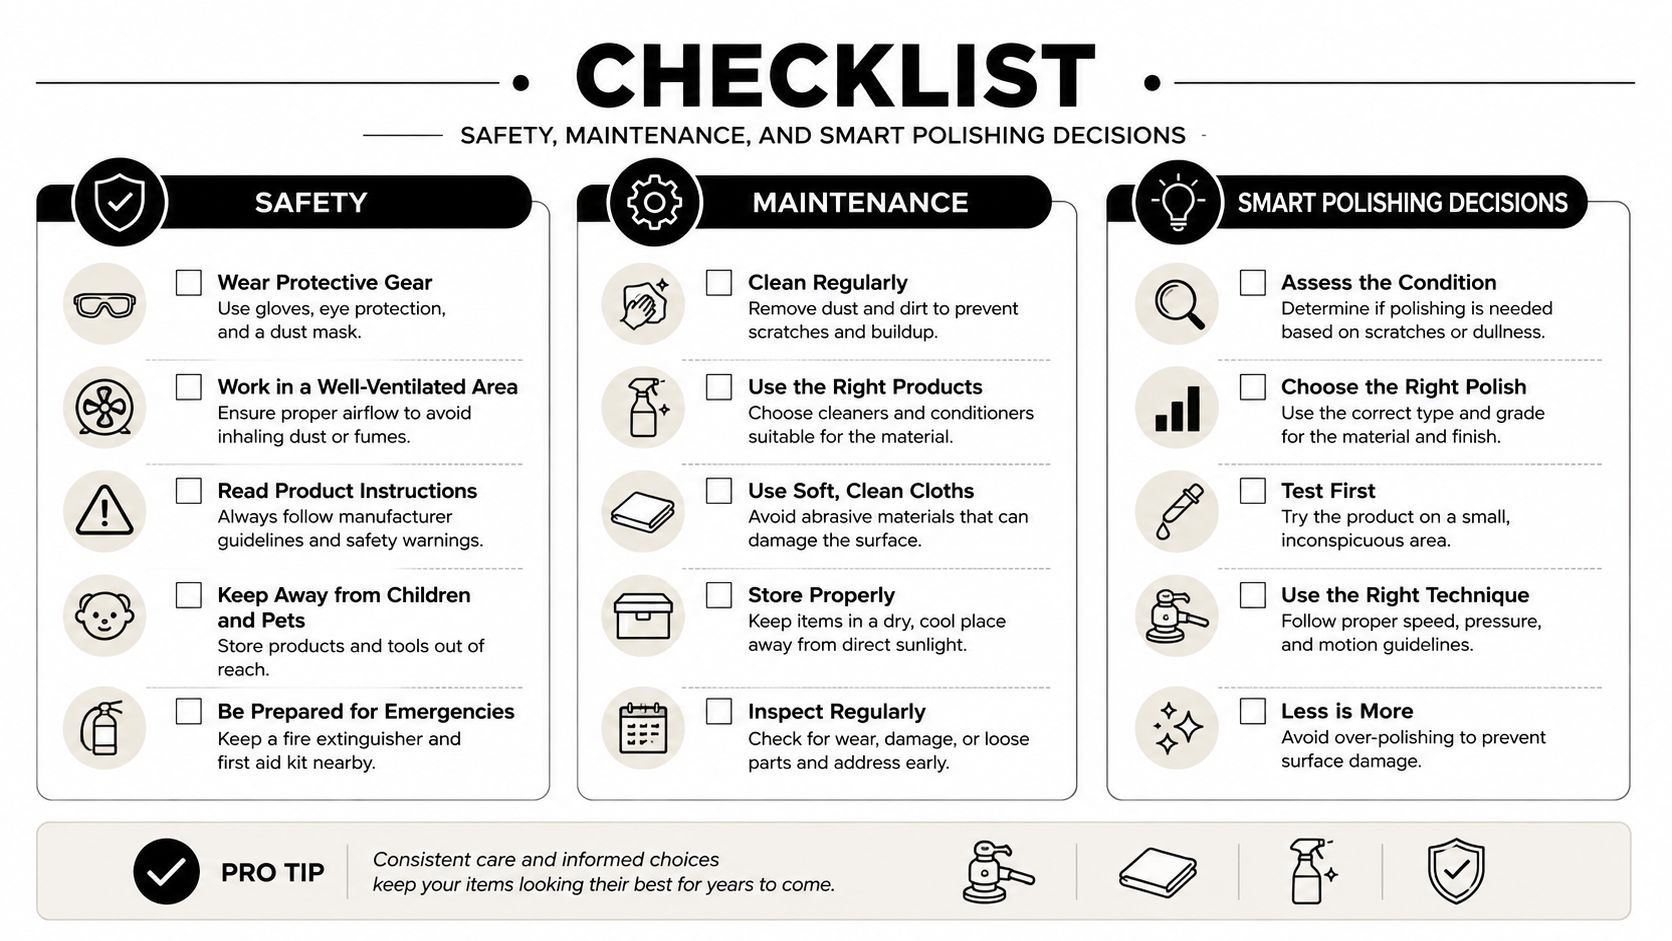
Safe polishing isn’t glamorous, but it’s the part that keeps a shop consistent. You need stable footing, managed cords, clean pads, and proper breathing protection when the bay is kicking up residue. You also need discipline around storage, because a contaminated pad or dusty compound container can undo good work before the next car even rolls in.
Know when not to polish harder
Not every finish should be pushed. Older single-stage paint, thin repainted panels, and areas where a paint meter shows limited clear coat are places to back off, not lean in. On those jobs, a lighter polish and a flexible elastomer protection layer can be a better answer than aggressive defect removal, because the customer gets a better-looking car without sacrificing unnecessary material.
Troubleshooting is straightforward when you’ve watched enough bad passes. Holograms usually come from rotary technique that’s too hot, too fast, or too inconsistent. Haze often comes from an overworked pad. Uneven correction usually points back to pressure swings, oversized sections, or a tech who didn’t inspect after each panel.
Keep the finish alive after the correction
Once a car is polished and coated, maintenance has to protect the result. Gentle washing, clean mitts, and quick attention to contamination keep the finish from sliding backward. That’s where a well-prepped APEX NANO – Titan Coatings system earns its place in a professional workflow, not as a substitute for polishing, but as the layer that helps preserve the correction you’ve already earned.
The bigger lesson is simple. Smart polishing decisions aren’t about removing the most paint, they’re about removing just enough, finishing cleanly, and choosing protection that matches the substrate. That’s the standard that keeps a detail bay profitable and keeps customers coming back with a car that still looks correct months later.
If you’re building a finish that has to last, Titan’s APEX NANO line is built for the stage that comes after correction, when the paint is clean, refined, and ready for protection. Visit APEX NANO – Titan Coatings to see how Alpha Quartz, Apex Glass, and Ultra Ceramic Spray fit into a professional polishing and coating workflow.
0 Comments