
You notice it on a Saturday morning, usually while washing the car. One headlight looks almost normal. The other has a yellow veil over it, and when you drove home the night before, its beam seemed weak and scattered. A towel and car shampoo won't solve it, because the problem isn't dirt sitting on top. It's the damaged surface of the lens.
A careful DIY car headlight polish can restore useful clarity, but the polish is only the preparation. The result depends on whether you remove the oxidation evenly, avoid overheating the plastic, and replace the UV protection you've taken away. AAA testing found that cloudy or yellow headlamps produced only about 22% of their original light output, while professional and DIY restoration typically returned output to approximately 70% of new-lens performance (AAA's headlight restoration summary). That's a meaningful recovery, but it still isn't a return to factory condition.
Why Headlights Fog Up and What Polishing Actually Fixes
Modern headlight lenses are generally made from polycarbonate, not glass. The material is tough and light, but sunlight gradually breaks down its protective surface. Academic technical documentation describes the underlying process as UV-driven photo-oxidation, where radiation breaks down polymer chains in the plastic (technical documentation on polycarbonate photo-oxidation).
AAA reports that headlamp lenses typically begin showing yellowing and deterioration at about 5 years of age, with a margin of plus or minus 2 years (AAA headlamp lens deterioration research). Road film, heat, washing chemicals, and sunlight all make the surface harder to keep clear. The yellow layer scatters light before it reaches the road, so the issue affects optical performance as well as appearance.
I check a questionable lens with isopropyl alcohol before reaching for sandpaper. Wipe a small area, then inspect it from several angles in direct sunlight. If the haze briefly disappears and returns, you're likely looking at surface oxidation. If you see deep cracks, heavy pitting, moisture inside the housing, or yellowing that appears embedded in the plastic, polishing won't be an honest fix. Replacement may be the sensible answer.
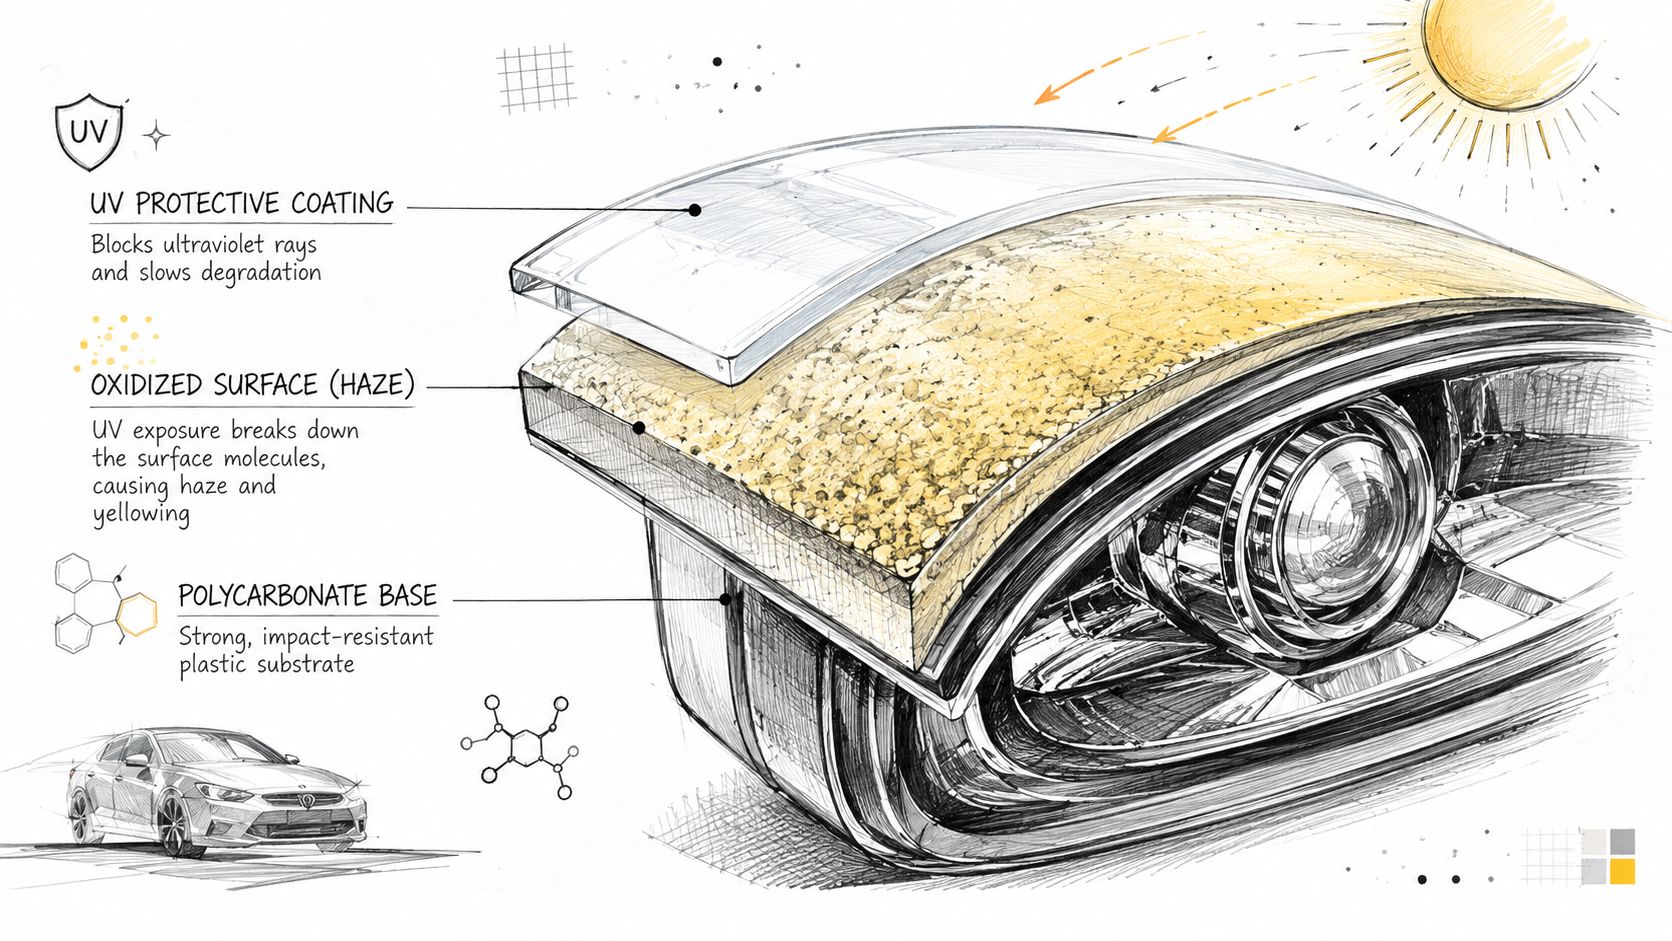
What the polish removes
A restoration removes the oxidized surface and shallow scratches. It doesn't rebuild cracked polycarbonate or correct moisture fogging from inside the lamp. AAA's testing also showed that restored headlamps can regain a substantial amount of performance, but the final protective layer determines how long that clarity survives.
Practical rule: Treat polishing as surface correction. Treat sealing as the restoration's finish.
For readers planning a longer-term repair, it helps to understand the role of a UV protective coating for polycarbonate. A clear lens on Saturday can become a hazy lens again if bare plastic is left exposed.
Hand Sanding vs Machine Polishing Tools
The first time I restored a lightly hazed lens, I used a foam sanding block, wet paper, a plastic compound, and patience. That approach gave me control over every edge. If a grit felt too aggressive, I could stop immediately instead of letting a spinning pad remove material faster than I intended.
A machine changes the pace, not the basic objective. A dual-action polisher can reduce compound work and refine the finish efficiently. A rotary can cut even faster, but it also gives a beginner less forgiveness. Polycarbonate heats quickly, and excessive pressure or speed can leave uneven clarity or permanently damage the housing.
| Factor | Hand Sanding | Machine Polishing |
|---|---|---|
| Control | Excellent, especially around edges and trim | Requires pad control and steady movement |
| Speed | Slower on heavy oxidation | Faster for compound and finishing work |
| Learning curve | Accessible to first-time restorers | Higher, particularly with a rotary |
| Finish | Good when grits are changed carefully | Fine finish is easier once technique is sound |
| Typical use | Light haze and cautious DIY work | Heavy oxidation or repeated restoration work |
Choosing by the lens, not the toolbox
For mild haze, hand sanding and a plastic polish are usually enough. For a lens with severe oxidation, orange-peel texture, or stubborn scratches, a machine may save time, but only if you can keep the pad flat and moving.
The common mistake is buying speed before learning surface control. A drill attachment or rotary tool can burn through an edge while the center still looks cloudy. If you use a machine, start conservatively, inspect often, and stop as soon as the lens feels warm rather than hot.
The goal is a uniformly prepared surface. Whether your hands or a dual-action polisher create it, the lens must be ready for protection before the project is finished.
Masking and Progressive Wet Sanding
Masking comes before sandpaper touches the lens. Run automotive painter's tape around the complete housing, including the fender, hood edge, bumper, and nearby trim. The tape catches slurry and gives your sanding block a safe boundary.
A plastic-friendly automotive masking tape is useful because it pulls away cleanly without leaving adhesive on delicate trim. Press the edge down firmly, especially where the lens meets painted panels.
Prepare the surface
Wash the headlight and surrounding panel first. Remove grit that could become a fresh scratch under the sanding paper. Fill a bucket with clean water and add a small amount of dish soap for lubrication, then keep the lens wet throughout the process.
Use the lens condition to choose your starting point:
- Severe pitting or flaking clear coat: Begin around 400 to 600 grit, as outlined in restoration guidance from Engineer Fix.
- Moderate haze: Start at 1000 or 1500 grit when the surface doesn't need aggressive correction.
- Refinement: Move through 2000, 2500, or 3000 grit, keeping the same wet technique.
The supplied process notes for progressive restoration commonly describe a range from 800 through 3000 grit, while heavier damage may require a coarser beginning. The correct starting point is the least aggressive grit that removes the visible damage evenly.
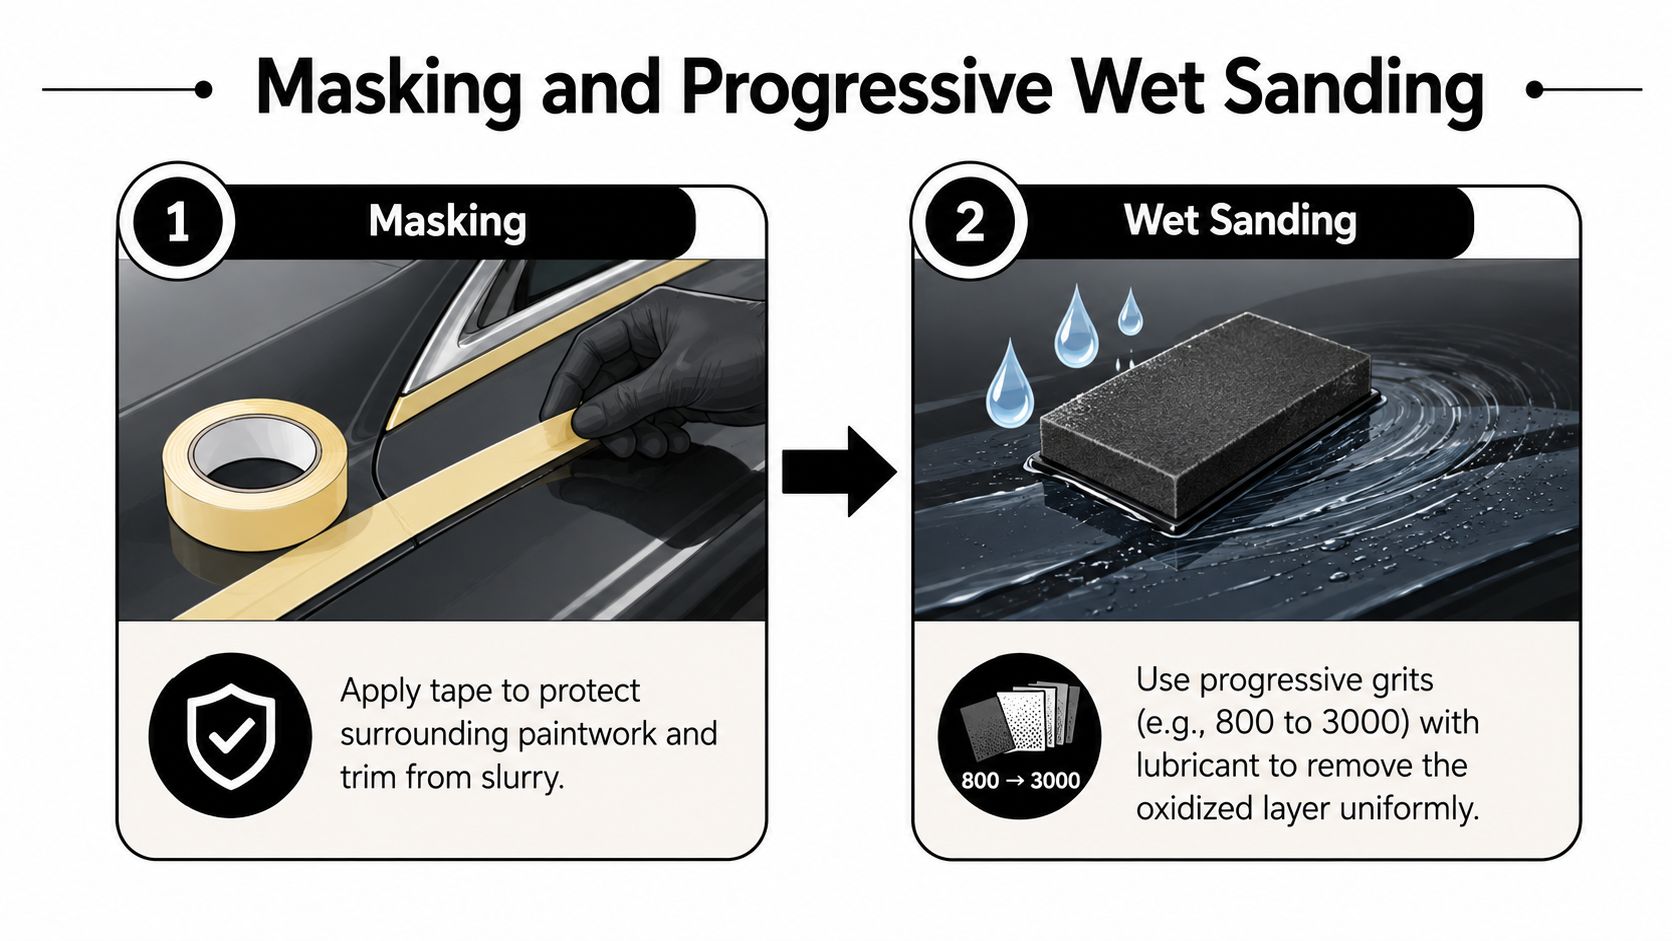
Keep each sanding stage honest
Work in straight horizontal strokes across one section at a time. Use the weight of your hand, not the force of your arm. If the lens dries, stop and add more water. Dry sanding creates heat and deep scratches that compound may struggle to remove.
After each grit, wipe the lens dry and inspect it. The surface should look consistently matte. Shiny islands mean the old coating or oxidation remains, while random deep lines indicate uneven pressure or incomplete refinement. Don't move to the next grit until the previous scratches have been replaced with a uniform pattern.
The sanding stage decides whether the polish will be easy or an afternoon of chasing defects.
Rushing from a coarse grit directly to compound is where many beginners lose time. Fine paper doesn't erase deep sanding marks instantly, and a polish can't compensate for a lens that wasn't prepared evenly.
Polishing Compounds and Pad Selection
When the lens has a consistent matte appearance, wipe it clean and bring it under diffused light. A shop lamp held at a low angle will reveal whether the haze is even. You shouldn't see glossy patches mixed with dull sections before compound touches the plastic.
Choose a plastic-specific rubbing compound when possible. It's formulated for the softer, more sensitive surface of polycarbonate and generally gives you better control than an aggressive all-purpose compound. A cutting compound removes sanding marks, while a finishing polish refines the remaining micro-haze.
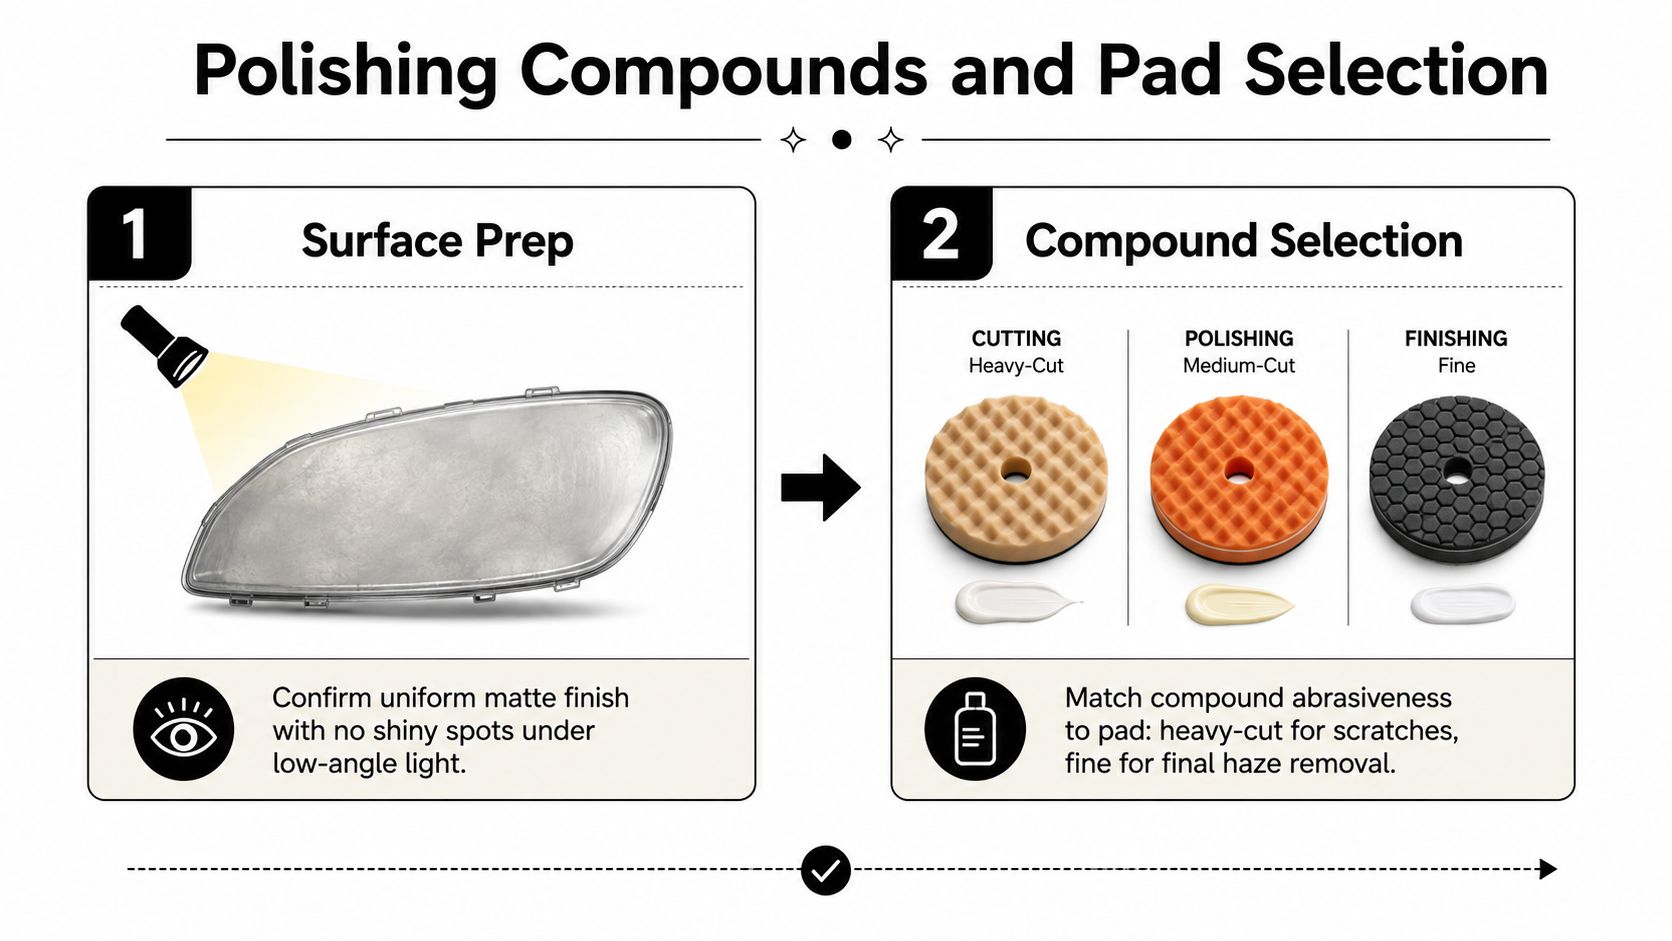
Match the pad to the correction
Foam pads are usually the forgiving choice. A firmer cutting foam helps remove sanding marks, while a softer polishing foam improves final clarity. Microfiber pads cut more strongly, but they also build heat and can leave more residue or micro-marring if you press too hard.
Work a small area, roughly 6 inches, before checking the result. Keep the pad flat and use light to moderate pressure. With a dual-action polisher, the supplied guidance places working speed around 1200 to 1800 RPM, though the tool's design and pad movement matter as much as the dial setting.
Wipe residue away with a clean microfiber towel before judging the finish. If the lens still looks cloudy, first ask whether the sanding marks were refined enough. Adding more compound to an under-sanded surface wastes product and generates unnecessary heat.
Know when to stop
Polycarbonate heats faster than automotive paint. Touch the lens often. Warm is manageable. Hot means you need to pause and let the surface cool.
Titan Coatings also offers polishing and buffing pads for users building a repeatable detailing setup. The pad is only part of the result, though. Clean media, a flat working angle, and frequent inspection matter more than chasing maximum cutting power.
Why Protection Matters More Than the Polish Itself
The polished lens is the most attractive moment of the job, and it's also the moment when many restorations fail. Sanding removes the degraded surface, but it can also remove what remains of the factory UV protection. The freshly clear polycarbonate is then exposed to the same sunlight that caused the original yellowing.
Polishing a headlight without sealing it is like pressure-washing a deck and skipping the stain. The surface looks renewed while it's wet, but the environment hasn't changed. Restoration guidance notes that haze can return within weeks to a few months when the lens is left unsealed (headlight restoration durability guidance).
A proper restoration therefore has two deliverables:
- Optical correction: Remove oxidation and refine sanding marks.
- UV protection: Add a compatible barrier that slows re-oxidation.
The polish creates the appearance. The protective layer determines whether you keep it.
Before sealing, remove polishing oils and residue. Apply protection in shade, on a cool lens, and follow the product's cure instructions. A clear coat or coating applied over contamination may look fine at first but fail through poor adhesion.
For a product-focused overview of the protection stage, see Titan's guide to ceramic coating for headlights. The important decision isn't which bottle produces the fastest shine. It's which protection method fits your sunlight, weather, parking, and ownership plans.
Choosing the Right UV Protection for Your Lens
The restored lens needs a barrier, but not every barrier suits every car. A vehicle parked outdoors in intense sun places a different demand on its coating than a weekend car kept in a garage. The four common paths are easy to compare once you separate application effort from expected durability.
| Option | Typical Durability | Approx. Cost | Best For |
|---|---|---|---|
| Spray-on sealant | About 2 to 3 months in the supplied restoration guidance | Lower-cost DIY maintenance | Older daily drivers, rental cars, or quick refreshes |
| Wipe-on UV clear coat | About 6 to 12 months, depending on exposure and preparation | Moderate DIY spend | Owners wanting a simple step beyond spray protection |
| Consumer ceramic coating | About 3 to 5 years in favorable garage-kept conditions, with less durability under harsh sun | Higher DIY spend | Carefully prepared vehicles kept in controlled conditions |
| Paint-protection film patches | 5-plus years in the supplied comparison guidance | Most expensive option | New or restored headlights on cars being kept long term |
These ranges are not guarantees. The comparison guidance for DIY restoration methods also places many sealants around 6 to 12 months, while ceramic or film-based systems may extend from 2 to 5-plus years, depending on climate, use, and maintenance (protection-method comparison).
Where each method makes sense
Spray sealants are quick and forgiving, but they make sense only if you're comfortable refreshing them. Wipe-on clear coats offer a more substantial layer, yet they demand careful preparation and even application.
Ceramic coatings require disciplined wipe-off. Generic paint ceramic products may flash unevenly on plastic, so choose a coating rated for polycarbonate or automotive plastics. Film gives the strongest physical shield against road impact, but it can leave a visible edge that some owners dislike and requires more precise installation.
Elastomer-based options, including Titan Coatings' products, target a different trade-off. Titan describes its elastomer coatings as hard like glass while remaining flexible, so the layer can accommodate temperature changes rather than cracking as a rigid film might. The company also presents its Dark Matter technology and nanotube-based coating approach as part of its coating technology portfolio. Those product claims should be judged against the manufacturer's instructions, surface compatibility, and your actual climate.
For DIY and mobile detailers, the practical question is simple. Do you want the quickest refresh, a careful coating application, or a more durable flexible barrier that avoids the look of film?
Aftercare, Troubleshooting, and Long-Term Results
A month after restoration, the lens should be treated like a freshly corrected surface, not scrubbed like neglected plastic. Wash it with pH-neutral car soap, use a clean microfiber for drying, and avoid abrasive compounds unless you're deliberately correcting the surface again.
I like to inspect restored headlights during routine vehicle checks. Look at them in daylight and notice whether the surface remains clear, whether water sheets or beads unevenly, and whether a faint haze is forming around the edges. Catching early deterioration is easier than repeating a full sanding process.
When the result starts to slip
A haze that returns quickly usually points to a protection problem, not a defective polish. The common causes include skipping the UV sealant, applying it over polishing oils, or curing it on a hot lens in direct sunlight.
- Haze within weeks: The polycarbonate may have been left unsealed, or the protective product may not have bonded.
- Orange-peel texture: The compound may not have been worked down far enough, or the surface may still carry coarse sanding marks.
- Swirl marks: A dirty pad, excessive pressure, or aggressive rotary technique may have created fresh micro-scratches.
- Uneven clarity: The sanding pattern may not have been uniform before polishing.
Some technical application guidance recommends 2 to 3 light coats of UV-resistant sealant, held approximately 8 to 10 inches from the lens, with about 5 minutes between coats and as much as 24 hours of cure time before rain exposure (sealant application guidance). Follow the specific product directions if they differ.
Make it repeatable
A basic spray sealant may need regular renewal. A consumer ceramic coating can last longer under suitable daily-driver conditions, while Titan's elastomer coating line is positioned for longer-term protection and flexibility across temperature changes. Titan also describes its elastomer approach as useful where impact and thermal movement matter, because the coating is designed to flex rather than crack.
The broader headlamp restoration kit review resource can help you compare preparation and protection choices before buying. If the beam still looks uneven at night after restoration, inspect the pattern rather than assuming surface clarity means perfect optical performance. A cracked lens, internal moisture, or serious structural damage still calls for replacement.
APEX NANO – Titan Coatings offers coating options for the protection stage that follows DIY car headlight polish, including flexible elastomer technology designed to remain hard like glass while accommodating temperature movement. Visit APEX NANO – Titan Coatings to review the shop, the Ultra Ceramic Spray, Apex Glass Ceramic Coatings for glass and windshield visibility in rain, and Alpha Quartz for DIY and mobile-detailing applications.
0 Comments