
A one-step paint correction typically costs $200–$400 for a sedan, $275–$500 for an SUV, and $300–$550 for a truck or van. Three-step correction can reach $600–$1,800, depending on vehicle size and condition.
You’re probably here because the paint looks fine in the shade, then sunlight reveals swirls, scratches, or dull patches. The right quote isn’t the one promising to erase every mark for the lowest price. It’s the one that matches the defects you have, protects the clear coat that remains, and spells out exactly what the shop will do.
Paint Correction Cost at a Glance
The right tier depends on the defects you want improved and how much clear coat you’re willing to remove. A lighter correction can preserve more of that protective layer and cost less. For some cars, that is the smarter choice.
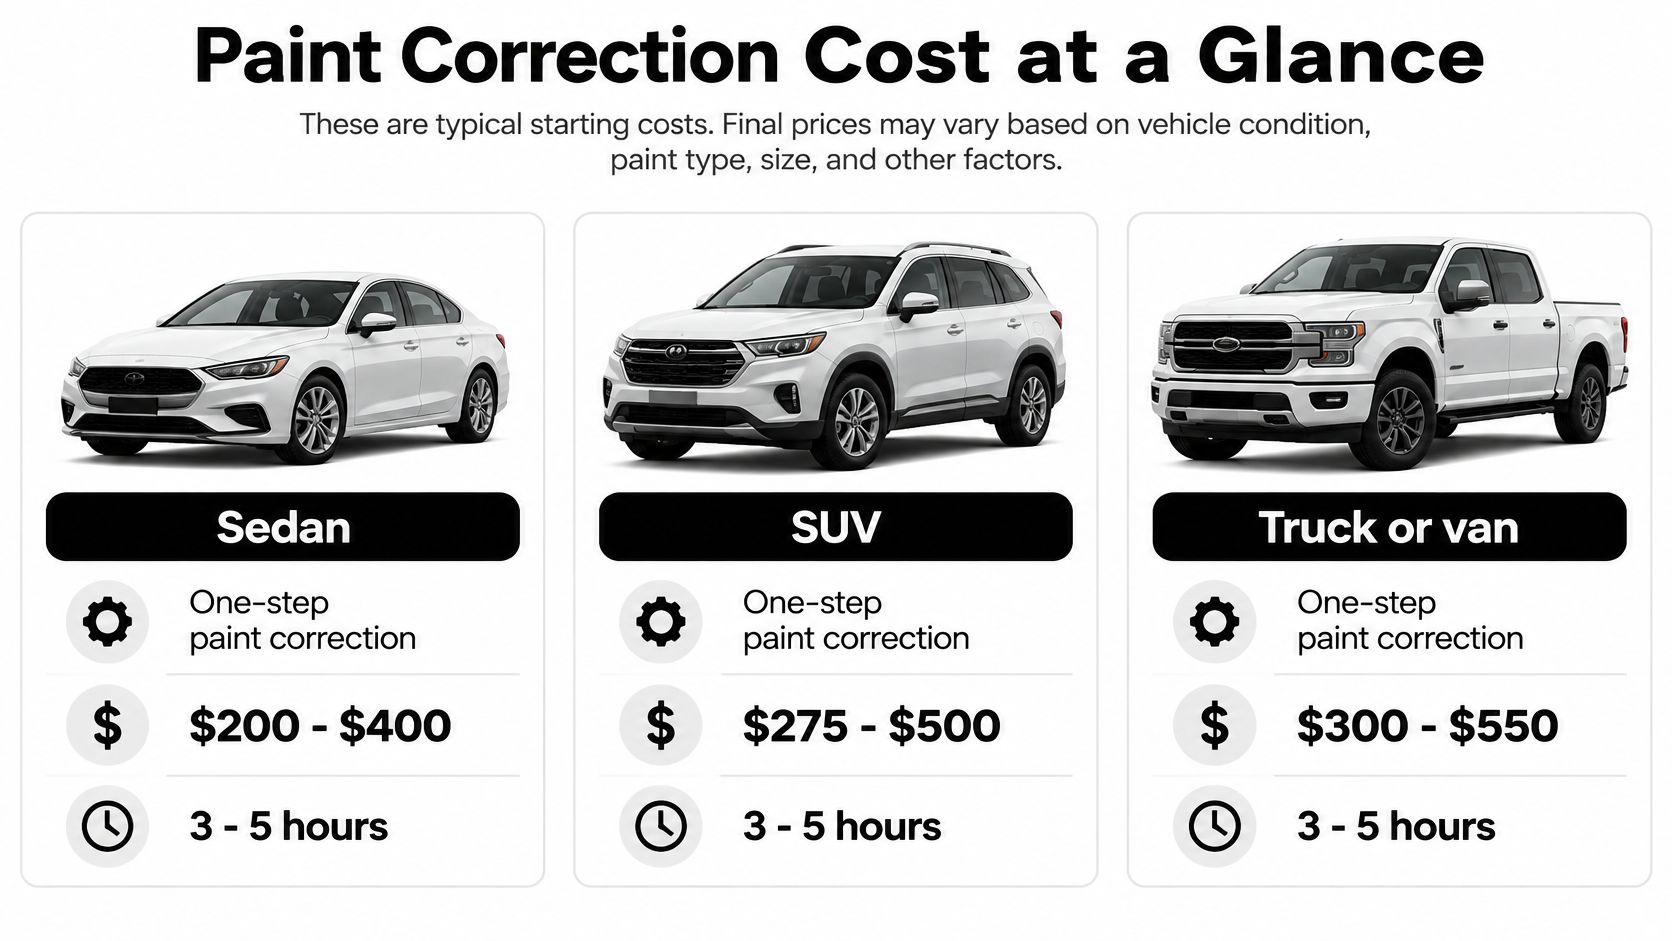
| Correction tier | Sedan | SUV | Truck or van | Typical labor time |
|---|---|---|---|---|
| One-step, light swirls and gloss | $200–$400 | $275–$500 | $300–$550 | 3–5 hours |
| Two-step, compounding plus refining polish | $400–$700 | $500–$900 | $550–$1,000 | 6–10 hours |
| Three-step, wet sanding, compounding and polishing | $600–$1,800 across sizes | $600–$1,800 across sizes | $600–$1,800 across sizes | 8–14 hours |
A U.S. sample of 669 advertised paint-correction prices from 330 detailing shops found a typical posted price of about $470 for a standard car, with half of the prices between $349 and $700, according to Ceramic Coating’s paint correction cost comparison. These are advertised prices, not guaranteed quotes. Vehicle size, paint condition, defect depth, and the number of correction stages all affect the final bill.
What each tier buys
A one-step service uses one polishing process to improve gloss and reduce light swirls. It removes less material than more aggressive correction, making it a sensible, lower-cost choice when defects are minor.
A two-step correction adds abrasive compounding before the refining polish. Choose it for more noticeable defects, but ask the shop to explain how much improvement is realistic without taking off unnecessary clear coat. A three-step correction may include wet sanding before compounding and polishing. It demands more time and judgment, and is not the right choice for every car.
Don’t compare quotes by the words “paint correction” alone. Ask each shop to name the tier, list the stages, and say which defects it expects to improve. For background on the difference between polishing and correction, read this guide to understanding car paint polishing.
Check the paint in direct sunlight, judge whether the defects are light, moderate, or pronounced, then request quotes for that level of work. A low price for a one-step enhancement is not comparable to a multi-stage correction.
What Labor and Time Really Add to Your Bill
Paint correction prices reflect the technician’s time and control more than the cost of compound. A light polish takes less work than stripping away deeper defects through several stages, even though both jobs use similar materials. You’re paying mainly for skilled labor and a controlled process, not for a bottle of compound.
The Nevada Department of Motor Vehicles body-shop survey reports auto-body labor rates around $50–$62 per hour and structural labor rates up to $140 per hour. These are body-work figures, not detailing-shop rates. Use them only as a ceiling for understanding how labor-intensive automotive work can affect a bill, not as the basis for estimating a paint-correction quote.
What the hours pay for
A two-step correction can require six to twelve hours of skilled work. The technician inspects panels, masks trim and edges, tests the process, changes pads, removes compound residue, and checks the finish under controlled lighting. Swirled, oxidized, or scratched paint may need extra preparation and polishing stages.
Labor accounts for most of the hands-on work in a two-step job. The exact charge depends on the shop’s rate and the time the vehicle needs, so ask for those details rather than treating an unrelated body-shop rate as a quote estimate.
Ask for the work, not just the name. Request the estimated working hours and number of stages. That gives you a practical basis for comparing quotes. A lower-cost, less aggressive correction is a sound choice when it meets your goal; more polishing means more labor and more clear coat removed. For guidance on professional car polishing and its scope, consider what defects you want improved before choosing a service.
Why Clear Coat Thickness Sets the Limit
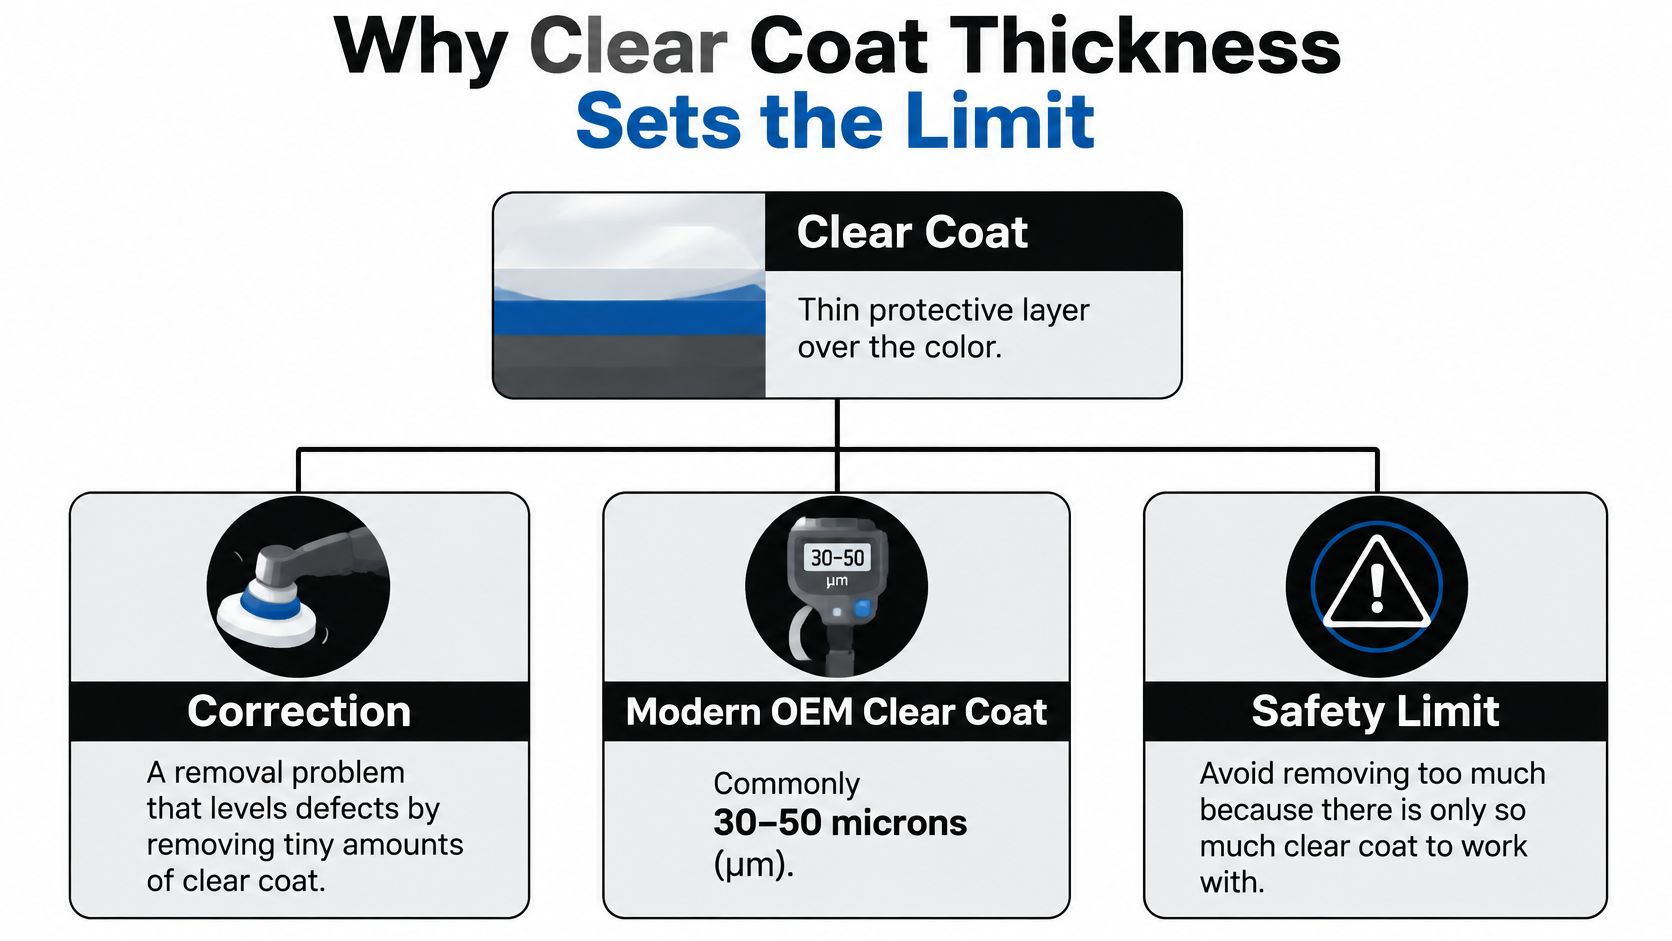
Correction removes clear coat to level defects. Deeper marks can require removing more of this protective layer, so choose a correction level based on the finish the car can safely support.
Clear coat is the transparent protective layer above the color. Modern OEM clear coat is commonly cited at about 30–50 microns, or 1.2–2.0 mils, though individual panels and refinished areas can differ, according to this guide to automotive clear-coat thickness. A more aggressive service is not automatically better, because each polishing stage removes some of that finite layer.
Why the cheaper tier has a ceiling
A one-step service can raise gloss and reduce light swirls, but it cannot deliver the same result as multi-stage work aimed at sanding marks, etching, or deeper scratches. That extra correction takes more work and removes more clear coat. For some owners, accepting a visible improvement instead of paying to chase every defect is the sensible, money-saving choice.
Some marks should be softened rather than removed completely. Deep scratches, especially near an edge or on a thin panel, may not be safe to chase. A surface with an uncertain repaint history also calls for caution. Ask the shop to distinguish gloss refinement, visible improvement, and full defect removal in the quote, since those describe different outcomes.
For repainted or visibly damaged panels, ask whether the shop will take paint-thickness-gauge readings where practical. A gauge cannot make every panel safe to correct, but it gives the technician more information when choosing an approach. Titan Coatings’ guide to paint-thickness gauges for cars explains what the tool measures.
Get the limits in writing, including whether defects that reach through the clear coat may remain. More inspection and slower work can raise the ticket, but stopping before unsafe removal protects the car’s finish. Choose the least intensive correction that achieves the improvement you want.
The Factors That Move Your Quote
Two cars can need the same correction tier and still receive different quotes. The difference comes down to how much surface needs work, how difficult the paint is to correct, and whether the job includes protection afterward. The table below shows what changes the scope.
| Factor | How it moves price | Example |
|---|---|---|
| Vehicle size | Larger vehicles need more passes across more panels | An SUV takes longer to polish than a comparable sedan |
| Stage count | More correction stages add labor and increase the amount of clear coat removed | Three-step work may add wet sanding before compounding and polishing |
| Defect depth | Deeper scratches and etching require more passes and slower finishing | Light swirls may suit one-step work; sanding marks need more intensive treatment |
| Paint hardness | Harder paint can take longer to cut with the same pad and compound | A hard finish may need extra compound passes |
| Access and trim | Edges, badges, and masked trim slow the work | Tight body lines require masking and hand finishing |
| Repainted panels | Thin or uneven clear coat calls for conservative work and gauge checks | A repainted hood may be improved rather than fully corrected |
| Location | Local labor rates and shop overhead affect the total | Two shops may quote different amounts for the same tier |
| Bundled protection | A coating adds product and application time | Coating a corrected panel increases the job scope |
Stage count and defect severity usually shape the scope more than any single detail. Use the Detail Pilot car detailing pricing guide to compare typical correction tiers, prices, and time requirements. Treat those figures as a starting point, not a promise: vehicle size, paint condition, and the number of panels needing attention all affect the final quote.
What to weigh when comparing quotes
Start with the defects you want improved. Light swirls on a few panels call for less work than oxidation and etching across the hood, roof, and doors. A more intensive correction may deliver a larger visible change, but it also means more labor and more clear-coat removal. Choose the least aggressive scope that meets your goal, rather than paying to chase defects that can safely remain.
Paint and access matter too. Hard paint may need additional compound passes, while tight body lines, badges, and sensitive edges take more masking and hand finishing. Repainted panels deserve caution because their clear coat may be thin or uneven. Location affects labor costs, and a coating adds product and application time after correction. The Titan Coatings’ car paint detailing cost guide can help you compare service scope and protection choices.
Before accepting a quote, inspect the car in direct light and note which panels show defects, along with any repaint history or deep marks. Ask the shop to name the correction tier, explain what it expects to improve, and estimate the hours involved. Then compare quotes by scope, not just by total. A lower price may reflect fewer stages, fewer panels, or a more limited result, which can be the right choice if modest improvement is all you want.
Three Owners and What Each Should Expect to Pay
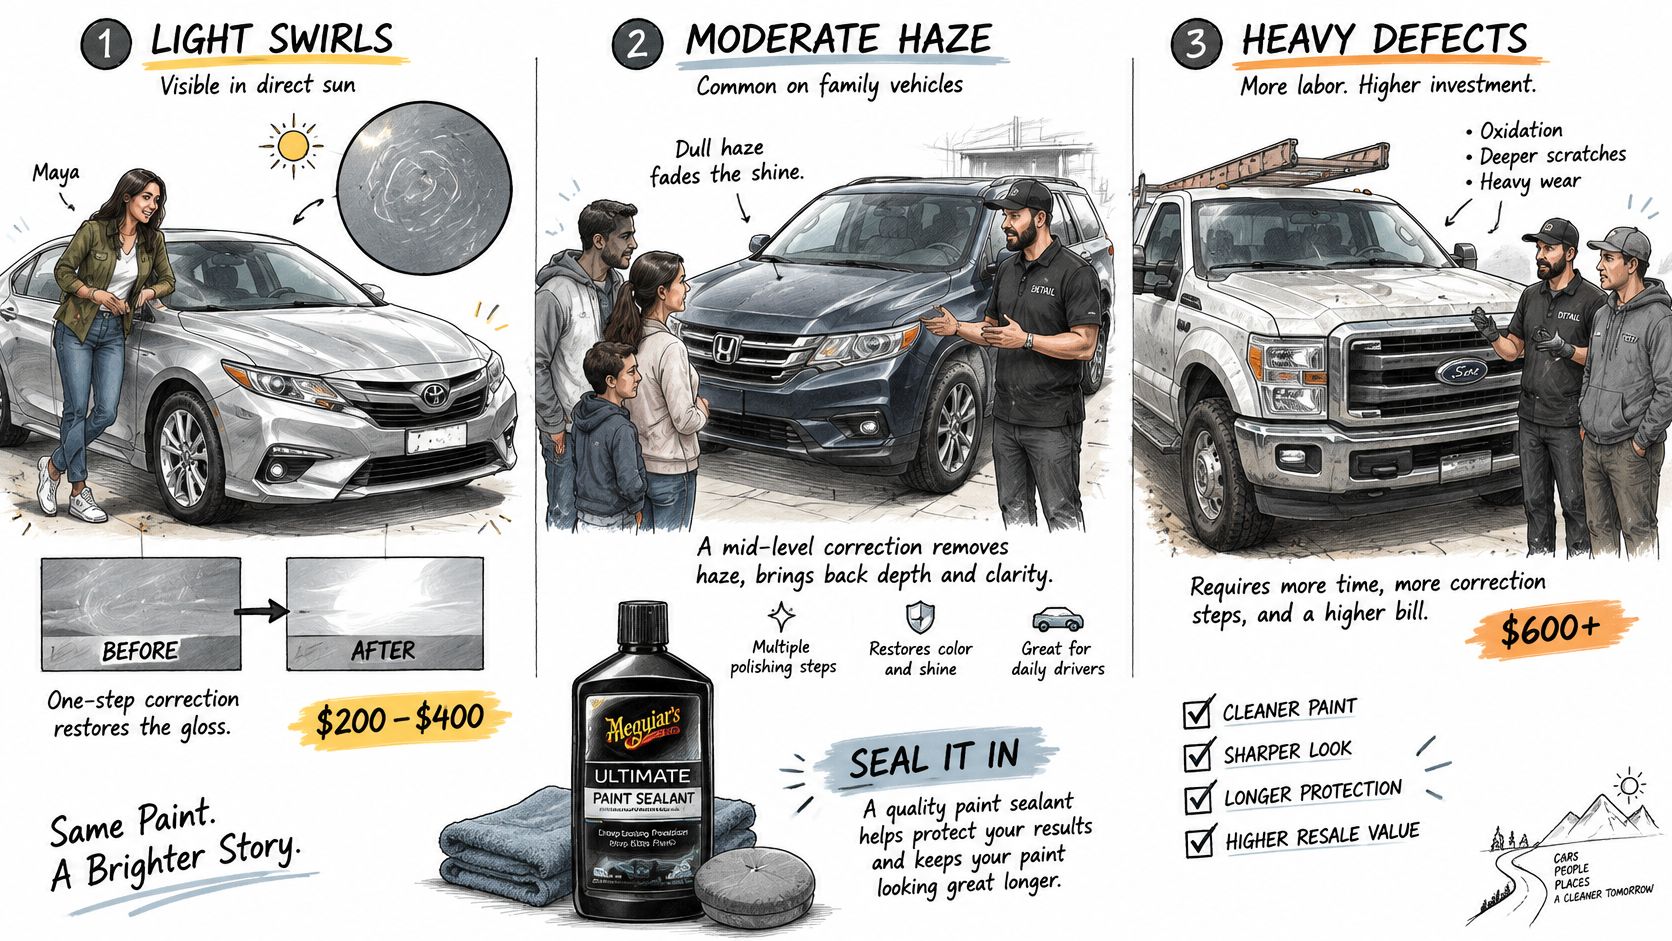
Maya’s silver sedan looks clean in the garage, but sunlight reveals light swirls across the doors. She wants more gloss, not a show-car finish, so a one-step correction is the sensible starting point: $200–$400 for a sedan in the typical U.S. range. She should ask whether the quote includes the full car, what the technician expects to improve, and whether any deeper marks will remain.
A more involved SUV
Dan’s black SUV shows swirls across multiple panels, oxidation on the roof, and light etching on the hood. A one-step pass may not meet his goal; a two-step process is more plausible, and the larger vehicle size pushes the likely quote above a comparable sedan. He should ask for a test spot before authorizing the full job, then get a written estimate showing the stages and scope.
When correction isn’t the repair
Ray’s pickup has a repainted hood, scratches that catch a fingernail, and a rust bubble near the wheel arch. Polishing can improve suitable surface marks, but it won’t replace missing paint, repair rust, or fill a deep scratch. AAA’s paint-repair cost guide reports that deep scratches requiring filling and sanding commonly cost $150–$300 to repair, rust repair typically costs $150–$500 per affected area, and minor dent repairs generally cost $50–$150 per dent.
Ray needs bodywork or refinishing first, then correction on the areas that can be safely polished, followed by protection. He should ask the shop to identify which panels need repair, which can be corrected, and whether the repaint can be safely polished. The estimate should separate those jobs rather than bundling them under “paint correction.”
DIY Correction Versus a Professional Shop
DIY correction removes the labor line, but it doesn’t remove the time, practice, or risk. If you’re weighing a home setup against a shop, compare what each route asks of you:
| Factor | DIY correction | Professional correction |
|---|---|---|
| Upfront tools | Polisher, pads, compounds, and lighting bought once | Equipment and labor included in the shop quote |
| Time required | Often many hours across several days for a full car | Usually 3–5 hours for one-step work and 8–14 hours for three-step work |
| Skill needed | Learn pad choice, speed, and pressure on a test panel | Trained technicians judge depth and stop short of unsafe removal |
| Clear-coat risk | Higher if you guess at pressure and passes, especially on edges | Lower when gauge readings and test spots guide the work |
| Consistency | Results rely on lighting, patience, and practice | Controlled inspection and a written scope support consistency |
| Best fit | Light swirls on one car you can practice on | Deep defects, repainted panels, or a car you plan to keep for years |
What a DIY owner needs
A practical setup starts with a dual-action polisher, several pads, compounds matched to the defects, strong diffused lighting, and a few days to learn on a hidden panel. Use a test spot, inspect it under good light, and change only one part of the process at a time. That helps you see whether the pad and compound are working before you repeat the same combination across the car.
Common mistakes include pressing too hard, making too many passes over an edge, and working in direct sun where glare makes defects difficult to judge. If you’re learning the process, review Titan Coatings’ paint correction and polish guide before putting a machine on a visible panel.
A professional adds trained judgment about defect depth, paint-gauge checks where appropriate, and the discipline to stop before removal becomes unsafe. DIY makes sense for light swirls on a car you can afford to practice on. For deep defects, repainted panels, or a car you intend to keep for years, hire a shop that documents its process.
Use one simple test: if you can’t see clear progress under good lighting after a test spot, stop and hand the job to a professional.
How Coatings Change the Total
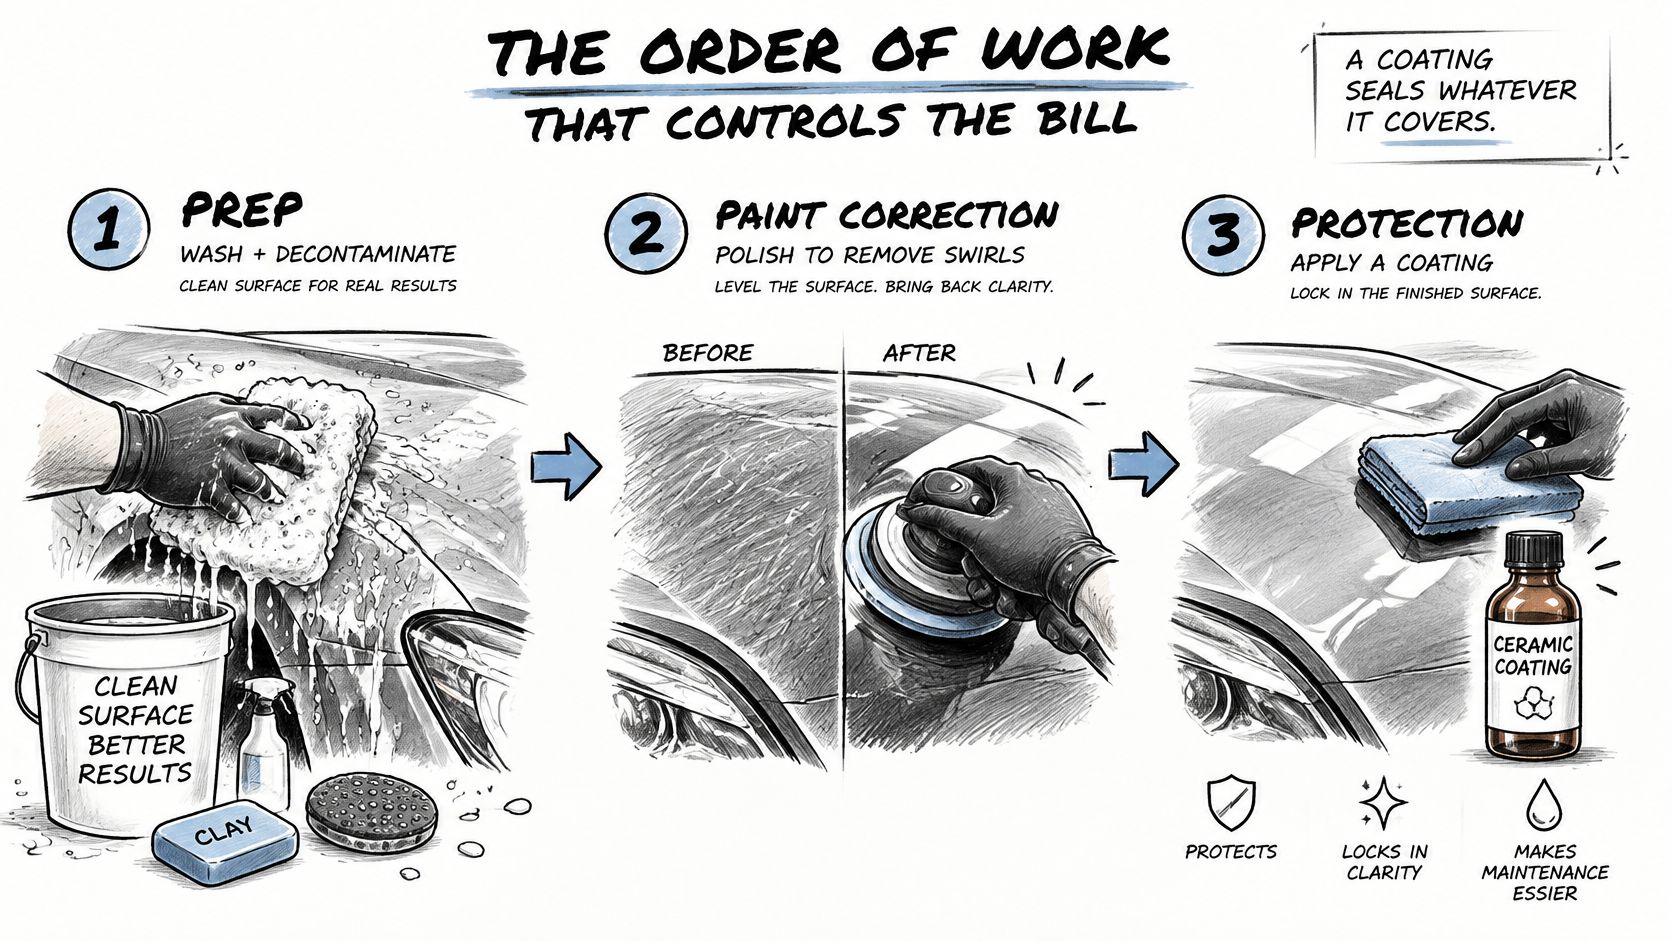
Correct first, protect last. A coating preserves the surface beneath it, including swirls left in place. Choose the correction level before adding protection to the quote. The work typically involves washing and decontaminating the paint, claying where needed, masking edges, and inspecting the finish under diffused light. After correction, product choice, preparation, application, and cure requirements shape the protection portion of the bill. A lighter correction can be the right call: removing less clear coat also means less labor before protection goes on.
Match the protection to the job
Titan describes Alpha Quartz 50ml Ceramic coatig as an elastomer ceramic coating intended for DIY owners and mobile detailers. It is designed for use on multiple surfaces and to protect against UV exposure, chemicals, and abrasion. The coating’s flexibility is intended to help it resist cracking from impacts and temperature changes. It does not repair paint defects, so choose the correction level first and follow the product directions for application.
For a spray option, ULTRA Ceramic Spray is a water-based flexible membrane sealant intended for paint, wraps, paint protection film, glass, wheels, and plastic trim. Its format can suit owners looking for a straightforward way to protect a corrected surface. Follow the directions for preparation and application.
APEX Glass Ceramic Coating is intended for glass and windshields, where it is presented as a treatment to improve visibility in rain. It is a separate glass treatment, not a paint-correction step. Compare the protection part of a quote with this vehicle ceramic coating cost guide, then check product details for application and care directions. Titan’s shop catalog lists its coating products.
Choose Your Correction Level Before You Book
How long will you keep the car? Have any panels been repainted? Do the defects catch your fingernail? Those answers help separate a worthwhile correction from an expensive attempt to chase marks that should be softened or repaired instead.
If you’re planning to sell soon, a limited gloss-enhancement service may make more financial sense than a costly multi-stage job. If you’ll keep the car for years, measured correction followed by protection can be a defensible investment. The Mordor Intelligence car detailing services market report highlights the importance of matching specialty correction and protection choices to vehicle condition, ownership plans, and clear-coat risk. The question isn’t whether every swirl can be removed. It’s what improvement is safe and worth paying for.
Spend less without choosing blindly
- Choose one-step work for light swirls. Don’t pay for extra stages that won’t meaningfully improve the finish.
- Ask for a test spot first. It shows the least aggressive process that can meet your goal.
- Compare bundled and separate pricing. Ask the shop to itemize correction and protection so you can compare scope.
- Ask about quieter booking periods. A shop may have different availability when its schedule is less busy.
- Wash safely after the work. Careful washing helps avoid adding new defects to the corrected finish.
- Watch reputable detailing demonstrations on YouTube. Look for a clear explanation of test-spot technique before you commit to DIY work.
Request a written estimate listing the tier, working hours, stages, paint-gauge plan, and stated limits on defect removal. Then review protection options through the Titan Coatings shop and choose a coating only after you know what surface it will protect.
APEX NANO – Titan Coatings offers coatings for paint, glass, and other vehicle surfaces, including options designed for flexible protection after correction. Visit APEX NANO – Titan Coatings to compare products and choose protection that fits your finish and how you use the car.
0 Comments