
You finish washing your dark-colored car, pull into a petrol station, and notice the paint looks worse under the overhead lights. Fine spiderwebs radiate across the hood. The doors carry dull arcs from old wash mitts. A quick wax might deepen the reflection, but it won’t remove the marks. That’s where paint correction polish earns its place.
Proper correction is controlled clear-coat removal, not a glossy disguise. The objective is to level defects safely, refine the finish, and protect the surface before new contamination and washing damage undo the work. The process matters just as much as the product, because every polishing pass spends a small amount of a limited paint system.
Why Paint Correction Polish Matters More Than Shine
A customer once brought in a black sedan that looked excellent in the shade. Under direct LED lighting, the hood told a different story. Swirls covered the upper panels, a few water spots had etched the surface, and an old glaze had made the paint look better only until the oils wore away. The owner didn’t need another gloss product. He needed the surface leveled.
That distinction separates true paint correction from cosmetic hiding. A glaze, wax, or filler can temporarily reduce the visibility of defects. A paint correction polish uses abrasive compounds and a pad to mechanically remove a microscopic layer of clear coat around the defect, bringing the surrounding surface closer to the same level. The process is explained in practical terms in this guide to what paint correction actually does.
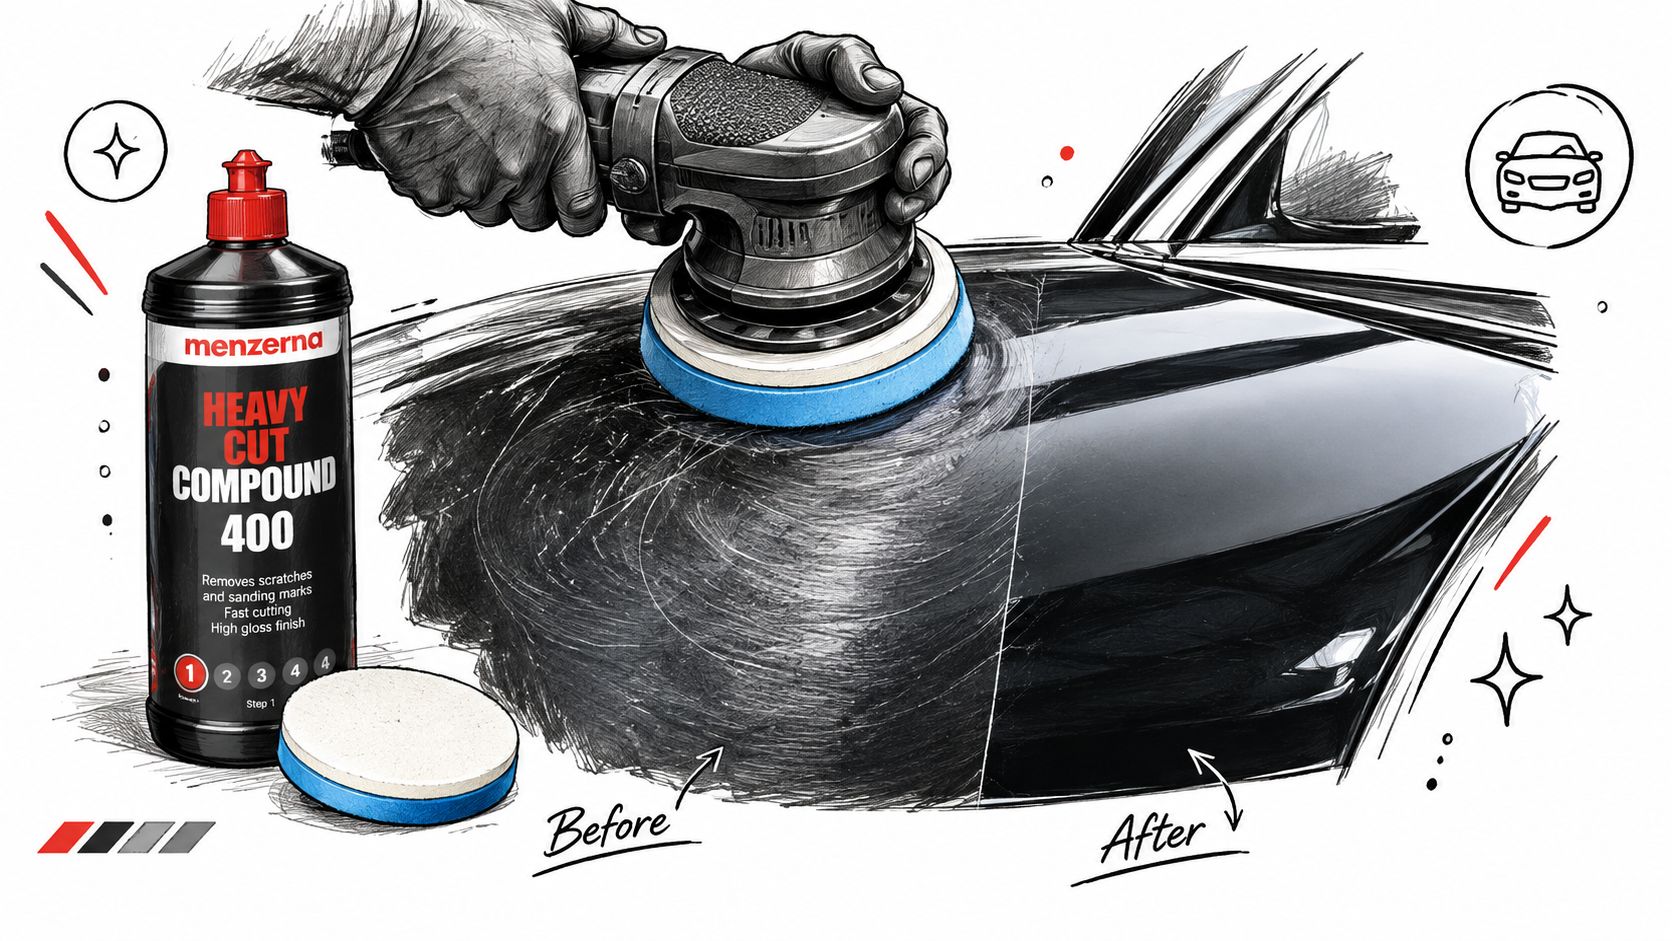
Correction has a limit
The clear coat is the working material. Professional guidance commonly describes removal at roughly 1 to 3 microns per correction stage, with heavier work sometimes reaching 4 to 5 or more microns depending on the process and defect severity, as detailed in this technical explanation of clear-coat removal during polishing.
That doesn’t mean a detailer should chase every visible mark. A scratch that sits within the clear coat may improve substantially. A mark that catches a fingernail usually indicates deeper damage and may not be safely removable with polishing alone. Base-coat damage, primer exposure, stone chips, peeling clear coat, and rust require a different repair decision.
The practical question isn’t, “Can I make this panel perfect?” It’s, “What level of improvement is worth the clear coat I’d remove?” A one-step polish may reduce light swirls without pursuing maximum defect removal. A more aggressive multi-stage process may improve heavier defects, but it also consumes more of the available paint system and can leave micro-marring that needs refinement.
Why correction comes before protection
A coating preserves the condition beneath it. If the surface carries haze, swirls, or etched water spots, protection won’t magically level those defects. It can make the finish more reflective, but the damage remains part of the surface you’re preserving.
That’s why correction belongs before ceramic or elastomer protection. Titan’s coating approach is built around a surface that’s hard like glass while retaining flexibility, rather than treating hardness as the only performance goal. The flexible behavior is intended to help the coating tolerate movement and temperature changes without becoming brittle. The preparation still comes first. A coating can protect good correction, but it can’t replace it.
What to Prepare Before You Touch the Polisher
The polisher should be one of the last tools you pick up, not the first. Dirt, bonded fallout, loose grit, and unmeasured paint can turn a controlled job into unnecessary abrasion. Before correcting a panel, I want the surface clean enough to inspect, dry enough to read accurately, and understood well enough to choose a sensible starting combination.
Start with contamination control
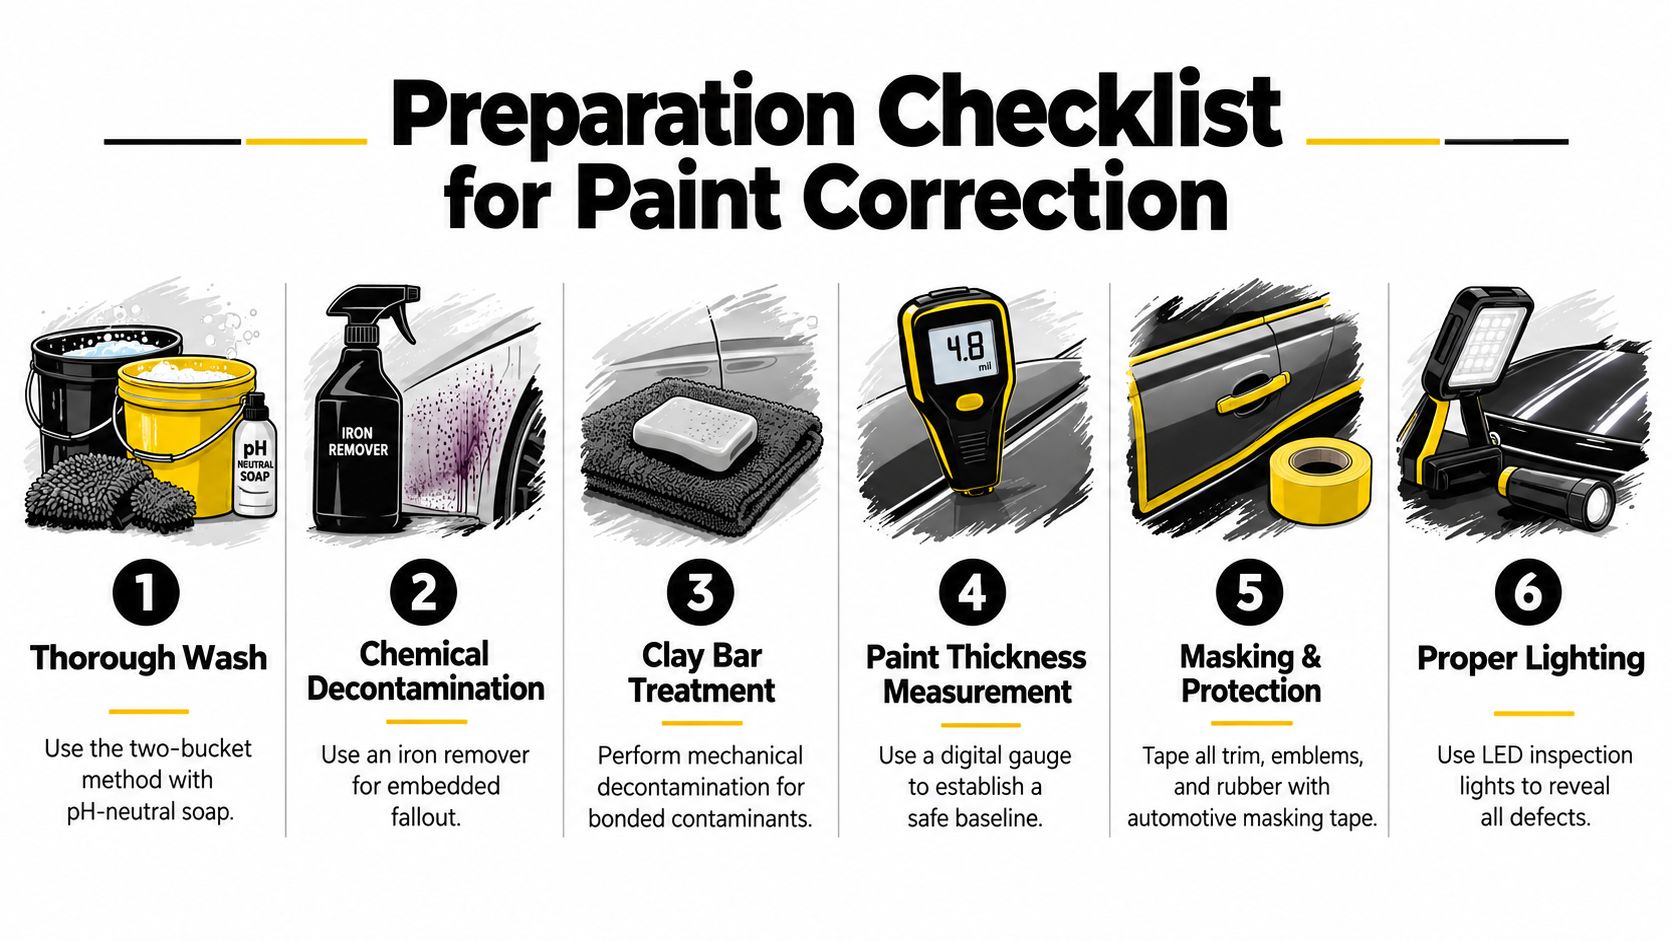
Begin with a thorough wash using a safe wash method and clean tools. Rinse loose grit away before contact washing, then clean the vehicle panel by panel. Chemical decontamination can address embedded fallout, while clay or another mechanical decontamination method removes bonded particles that leave the paint feeling rough.
Rough paint changes pad behavior. It can load the face of the pad, increase friction, and introduce fresh marks while you’re trying to remove old ones. For a more detailed preparation sequence, use Titan’s guide to preparing car paint before polishing.
Establish a safe starting point
A paint-thickness gauge gives you information that your eyes can’t. Measure broad sections, pay attention to edges and repaired areas, and record unusual readings before you begin. A repainted door may respond very differently from the original hood beside it, even when the colour appears identical.
Mask rubber, textured trim, badges, and vulnerable edges with automotive masking tape. Set up bright LED inspection lighting so defects remain visible after the panel dries. Shade is useful for keeping products manageable, but inspection lighting is what reveals whether the correction worked.
Build a test spot
Choose a representative section and start with the least aggressive pad-and-polish combination that might solve the problem. Work a small test area, wipe the residue completely, use a panel wipe if appropriate, and inspect from several angles under bright light. Don’t judge a combination through leftover polishing oils.
A practical test spot answers several questions at once:
- Defect response: Does the combination reduce the swirls, haze, or etching?
- Finish quality: Does the panel look clear, or has the process introduced haze?
- Paint behavior: Does the surface react quickly, or does it need additional refinement?
- Process control: Can you repeat the result without excessive heat, pressure, or product buildup?
Work in manageable sections, roughly 50 by 50 centimetres, rather than spreading polish over an entire hood. Small sections keep the product active, make inspection reliable, and stop you from spending more clear coat than the defect requires. If the test spot doesn’t deliver a worthwhile improvement, reassess the defect depth before increasing aggression.
How to Choose the Right Polish and Pad Combination
Pad and polish selection is a negotiation between defect removal, finish quality, machine control, and paint preservation. A cutting compound on a firm microfiber or wool pad can remove defects quickly, but it may leave haze or micro-marring. A finishing polish on soft foam can produce beautiful clarity, but it won’t correct defects that need more mechanical bite.
The least aggressive combination that works remains the safest starting point. That doesn’t mean using the softest pad on every car. It means testing a sensible light combination first, then escalating only when the panel proves it needs more correction.
Match the system to the defect
Light swirls on reasonably healthy paint often respond to a medium or finishing polish with a polishing foam pad. Oxidation and heavier wash marks may require a stronger compound and a more assertive pad. Water-spot etching varies widely. Some marks respond to polishing, while deeper etching may demand careful correction with realistic expectations.
| Defect Type | Recommended Polish Level | Pad Type | Expected Outcome |
|---|---|---|---|
| Light swirls and mild haze | Finishing or medium polish | Soft or medium foam | Improved clarity and reduced fine defects |
| Moderate swirls | Medium polish or light compound | Medium foam or microfiber | Noticeable defect reduction with manageable refinement |
| Oxidation and heavier surface defects | Cutting compound | Microfiber, firm foam, or wool | Stronger correction, often followed by refining |
| Water-spot etching | Medium polish, escalating after testing | Medium foam or microfiber | Reduced etching where damage remains within the workable clear coat |
| Final haze or micro-marring | Finishing polish | Soft foam | Cleaner reflections and increased optical clarity |
One step or two stages
A one-step polish makes sense when the car needs a visible improvement rather than maximum correction. It’s often the right choice for a daily driver with light to moderate swirls, a newer vehicle, or a client who values paint preservation over chasing every defect. One industry guide estimates that a one-step process may reduce light swirls by about 30 to 70 percent under typical conditions, depending on the paint and method, as discussed in this car polishing and correction guide.
A two-stage process starts with compounding and follows with a finer polish. The first stage removes more substantial defects, while the second removes the haze or micro-marring the cutting step can leave behind. On sensitive paint, a medium polish may outperform a heavy compound because it finishes cleaner and avoids unnecessary removal.
Think about the coating stage
The final finish must be clean and residue-free before protection. An elastomer coating still needs a properly prepared surface to bond consistently. The polishing and buffing pad guidance from Titan is useful when building a pad system for correction and final refinement, especially for mobile detailers who need predictable results across different paint types.
Machine and Hand Polishing Techniques That Actually Work
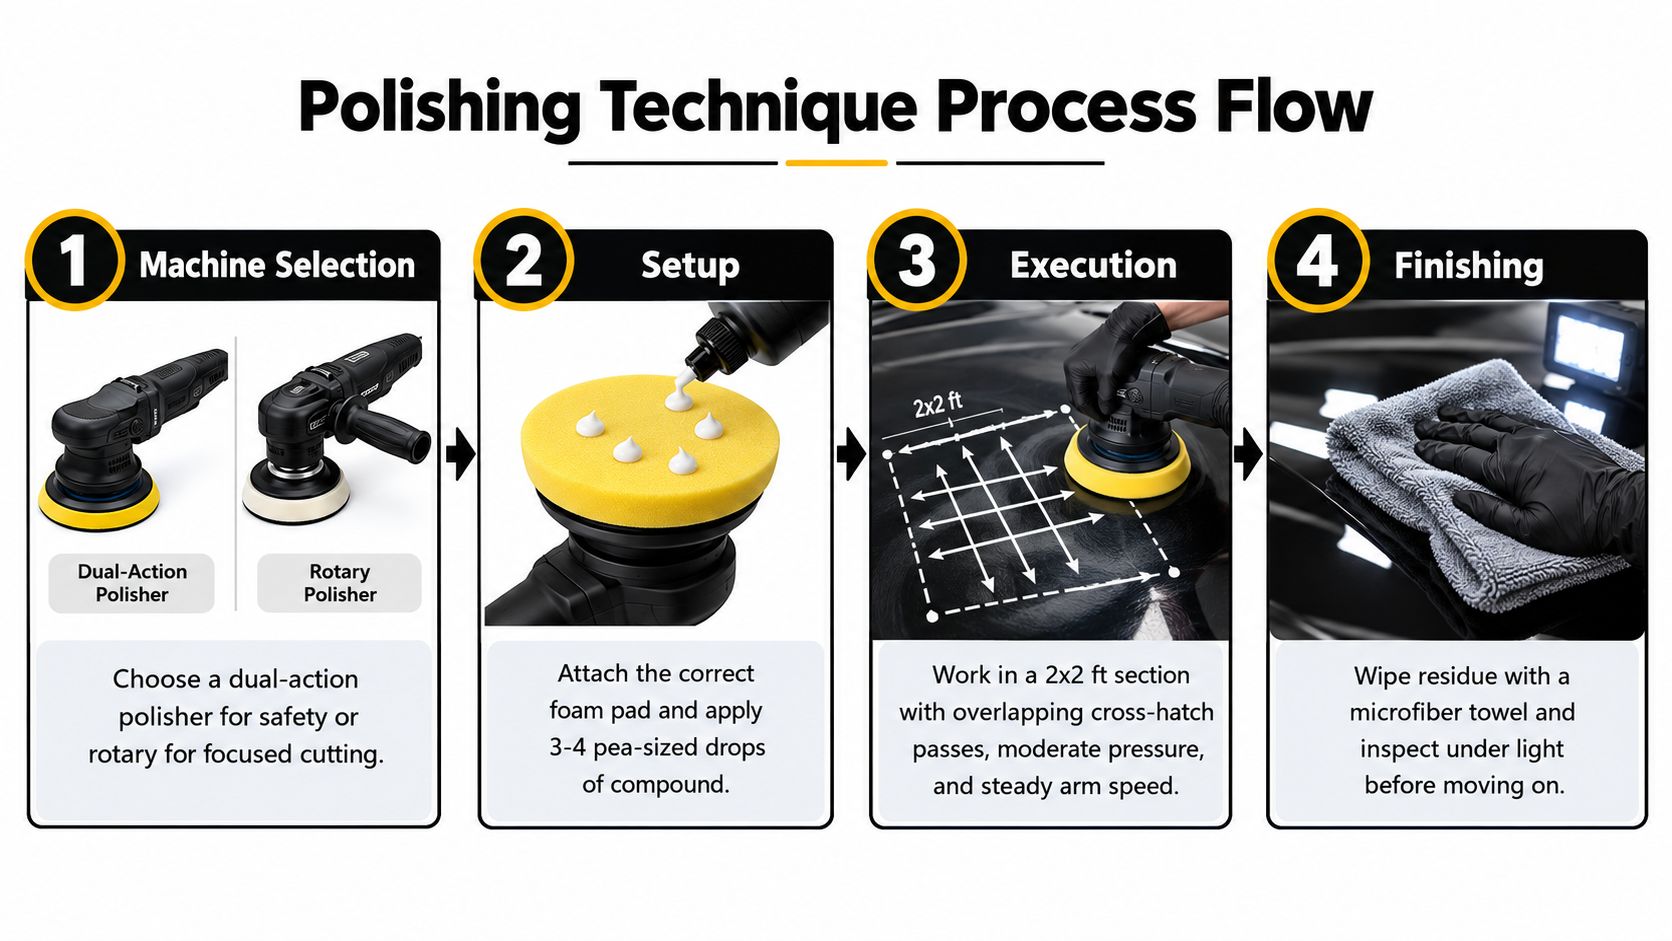
A dual-action polisher is the safer starting point for most DIY users and mobile detailers because its movement reduces the chance of leaving rotary-style holograms when the operator is still learning. A rotary machine offers focused cutting and remains valuable in experienced hands, especially on isolated defects, tight correction areas, or hard paint. Neither machine compensates for poor preparation or an unsuitable test spot.
Set up the pad correctly
Prime the pad according to the polish manufacturer’s method, then use a controlled amount of product. The practical setup shown in the provided process guidance uses 3 to 4 pea-sized drops for a working section. Too much product can reduce cut, extend wipe-off, and make inspection harder. Too little can increase friction and cause the product to dry before the abrasives finish working.
Keep the pad flat on the paint. Tilting the machine concentrates pressure on an edge, increases heat, and makes the result less predictable. Clean or change pads regularly because spent polish and removed paint quickly load the face of the pad.
Practical rule: The machine should move slowly enough to work the polish, but not so slowly that heat builds in one spot.
Use overlapping cross-hatch passes
Work a small section with overlapping horizontal passes, followed by overlapping vertical passes. Keep your arm speed steady and use moderate, even pressure. Let the pad do the cutting instead of forcing the machine into the panel.
After the working cycle, wipe the residue with a clean microfiber towel and inspect under the LED. If the defect has improved and the finish remains clear, repeat the proven combination across the panel. If the panel looks hazy, don’t immediately reach for a stronger compound. First try a cleaner pad, less pressure, a shorter cycle, or a finer polish.
A mobile detailer correcting a hood outdoors has another problem to manage, heat. Work in shade, keep the panel cool, and avoid letting residue bake onto the paint. If wind carries dust across the work area, stop and improve the environment rather than grinding that contamination into the finish.
Hand polishing has a place
Hand application works for narrow pillars, deep recesses, small spot repairs, and areas where a machine pad can’t sit safely. Use a small foam applicator, moderate pressure, and short controlled movements. Hand polishing can improve localized light defects, but it won’t match machine correction for broad panels or substantial defects.
A DIYer working on a door in a driveway should complete one test area, inspect it, and avoid treating the full vehicle as one uninterrupted job. The Titan guide to buffing a car provides additional practical context for pad control, machine movement, and residue removal.
Troubleshooting Haze Swirls and Other Polishing Problems
Most polishing failures come from process errors, not mysterious paint behavior. The common pattern is familiar: the operator works too large an area, applies too much pressure, skips inspection, then increases aggression when the finish looks worse. That response usually removes more paint without solving the underlying problem.
When the product dries out
A dry, dusty film often means the working area was too large, the panel was too warm, or the product amount and machine movement were poorly matched. Reduce the section size, use less product, clean the pad, and wipe residue before it hardens. Don’t keep adding compound to a loaded pad.
When compounding leaves haze
Heavy cutting can leave micro-marring, particularly on soft or sensitive paint. The solution is usually a finer polish on a softer, clean pad, not another aggressive pass. Inspect after wiping oils away, because a panel can appear perfect until the masking effect disappears.
When holograms remain
Holograms can come from rotary technique, excessive speed, an unstable pad, or poor finishing discipline. Reduce machine speed, keep the pad flat, refine with a finishing polish, and inspect from multiple angles. If the marks are limited to a small area, spot refinement is safer than repeating a heavy cut over the entire panel.
When defects reappear
Oils can hide defects temporarily. A proper wipe-down and panel inspection reveal whether the scratch reduction is genuine. If the mark returns after cleaning, the previous pass improved appearance without fully leveling the defect.
Deep scratches deserve restraint. If a fingernail catches, stop trying to polish the mark away. A useful complementary resource is this flawless paint finish guide from GP Mobile Car Wash & Detail, especially when deciding whether a visible mark needs correction, touch-up, or a more involved repair. The safest correction is the one that leaves enough clear coat for future ownership, not the one that removes every visible imperfection today.
Lock In Your Results With Titan Elastomer and Glass Protection
A corrected car can look outstanding when it leaves the bay and lose that crisp clarity through careless washing, airborne contamination, and weather exposure. Protection doesn’t replace correction. It preserves the corrected surface and makes routine maintenance more controlled.
Titan’s elastomer approach combines glass-like hardness with flexibility. The company describes its technology around nano-tube materials and Dark Matter technology, with the aim of producing a protective film that resists becoming brittle as conditions change. The underlying material principle is consistent with technical literature on nano-carbon-reinforced elastomers, where nano-carbons can improve mechanical performance while retaining elastomeric behavior, as discussed in this technical overview of flexible advanced coating materials.

Choose protection for the surface
Alpha Quartz elastomer coating is positioned for straightforward installation by DIY users and mobile detailers. Its flexible coating behavior is intended to help it tolerate temperature movement from frozen conditions to hot conditions without cracking, while elasticity can help the film remain resilient when insects or minor environmental impacts strike the surface. The application still depends on proper correction, prep, panel wipe, and curing conditions.
For glass, Apex Glass Ceramic Coating is designed for windshields and other glass surfaces. A clean, polished windshield gives the coating a better foundation, while the hydrophobic effect can improve water behavior and visibility during rain. That can make wet-weather driving less stressful, particularly when the glass is free from old wiper film and bonded contamination. The product details are available through Apex Glass Ceramic Coating.
Ultra Ceramic Spray offers a simpler maintenance-oriented route for users who want an easy application and fresh protection without a full coating installation process. It can fit a DIY maintenance routine or a mobile detailer’s service menu when the vehicle needs a practical refresh between larger correction and coating appointments. Product information is available on the Ultra Ceramic Spray page.
Preserve the correction
Use clean wash media, avoid wiping dusty paint, dry with suitable microfiber towels, and remove bird contamination or insects before they bake into the finish. Full paint correction shouldn’t become routine maintenance. If the coating and wash process prevent new marring, you’ll spend less time removing clear coat in the future.
For the broader technology and application philosophy, see Titan elastomer coatings. The correction stage creates the visual foundation. Flexible protection, careful glass treatment, and disciplined washing help keep that foundation intact.
APEX NANO – Titan Coatings offers coating options that fit the complete correction workflow, from preparing leveled paint to protecting it with flexible elastomer technology and maintaining visibility with glass protection. Visit APEX NANO – Titan Coatings to review the available products and choose the protection system that matches your vehicle, tools, and application experience.
0 Comments