
A black sedan rolled into the bay looking clean from ten feet away and tired from two feet away. Under the lights, the hood was a web of wash swirls, the trunk was dull from sun exposure, and the owner’s first question was the one detailers hear every week: can this paint come back?
Beyond the Shine The Art of Flawless Paint Correction
Auto detailing and paint correction is commonly understood to mean making a car glossy. That’s only the surface of it. Real correction is controlled restoration. It removes what shouldn’t be there, preserves what must stay, and creates a finish that looks right in sunlight, shop lighting, and the harsh angle of a phone flashlight.
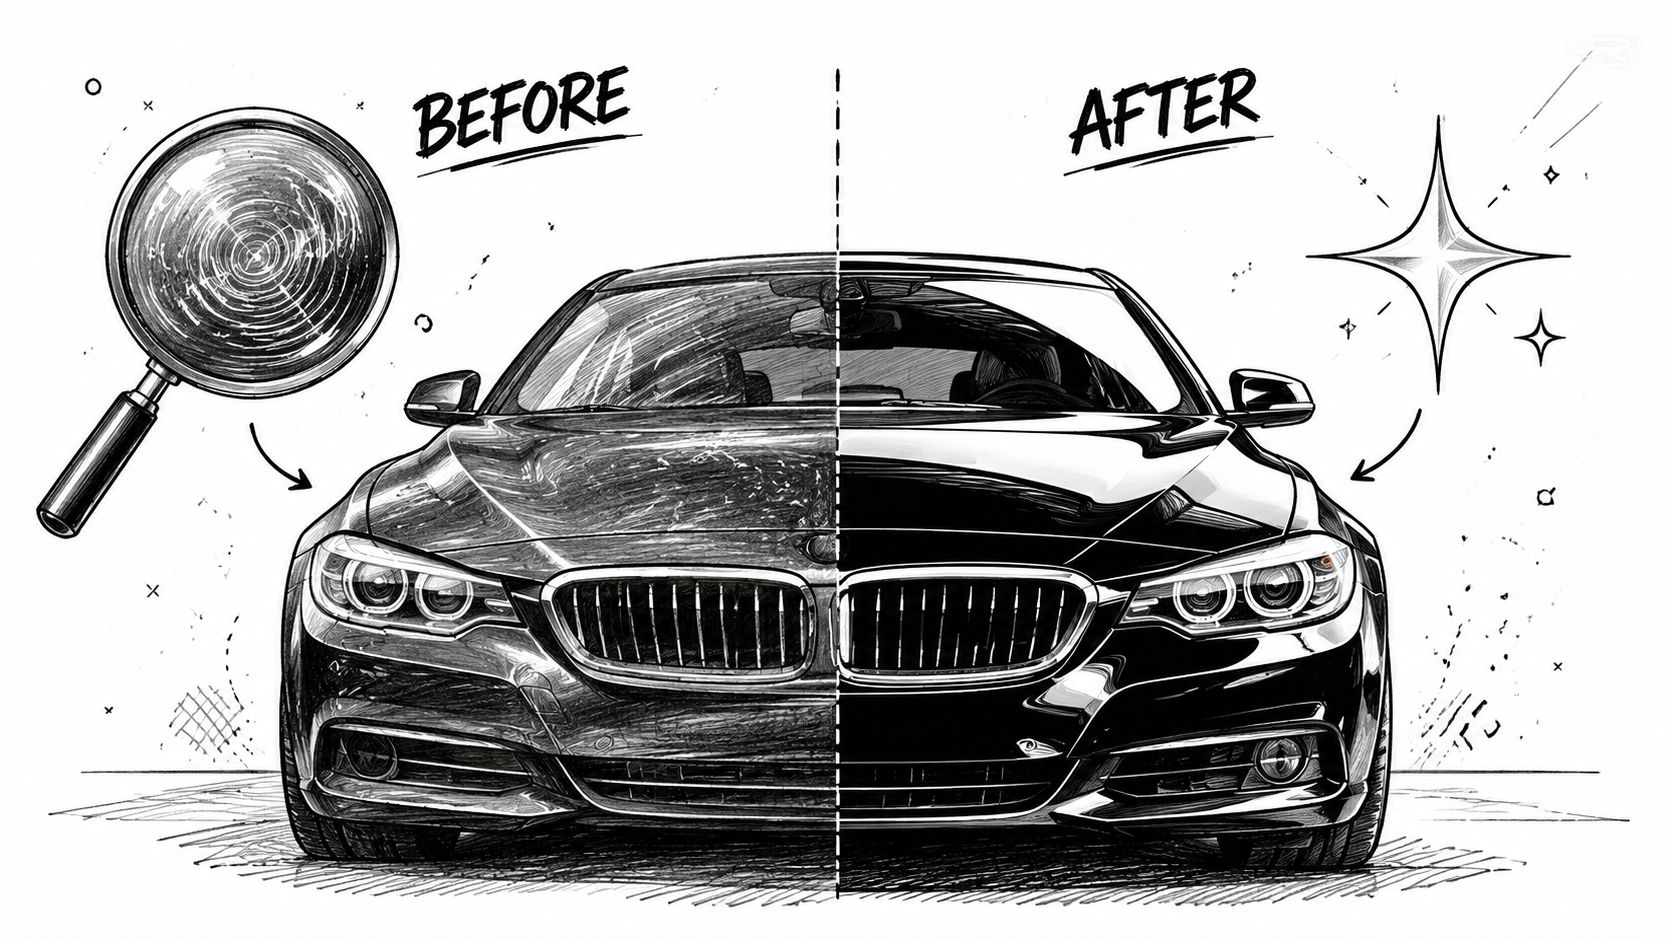
That black sedan is a good example because black paint tells the truth. It shows every shortcut. A wash-and-wax would have darkened it for a few days, but the swirl marks would still be there. The haze would still mute the reflections. The owner didn’t need shine. He needed clarity.
What correction actually changes
Paint correction isn’t about filling defects and hoping the next wash hides the truth. It’s about mechanically leveling the clear coat so swirl marks, oxidation, haze, and light scratches stop scattering light. When the surface is level, gloss returns naturally.
That’s why correction sits at the center of serious exterior work. The economics of the trade reflect that. The global car detailing services market was valued at USD 41.40 billion in 2024 and is projected to reach USD 58.06 billion by 2030, while exterior detailing held a 66% share in 2022, which tells you where customers place value. Surface refinement is not a side service. It’s the work clients see immediately and remember longest.
Practical rule: If defects are still in the paint, protection only preserves defects.
Why the first step matters more than the last product
A lot of coatings fail in spirit before they fail on the panel. The installer puts premium protection over uncorrected paint, or over polishing oils, or over contamination that should have been removed hours earlier. The result may bead water, but it won’t look as sharp as it should and it won’t bond as cleanly as it could.
That’s why any serious discussion of coatings starts with correction. The paint has to be honest before it can be protected. If you want a deeper look at that relationship, paint correction before ceramic coating is the standard sequence for a reason.
Modern coating technology has raised the ceiling for what happens after correction, especially with elastomer-based protection that combines hardness with flexibility. But none of that matters if the finish underneath is still compromised. In the bay, the order never changes. Clean first. Correct second. Protect last.
The Foundation Decontamination and Surface Prep
A few years ago, a black SUV came in after two failed “paint corrections” at other shops. Under the bay lights, the hood looked hazy, the lower doors felt like sandpaper, and the rear hatch had tar specks baked into every edge. The owner wanted a coating. The paint was nowhere near ready for one.
That job turned around in prep, not at the polisher. Once the bonded contamination was removed properly, the defects became honest. I could see what the abrasives needed to cut, what needed restraint, and where modern elastomer coatings would later matter most. Flexible coating chemistry can absorb use and weather better than older, brittle protection systems, but it still needs a surgically clean surface to bond and level the way it should.
Good correction starts before the machine touches paint. If iron fallout, tar, mineral residue, or traffic film remain on the panel, the pad picks them up and drags them across the clear coat. That creates fresh marring, shortens pad life, and muddies your read on the paint.
Start with removal, not friction
The first goal is simple. Remove as much loose debris as possible before your wash media ever touches the surface.
Rinse thoroughly. Use foam or pre-soak if that fits your process and the vehicle needs it. Then wash with controlled contact, clean mitts, and rinse water you are willing to trust on soft black paint. The point is not appearance. The point is reducing abrasive contact.
Chemical decontamination comes next because bonded contamination does not wash away. Iron remover targets ferrous particles lodged in the clear. Tar remover breaks down petroleum-based residue that would otherwise smear, clog pads, and interfere with a clean polishing cycle. Product labels and manufacturer directions matter here. Cool panels, shade, and prompt rinsing keep these chemicals working as intended instead of drying on the surface and creating extra cleanup.
Why a clean-looking panel can still be dirty
Plenty of vehicles look clean and still fail the baggie test or feel rough under a nitrile glove. That roughness matters because polishing works best when abrasives contact paint evenly.
Common contamination includes:
- Iron fallout: Brake dust and industrial particles that embed in the surface and oxidize.
- Tar and road residue: Usually concentrated on rocker panels, behind wheels, and lower rear sections.
- Organic and environmental film: Sap mist, bug residue, road film, and old grime that dull gloss and mask the true condition of the finish.
Each one changes how the pad behaves. A loaded pad cuts inconsistently, runs hotter, and leaves you chasing clarity that should have been available from the first section pass.
Cool paint gives you control. Hot paint shortens working time and raises risk.
Mechanical decontamination finishes the foundation
After chemical decon, mechanical decontamination removes what is still bonded above the surface. Clay bars, synthetic clay mitts, and clay towels all have a place. The trade-off is speed versus feel. A traditional clay bar gives the best feedback on delicate paint. A clay mitt covers ground faster on harder, neglected finishes, but it can mar more easily if the wash step was sloppy or lubrication is poor.
The panel should feel slick when you are done. If it still feels gritty, polishing is premature.
My standard order is straightforward:
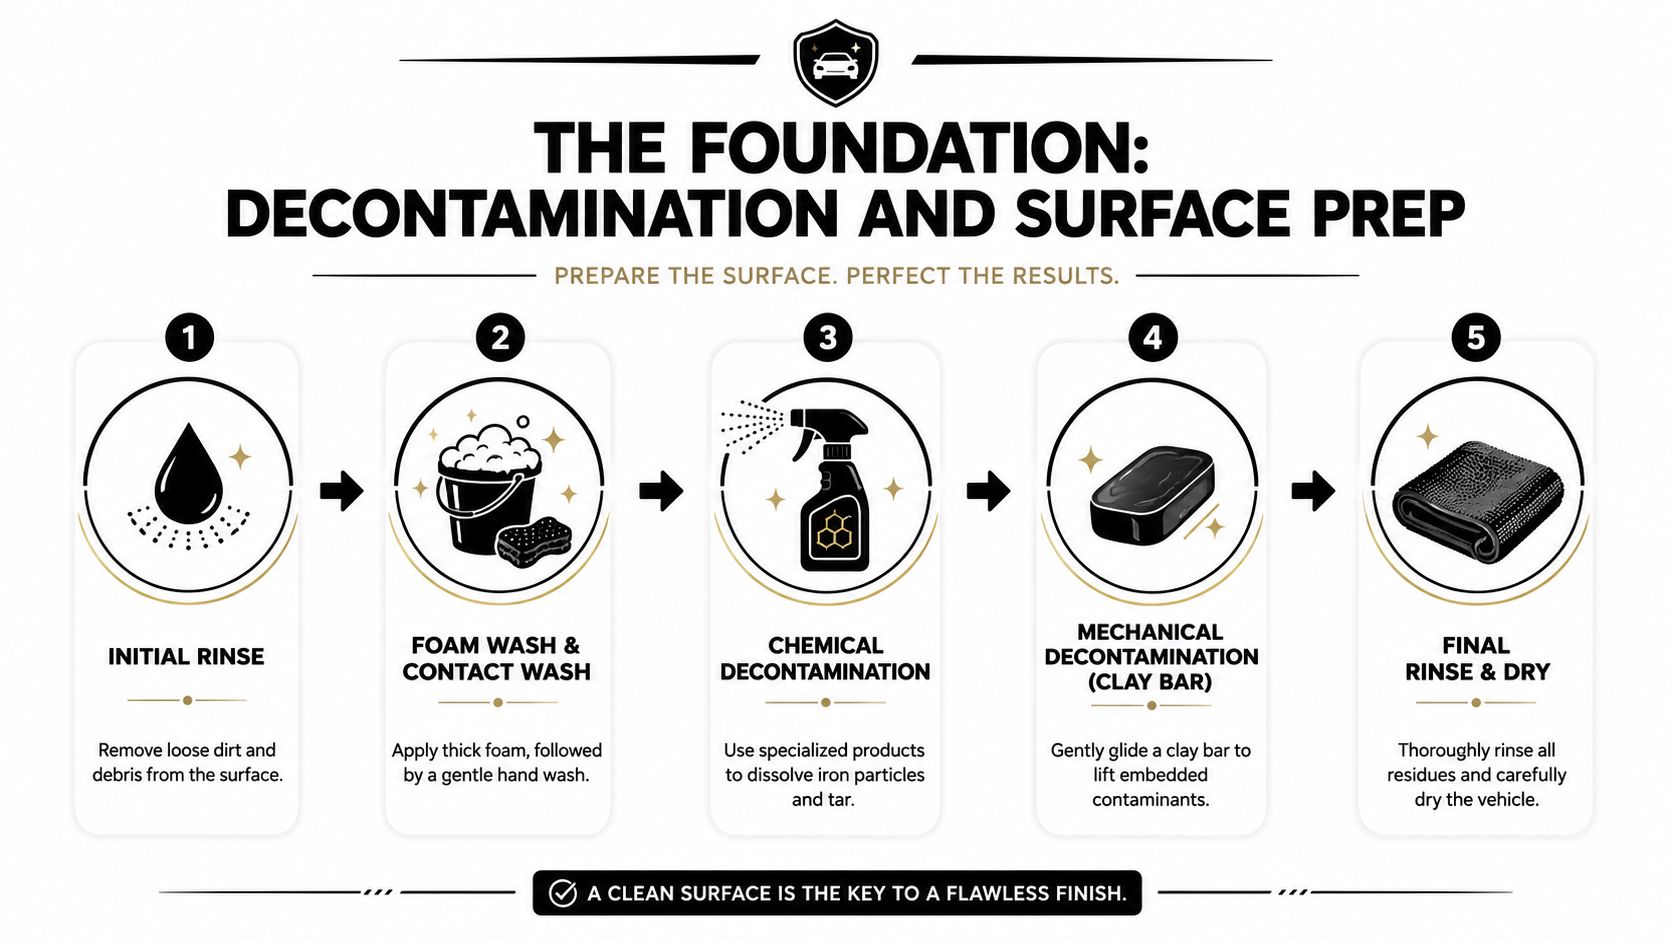
- Initial rinse: Remove loose dirt and soften heavy grime.
- Contact wash: Clean the surface with as little added marring as possible.
- Iron remover: Dissolve embedded ferrous contamination.
- Tar treatment: Remove stubborn road residue in high-impact areas.
- Mechanical decon: Lift the bonded material chemicals left behind.
- Final rinse and dry: Leave the panel clean enough for inspection and test-spot work.
That sequence is why decontaminating car paint properly before correction changes the result so much. You get cleaner pad rotation, more predictable cut, and a truer picture of what the paint needs.
Prep mistakes that cost time later
Rushed prep creates expensive problems.
Using iron or tar removers on warm panels shortens dwell time and makes product control worse. Skipping tar removal loads the pad and causes random drag marks. Claying a badly washed car installs marring before correction even starts. Drying with contaminated towels puts fresh defects into a panel you just cleaned.
Professional prep standards from the International Detailing Association align with what experienced detailers learn the hard way. Surface condition determines every step that follows. Cleaner paint gives you a more accurate inspection, safer polishing decisions, and a better foundation for advanced protection.
Clients rarely notice this stage while it is happening. They notice it later, when the finish corrects faster, wipes cleaner, and looks sharper under real light instead of just shop gloss.
The Correction Phase Choosing Your Tools and Technique
Paint correction starts getting expensive the moment guesswork enters the job.
A few months ago, a black sedan came into the shop after years of tunnel washes, rushed dealer polishing, and one old body repair on the rear quarter. Under the lights, the hood was covered in tight wash swirls. The doors had isolated scratches with hard edges you could feel through a nitrile glove. The quarter panel told a different story. Softer paint, faster heat build, and a finish that reacted nothing like the factory panels. Jobs like that are why experienced detailers do not chase a single combo across the whole car.
The test spot decides the job
A proper test spot sets the pace for everything that follows. Pick an area that represents the average condition of the vehicle, then start with the mildest pad and abrasive combination likely to make a real improvement. Inspect it in honest light. If the defects remain, increase cut in small steps.
That process protects clear coat and keeps expectations grounded.
The improvement range is well established. Professional paint correction often lands somewhere between a strong visual improvement and near-total defect removal, depending on paint thickness, defect depth, and how many stages the owner approves. The same source also notes the need to verify safe film build before chasing deeper defects. This is the primary question on every car. Not how much can be removed, but how much can be corrected without spending paint you cannot put back.
Machines, pads, and liquids
Machine choice changes risk more than many DIY owners realize. A dual-action polisher gives a wider safety margin and is the right starting point for most correction work. A rotary still has a place, especially on hard paint or severe defects, but it demands sharper control of heat, pressure, and pad angle.
Pads and liquids do the fine-tuning. They determine how fast the defects level, how much haze is left behind, and how much refining the next step will need. For anyone sorting through polishing and buffing pads, density, face material, and cut level are working variables, not accessory details.
| Defect Severity | Recommended Pad Type | Recommended Abrasive | Goal |
|---|---|---|---|
| Light haze and faint wash marring | Soft foam finishing pad | Finishing polish | Increase clarity and gloss |
| Moderate swirls and oxidation | Medium foam polishing pad | Polish or light compound | Improve correction while keeping the finish clean |
| Heavier swirls and noticeable scratches | Microfiber cutting pad or firmer foam cutting pad | Compound | Level more severe defects |
| Mixed-condition panels after heavier cutting | Soft finishing foam pad | Fine polish | Remove haze and sharpen reflection |
The why behind that chart matters. A more aggressive pad increases contact and defect removal, but it also leaves a rougher microscopic texture behind. That texture may still look glossy in the bay and then show haze in the sun. Modern elastomer coatings make that distinction more important, not less. These coatings bond best and look their best over paint that is not only corrected, but evenly refined. If the surface is still carrying compound haze, the coating will preserve that texture with the same loyalty it preserves gloss.
Technique matters more than aggression
Good correction is controlled abrasion. Poor correction is heat, residue, and wishful thinking.
The working pattern stays simple because simple is repeatable. Keep the section size reasonable. Use overlapping passes. Watch pad rotation on a DA. Clean pads often enough that spent abrasive and paint residue do not become a second source of marring. The exact machine speed and arm speed can vary with the system, but the principle does not. Consistency removes defects. Random aggression removes margin.
The International Detailing Association reinforces the same professional standard seen in good shops everywhere. Process and inspection matter more than chasing fast cut. That is why edges, crowns, and repainted panels get treated like separate problems. They are separate problems.
Shop note: Fast correction impresses people for a day. Stable correction that finishes clean under sunlight is what holds up under coating.
Three mistakes cause most avoidable trouble:
- Excess heat: Edges and body lines build temperature quickly and usually carry less clear coat.
- Bad pairing: An aggressive liquid on the wrong pad can haze soft paint and waste a full extra polishing step.
- False expectations: Deep gouges, chips, and failures in the paint film are repair issues, not polishing issues.
That black sedan proved the point. The hood responded well to a microfiber cutting pad and compound, followed by a refining step. The doors needed more selective work around the deeper marks because full removal would have taken too much material. The repainted quarter forced a different approach altogether. Softer pad, shorter cycle, frequent inspection. Once the finish was leveled and refined correctly, the owner chose an elastomer coating instead of a conventional wax or sealant. That made sense. On a car with mixed paint history, the added flexibility and chemical resistance gave the finish better long-term protection, and the coating highlighted the uniformity we had worked to build into the surface.
Experienced detailers read paint behavior first, then choose the package. That is how correction stays safe, efficient, and worth the money.
Perfecting the Finish From Polishing to Panel Prep
Compounding gets attention because it creates visible change. Final polishing is where the finish becomes elegant. This is the stage that sharpens reflections, deepens color, and removes the faint haze that cutting can leave behind.
On dark paint, the difference is obvious. On lighter colors, it’s more subtle but still important. The surface stops looking merely corrected and starts looking liquid.
Fine polishing creates optical clarity
A finishing polish on a soft foam pad refines the microscopic texture left behind by heavier abrasives. This is also the stage where impatience shows. Too much pressure, too much product, or a dirty pad leaves the surface looking better than before but short of its potential.
The goal is not just gloss. It’s clean, distortion-free reflection.
When polishing, professionals also keep checking the surface, not just with lights but with instruments and experience. Paint thickness gauges used throughout the process help monitor danger zones near edges and previously repaired areas, balancing defect removal against clear coat preservation. That ongoing measurement matters most when one panel behaves differently from the next.
Polishing should make the paint look calmer, sharper, and more even. If it only looks wetter because of residue, you’re not done.
The panel prep wipe is not optional
The last polishing pass can leave oils behind. Those oils make the paint look rich, but they also hide the true finish and interfere with the next layer’s bond. That’s why panel prep exists.
A proper panel wipe removes residue so you can inspect bare truth. It also gives your protection layer the direct contact it needs with the paint.
A disciplined finishing sequence looks like this:
- Inspect after polishing: Use direct lighting and change viewing angles.
- Wipe with panel prep: Remove polishing oils fully, not selectively.
- Recheck the surface: Confirm the gloss is real and not product-filled.
- Protect only after verification: Coatings and sealants belong on clean paint.
If you’re refining your finishing process, polishing car paint correctly starts with understanding that final polish and final wipe are a pair. Skip either one and the work loses credibility.
Where detailers get into trouble
Most finishing problems come from one of three mistakes. The pad is overloaded. The operator chases one defect too long in a thin area. Or the panel prep wipe is rushed because the paint already looks good under soft light.
That black sedan taught the usual lesson. After compounding, the hood looked transformed. After final polishing and a true panel wipe, it looked finished. Those are not the same condition.
Locking In Perfection with Advanced Titan Coatings
A corrected finish needs protection that matches the effort invested in it. Expectations have shifted due to modern coating chemistry. Old thinking treated hardness as the whole story. In practice, hardness without flexibility can become a liability when vehicles live through heat, cold, impact, and daily use.
The sedan that came in tired left with a deep black finish that finally reflected clean lines across the hood and doors. The owner had one concern after seeing the result. He didn’t want the first harsh season to undo the work.
Why elastomer technology matters
Titan introduced elastomer coatings to the market as the first company using nano-tube technology and Dark Matter Technology, creating a barrier that remains solid through freezing and scorching temperatures without cracking, as described on Titan’s marine ceramic coating technology page. That matters because coatings don’t live in a lab. They live on hoods, roofs, mirrors, and windshields that expand, contract, and take abuse.
Titan also states that its elastic coatings are engineered to flex and absorb impacts rather than crack under pressure, helping the protective layer stay intact by scattering thermal stress instead of failing like rigid coatings in extreme climates, as explained on its nano ceramic coating for cars page. That’s the practical advantage detailers care about. Protection has to survive real conditions, not just produce a glossy handoff photo.
The products that fit real workflows
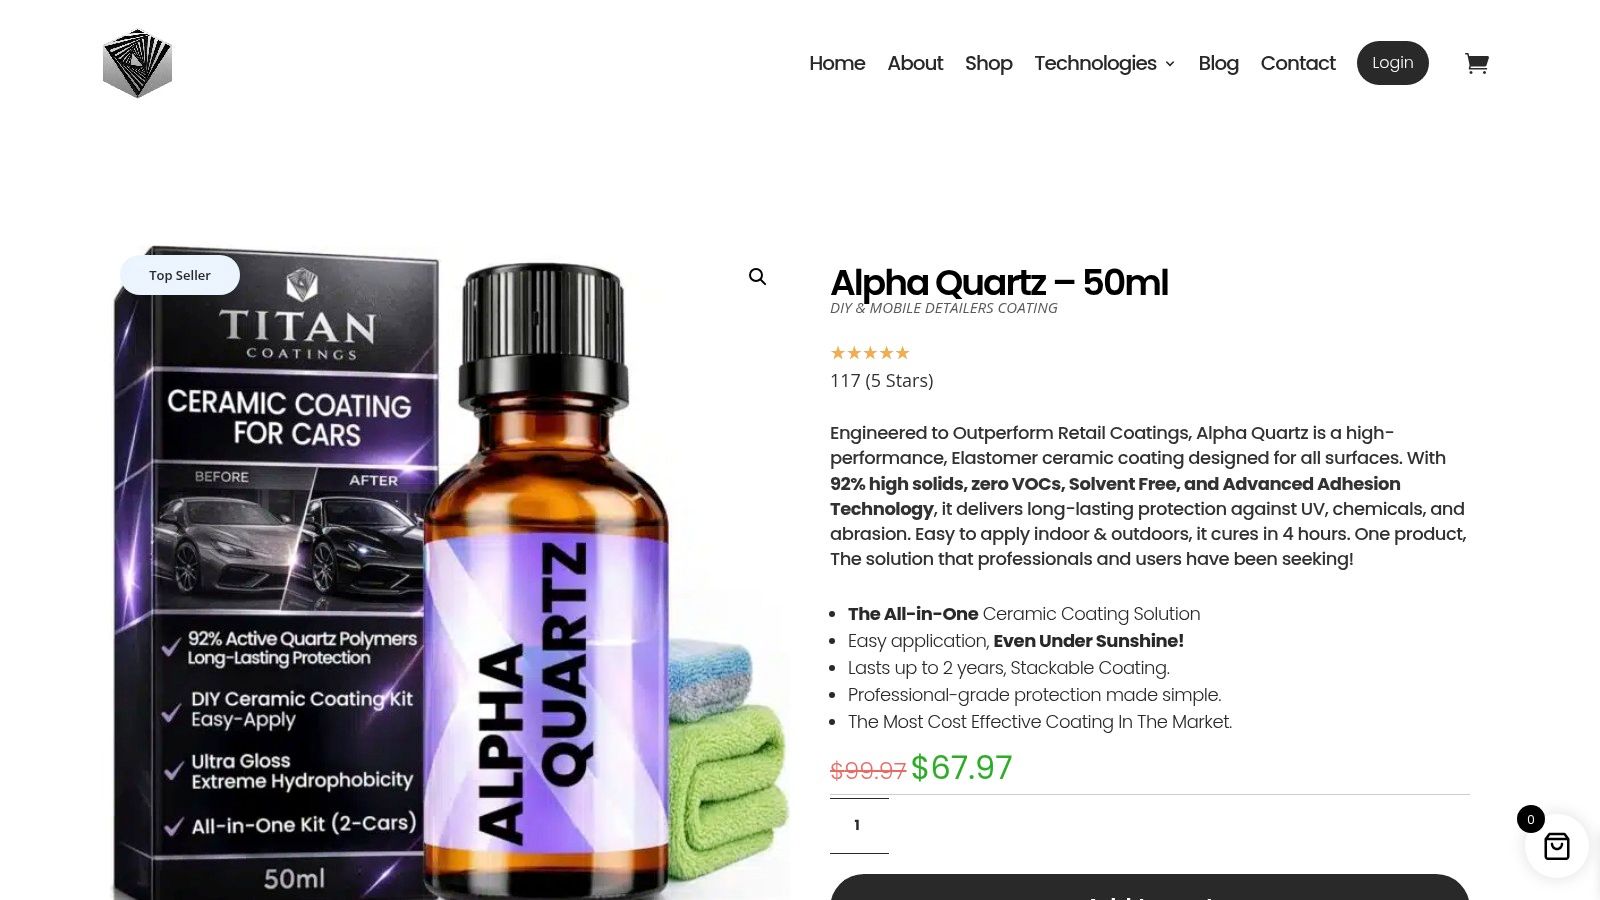
Alpha Quartz stands out because it’s easy to install and practical for both DIY users and mobile detailers. That ease matters. A coating can be technically impressive and still fail in the field if application is fussy or unforgiving. Alpha Quartz fits the kind of workflow where prep has been done right and the installer wants strong visual payoff without turning every job into a marathon.
For glass, APEX Glass Ceramic Coatings deserves more attention than it gets. Windshield protection is not cosmetic fluff. Good glass behavior changes driving comfort in bad weather. A clean, easy-to-use option like APEX Glass Ceramic Coatings helps visibility in rain and reduces the stress that comes from smeary, grabby glass.
For quick enhancement and upkeep, Ultra Ceramic Spray has a clear role. It’s easy to apply, gives strong results, and fits maintenance details where speed matters. Products in this category work best when they support a corrected and protected surface rather than trying to replace proper correction. The Ultra Ceramic Spray approach makes sense for detailers who want a straightforward gloss and hydrophobic top-up.
Why this solved that sedan’s problem
That sedan lived outdoors. It saw heat, cold mornings, road film, bug hits, and regular driving. A brittle layer wouldn’t have been my first choice for that use case. An elastic coating made more sense because the vehicle needed a protective shell that was hard like glass and flexible, not one that risks cracking as conditions change.
For broader insight into what separates coating systems in the field, coating excellence is worth reviewing. The key point is simple. Correction creates the canvas. Coating technology decides how well that canvas holds up.
Maintaining the Masterpiece and Common Pitfalls
A corrected and coated vehicle still needs disciplined washing. Bad maintenance can put fresh swirls into excellent paint fast. Good maintenance keeps the finish honest.
The safest routine is boring on purpose. Use a pH-neutral shampoo, quality wash media, and drying towels that are thoroughly clean. Keep friction low. Keep tools clean. Don’t rush the drying stage.
The mistakes that undo good work
Some failures happen in the wash process. Others start with bad assumptions.
The most common one is believing a new vehicle doesn’t need correction. That’s mistaken. Many new cars arrive with swirls and light scratches from shipping, transport, and dealership pre-delivery washing, and those defects should be addressed before a ceramic coating goes on if you want the finish and bonding to perform at their best.
A few recurring trouble spots deserve attention:
- Automatic wash damage: Reintroduces circular marring quickly.
- Poor drying habits: Drying with contaminated towels can scratch paint that was just corrected.
- Ignoring coating maintenance: Protection lasts longer when the surface is washed properly and contamination is removed early.
- Treating appearance as the only detail: Cabin experience matters too. For clients who want the interior to match the exterior presentation, custom car air fresheners can be a useful finishing touch without turning the cabin into an afterthought.
A masterpiece doesn’t stay a masterpiece by accident. It stays that way because the maintenance matches the correction.
Keep the finish easy to live with
Maintenance should be simple enough that owners will follow it. That usually means a safe hand wash routine, quick response to bird droppings or bug residue, and periodic inspection under good light. If the coating ever feels less responsive, clean the surface first before assuming the protection is gone.
For owners and detailers building that upkeep habit, ceramic coat maintenance is where long-term appearance is won or lost. The best correction job in the world still depends on what happens in the months after delivery.
If you want protection that matches high-level correction work, explore APEX NANO – Titan Coatings. The lineup is built for detailers, studios, mobile operators, and serious enthusiasts who want modern coating technology with practical application for daily use.
0 Comments