Ever look at your car under direct sunlight and see a frustrating spiderweb of fine scratches and swirl marks? It’s a common sight. Daily driving, those harsh-bristled automatic car washes, and even using the wrong towel can slowly turn a brilliant finish into a dull, lifeless one.
This is exactly what buffing compounds are made to fix.
A buffing compound is essentially a specialized abrasive paste designed to gently level your car's clear coat. It works by shaving off a microscopic layer of paint to smooth out imperfections, bringing back that deep clarity and shine. This is the heart and soul of professional paint correction, and it’s the single most important step in preparing your vehicle for a jaw-dropping finish.
Why Buffing Compound Is a Game-Changer for Your Paint
Think of a high-quality buffing compound as the ultimate reset button for your car's paint. It’s not just about a temporary shine for a weekend car show; it’s about restoring the paint's health, boosting your car's value, and creating the perfect foundation for long-lasting protection.
The Magic Behind That Mirror Finish
At its core, a buffing compound is like liquid sandpaper. When you work it into the surface with a polisher, its tiny abrasive particles gently cut away a fraction of the damaged clear coat. This levels the surface, completely erasing those defects that catch the light and make your paint look hazy.
This isn't just a niche hobby anymore. More and more car owners are demanding that perfect finish, and the market reflects it. The global auto detailing compound market hit $2.8 billion in 2024 and is on track to explode to an incredible $7.2 billion by 2033. This massive growth just goes to show how critical these products are for achieving professional-grade results.
To truly understand what you're up against, it helps to identify the enemy. Here's a quick rundown of the common paint problems that buffing is designed to eliminate.
Identifying Common Paint Defects
This table is a quick guide to the paint issues that buffing compounds are designed to correct, helping you diagnose your car's specific needs.
| Defect Type | What It Looks Like | Common Cause | Best Correction Approach |
|---|---|---|---|
| Swirl Marks | Fine, circular scratches visible in direct light. | Improper washing/drying techniques, automatic car washes. | Light to medium cutting polish with a foam or microfiber pad. |
| Light Scratches | Minor, isolated scratches that haven't gone through the clear coat. | Fingernails around door handles, light brush-ins. | Spot treatment with a medium compound, followed by a finishing polish. |
| Oxidation | Dull, faded, or chalky-looking paint. | Prolonged sun/UV exposure, lack of protection. | Medium cutting compound to remove the oxidized layer, followed by a finishing polish and sealant. |
| Water Spots | Mineral deposits left after water evaporates. | Hard water, acid rain, sprinklers. | A dedicated water spot remover first, then a light polish if etching remains. |
| Holograms | Hazy, rainbow-like patterns left by improper buffing. | Using an aggressive compound/pad with poor technique. | A fine finishing polish with a soft foam pad and proper machine technique. |
Once you know what you're dealing with, you can choose the right tool for the job and get started on bringing that paint back to life.
It's More Than Just a Pretty Shine
Here’s the thing many people miss: buffing is the critical first step before you apply any wax, sealant, or ceramic coating. By removing all the defects, you create a perfectly smooth, clean canvas. This allows your protective coating to bond directly and evenly to the clear coat, giving you the best possible durability and performance.
Think of it this way: you wouldn't paint a dirty, scuffed-up wall without sanding and priming it first, right? The exact same logic applies to your car's paint. Buffing is the prep work that makes the final result last.
If you skip this step, you’re just sealing in all those scratches and swirls. A properly buffed surface is the only true foundation for a flawless finish that will turn heads for years to come.
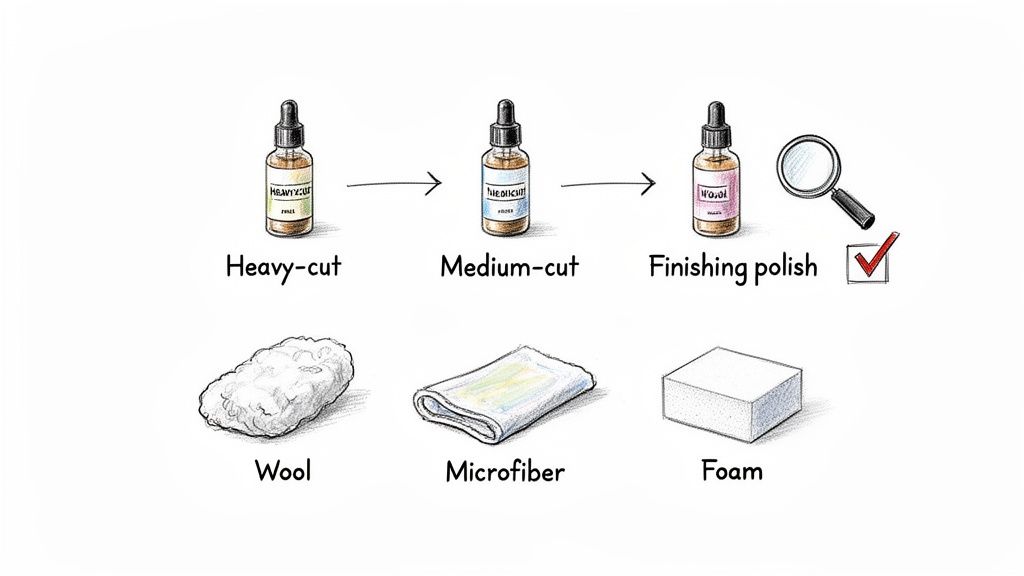
Choosing the Right Compound and Pad Combo
Picking the right buffing compound for car paint can feel overwhelming. You walk into the store or browse online and you're hit with a wall of options: heavy-cut compounds, medium polishes, finishing glazes—and that's before you even get to the dizzying array of pads made from wool, microfiber, or a dozen different foam densities.
Here's the secret: success isn't about finding the single "best" product. It's about building the perfect team for the specific job you're facing.
The core idea is simple: match the aggressiveness of your compound and pad to the severity of your car's paint defects. A daily driver that's seen years of automatic car washes and has deep water spots needs a much more aggressive approach than a weekend car with just a bit of light haze.
This decision tree nails the first step—figuring out if you need to correct the paint or just protect what you've got.
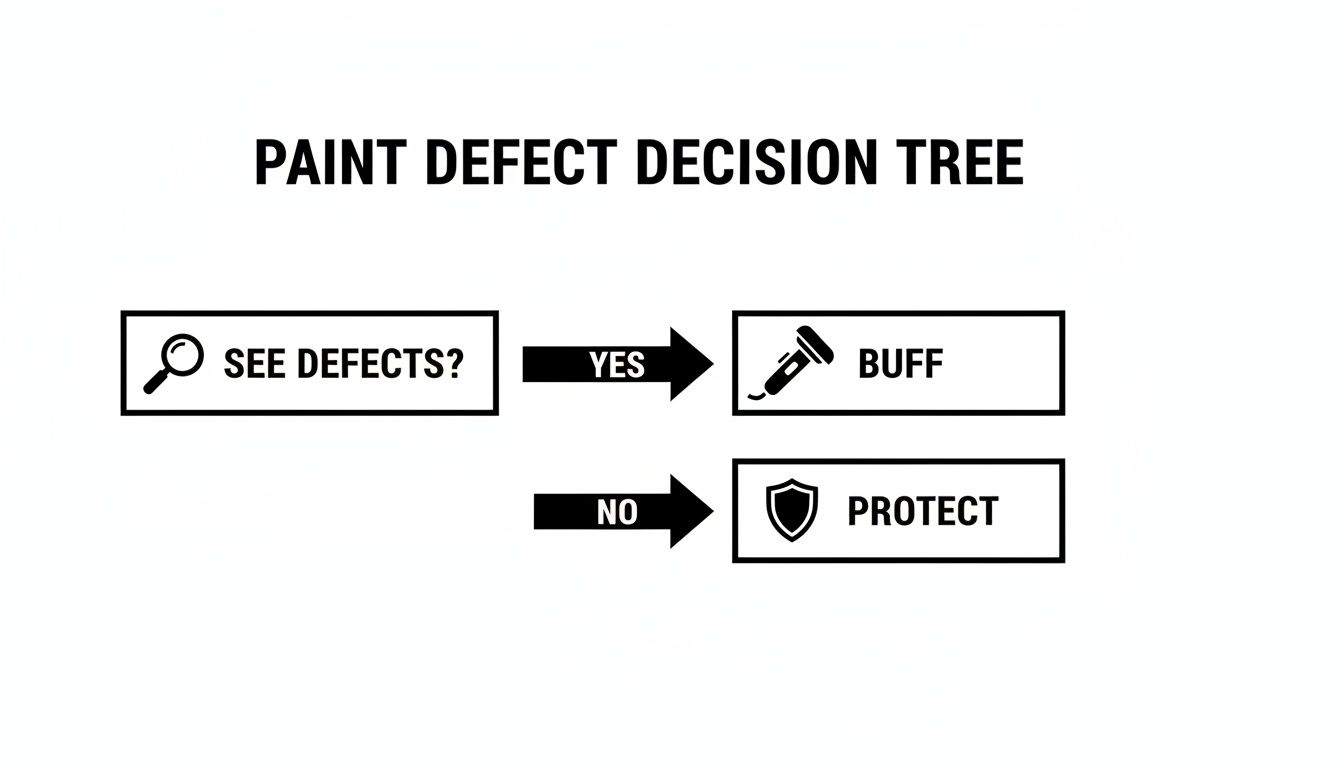
As you can see, if defects are present, your mission is paint correction. And that mission always starts by choosing the right compound and pad combination.
Matching Compounds to Paint Condition
Think of compounds and polishes as different grits of sandpaper, just in liquid form. They exist on a spectrum from heavy-cutting to fine-finishing.
Heavy-Cut Compounds: These are your heavy hitters. They’re built to tackle serious problems like deep swirl marks, moderate scratches, and heavy oxidation. The larger, sharper abrasives in these compounds work quickly to level the clear coat and erase the damage.
Medium-Cut Polishes: This is the sweet spot for most jobs. These polishes strike a great balance between cutting power and finishing quality. They'll make short work of lighter swirls and water spots while leaving behind a surprisingly glossy surface.
Finishing Polishes: These are the jewelry polishes of the detailing world. They contain incredibly fine, almost microscopic, abrasives designed to remove any light hazing left by the more aggressive steps. Their only job is to refine the paint to its maximum potential, creating that deep, wet-looking gloss we're all after.
The desire for a perfect finish isn't just a local trend; it's a global phenomenon. The Asia Pacific region now accounts for over 42% of the automotive polishing compounds market, which was valued at a staggering $2.1 billion in 2024. As car ownership and disposable incomes rise, people are investing more in keeping their vehicles looking pristine, fueling the demand for high-performance compounds.
Pairing Your Compound with the Right Pad
The pad you choose is just as critical as the compound itself. It’s the other half of the equation, working directly with the liquid abrasive to achieve the final result.
The pad is the interface between your machine and your paint. Changing just the pad can dramatically alter how a compound performs, either increasing its cutting power or refining its finishing ability.
Here's a quick rundown of the most common pad types:
Wool Pads: These are the most aggressive option out there. The natural fibers cut fast and hard, making them perfect for removing severe defects, especially on tough, hard clear coats. You'll almost always pair these with a heavy-cut compound.
Microfiber Pads: A fantastic modern option. Microfiber pads offer a strong cutting action but tend to finish down much better than wool, leaving less haze behind. They've become a go-to for "one-step" corrections where you need to balance solid defect removal with a great finish.
Foam Pads: This is the most versatile category, with a foam for every occasion.
- Cutting Foam (Firm): Dense and firm, this foam is designed to maximize the cutting power of your compound.
- Polishing Foam (Medium): The perfect all-rounder for general polishing and light defect removal.
- Finishing Foam (Soft): Ultra-soft and pliable, this foam is used with finishing polishes to create the highest level of gloss and clarity without adding any marring.
Compound and Pad Pairing Matrix
Choosing the right combination is key to an efficient and effective workflow. This chart is a great starting point for matching your tools to the task at hand.
| Paint Condition | Recommended Compound | Ideal Pad Type | Expected Result |
|---|---|---|---|
| Severe Defects (Deep scratches, heavy swirls, oxidation) | Heavy-Cut Compound | Wool or Microfiber Cutting Pad | Removes major defects, but will require a follow-up polishing step. |
| Moderate Defects (Light swirls, water spots, minor scratches) | Medium-Cut Polish | Foam Polishing Pad or Microfiber Cutting Pad | Removes most common defects and leaves a high-gloss finish. |
| Minor Defects (Light haze, micro-marring) | Finishing Polish | Foam Finishing Pad | Removes fine imperfections and maximizes gloss for a show-car shine. |
| No Visible Defects (Excellent Condition) | Cleaner Wax or Sealant | Foam Finishing Pad | Cleans the surface and adds a layer of durable protection. |
Remember, this matrix is a guide. Always start with the least aggressive combination you think might work and test it on a small, inconspicuous area first.
Building the perfect combo takes a little practice, but once you understand these fundamentals, you'll be on the fast track to getting incredible, professional-level results. When you're ready to buy, checking out trusted auto parts reviews can help ensure you’re investing in quality products that perform as advertised. And for those just getting started with machine polishing, our guide on the best car polisher for beginners is the perfect next step.
Your Step-By-Step Machine Polishing Guide
This is where the real magic happens. After all the prep work, the machine polishing process is what turns a dull, swirled-up finish into that brilliant, liquid-like surface every car owner dreams of. But success here is all about being methodical, and that starts long before the polisher ever touches the paint.
Before you even think about starting, the car's surface needs to be surgically clean. A thorough wash followed by a full clay bar treatment is non-negotiable. This removes all the bonded gunk that would otherwise get ground into your paint, causing even more scratches. The last prep step? Carefully mask off any sensitive trim, emblems, and plastic pieces with painter's tape to prevent accidental damage or ugly compound stains.
Setting Up for Success
With your canvas prepped, it’s time to get your tools in order. For most enthusiasts and even many pros, a dual-action (DA) polisher is the safest and most effective choice. Go ahead and attach your chosen pad—whether it's foam, microfiber, or wool—making sure it’s centered and secure on the backing plate.
To prime the pad for its first pass, apply 4-5 pea-sized dots of your chosen buffing compound for car paint in a circle near the outer edge. This little step is crucial; it ensures even distribution from the start and prevents dry buffing, which can easily scour the paint.
The single most important part of this entire process is the test spot. Seriously. Always start on a small, inconspicuous 2×2 foot section to dial in your compound, pad, and technique. This is your chance to confirm the process will deliver the results you want before you commit to the whole car.
Mastering Machine Polishing Technique
Once your test spot gives you the green light, you can start working on the rest of the car, tackling it one panel at a time. The name of the game is smooth, controlled, and consistent movement.
- Machine Speed: Begin with the polisher on a low speed (setting 1-2) just to spread the compound over your working area. Once it's spread, bump the speed up to a moderate setting (usually 4-5 on most DA polishers) to let the abrasives get to work.
- Arm Movement: Guide the machine slowly and deliberately across the paint. A good pace is about one inch per second. If you rush this, the abrasives in the compound won't have time to fully break down and do their job.
- Consistent Pressure: You only need to apply enough downward pressure to keep the pad flat against the surface—about 5-10 pounds is plenty. Let the machine's weight and the pad's rotation do the heavy lifting.
- The Cross-Hatch Pattern: This is key for even correction. Work in a systematic grid, making two or three overlapping passes horizontally, then follow up with two or three overlapping passes vertically. This ensures you haven't missed a spot.
After you’ve completed a few cross-hatch patterns, you’ll see the compound change from an opaque film to a thin, oily, almost transparent layer. That’s your signal that the abrasives have done their work. Turn the machine off, wipe the residue away with a clean microfiber towel, and inspect your work with a bright inspection light.
This meticulous process is exactly why the automotive appearance chemicals market is booming, valued at a massive $30.38 billion in 2024. Professionals and enthusiasts alike rely on high-quality compounds to achieve that perfect gloss, contributing to a market projected to hit $49.05 billion by 2035. You can see the full breakdown in this in-depth automotive appearance chemicals market analysis.
It's an amazing feeling to watch a hazy, defect-ridden panel transform into a flawless, mirror-like surface right before your eyes. For an even deeper dive into the nuances of technique, check out our comprehensive guide on how to properly polish car paint.
Getting Through Common Polishing Hiccups
Look, even with the best gear and a solid game plan, sometimes things just don't go perfectly when you're polishing. It happens to all of us, from the guy detailing his pride and joy on a Saturday to seasoned pros in a shop. Don't sweat it. The real skill is learning to read the paint, figure out what's gone wrong, and tweak your approach to fix it. This isn't a failure—it's how you get good at this stuff.
Let's break down a few of the most common headaches you might encounter when using a buffing compound for car paint and talk about how to get things back on track.
Identifying and Fixing Those Dreaded Buffer Trails
Ever finish a panel, wipe it down, and see faint, hazy lines that perfectly trace the path your polisher took? Welcome to the world of holograms, or buffer trails. They’re a tell-tale sign that your technique or product combo was just a little too aggressive for the paint.
So, what causes them?
- Too much muscle: You might be using a heavy-cutting compound with a wool pad on a soft clear coat. The combo is just leaving its own fine scratches behind.
- Bad machine angle: Tilting the polisher up on its edge focuses all that power and heat on one small line, effectively etching a trail into the paint.
- Running the polish dry: If you keep buffing long after the compound has broken down and dried up, the leftover abrasives are just grinding against the surface.
Thankfully, the fix is usually pretty simple. You just need to refine your work. Step down to a much lighter finishing polish paired with a soft foam finishing pad. Go back over the area with slow, controlled passes, keeping the pad flat. This gentle step will level out those microscopic scratches and bring back that flawless, glossy finish you were aiming for.
Why Is My Compound So Dusty?
There are times you'll be working away and notice your compound is creating a blizzard of dust. It gets everywhere and is a real pain to clean up. While some products are just dustier by nature, a ton of dust usually means something in your process needs adjusting.
The number one culprit? Working the product for too long. Once the lubricants in the compound have broken down, all you're left with are dry abrasives. As you continue to buff, they just turn to powder.
Another common cause is starting with a pad that’s too dry. You always want to make sure your pad is properly "primed" with a bit of compound before you begin. If you see dust starting to fly, stop what you’re doing. Clean the pad on the fly with a brush or a shot of compressed air, add a couple more pea-sized drops of fresh compound, and get back to it. Keeping that pad surface lubricated is key.
Knowing When a Scratch Is Too Deep to Buff
One of the most critical skills you can develop in paint correction is knowing when to say "when." You have to accept that some scratches are just too deep to be safely removed with a buffing compound.
Pro Tip: Try the old "fingernail test." Run your fingernail gently across the scratch. If your nail snags or catches in it, that's a bad sign. It almost certainly means the damage has gone past the clear coat and into the color coat or even the primer below.
Trying to be a hero and buff out a scratch that deep is how you end up burning right through the clear coat. That’s not a simple fix; that's a trip to the body shop for a respray. When you find a scratch that deep, the smart money is on consulting a professional detailer. They have the experience to tell you if it can be improved with something like wet sanding or if it needs a more serious repair. Recognizing your limits is what separates the amateurs from the pros.
Locking In Your Shine with Titan Coatings
You did it. All that time, sweat, and careful effort have paid off. Your car’s paint is finally at that stunning, jaw-dropping gloss you were aiming for. The swirls are gone, the clarity is off the charts, and the reflections are tack-sharp. But don’t pop the champagne just yet—the most critical step is next. It's time to protect that perfection.
All your hard work has left the clear coat perfectly smooth, but it's also completely exposed. It’s now a sitting duck for the very things you just worked so hard to erase: UV rays, acid rain, bird droppings, and road grime. Slapping on a traditional carnauba wax at this point is like trying to stop a hurricane with a paper umbrella. It might look good for a minute, but it offers almost no real, lasting defense.
The Problem with Temporary Protection
Look, traditional waxes and even many sealants are just a temporary fix. They sit on top of the paint and wash away faster than you’d think, sometimes in just a few weeks. Before you know it, you're right back where you started, constantly reapplying them just to keep up appearances.
I’ll never forget my neighbor, Dave. He was a meticulous guy who spent one Saturday a month waxing his black sedan. It looked incredible for about a week, but after a couple of washes and a rainstorm, that deep, wet gloss just vanished. He was trapped in a cycle of temporary shine, always chasing a look that never stuck around.
This is a story I hear all the time. You finally get the paint looking absolutely perfect, only to watch it slowly die a death by a thousand cuts, knowing you’ll have to do the whole song and dance over again soon.
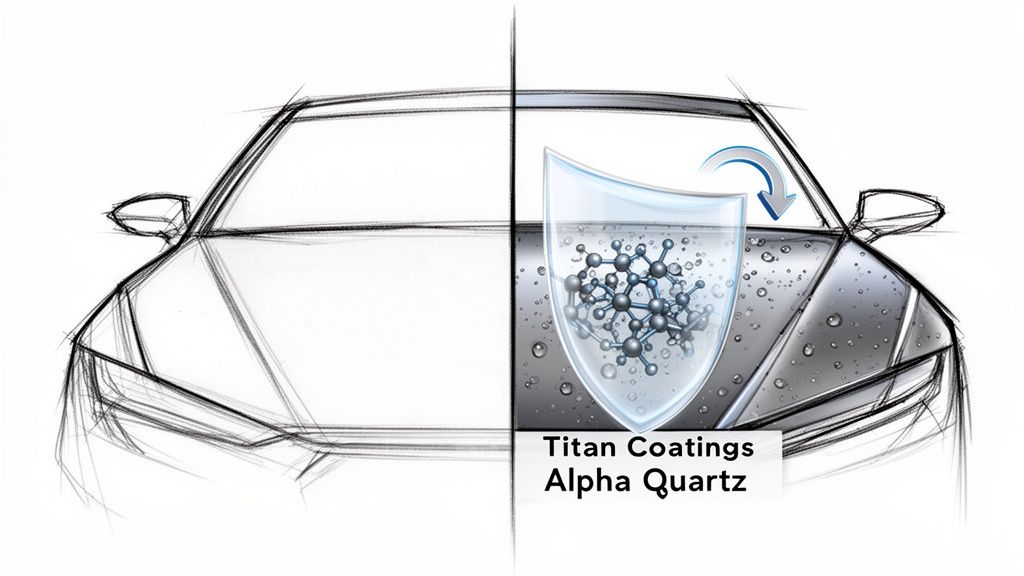
A New Era of Paint Defense with Elastomer Coatings
This is the exact problem we set out to solve. We brought the first elastomer coatings to the market, built from the ground up with our proprietary nano-tube technology and Dark Matter Tech. Unlike the old-school ceramic coatings that are hard but brittle, our elastomers are engineered to be different. Think of them as being hard like glass, but with built-in flexibility.
Imagine a coating that can handle the unbelievable temperature swings from a frozen winter morning to a blazing summer afternoon without developing those tiny micro-cracks. That’s the magic of flexibility. This elasticity allows the coating to move and flex with your car's body panels, giving it a level of durability that was just a pipe dream a few years ago. It’s not just a coating; it’s flexible armor for your paint.
For the ultimate shield, our Titan Coatings Alpha Quartz is in a league of its own. It forms an incredibly tough bond with your paint that protects your hard-earned finish for years, not months. That elasticity means small impacts from rock chips and bug guts are far less likely to cause damage, preserving that flawless surface you worked so hard for.
This is how you break the cycle of temporary shine. By locking in your freshly buffed paint with an elastomer coating, you’re making that deep, brilliant gloss a permanent feature, not a fleeting moment. To see what comes next, check out our complete guide on applying a ceramic coating to your car and make that shine last.
More Ways to Protect Your Perfect Finish
You’ve put in the work, dialed in your technique, and now your car's paint looks absolutely flawless. So, what's next? Letting that incredible finish fend for itself is not an option. You need to lock in that shine and protect it from the elements.
But let's be realistic—not everyone has a full weekend to dedicate to applying a professional-grade coating. That doesn’t mean you have to settle for less protection.
For a serious defense that’s unbelievably easy to apply, our Ultra Ceramic Spray is the answer. It’s a simple spray-on, wipe-off formula that delivers a ridiculous gloss and amazing water-beading. You get a tough, durable layer of protection in just a few minutes.
Don't Forget Your Glass
Think about it: you wouldn't drive with a smeared, dirty windshield. So why would you leave your glass unprotected? Navigating a sudden downpour is stressful enough without your wipers smearing water across your field of vision, making things worse.
Our Apex Glass Ceramic Coating totally changes the game. It creates a super slick, hydrophobic surface on all your glass.
Instead of water sheeting and clinging, it beads up into tiny little balls and flies right off the windshield as you drive. This dramatically improves your visibility, making rainy drives safer and far less draining. Plus, your glass just stays cleaner, longer.
A customer recently told us our glass coating was a "game-changer" for his long nighttime commutes. He said the clarity during rainstorms was so good, it felt like the rain wasn't even hitting his windshield at highway speeds, reducing his eye strain significantly.
When you treat every surface—from paint to glass—you’re creating a complete shield that keeps your entire vehicle looking incredible. If you're still weighing the heavy-duty options for your paint, check out our guide on Paint Protection Film vs. Ceramic Coating for a deeper dive.
Answering Your Top Buffing Compound Questions
Even the most seasoned pros had questions when they first started. It’s a natural part of mastering any skill, and paint correction is no different. Let's tackle some of the most common questions that pop up, so you can move forward with confidence.
Can I Really Use Buffing Compound by Hand?
You sure can. While a machine polisher is your best friend for tackling an entire vehicle, applying compound by hand is perfect for small touch-ups and isolated scratches. Think of that one nasty fingernail scratch under a door handle—hand application is ideal for that.
Just grab a quality microfiber or foam applicator pad, use a few small drops of compound, and work it in with firm, even pressure. Use overlapping circular or straight-line motions. It takes more elbow grease, but for spot corrections, it works wonders.
What's the Real Difference Between a Compound and a Polish?
This is a fantastic question, and the answer is all about abrasiveness.
Think of it like this: a buffing compound for car paint is your heavy hitter. It's like a liquid sandpaper designed to "cut" away the top layer of clear coat to level out deeper defects like swirl marks, oxidation, and even some scratches.
A polish, on the other hand, is the finesse step. It uses much finer abrasives to refine the surface after compounding. It cleans up any haze left by the compound and really amps up the gloss, giving you that jaw-dropping, wet-look shine. You cut with a compound, and you perfect with a polish.
How Do I Know When I’m Done Working the Compound?
You're looking for a specific visual cue. Most modern compounds are made with "diminishing abrasives," which means they break down as you work them.
When you start, the compound will look like a hazy, opaque film on the paint. As you continue to work it with your polisher, those abrasives do their job and break down into smaller particles. The film will slowly turn into a thin, oily, almost transparent layer. That’s your signal! Once you see that change, it’s time to stop, wipe away the residue, and check your work.
Expert Tip: Don't overwork the product. Once the compound has turned clear and oily, continuing to buff is just creating friction and heat with no additional cutting action. Wipe it off and assess the results.
Is Sealing the Paint After Buffing Really Necessary?
Yes. 100% yes. This is the one step you absolutely cannot skip.
The compounding and polishing process strips everything off your clear coat—old waxes, sealants, everything. You've essentially reset the surface, leaving it completely bare and vulnerable. If you leave it like that, it's an open invitation for UV rays, bird droppings, and road grime to start damaging your fresh finish immediately.
You have to lay down a durable layer of protection. For a truly robust shield that will protect all your hard work and won't crack under heat cycles, a professional-grade flexible coating is the way to go. A product like Titan Coatings Alpha Quartz is engineered to bond with the paint and protect it from whatever the road throws at it.
Don't let your hard work go to waste. Protect your perfectly polished paint with the advanced flexible technology of Titan Coatings. Check out our full lineup of elastomer and ceramic coatings in our online shop and lock in that shine.
0 Comments