
You wash your dark-blue hatchback, admire its deep reflection in the shade, then pull into sunlight and find a veil of haze across the bonnet. The bottle of car paint protection polish you bought promises shine, but you’re wondering whether that shine will also keep the paint protected.
What a Paint Protection Polish Does Compared With Wax and Coatings
The hatchback owner hasn’t necessarily bought the wrong product. They’ve bought a product for a different job.
Car paint protection polish is primarily a refining product. An abrasive formula improves the appearance of light oxidation, haze and fine swirls. It doesn’t automatically leave a durable shield behind, even when protection appears prominently on the label.
Some products combine abrasives, fillers and protective ingredients. That makes the label important: a finishing polish, an all-in-one polish and a ceramic sealant aren’t interchangeable.
Refinement and protection are different jobs
Think of polish as sanding and buffing a cloudy window until the view becomes clearer. Wax, sealant or coating is the clean protective film added afterwards, not the tool that removed the cloudiness.
There’s an important qualification to that analogy. Proper abrasive correction doesn’t disappear at the next wash, but oils and fillers that temporarily disguise defects can wash away. A polished surface can therefore stay corrected while still needing protection.
Polish versus wax, sealant and ceramic coating
| Option | Main job | Corrects defects? | Typical durability |
|---|---|---|---|
| Paint protection polish | Refines gloss and removes light oxidation and haze | Light defects only | Correction remains; fillers may wash away; no inherent protective lifespan |
| Carnauba wax | Warm glow and water beading | No | Renew when cleaning and exposure weaken the film |
| Synthetic sealant | Slick, durable water-repellent layer | No | Follow the product’s maintenance interval and inspect after washing |
| Ceramic coating | Hard, chemical-resistant layer bonded to the paint | No, needs a clean, appropriately prepared base | Product-specific service life, supported by preparation and care |
A wax suits an owner who enjoys regular hands-on maintenance and wants that particular finish. A sealant suits someone who wants a straightforward protective routine. A ceramic coating requires more careful preparation, but it serves a different purpose from repeatedly polishing the car.
Our explanation of the difference between wax and ceramic coating helps separate appearance preferences from protection requirements.
Practical rule: Buy polish to improve a confirmed surface defect. Choose protection to help preserve the finish afterwards.
For the hatchback, the sensible answer might be a gentle finishing polish followed by compatible protection. If washing alone restores a crisp reflection, there’s no reason to polish just because the bottle is already on the shelf.
Why Clear Coat Needs Protection and Polish
The coloured base coat gives the hatchback its blue appearance. The transparent clear coat above it supplies the gloss and takes much of the environmental exposure.
Say that hatchback spends its weekdays in an open-air parking lot. In a 2021 peer-reviewed clear-coat study, 400 hours of accelerated ultraviolet exposure, calculated by the researchers as approximately six years outdoors, reduced gloss by about 10%. Those numbers come from one controlled test, so a real vehicle may weather faster or slower depending on where it lives.
Heat, moisture and movement add their own stress
Sunlight does only part of the work. The paint, vehicle substrate and protective film expand and contract at different rates as temperatures swing, which places stress where those materials meet.
The ASTM coating standards collection lists separate methods for evaluating cracking, checking, flaking and other coating failures. A surface can still look glossy while the film underneath begins to fail mechanically, so shine alone is a poor health check.
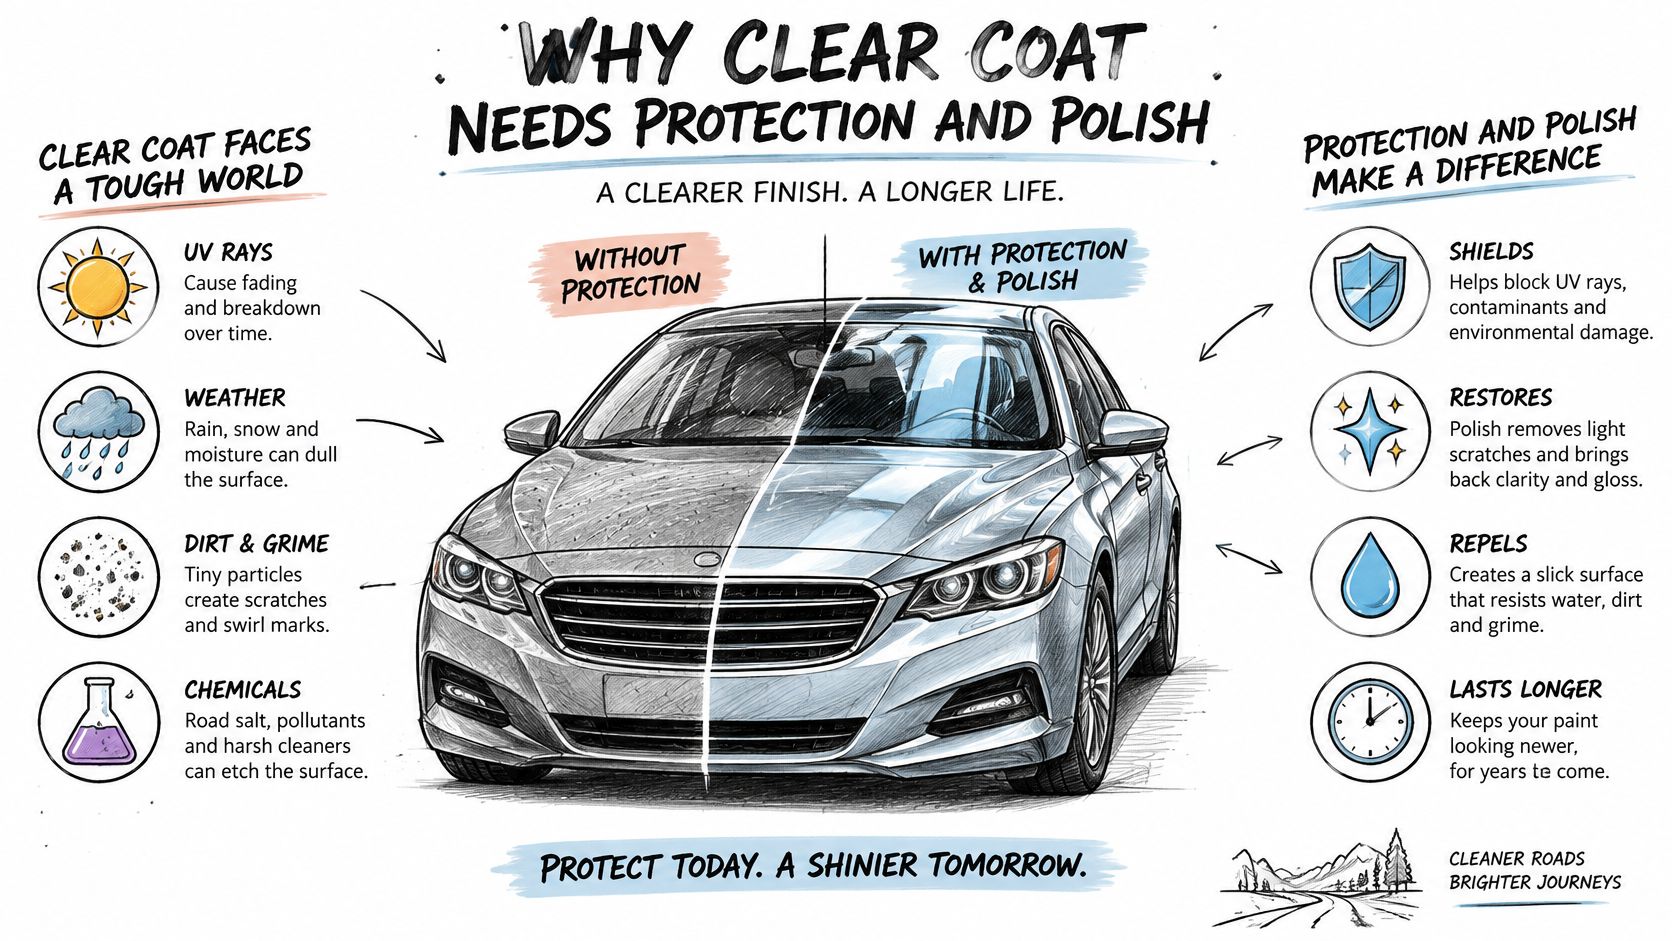
Elastomer coatings combine a hard surface with flexibility. The intention is glass-like hardness without the brittleness of a purely rigid film. Flexibility helps the coating accommodate movement and can support longer-lasting protection, though no finish shrugs off every frozen-to-hot cycle or insect impact.
Alpha Quartz 50ml ceramic coating sits in the DIY range for owners and mobile detailers who want to keep their vehicles shining at home. Its flexible chemistry suits this kind of maintenance, while preparation and installation conditions still decide how well it performs.
Polish and protection do different jobs on that clear coat. Polishing refines it by removing a small amount of damaged material, and every pass spends a little of the layer you have left. Protection slows the exposure that creates the damage in the first place, so the economical routine corrects only what needs correcting and shields what remains.
- Check the reflection: After washing, examine a cool panel in direct sunlight for softened reflections, fine swirls or cloudy patches.
- Separate dirt from damage: A dull reflection can indicate contamination rather than clear-coat deterioration.
- Check the specification: Judge temperature resistance by the formulation’s technical documentation, not flexibility alone.
Understanding the paint on your car helps you recognise which layer you are maintaining. This week’s useful check is simple: does a clean panel give a sharp, even reflection, or has the gloss gone soft?
Check Your Protection Before You Polish
Clear coat is a limited material budget. According to the Brookswood paint-correction explanation, modern factory finishes commonly have approximately 30–50 microns of clear coat within around 100–160 microns of total paint thickness.
That doesn’t mean a gauge reading tells you exactly how much clear coat remains. Common gauges measure the complete coating stack over a suitable substrate, so panel comparisons and repair history are important.
Establish the paint budget and existing layer
Use a paint thickness gauge for cars before correction, especially when panels may have been repainted. Preserve material at edges and raised body lines, and don’t chase a deep scratch just because the surrounding paint now looks better.
Next, identify what’s already protecting the panel. Installation records are more useful than guessing from water behaviour.
A peer-reviewed review of automotive protective coatings describes silica-rich ceramic formulations, sometimes supplemented with titanium dioxide, for hardness and ultraviolet resistance; one quartz example has a pH tolerance of 3–14 and an application window of 3–40°C. Those are specifications for that example, not permission to use any cleaner or install every coating in those conditions.
Polish approach by existing protection layer
| Existing protection | Polish approach | Before adding new protection |
|---|---|---|
| Bare paint, no coating | Finishing polish, or light correction if defects show | Decontaminate, rinse and dry, then apply protection |
| Carnauba wax or synthetic sealant | Cleanse first, then use a finishing polish if needed | Remove residue so the new layer bonds |
| Silica-based ceramic coating | Only an approved non-abrasive finishing product; avoid compounds unless permitted | Use a compatible topper and check the product label |
| Elastomer ceramic coating | Follow product instructions and use the gentlest effective method | Refresh only with a listed compatible product |
Even a non-abrasive finishing product needs approval. It may leave ingredients that change the coating’s surface behaviour.
Keep maintenance separate from removal
Before touching a protected panel:
- Check compatibility. Confirm that the coating permits the proposed polish or cleanser.
- Avoid abrasive compounds. Use them only when deliberate correction or removal is appropriate.
- Respect curing. Don’t disturb a newly installed film before its prescribed cure.
- Avoid harsh chemicals. Maintain the vehicle with pH-neutral shampoo and non-abrasive cleaning products.
ULTRA Ceramic Spray is our concentrated, water-based flexible membrane sealant for surfaces including paint, wraps, PPF and glass. It belongs in a compatible maintenance routine rather than replacing defect diagnosis.
Removal technique is coating-specific. PX10, for example, requires machine polishing and compounding, and professional removal is best. If a coating degrades, our process requires a certified installer to inspect the vehicle, provide feedback and restore the coating as needed.
Use beading and surface feel as initial clues, not proof of which protection remains.
Choosing Between Hand and Machine Polishing
A cloudy patch beside one door handle, on paint that otherwise reads clear, is a job for a foam applicator, not a rotary. Every pass of an abrasive removes a little clear coat, so the right tool is the one that clears the defect with the least correction. Bringing out an aggressive machine setup for a small area creates more opportunity for error than the job requires.
Hand application offers control and a low-risk starting point. A foam applicator and clean microfiber towels handle light gloss enhancement, small areas and sealant application, although hand polishing can still mark paint if the pad carries grit.
Match the tool to the defect
A dual-action polisher combines rotation and orbital movement. It is generally more forgiving than a rotary, but holding it carelessly against an edge or pairing it with an aggressive pad can still damage a finish.
A rotary removes defects quickly in skilled hands. Its direct rotation makes heat management and finishing technique more demanding, which is why heavy correction is usually professional work.
Hand, DA and rotary polishing compared
| Method | Speed | Risk of holograms or burn-through | Best for |
|---|---|---|---|
| Hand application | Slow | Very low | Light gloss top-up and applying a sealant |
| Dual-action (DA) polisher | Moderate | Low, forgiving for beginners | One-step correction on most cars |
| Rotary polisher | Fast | High, needs skill | Heavy defects, handled by professionals |
Our guide to the best car polisher for beginners can help you choose a manageable tool rather than buying purely for cutting power.
Use these decision rules:
- Start gently: Choose the lightest method likely to improve the defect.
- Let a test spot decide: Polish a small test area on the problem panel before committing to the whole car. The result, not the tool’s reputation, settles the choice.
- Escalate deliberately: Change the pad, abrasive or technique only if the first combination leaves unacceptable defects.
Work in shade on cool paint. Use diffused light to judge overall clarity, then a focused inspection light to reveal fine swirls that broad lighting can conceal.
A successful test spot tells you what to repeat. An unsuccessful one tells you to change the method, not press harder.
Think of the decision as spending from a fixed budget. Clear coat does not grow back, so a panel corrected gently three times keeps more paint than one attacked aggressively once. When a gentler method gets the result, the leftover thickness is the profit.
How to Polish Your Car in Six Steps
A polished bonnet should show an even reflection, not merely feel slippery beneath leftover oils. Preparation and inspection are what separate a lasting correction from a temporary disguise.
As the Pad and Polish correction guide explains, abrasives level the raised areas surrounding shallow defects, reducing light scattering. Correction removes clear coat, so the target is the smallest amount of work that produces an acceptable finish.
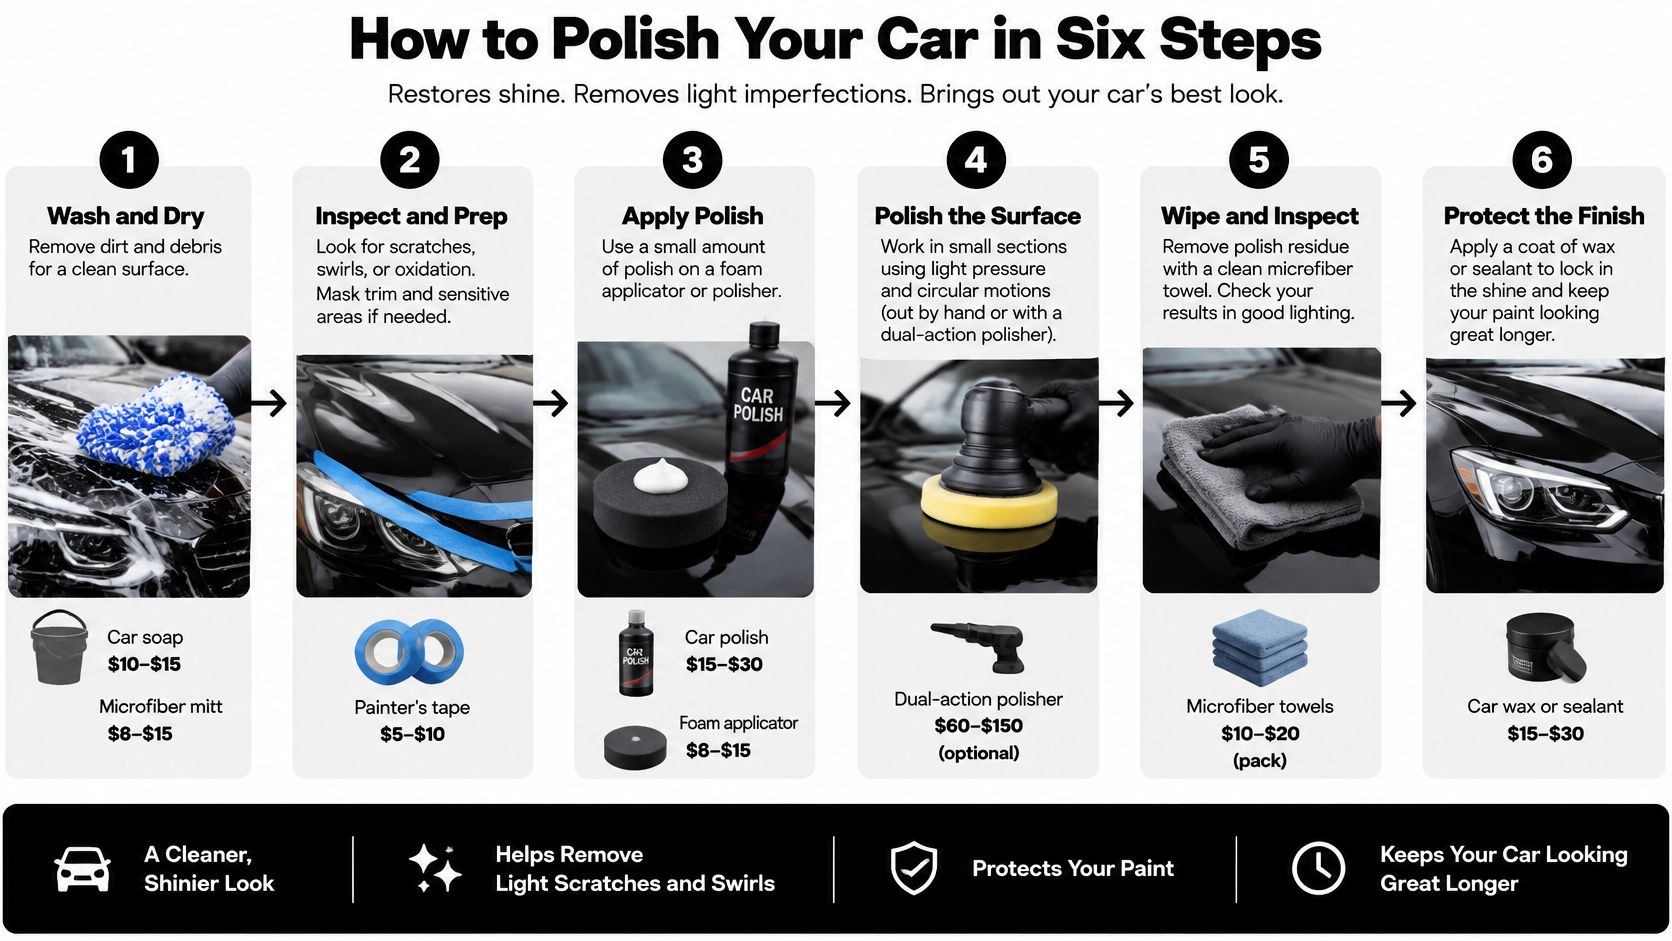
Prepare, refine and inspect
Wash and dry thoroughly. Use a pH-neutral automotive shampoo, rinse well and dry with clean microfiber. Grit trapped beneath an applicator can create fresh scratches while you’re trying to remove old ones.
Remove bonded contamination. Use a paint-compatible iron remover where required, then rinse completely; use lubricated clay only if bonded deposits remain. Claying can introduce marring, so don’t treat it as an automatic step on already-smooth paint.
Mask vulnerable areas and test. Protect textured trim, badges, sharp edges and delicate body lines, then try a small area with the least aggressive suitable pad and finishing polish. Inspect the wiped surface under diffused and focused lighting before choosing that combination for the rest of the car.
Work controlled, overlapping passes. Begin at a low setting suitable for the machine and product, then use the working speed recommended for that combination. Keep the pad flat, avoid heavy pressure and stop before the polish dries into stubborn residue.
Remove residue without dragging it around. Lift the initial residue with clean short-pile microfiber, then use a separate soft towel for the final buff. Turn or replace towels when they load up, rather than smearing oily product across the panel.
Inspect the actual finish. Use a coating-compatible preparation product to remove remaining polishing oils, then check for haze, streaks and an even reflection. If the surface still looks cloudy, diagnose the cause before repeating correction or applying protection.
Know when the panel is ready
The finish should look sharp and consistent rather than patchy or artificially wet. A properly decontaminated surface should feel smooth, but don’t rub bare fingers across it or use a squeaky feel as proof that all residues are gone.
Protection goes on only after the surface is clean, dry and residue-free. Check seams and badge edges too, because trapped water can run onto a freshly prepared panel.
For subsequent coating maintenance, use pH-neutral shampoo and avoid harsh chemicals and abrasive cleaning products. A careful wash should preserve your work, not become another correction job.
Fixing Haze, Holograms and Lost Beading
A black sedan can leave the wash looking grey, and the owner swears the coating failed overnight. The clear coat is usually fine. A film of shampoo residue, mineral deposits or leftover polish oil is sitting on top, scattering the light before it reaches the paint.
Reaching for the polisher at that moment spends clear coat to solve a dirt problem. Polish refines; it does not protect, and every pass removes a little of the layer you are trying to save. Clean, dry and inspect first. A symptom is not a diagnosis when contamination and polishing defects can soften a reflection in exactly the same way.
Match the symptom to the cause
- Haze after washing: Residual polish oils are one possibility, but fine abrasive marring can look similar. Rewash, then use a preparation product such as BIOPREP, which lifts polish residues and silicones without damaging the paint or clear coat, before deciding which problem you have.
- Holograms after machine work: An aggressive pad, unsuitable speed or poor finishing technique can leave directional trails. Test a gentler finishing combination on a small area without increasing pressure.
- A dull patch or suspected burn-through: Stop immediately. Don’t try to restore gloss with more passes; have the area professionally assessed.
- Patchy water beading: Check for shampoo residue, mineral deposits and road film before assuming the coating has disappeared.
- Persistent coating deterioration: Have a certified installer inspect the vehicle, give feedback and restore the coating as needed.
The Automoblog ceramic-coating review stresses preparation, application and maintenance when judging coating performance. Water behaviour alone does not prove resistance to ultraviolet exposure, chemical etching or abrasion.
Check the surface, not just the droplets
A coating can sit healthy beneath contamination that changes how water spreads, while dramatic beading says nothing about whether the film stops stone chips. Judge the finish after decontamination, not before.
When inspection confirms actual wash marks rather than deposits, use our guide to removing swirl marks from a car and limit correction to the panels that need it.
If cleaning restores the finish, put the polisher away.
Photograph persistent patches under the same lighting before and after cleaning, and compare dry panels rather than judging the car wet, when water can temporarily hide fine defects. The goal is the least correction that restores clarity, followed by a compatible protective layer, because paint you keep is worth more than gloss you borrow.
Choose Your Routine and Protect the Finish Today

Mara parks her daily driver outside in a sunny region. She wants colour depth and easier maintenance, not a concours correction every spring.
Her routine is regular gentle washing with a pH-neutral shampoo, prompt removal of contamination and an annual inspection. A light finishing polish might be appropriate at that inspection, but only if she finds a defect that cleaning won’t resolve. Every polishing pass she skips is clear coat she keeps.
Three owners, three sensible routines
A mobile detailer works on client driveways and needs a repeatable process. He chooses an easy-application elastomer ceramic system suited to DIY and mobile work, checks the working conditions and polishes only where the client’s paint needs correction.
His advantage isn’t a promise of effortless results. It’s a defined sequence: inspect, prepare, correct only as necessary, then protect.
The weekend owner in a cold climate has a different concern. His car moves between freezing weather and warmer storage, so he prioritises a flexible protective film and checks its condition seasonally rather than assuming hardness alone guarantees durability.
- Sunny daily driver: Maintain protection and inspect for UV-related deterioration without automatically scheduling abrasive work.
- Mobile detailing client: Agree on realistic defect improvement and preserve paint rather than pursuing every scratch.
- Cold-climate weekend car: Select documented temperature performance and monitor adhesion, clarity and contamination.
We manufacture elastomer-based ceramic coatings for automotive surfaces. Titan’s proprietary Dark Matter Technology® formula is built for premium preservation against harsh UV rays, scratches and chemicals, with regenerative properties that support longer-lasting protection.
Remember the glass and preparation
Paint gloss doesn’t improve the driver’s view through a wet windshield. Apex Glass Coating, part of the DIY and mobile detailers range, costs $39.97 for a 50ml bottle and treats glass separately from paint correction.
Whatever coating sits on the glass, sound wipers, a clean surface and appropriate driving speed still matter most in bad weather. Follow the product’s preparation and curing directions rather than treating application as a quick wipe-on step.
For paint preparation, our BIOPREP concentrate removes polish residues and silicones without damaging paint or clear coat, helping prepare the surface before waxes or coatings. For a professional application, an authorized installer provides an accurate quote based on vehicle size, condition and the coating package chosen.
Owners who prefer to maintain their own vehicles can keep a coating fresh between inspections with ULTRA Ceramic Spray ($39.97) or OMNIGUARD quick sealant ($57.97), both aimed at drivers who want their cars shining and in great shape at home. This week, test one clean panel, record what improves after cleaning, and decide whether your car needs polish, protection or both before the next season.
APEX NANO – Titan Coatings offers elastomer-based automotive coatings, surface-preparation products and maintenance options to complement careful paint refinement. Visit APEX NANO – Titan Coatings to choose protection for your paint and glass, then build your routine around the least correction your finish needs.
Shop Titan Coatings on Amazon: Apex Glass Coating on Amazon | Alpha Quartz Ceramic Coating on Amazon.
0 Comments