A client once called me in a panic about a freshly coated black sports car that had turned cloudy and patchy overnight. He thought the coating had failed. The coating wasn't the problem. The prep was.
Why Most Coatings Fail Before They Even Cure
Most bad coating jobs are lost before the applicator opens the bottle. That sounds harsh, but it matches what seasoned installers see every week on paint, wheels, glass, concrete, and industrial steel.
Industry analysis shows that about 75% of coating failures are caused by poor surface preparation according to CoatingsPro's review of surface-prep failure data. That's the number I think about every time someone wants to rush from wash bay to coating applicator.

Failure usually starts with what you can't see
Visible dirt is easy. Invisible residue is what wrecks jobs.
Polishing oils, silicone-heavy dressings, wax residue, hard-water minerals, road film, bug remains, and moisture can all sit on the panel while the surface still looks clean under shop lights. Then the coating lands on top of contamination instead of bonding to paint. You get smearing, weak adhesion, cloudy spots, or strange behavior during leveling.
I've had cars arrive after another shop “prepped” them with a wash and a quick alcohol wipe. Under proper lighting, the panels still showed loaded pores around edges, residue near badges, and a greasy film left behind from polishing. Those are the jobs that teach you to respect coating surface preparation.
Advanced coatings still demand disciplined prep
Modern elastomer coatings changed part of the game. Flexible technology makes a lot of sense on vehicles that live through heat, cold, road grime, bug impact, and constant expansion and contraction. A coating that's hard like glass but still flexible has a real practical advantage because it's less likely to struggle when panels move through temperature swings.
That said, flexibility doesn't excuse sloppy prep. Better chemistry widens your safety margin a little. It doesn't repeal physics.
Practical rule: A premium coating can only bond to the surface you actually prepared, not the surface you hoped was clean.
A lot of installers also underestimate cure behavior. If the substrate wasn't properly cleaned and dried, the curing window becomes a stress test. Problems that looked minor during application often show up later. If you want a better handle on timing and expectations, Titan's explanation of how long ceramic coating takes to cure is worth reading before you schedule a job.
The finish always tells the truth
A coated car doesn't hide prep mistakes. It magnifies them.
That's why the pros who get repeat business aren't just good at applying product. They're methodical before application starts. They inspect more, strip more residue, correct only what needs correcting, and stop treating prep like dead time.
Decoding Your Surface Decontamination Strategy
A proper wash isn't prep. It's the first gate.
If the panel still carries bonded contamination or leftover polishing residue, coating over it is just sealing in the problem. Real coating surface preparation starts with a decontamination strategy, not a random mix of soap, clay, and hope.

Start with what can scratch the paint
Before any chemical decon, get loose grit off the vehicle safely. Heavy dirt left on the surface turns wash mitts and towels into sandpaper.
My sequence is simple:
- Pre-rinse first to knock off loose grit, dust, and road film.
- Pre-wash or foam to soften heavier contamination.
- Two-bucket contact wash with a clean mitt and frequent rinsing.
- Dedicated wheel and lower-panel tools so brake dust and tar don't transfer to upper paint.
If you've ever wanted visual proof of how much grime pressure washing can remove before hand contact, this set of proof of pressure washing quality examples shows why that first stage matters.
Then attack the bonded contamination
After the wash, the paint may still feel rough. That roughness is usually bonded contamination, not texture in the clear coat.
The usual culprits include:
- Iron fallout: Rail dust, brake dust, and industrial particles embedded in the surface.
- Tar and adhesive residue: Common behind wheels, rocker panels, and lower doors.
- Sap and organic residue: Sticky contamination that survives normal soap.
- Road film: A stubborn traffic layer that dulls the surface and interferes with wipe-downs.
Run your hand inside a thin plastic bag over the paint. If it feels gritty, the surface isn't ready. That baggie test is still one of the quickest ways to confirm what your eyes miss.
When contamination is present, use chemistry before abrasion. Iron remover for ferrous particles. Tar remover where needed. Clay only after those chemicals have done the heavy lifting. If you clay a heavily contaminated panel too early, you risk dragging residue across the paint and creating extra correction work.
Surface readiness is a verification problem
One of the biggest mistakes detailers make is assuming clean-looking paint is coating-ready paint. It often isn't.
Guidance used in coating prep emphasizes that detailers need practical ways to verify the surface is free of polishing oils, silicones, and waxes, because those invisible contaminants are a major cause of coating failure on modern automotive finishes, as noted in this surface preparation reference for coating readiness.
If your towel is still pulling residue after the “final wipe,” the final wipe wasn't final.
For cars that need mechanical decon after chemical cleaning, Titan's article on what clay barring a car does is a useful primer for newer installers.
Adjust the method to the surface
Not every part of the car should be treated the same way.
- Clear-coated paint: A full decon routine is the most sensible choice.
- Single-stage paint: Use a gentler approach. Old pigment transfer can load towels fast and tempt you into overworking the panel.
- Plastic trim: Be careful with aggressive chemicals and don't let residue dry in grain.
- Freshly repainted panels: Confirm cure status before using stronger decon steps or solvents.
The goal isn't to make every panel equally aggressive. The goal is to make every panel equally ready.
Creating Mechanical Perfection Through Correction
Chemical cleaning removes what shouldn't be there. Correction deals with what's left.
That means texture, swirls, oxidation, old staining, isolated defects, and the glossy-but-slippery surface that still isn't ideal for coating adhesion. Good correction work doesn't just improve looks. It helps create the surface profile the coating can hold onto.

Mechanical keying matters
A complete prep workflow includes inspecting the substrate, removing contamination, repairing defects, and creating a mechanical profile through sanding or polishing because adhesion is improved by mechanical keying, as outlined in this guide to long-lasting coating prep.
On a vehicle, that doesn't mean sanding every panel like an industrial substrate. It means understanding when the paint is too slick, too oxidized, too damaged, or too loaded with embedded defects to accept a coating cleanly.
Here's the decision I use in the bay:
| Surface condition | Best next move | Why |
|---|---|---|
| Feels rough but looks decent | Clay or clay mitt | Removes bonded contamination |
| Glossy but swirled | Machine polish | Levels defects and refines finish |
| Oxidized or heavily neglected | Compound, then polish | Restores clarity and uniformity |
| Deep isolated defects | Spot sanding, then refine | Corrects local damage without chasing the whole panel |
Don't remove more paint than the job requires
A neglected daily driver doesn't need concours-level correction to hold a coating. It needs a stable, even, well-refined surface.
That distinction matters. I've seen detailers chase every last mark until they've traded sensible prep for unnecessary clear coat removal. A coating will highlight crisp correction, but it won't reward reckless polishing.
A safer correction mindset looks like this:
- Match pad and polish to the defect: Start with the least aggressive combo that moves the defect.
- Test one section first: Don't commit to a whole-car process before you know what the paint responds to.
- Watch edges and body lines: They burn fast and don't forgive heavy-handed passes.
- Refine after cutting: A sharp finish levels coating behavior and helps wipe-off consistency.
The turnaround that proves the point
One of the better examples I've seen was a dark SUV that had years of tunnel wash damage, sap marks on the roof, and rough lower panels from fallout. The owner wanted coating because he was tired of the constant grime, but the paint was nowhere near ready.
The wash removed the obvious dirt. Iron remover lit up the lower half. Clay pulled more contamination than it should have. A one-step polish made the vehicle look better, but a few test spots showed the paint still had too much haze to leave as-is. A more deliberate correction pass brought back proper clarity.
Only then did the paint start to look like a surface worth sealing.
For installers who want a cleaner breakdown of that correction stage, Titan's page on what paint correction is gives a useful overview.
The coating doesn't create perfection. It preserves the level of perfection you actually achieved.
Final Lockdown Masking Environments and Primers
The last part of coating surface preparation is where rushed installers sabotage good work. The paint is corrected, the car looks sharp, and people start acting like the hard part is over. It isn't.
Discipline is paramount. Masking, environmental control, final wipe-downs, and primer decisions decide whether application feels smooth or turns into a cleanup job.
Mask first so you don't polish mistakes later
Masking isn't just about protecting trim from polish dust. It keeps coating away from textured plastics, rubber seals, porous edges, and tight areas where product gets trapped.
Use automotive tape with clean edges and remove it with the same care you used to apply it. If you need a refresher on tape types and where they belong, Titan's overview of auto paint tape is a practical reference.
The same logic shows up outside detailing. If you've ever looked at interior paint prep, this guide for priming drywall is a good reminder that substrate prep and masking decisions always affect the finish, no matter what you're coating.
Environment is not a suggestion
Industrial guidance notes that surface preparation can account for up to 40% of the cost of a repainting project in major markets, according to Graco's summary of surface prep standards. In automotive work, the lesson is the same. Prep feels expensive until a failed job forces rework.
The environment can ruin even careful prep if you ignore it:
- Humidity: Slows flash behavior and can interfere with wipe-off.
- Panel temperature: A cool bottle and a hot hood rarely cooperate.
- Condensation risk: A panel can look dry and still carry moisture.
- Air movement: Too much can flash solvents too fast. Too little can trap vapor.
Mobile detailers have to manage this harder than shop installers. Shade, panel timing, and job sequencing matter. I'd rather delay application than fight a panel that keeps behaving differently from one side to the other.
Panel wipe first, primer only when the system calls for it
A final panel wipe is essential. It removes leftover polishing oils and exposes what the surface really is.
A primer or adhesion promoter is different. Use one when the coating system or substrate calls for it. Don't throw extra chemistry at the panel just because it sounds more advanced. More products don't automatically mean better bonding. Correctly matched products do.
This is also where product choice matters. APEX NANO – Titan Coatings offers options like Alpha Quartz for installers who want an easier application path, but even easy-to-use coatings still perform better on a properly cleaned, dry, controlled surface.
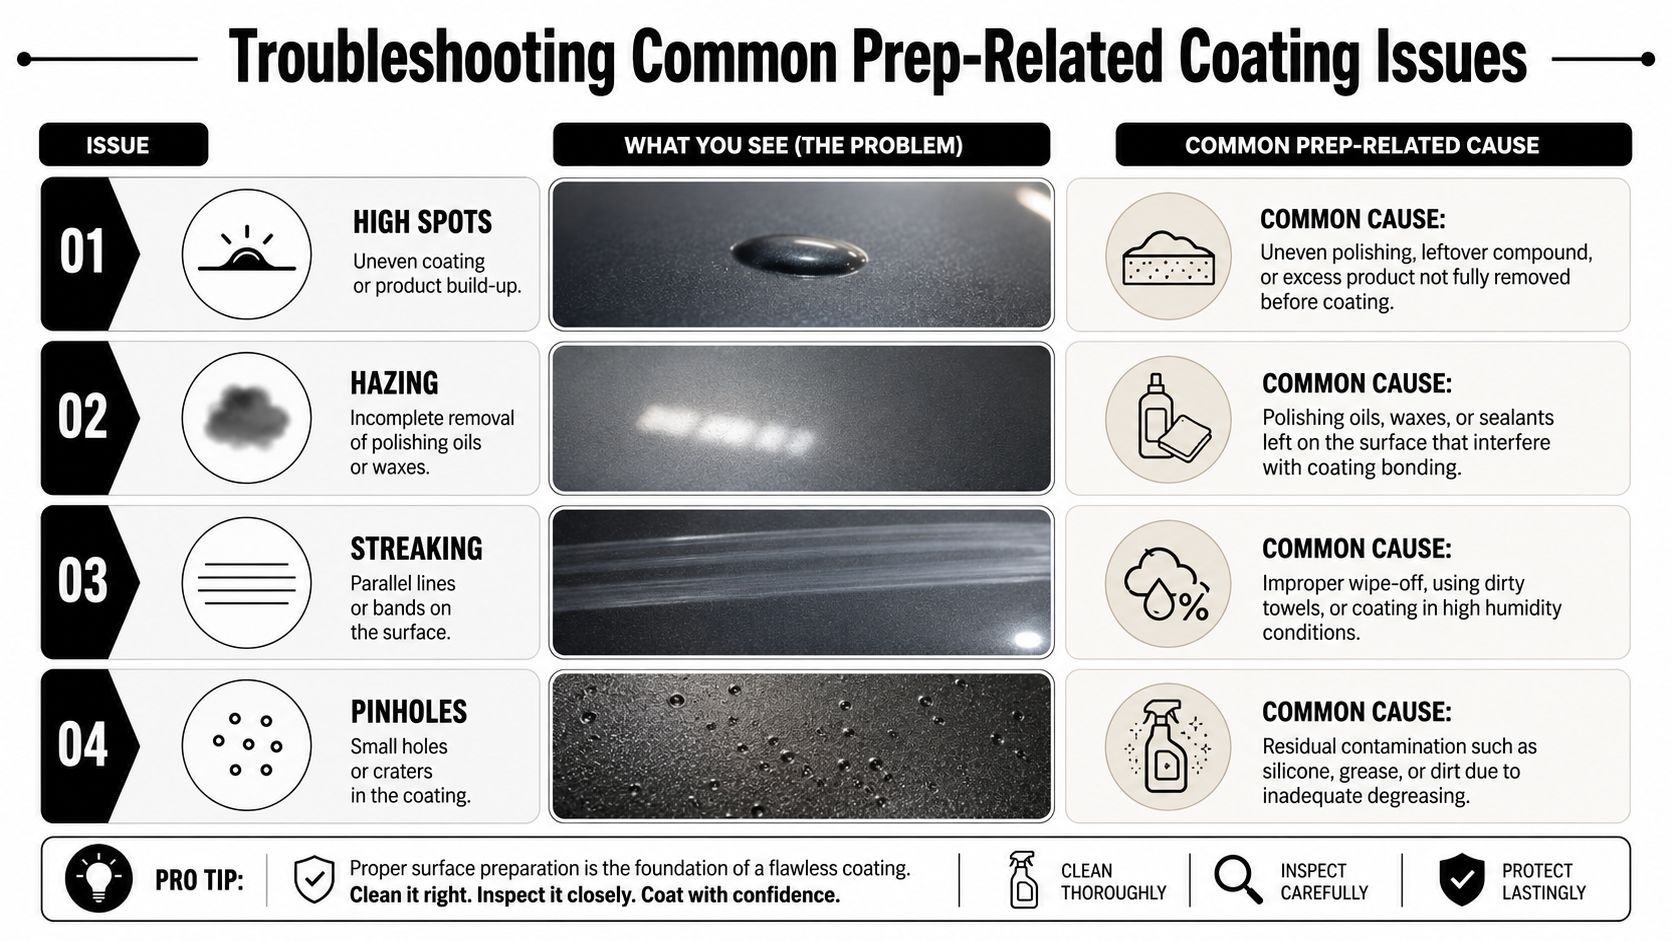
Troubleshooting Common Prep-Related Coating Issues
When a coating goes wrong, the panel usually leaves clues. The trick is knowing how to read them.
Most application defects that people blame on the bottle started earlier in the prep chain. If you know the symptom, you can usually trace it back to the missed step.
What the defect is telling you
Some of the most common failures point straight back to prep:
| Problem | Likely prep cause | What to do |
|---|---|---|
| High spots | Uneven leveling, missed residue, overloaded application | Catch early, level carefully, inspect with direct light |
| Hazing | Polishing oils or waxes still on panel | Re-clean, reassess surface, refine if needed |
| Streaking | Residue, poor wipe-off, unstable environment | Reset with proper wipe-down and controlled conditions |
| Pinholes | Moisture or contamination under coating | Stop, dry, strip affected area if necessary |
Technical guidance notes that pinholes are often caused by applying coating to a wet surface, which lets moisture escape during curing, and that residual grease or salts can lead to blistering and adhesion failure, as explained in this step-by-step surface preparation guide.
The inspection method matters
You won't catch every issue with one light source.
Use both direct and diffused lighting. Direct light finds high spots, leftover residue, and sharp application defects. Diffused light shows broader haze, uneven gloss, and wipe pattern issues. Move your head. Change the angle. Inspect edges, lower doors, and the center of large panels separately.
I also like to check the same panel twice. Once right after wipe-off, once after a short pause. Some defects only reveal themselves once the coating starts to settle.
A panel that looks perfect from one angle can still be wrong from the angle the customer sees first.
Fixes that work and fixes that waste time
If the problem is fresh, you often still have options. If it's cured hard, your options shrink.
- For high spots caught early: Re-level with the proper towel and inspect again under tight light.
- For hazing caused by residue: Strip the affected section back to a clean surface and correct lightly if needed.
- For streaking: Don't keep chasing it with dirty towels. Reset the panel.
- For pinholes or blister-like defects: Assume contamination or moisture until proven otherwise.
What doesn't work is layering more coating over the defect and hoping it disappears. It won't. You just make the repair harder.
Prepping Glass for Unbelievable Driving Clarity
Glass gets ignored because people think it's simple. It isn't. Windshields collect film, minerals, washer-fluid residue, traffic grime, and wiper transfer that normal glass cleaner won't fully remove.
When glass is properly prepped and coated, night driving improves, rain behavior changes, and the windshield stays easier to clean. That's not hype. It's just what happens when water meets a clean, properly treated surface.
Glass prep has to be deeper than a wipe-down
A windshield should be stripped in layers.
Start with a deep clean to remove traffic film. Then decontaminate. If the glass has water spotting or stubborn residue, polish it with a dedicated glass polish or appropriate machine setup. Clean the edges, the cowl-adjacent lower section, and the wiper sweep path carefully because that's where leftover grime likes to hide.
After correction, the glass should feel smooth and wipe clear without smearing. If it still grabs the towel or leaves oily trails, it isn't ready.
For anyone who wants a tighter process before coating, Titan's guide to the best way to clean an auto windshield covers the basics well.
Why coated glass changes the driving experience
The value of glass coating isn't bragging rights. It's reduced stress in ugly weather.
A properly prepared windshield coated with a product like Titan's APEX GLASS Ceramic Coating can help water move off the glass more cleanly and reduce the cling that makes rainy driving tiring. The product angle that matters here is ease of use. If a coating is straightforward to apply and the prep is done right, both pros and DIY users have a much better shot at a clean result.
I also like easy spray products as maintenance tools. Titan's Ultra Ceramic Spray fits that role well for quick protection on secondary surfaces like exterior glass, trim, or wheels when the goal is simple upkeep rather than a full correction-and-coat session.
The mistake that ruins glass results
Most bad glass coating jobs fail for the same reason paint jobs fail. Residue.
If the installer leaves mineral spotting, old repellents, oily cleaner residue, or wiper contamination on the windshield, the coating won't lay down evenly. Then the user blames the product when the actual issue was the substrate.
Clean glass is never just visually clean. It has to be chemically clean too.
The Ultimate Pre-Application Checklist
Repeatable coating surface preparation beats memory every time. Use this final check before the applicator touches the panel.
Coating Pre-Application Final Check
| Check Area | Task | Status (Pass/Fail) |
|---|---|---|
| Wash | Vehicle fully washed and loose grit removed | |
| Decontamination | Iron, tar, sap, and bonded contamination addressed | |
| Surface feel | Paint passes touch check and feels smooth | |
| Inspection | Defects, failing areas, and sensitive edges identified | |
| Correction | Required polishing or refinement completed | |
| Residue removal | Polishing dust and residue cleared from cracks and trim | |
| Panel wipe | Surface wiped until towels come away clean | |
| Dryness | Panels, edges, mirrors, emblems, and seams fully dry | |
| Masking | Trim, badges, rubber, and sensitive areas masked | |
| Environment | Application area stable and suitable for coating work | |
| Lighting | Direct and diffused light available for inspection | |
| Tools | Fresh towels, applicators, and backup supplies ready |
A simple checklist does two things. It catches missed steps, and it keeps you from rushing when the car already looks “good enough.” Good enough is where prep mistakes usually sneak in.
Frequently Asked Questions About Surface Prep
Do I always need to clay before coating?
No. Clay is useful when the paint still has bonded contamination after washing and chemical decon. If the surface is already clean and smooth, unnecessary claying can create extra marring and extra polishing work.
Can I coat right after polishing?
Only after a proper wipe-down confirms the surface is free of polishing oils and residue. Freshly polished paint often looks cleaner than it is.
Is a stronger coating more forgiving of bad prep?
No. Better chemistry can improve durability and flexibility, but it still needs a properly prepared surface. Strong products don't bond well to oils, waxes, moisture, or contamination.
What's the biggest prep mistake DIY users make?
Rushing the final cleaning stage. They wash, decon, maybe polish, then assume the paint is ready because it looks glossy. Gloss is not proof of readiness.
Should I strip old coatings before installing a new one?
If the old layer is failing, yes. Coating over a compromised layer usually traps the weakness underneath. The new install is only as sound as what sits below it.
How do I know the panel is really ready?
Use touch, light, and towel feedback together. The paint should feel clean, look even under inspection lighting, and wipe without smearing or picking up residue.
Surface prep is where durable results start. If you want coating systems built around advanced protective technology for paint, glass, and more, explore APEX NANO – Titan Coatings and choose the product that fits the surface and the way you work.
0 Comments