You’ve probably seen it before—that hazy, flaking, or peeling patch on a car’s hood or roof. It’s frustrating, and it makes an otherwise great-looking vehicle look old and neglected. While the quick fix seems to be sanding it down and spraying on a new layer, a real, lasting repair means first understanding why your clear coat gave up the ghost.
Why Your Clear Coat Is Failing and How to Stop It
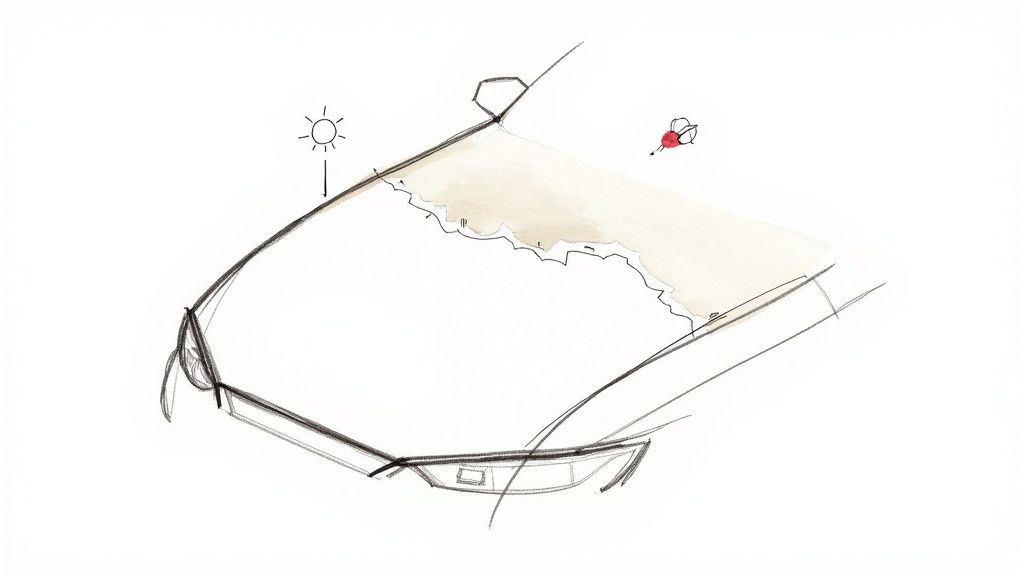
Spotting that first milky patch is a gut-punch for any car owner. This isn’t just a small cosmetic flaw; it’s the sign that your vehicle’s primary shield is breaking down. Think of your clear coat as armor. Once that armor is compromised, the vibrant color underneath is left completely exposed to the elements.
The number one enemy? The sun. Day after day, relentless ultraviolet (UV) radiation slowly bakes the clear coat, making it brittle and weak. Once it loses its flexibility and integrity, it can no longer hang on to the base coat, and that’s when you see the peeling and flaking start.
The Daily Driver’s Dilemma
I see this all the time. Take a common scenario: someone who meticulously washes their car but has to park it outside every day for work. After just four years, they start noticing the roof and hood—the surfaces that get blasted by the sun—are looking cloudy. Before they know it, small flakes start lifting. This is a textbook case of UV degradation sped up by constant exposure.
This story plays out constantly. The daily cycle of heating up and cooling down, combined with a whole host of other environmental attacks, creates the perfect storm for clear coat failure.
- Environmental Fallout: Things like acid rain, bird droppings, and tree sap are surprisingly acidic. If left to sit, they can literally etch into the clear coat, creating weak spots that eventually fail.
- Abrasive Damage: Those automatic car washes with spinning brushes? They can be brutal. Improper hand-washing techniques and even road debris create tiny micro-scratches that slowly but surely break down the clear coat’s seal.
- Time and Exposure: Nothing lasts forever. Over the years, every clear coat loses the protective oils and resins that keep it healthy. Industry data often shows clear coat problems popping up around the 7-12 year mark, but intense sun can cut that down to just four or five years.
Key Takeaway: Clear coat failure isn’t a sudden event. It’s a slow-motion breakdown caused by a relentless combination of UV rays, environmental pollutants, and everyday wear and tear.
From Brittle to Flexible: A Better Defense
Here’s the fundamental issue with most factory and many aftermarket clear coats: they are hard but incredibly rigid, almost like a thin sheet of glass. This is where Titan Coatings’ advanced Elastomeric coatings completely change the equation.
As the first company to introduce Elastomer coatings to the market using revolutionary nano-tube and Dark Matter tech, we engineered a solution that is both hard like glass and remarkably flexible. This built-in elasticity lets them absorb impacts from small road debris and withstand wild temperature swings—from freezing winter nights to scorching summer days—without cracking or peeling. Unlike traditional coatings, the flexibility means extreme temperature changes won’t cause them to crack down.
By truly understanding why the original clear coat failed, you can choose a solution that doesn’t just patch the problem but genuinely upgrades your vehicle’s defense for the long haul. You can learn more about this proactive approach in our guide on how to protect car paint from sun damage.
Getting Your Gear Together for a Pro-Level Repair
Before you lay a single piece of sandpaper on your car, let’s talk about what really separates a shoddy patch job from a professional-looking finish: preparation and the right tools. Trying to fix a peeling clear coat without the right gear is a recipe for frustration and a result you’ll regret. Think of this as your pre-project checklist to get it right the first time.
The first step isn’t buying supplies; it’s playing detective. You have to understand exactly what you’re dealing with. Is it a small, coin-sized blemish on the corner of your hood? That’s a perfect candidate for a simpler spot repair. But if you’re seeing big, flaky sheets peeling off the entire roof or trunk lid, you’re in for a full panel refinish. Pay close attention to the depth, too—if the damage goes past the clear and into the color coat, exposing primer or bare metal, your job just got a lot more involved.
What You’ll Absolutely Need on Hand
Once you’ve got a clear picture of the damage, it’s time to assemble your toolkit. This is one of those times where investing in quality materials really pays off. Cheap masking tape that leaves a sticky mess or sandpaper that falls apart after a few passes will only create more headaches and compromise your final result. Don’t cut corners here.
Here’s what should be on your shopping list:
- Safety First, Always: This is non-negotiable. Get a good respirator rated for paint fumes, a pair of safety glasses, and some nitrile gloves.
- The Prep Crew: You’ll start with a good automotive soap and a clean microfiber mitt. A dedicated degreaser or wax and grease remover is critical for getting the surface surgically clean. If you feel any roughness after washing, it’s time for a clay bar. You can learn all about that process in our guide on what is clay bar treatment.
- Masking Off: Quality automotive masking tape and paper are your best friends for protecting the surrounding paint. Don’t use painter’s tape from the hardware store; it’s not the same.
- The Sanding Arsenal: You’ll need a variety of wet/dry sandpaper grits. A good range to have is a coarser 400-grit to knock down the failed clear, a medium 800-grit to feather out the edges smoothly, and then ultra-fine grits like 1500 or 2000 for the final wet sanding.
- The Main Event – Clear Coat: For most DIY repairs, a 2K aerosol clear coat is the way to go. The “2K” means it has a separate hardener you activate, which creates a far more durable, gasoline-resistant, and long-lasting finish than the standard 1K stuff.
Before we dive into the process, here’s a detailed checklist to make your shopping trip easier. Having everything ready to go before you start makes a world of difference.
DIY Clear Coat Repair Toolkit Checklist
| Category | Essential Items | Pro-Tip / Recommended Spec |
|---|---|---|
| Safety Equipment | Respirator, Safety Glasses, Nitrile Gloves | Look for a respirator with organic vapor cartridges. |
| Cleaning & Prep | Automotive Soap, Microfiber Mitts, Degreaser, Clay Bar Kit | Use a two-bucket wash method to avoid scratching. |
| Masking | Automotive Masking Tape (3/4″ & 1.5″), Masking Paper/Plastic | 3M or a similar high-quality brand will prevent bleed-through. |
| Sanding | Wet/Dry Sandpaper (400, 800, 1500, 2000 grits), Sanding Block | A flexible or rubber block helps apply even pressure. |
| Application | 2K Aerosol Clear Coat, Tack Cloth | A tack cloth is crucial for removing dust right before spraying. |
| Polishing | Rubbing Compound, Polishing Compound, Foam Pads, Polisher | A dual-action (DA) polisher is much safer for beginners than a rotary. |
| Finishing Touches | Microfiber Towels, Isopropyl Alcohol (IPA) Solution, Wax or Sealant | Use a 50/50 mix of IPA and distilled water to clean polish residue. |
With these items laid out and ready, you’re truly prepared for a successful repair that blends seamlessly and protects your paint for years to come.
The Real Value of Doing It Right
Getting this repair right isn’t just about making your car look good again—it’s a smart financial move. The global car clear coat market was pegged at USD 28.16 billion in 2025 and is expected to climb to USD 51.51 billion by 2032. That massive number shows just how much is spent on vehicle finishes and, more importantly, on fixing them when they fail. A proper DIY job saves you from contributing to that repair statistic down the road. You can see a deeper dive into these market trends in this comprehensive market analysis.
Pro-Tip: Seriously, don’t cheap out on the clear coat. A quality 2K clear provides the robust UV and chemical protection needed to prevent a repeat failure. It cures much harder and will outlast its 1K counterparts by years, not months.
Your Guide to a Flawless Clear Coat Finish
Alright, you’ve got your gear lined up and your workspace is ready to go. Now for the fun part—actually bringing that damaged panel back to life. This isn’t a race. It’s about taking your time and doing it right, which is what separates a decent repair from one that looks like it came straight from a professional shop.
Think of yourself as a surgeon preparing for an operation. The first step is creating a perfectly sterile environment. Any spec of dirt, old wax, or grease is your enemy here; it will absolutely prevent the new clear coat from sticking. Give the entire panel a good wash with a quality automotive soap, then follow up with a dedicated wax and grease remover. A final wipe-down with an isopropyl alcohol (IPA) solution ensures the surface is squeaky clean.
With the panel prepped, it’s time to mask everything off meticulously. You don’t want overspray landing on your good paint. Use high-quality automotive masking tape to create a sharp border about an inch outside your repair area. Then, use masking paper to cover everything else nearby. Trust me, overspray gets everywhere.
The Art of Feathering the Edges
Now the real hands-on work begins. Our goal is to create a seamless, invisible transition between the damaged spot and the healthy, original clear coat. This technique is called feathering, and it’s the absolute key to making your repair disappear.
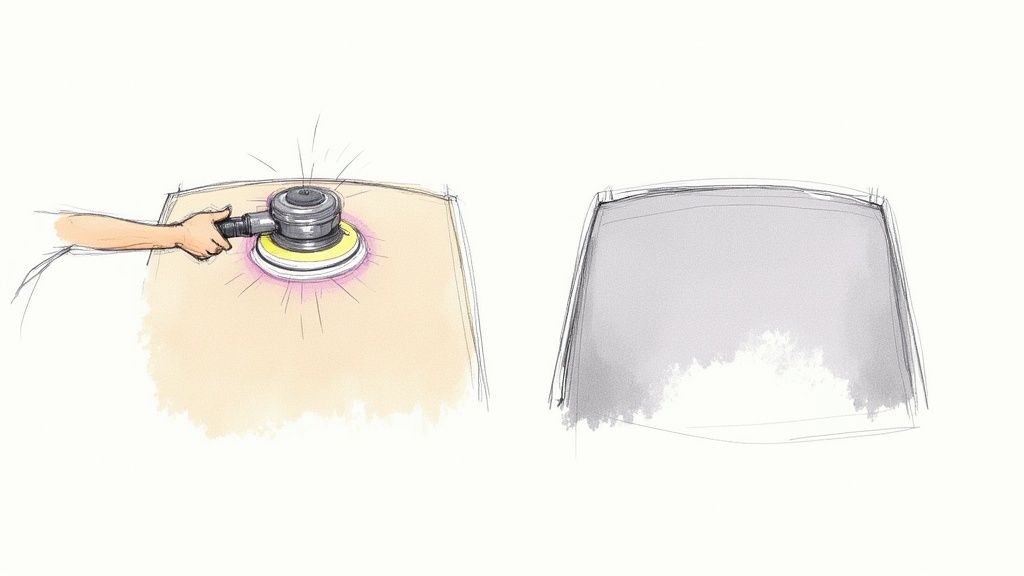
Grab your coarsest sandpaper to start, which will probably be a 400-grit. Gently sand down the peeling sections, removing all the loose, flaky clear coat until you reach a stable, solid layer. At this point, you’ll still have a noticeable, hard edge around the repair zone.
This is where the magic happens. Switch to a finer 800-grit sandpaper to soften those edges. You’ll want to sand a slightly wider area, blending the perimeter of the damaged clear coat into the surrounding paint. What you’re aiming for is a gradual, tapered edge that you can barely even feel with your fingertips. Be patient here. A good feathering job is the foundation of a great repair.
This quick flowchart breaks down the essential prep work that sets you up for success.
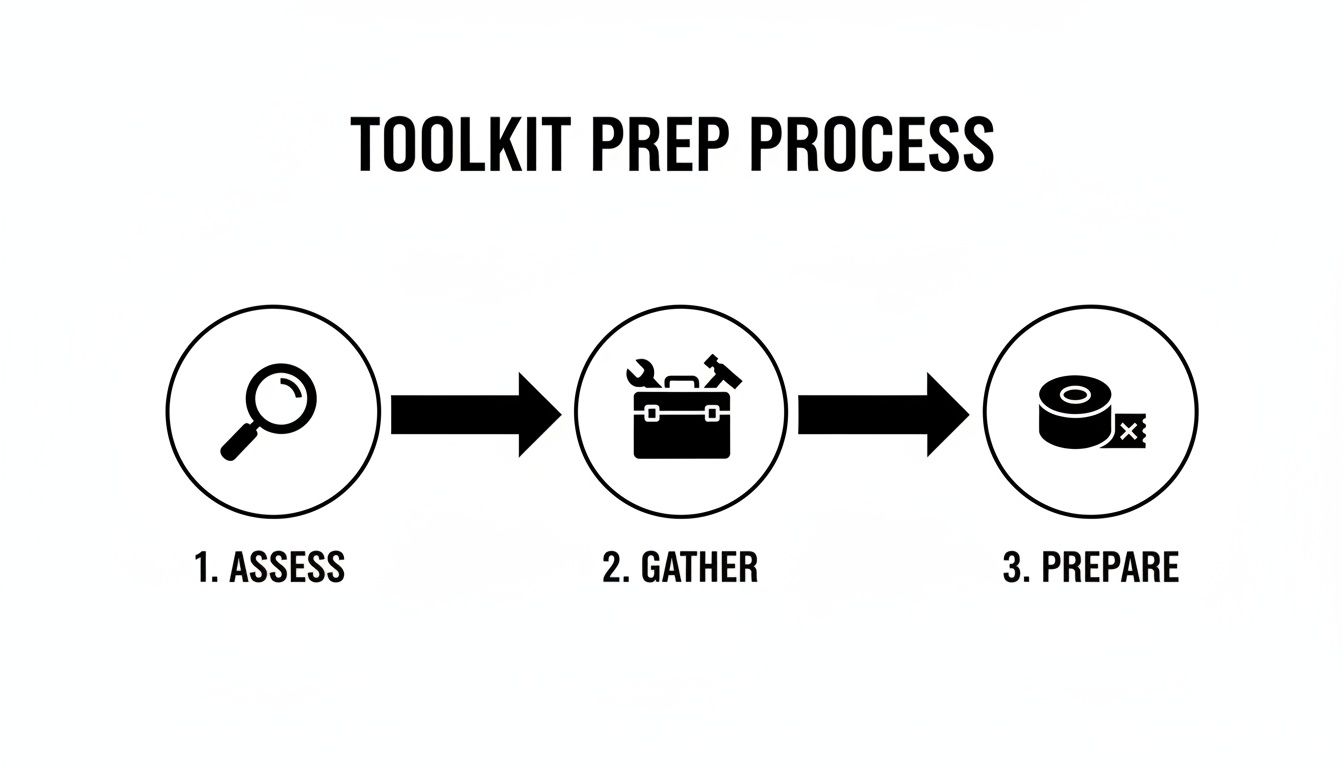
As you can see, the real work starts long before you ever touch a piece of sandpaper. A methodical approach from the very beginning is what makes all the difference.
Applying the New Clear Coat
This is the moment of truth. Just before you spray, give the entire repair area one last gentle wipe with a tack cloth. This little step picks up any final, microscopic dust particles that could otherwise ruin your finish. If you’re using a 2K aerosol can, pop the activator on the bottom, and shake it like you mean it for the recommended amount of time.
Your spraying technique is everything. Don’t make the rookie mistake of just pointing and shooting at the center of the repair.
- Start your spray just before the repair area.
- Move across the panel in a smooth, steady motion.
- Stop spraying only after you’ve passed the other side.
- Overlap each pass by about 50% to get even coverage and avoid ugly “tiger stripes.”
Apply two to three light-to-medium coats. Give it the recommended flash time between coats (usually 5-10 minutes) to let the solvents evaporate. Don’t try to lay it on thick on the first pass; building it up in thin layers is how you avoid drips and sags. After that final coat, the hardest part is walking away. Don’t touch it! Let it cure completely according to the product’s directions.
Expert Insight: The secret to getting a glass-like finish from a spray can is consistency. Keep the can the same distance from the panel (6-8 inches is typical) and maintain the same travel speed for every single pass. Any hesitation or change in speed will show up in the final texture.
Beyond the Repair: A Story of Prevention
Let me tell you about a client of mine, Mark. He spent a whole weekend fixing a peeling spot on his hood, and he did an incredible job. It looked perfect. Six months later, he’s on the highway, and a piece of gravel gets kicked up and puts a nasty chip right next to his beautiful repair. He was worried the whole peeling cycle was about to start over again.
This is where traditional clear coats just can’t keep up. They’re hard, sure, but they’re also brittle. Mark’s new clear coat was tough, but it had zero “give.” When that rock hit, the finish had no choice but to chip.
This is exactly the problem our Elastic coatings were engineered to solve. They aren’t just hard like glass; they are also incredibly flexible, thanks to our cutting-edge nano-tube and Dark Matter technology. This elasticity is a total game-changer. It lets the coating absorb and dissipate the energy from an impact, making chipping far less likely. Plus, this flexibility allows the coating to expand and contract with unbelievable temperature swings—from freezing winter nights to blazing summer days—without becoming brittle and cracking. It’s a complete shift from a simple protective layer to a tough, adaptable shield.
Once your new clear coat is fully cured and polished, the next logical step is protecting your hard work for the long haul. If you’re looking for that ultimate layer of defense, our guide on how to apply ceramic coating to your car breaks down the entire process for getting a pro-level finish right in your own garage.
Achieving a Mirror Shine with Final Polishing
Alright, you’ve laid down the new clear coat, and the peeling is finally gone. It’s easy to think the job is done, but this last part is what really separates a decent repair from a truly invisible one. Taking that fresh, slightly uneven surface and turning it into a glass-smooth, factory-perfect shine is all about the fine art of polishing.
This isn’t a single step; it’s a two-stage process. First, we’ll level the new clear coat, then we’ll bring out that deep, wet-looking gloss that makes the color underneath really sing. It takes a bit of patience, but trust me, the result is more than worth it.
Leveling the Surface with Wet Sanding
No matter how good your spray technique is, you’ll almost always have some minor imperfections. A tiny speck of dust, a little bit of that “orange peel” texture—it’s normal. Wet sanding with some ultra-fine grit paper is how we gently knock those high spots down and create a perfectly flat canvas for polishing.
I like to start with 1500-grit sandpaper. Get a bucket of water, add just a drop of car soap to act as a lubricant, and let your paper soak for a bit. Using a good sanding block to keep things even, lightly sand the entire repaired area. The key here is to keep the surface wet and rinse your paper often. You’re looking for a uniform, dull haze across the whole panel—that’s how you know it’s flat.
Once you’ve leveled it with 1500-grit, step it up to an even finer 2000 or 3000-grit paper and repeat the process. This extra step erases the finer sanding scratches from the first pass and makes the next compounding stage a whole lot easier.
Compounding Away the Haze
The surface is perfectly level now, but it’s hazy. Time to bring back the shine. This is where your cutting compound and polisher earn their keep. A compound is basically a liquid abrasive that’s engineered to chew through the fine sanding scratches you just created.
Put a few small drops of compound onto a cutting pad on your machine polisher. I always start by spreading the product on low speed over a small two-by-two-foot section, then bump it up to a medium speed. Use slow, overlapping passes with light, consistent pressure.
You’ll physically see the compound break down and the haze give way to a clear, reflective finish. Wipe the residue off with a clean microfiber towel and take a close look. The sanding marks should be completely gone, leaving nothing but a brilliant shine.
Pro Tip: Your lighting is your best friend here. Check your work under different light sources—roll the car into the sun, use your garage lights, grab a flashlight. You need to hunt down any remaining sanding marks or swirls. Nothing ruins a great repair faster than hidden swirls that only show up in direct sunlight.
Final Polishing for That Deep Gloss
The last push is with a finishing polish. The compound did the hard work of removing the sanding scratches, but a good polish refines the surface to a whole new level, maximizing that gloss and depth. This is what gives you that “dripping wet” look.
Swap over to a soft foam finishing pad on your polisher and grab a fine-finishing polish. The technique is the same: small sections, slow overlapping passes, and very light pressure. We’re not correcting anymore; we’re just refining.
After polishing the whole area, give it a final wipe-down with an IPA (isopropyl alcohol) solution to strip any polishing oils and reveal the true finish. You should be looking at a seamless, swirl-free surface that melts right into the original factory paint. If you’re still seeing some pesky fine scratches, our guide on how to remove swirl marks from your car has some next-level techniques that can help.
This careful, meticulous polishing is the final, non-negotiable step. It ensures your hard work pays off by restoring the panel to a finish that’s as good as—or even better than—when it left the showroom.
Future-Proofing Your Paint with Titan Coatings
You’ve just spent hours—or even days—sanding, spraying, and polishing that peeling clear coat back to a mirror finish. The last thing you want is to do it all over again in a couple of years. Fixing the peeling is treating the symptom; now it’s time to cure the disease for good.
The tragic backstory of most clear coat failure is simple: brittleness. Traditional clear coats, and even a lot of ceramic coatings, act like a thin, fragile sheet of glass over your paint. They’re hard, sure, but they’re also rigid. The moment a rock kicks up from the highway or the sun beats down relentlessly, that rigid layer has nowhere to go. It cracks and chips, creating the perfect entry point for moisture and the beginning of another peeling disaster.
Beyond Hardness: The Power of Flexibility
This is exactly the problem we tackled head-on at Titan Coatings. We threw out the old rulebook and pioneered Elastomeric coatings, a completely different approach driven by advanced nano-tube technology and our own Dark Matter tech. Forget the fragile glass shield; imagine one that’s not just hard but also incredibly flexible. That elasticity is the secret to real-world durability.
This built-in flex allows the coating to absorb and scatter the energy from an impact. A rock doesn’t chip it; the coating gives a little and bounces right back. This is huge for preventing the micro-fractures that grow into full-blown peeling. It also means the coating can handle unbelievable temperature swings, from a freezing winter night to a blistering summer afternoon, expanding and contracting right along with your car’s metal panels. A rigid coating would just crack under that stress.
A Smarter Investment: When clear coat peeling happens, the repair bill can be all over the map. A small DIY spot fix might be manageable, but a professional full-panel respray can easily run from USD 1,000 to USD 5,000. Experts in the field all agree: prevention is everything. If you don’t address the root cause, the failure will almost certainly come back.
Meet Your Car’s New Armor: Titan Vulcan TX155
Let’s get specific. Titan Vulcan TX155 is the ultimate upgrade for your newly repaired finish. Once you’ve laid down that fresh clear coat and let it fully cure, applying Vulcan TX155 is like giving it a suit of high-tech, flexible armor that old-school products just can’t replicate.
Think about it this way. A car enthusiast, David, spent a whole weekend restoring the peeling clear coat on his daily driver’s roof. He was thrilled with the result. But after a long road trip a few months later, he found his pristine work peppered with tiny rock chips. He was gutted—right back where he started. That’s the exact scenario Vulcan TX155 was engineered to stop. It isn’t just another layer of “shiny stuff”; it’s a fundamental change in how paint protection works. For a deeper look at the science, you can learn more about the benefits of Titan’s Elastomer technology here.
To really see the difference, our comparison page highlights some of the key advantages of our products.
Titan Elastomeric Coatings vs. Traditional Clear Coats
The table below breaks down the key advantages of an elastomeric coating like Vulcan TX155 compared to what’s likely on your car right now. It’s a shift from a passive, brittle layer to an active, resilient shield.
| Feature | Traditional Clear Coat/Ceramic | Titan Elastomeric Coating (e.g., Vulcan TX155) |
|---|---|---|
| Impact Resistance | Hard but brittle; prone to chipping and cracking upon impact. | Flexible and absorbent; dissipates impact energy to resist chipping. |
| Self-Healing | No self-healing properties. Scratches are permanent until polished. | Offers thermal self-healing for light swirls and scratches with heat. |
| Thermal Expansion | Rigid structure struggles with expansion/contraction, leading to stress cracks. | Expands and contracts with vehicle panels, preventing cracks from temperature swings. |
| Chemical Resistance | Good, but can be etched by harsh chemicals like bird droppings. | Superior resistance to chemicals, bird droppings, and environmental fallout. |
| Longevity | Degrades over time with UV exposure, leading to oxidation and failure. | Engineered with advanced UV inhibitors for extreme long-term durability. |
In the end, choosing a Titan coating is about future-proofing your repair. You’re not just covering up the paint; you’re applying a solution specifically designed to fight the forces that cause clear coats to fail. It’s a smarter way to protect your investment and your hard work. The core idea is to create an impenetrable, durable barrier—a principle that applies across many industries, which you can read more about by understanding different waterproofing materials and their protective qualities.
Answering Your Top Clear Coat Repair Questions
Alright, even with a step-by-step guide, you probably have a few last-minute questions running through your head before you grab the sandpaper. It’s totally normal. Let’s tackle some of the most common things people ask when they’re about to fix peeling clear coat.
Can I Get Away With Just a Spot Repair?
This is a big one. People always want to know if they can just fix the one bad spot. The answer is yes… but with a major catch. A spot repair works beautifully when the damage is small and contained—think a silver-dollar-sized patch on a fender.
But if you’re looking at peeling that’s crawling across half your hood or the entire roof, you have to refinish the whole panel. Trying to patch up widespread failure is a recipe for a splotchy, uneven mess that will stick out like a sore thumb. For a seamless look on larger areas, a full panel refinish is the only real solution.
How Can I Get a Pro Finish From a Spray Can?
There’s a lot of skepticism about getting a smooth, professional-looking finish from an aerosol can, and for good reason—most cheap cans are terrible. The secret isn’t just in your technique, but in the can itself.
You absolutely need to use a high-quality 2K clear coat that comes with a proper, adjustable fan-pattern nozzle. This isn’t your average hardware store spray paint. A good nozzle lets you lay down a wide, even coat that mimics a professional spray gun, which is key to avoiding those dreaded runs and “tiger stripes.”
My Two Cents: Patience is everything after that final coat. You’ll be tempted to poke it, I know. But you have to let it be. Most 2K clears are dust-free in about 24 hours, but they are nowhere near ready for the next step. They need a full 3 to 7 days to fully cure before you can even think about wet sanding or polishing. Rush this, and you’ll undo all your hard work in an instant.
What if the Peeling Just Comes Back?
This is the question that really gets to the core of the problem. You’re putting in the time and effort, so you want the fix to last. A proper repair is durable, but if you’re just putting the same old brittle clear coat back on, you’re leaving it vulnerable to the exact same sun and environmental abuse that caused it to fail in the first place.
This is where you need to think beyond a simple fix and start thinking about a real upgrade. Protecting your new finish is just as important as the repair itself.
That’s precisely why we developed our line of Elastic coatings. They are built with advanced nano-tube technology that makes them incredibly hard and remarkably flexible. That elasticity is the game-changer—it allows the coating to flex with temperature changes and absorb small impacts without cracking or delaminating. It stops the peeling cycle before it can even begin.
At Titan Coatings, we don’t believe in temporary fixes. You’ve done the hard work, now give your car a defense system designed for the long haul. Upgrade your vehicle’s protection with a coating built for real-world resilience.
Check out our full range of advanced Elastomeric coatings and find the perfect shield for your car in the Titan Coatings shop.
0 Comments