The first time wheel clear coat failure is noticed, it's just a small milky edge near a spoke or around the lip. A week later, that tiny blemish starts flaking, the wheel looks older than the car, and every wash makes the damage more obvious.
The End of Peeling Rims Starts with a Story
A customer once rolled in with a car that still looked sharp from ten feet away. Fresh paint, clean glass, tidy interior. Then you got close to the wheels and saw the problem immediately. The clear coat had started lifting in thin white lines, then curling at the edges like dry skin.

That's how this usually starts. Not with dramatic damage. With a small failure that tells you the bond between the clear and the wheel has already broken. Once that happens, washing, quick polish, or spray shine won't put it back together.
What frustrates owners is that they often didn't do anything obviously wrong. Clear coat failure on aluminum wheels is common enough that approximately 90% of wheels with clear coats will begin to peel if left untreated for more than 36 months in high UV environments, according to the verified data provided with this topic and its listed clear coat failure rate reference. That tracks with what detailers see in real life. Sun, brake dust, road film, harsh cleaners, and trapped moisture all work on the edges until the coating lets go.
Peeling clear on rims is rarely just a cosmetic annoyance. It's usually the first visible sign that the protective layer has stopped protecting.
Bare or partially exposed aluminum doesn't stay clean and stable for long. Oxidation starts changing the surface. The wheel gets harder to maintain. Spot corrosion begins in the weak areas. Then owners try the usual shortcuts: scuff the spot, fog on fresh clear, hope it blends. It almost never holds if the old coating around it is already unstable.
That's why the better mindset is not “How do I hide this?” but how to fix clear coat peeling on rims in a way that upgrades the wheel instead of repeating the same failure.
Modern coating systems changed that conversation. Instead of treating the wheel like it needs another brittle skin, you can rebuild the surface properly and protect it with a more advanced top layer. Titan talks about this same durability mindset in its corrosion-resistant coating solutions. The important idea is simple. A wheel finish lasts longer when it can resist contamination and tolerate stress, not just look glossy on day one.
Assess the Damage and Choose Your Path
Before you buy stripper, paper, or coating, inspect the wheel like a technician, not like an owner who's annoyed by the flakes. The repair path depends on how much of the original finish is still trustworthy.
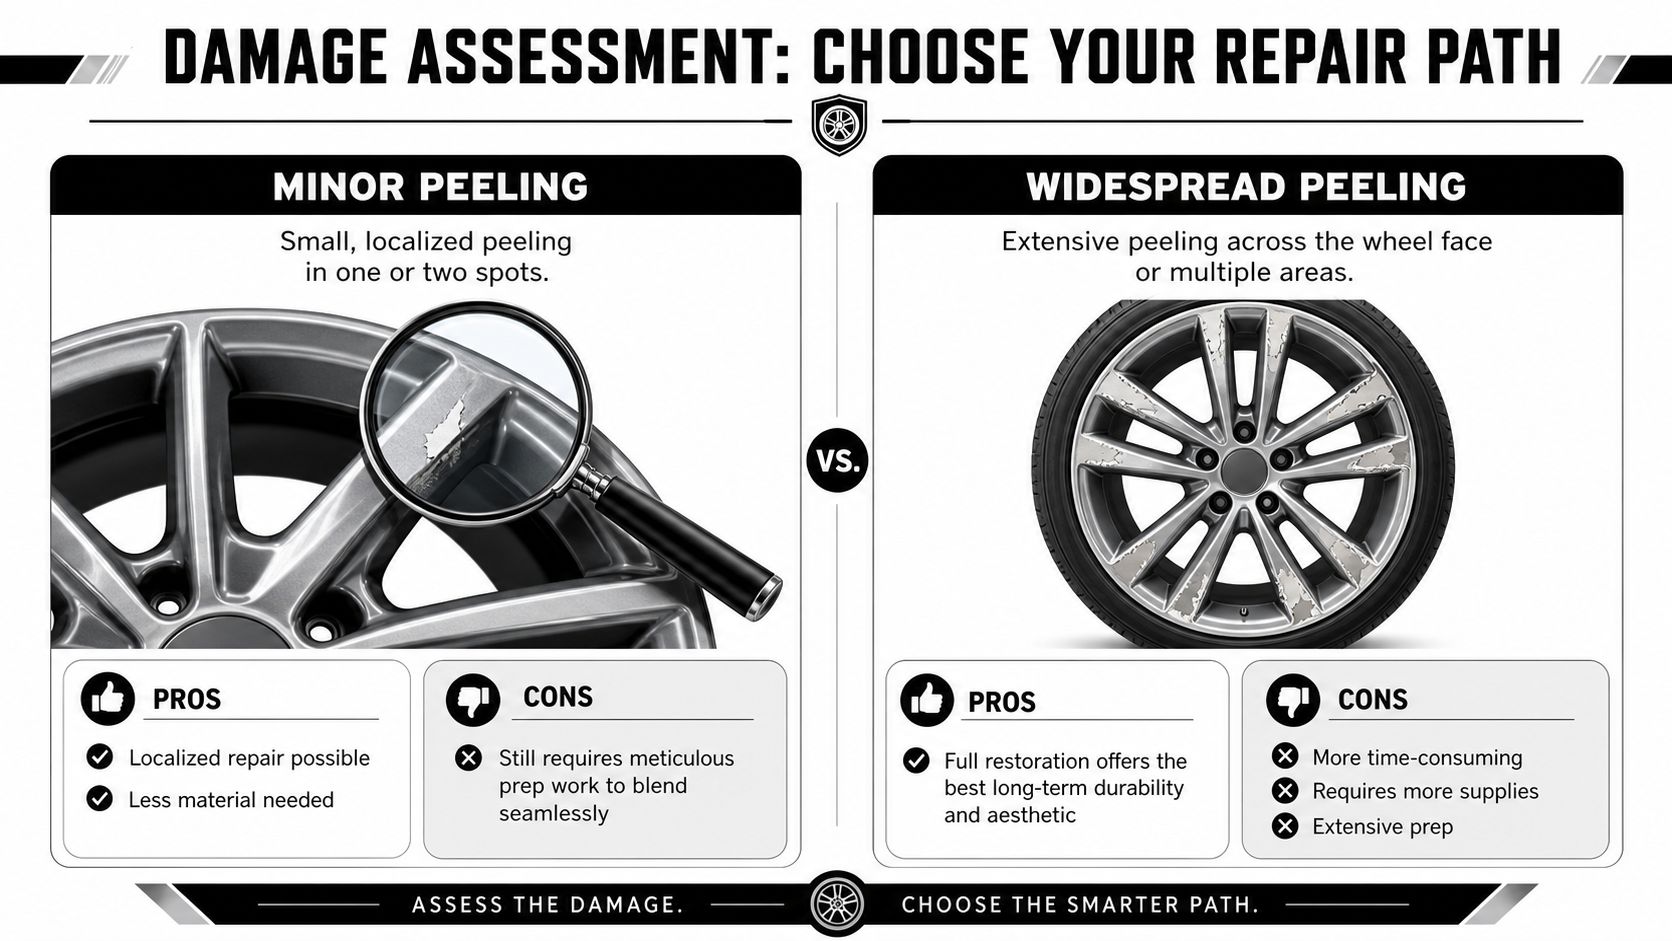
What minor peeling looks like
Minor peeling is localized. One or two small areas are lifting, often near a chip, curb contact point, or outer edge. The rest of the wheel still feels solid, and the surrounding clear doesn't show cloudiness, bubbling, or widespread edge lift.
In that situation, a partial repair may be worth considering. It uses less material and less time, but it still demands careful prep and blending. If you rush it, the repaired spot will look patched even if it stays bonded.
What widespread peeling looks like
Widespread failure has a different look. Multiple spokes show lifting edges. The face has chalky borders around damaged areas. You may see bubbling under the remaining clear, or sections that look intact until you press on them and feel the edge move.
One of the more useful decision rules from the verified material is this: if damage covers most of the wheel face, you are better off starting fresh; if only a few areas are affected, a partial approach may be considered, as noted in the linked wheel repair discussion. That rule saves people from wasting a weekend on a repair that fails because the untouched finish was already compromised.
Practical rule: If you can find multiple lifting edges without searching for them, stop thinking “spot repair” and commit to a full strip and refinish.
A clean wheel helps you judge correctly. Brake dust and old dressing can hide the true perimeter of the failure. Wash the wheel thoroughly, dry the crevices, and inspect it in good light before deciding. If needed, use dedicated car wheel cleaning brushes to reach spoke pockets and lug recesses where residue often masks damage.
A simple decision guide
| Condition | Smarter path |
|---|---|
| One or two isolated peeling spots | Partial repair can work |
| Peeling across most of face or multiple spokes | Full strip and refinish |
| Bubbling under remaining clear | Full strip and refinish |
| Repaired once before and failed again | Full strip and refinish |
There's also a durability question. Wheels live in a harsh zone. Heat cycles, wash chemicals, salt, and brake dust attack the weakest edge first. If your remaining factory clear has already started to let go in one area, the rest often isn't far behind.
That's why the best looking short repair is not always the best repair. Time spent reading the wheel correctly is what keeps you from doing the same job twice.
Gather Your Gear for a Professional Job
Bad wheel refinishing usually starts with missing supplies, not bad intentions. Someone strips part of the wheel, realizes they don't have the right abrasives, substitutes the wrong cleaner, then sprays over contamination. The result looks decent for a few days and then falls apart.
What to have on the bench
You need tools for removal, cleaning, leveling, recoating, and safety.
- For stripping: A chemical stripper or sanding setup. Either can work. The choice depends on wheel design, how much coating has failed, and how comfortable you are working with chemicals.
- For sanding: Start with 320 grit for failed clear removal, then move through 1000, 1500, and 2000 grit in the finish-prep stages, based on the verified repair guidance cited later in this article.
- For cleaning: Use soap first for heavy grime, then a proper wax-and-grease remover before any coating step. General-purpose cleaner isn't the same thing.
- For coating application: Primer if your system requires it, wheel paint if color needs restoration, and a clear or coating system compatible with wheels.
- For safety: Gloves, eye protection, and a respirator suited to the products you're using. This is not optional when chemical stripper or aerosol coatings are involved.
Why each item matters
The abrasive sequence isn't about obsessing over sandpaper. It's about controlling the scratch pattern so the next layer can bond and still finish smooth. The cleaner isn't just for appearance either. Silicone, tire dressing residue, polishing oils, and trapped dust are common reasons clear fails after application.
If you plan to machine polish bare or refinished metal before protection, a compact car buffer polisher can make the finish more uniform on open wheel faces. Tight spoke designs still require hand work.
Here's a practical planning view:
| Metric | Estimate |
|---|---|
| Time | Half day to full weekend depending on wheel condition and design complexity |
| Cost | Varies by supplies, wheel condition, and whether you already own tools |
| Difficulty | Moderate for simple faces, higher for intricate spoke patterns |
| Mess level | High during stripping and sanding |
| Skill demand | Prep-heavy, patience matters more than speed |
Buy every consumable before you start. Mid-project substitutions are where durable repairs go wrong.
One more point matters. If the wheel is bent, heavily corroded, or structurally damaged, cosmetic refinishing isn't the first conversation. Fix the wheel itself first. Coating never solves mechanical wheel problems.
Strip and Sand for a Flawless Foundation
This stage determines the job's success or failure. If the old clear stays in weak pockets, the new finish is sitting on failure. If you leave contamination in corners, the coating won't bond evenly. Prep is the whole job.
Use the full strip-clean-sand-recoat sequence
A practical wheel refinish follows a strip-clean-sand-recoat order, and one restoration walkthrough in the verified data recommends roughly 15 to 20 minutes of stripper dwell time before scraping off softened coating and polishing the bare metal, as shown in this wheel restoration walkthrough.
That sequence matters because each step sets up the next one. Stripping removes failed material. Cleaning removes residue. Sanding levels the surface and creates a consistent profile. Recoating only works when those earlier steps are done thoroughly.
Chemical stripping method
Chemical stripper is useful when the wheel has multiple curves, spoke pockets, and recessed details that would take forever to sand clean by hand.
Basic workflow:
- Apply the stripper evenly to the affected clear.
- Let it dwell according to product direction. The verified example references roughly 15 to 20 minutes before removal.
- Scrape or lift softened coating carefully.
- Rinse or clean off residue thoroughly.
- Dry the wheel completely, especially around lug bores, spoke joints, and valve stem area.
Don't force dry with guesswork. Water hides in wheel shapes. If moisture stays in creases and comes out later, it contaminates your next layer.
Mechanical sanding method
Some wheels respond better to sanding from the start, especially if the failure is isolated or if you want maximum control over edges and transitions.
The verified prep guidance recommends moving through progressively finer abrasives. One repair guide uses 320 grit to remove failing clear, followed by wet sanding around 1000, 1500, and 2000 grit, according to this clear coat repair guide.
That progression works because each grit removes the scratches from the previous stage instead of trying to jump straight to a polished surface.
A sanding progression that works
- 320 grit: Remove loose, lifting, or stubborn failed clear. Don't stop while glossy islands of old clear remain.
- 1000 grit wet: Refine the surface after major removal. This starts evening out the scratch pattern.
- 1500 grit wet: Smooths the finish further and reveals low spots or leftover edges.
- 2000 grit wet: Final refinement before polishing or coating prep.
If the wheel has polished aluminum sections, you may choose to polish after 2000 grit. If you're priming and repainting, stop at the surface profile your coating system prefers.
If you can still see a hard edge between old failure and repaired area after sanding, the coating will usually show it too.
Where DIY repairs often fail
Most failures come from one of four mistakes:
- Incomplete removal: Old weak clear remains in corners and around spoke bases.
- Poor cleaning: Wax, grease, or stripper residue stays on the wheel.
- Hidden moisture: Water sits in seams, then bleeds out during recoating.
- Rushing grit steps: Deep sanding marks telegraph through the final finish.
For spoke-heavy wheels, fold sandpaper into narrow strips and work each channel deliberately. For broad faces, keep your pressure even so you don't create waves. For tight corners, slow down. Those little pockets are exactly where peeling usually starts again.
After sanding, wash off slurry, dry the wheel, inspect under bright light, then wipe with wax-and-grease remover. If you want to bring bare alloy to a cleaner visual finish before protection, alloy wheel polishing helps explain the polishing stage after surface correction.
A wheel is ready for coating when the surface looks uniform, feels consistent by hand, and shows no unstable edges. That's the standard. Not “good enough from three feet away.”
Apply the Ultimate Protection with Titan Coatings
Once the wheel is stripped, cleaned, and leveled, the final protection step determines whether the job lasts or becomes another short-term cosmetic repair. For lasting results, old habits must change. Repeating a brittle finish after all that prep doesn't make much sense.
Final prep before any coating touches the wheel
The wheel should now be fully dry, dust-free, and free of polishing oils. Crevices matter. Lug recesses matter. The inner barrel edge matters. Any hidden residue can move to the face while you work.
Before recoating, do this short check:
- Touch test: The wheel should feel uniformly smooth, not slick with residue.
- Light test: Look across the face from an angle. Leftover edges and sanding misses show up faster in raking light.
- Crevice check: Use compressed air or careful towel work around seams and spoke joints.
- Wipe discipline: Use a proper surface prep wipe and fresh towels. Don't recycle a loaded towel across the whole wheel.
One finish-repair tutorial in the verified material describes applying clear in a light first coat followed by a heavier second coat after about 5 minutes. Even if you use a different wheel-safe protection system, that basic idea still holds. Build coverage with control. Don't flood the first pass.
Why a flexible top layer changes the outcome
Traditional wheel clear fails because adhesion degrades, then the coating turns into a weak shell. Once chips and edge lift start, water and contaminants get underneath. That's why a modern elastomer-style coating is appealing for wheels. The wheel isn't a static panel. It sees impact, heat, cold, brake dust, wash cycles, and regular flex in real-world use.
Titan positions Alpha Quartz as an elastomer coating built around nano-tube and Dark Matter technology, and that matters here because the claimed advantage is not just hardness. It's a finish that is described as hard like glass and flexible, which is the exact combination wheel protection needs when temperatures swing and road debris hits.
Used as one option in a wheel protection workflow, Titan's ceramic coating for rims fits the DIYer who wants more than a cosmetic reset. The practical appeal is straightforward. You've already done the difficult part by removing the failed finish properly. A more advanced protective layer gives that prep work a better chance of lasting.
What works better than the usual shortcut
The common temptation after wheel prep is to spray a quick clear and call it done. That can look fine at first. It often disappoints later because the wheel's environment is unforgiving.
A better approach looks like this:
- Rebuild the wheel surface correctly.
- Keep contamination out of the coating stage.
- Apply thin, controlled coverage instead of heavy wet guessing.
- Protect the finished wheel with a coating system designed for hard exterior surfaces.
The real upgrade isn't the shine. It's replacing a failure-prone finish with one that can handle temperature changes and everyday abuse more gracefully.
For DIYers and mobile detailers, ease of use matters too. A product that applies cleanly, flashes predictably, and doesn't punish careful work makes wheel restoration more achievable. The wheel won't forgive lazy prep, but it will reward a measured hand and a modern protection layer.
If you came here asking how to fix clear coat peeling on rims, this is the point where the job stops being a repair and starts becoming an upgrade.
Finish Curing and Future-Proof Your Wheels
Freshly coated wheels can look done long before they're ready for abuse. Let them cure undisturbed, keep them away from harsh cleaners, and inspect them in natural light before reinstalling if possible. A final soft wipe is fine if your coating system allows it. Aggressive touching is not.
The first weeks matter
Treat the finish like it's settling into place. Use gentle wheel cleaning only. Avoid acidic products unless the coating manufacturer specifically allows them. Brake dust should come off more easily now, which means you don't need aggressive agitation every wash.
For ongoing maintenance, Titan's Ultra Ceramic Spray makes sense as a simple topper for wheels and other hard exterior surfaces. It's the sort of product that helps maintain slickness and makes routine cleaning easier without turning maintenance into another full correction job.
Think beyond the wheel face
Good wheel protection usually changes how owners think about the rest of the car. Once you've seen how much easier a protected surface is to clean, it's natural to want the same benefit elsewhere.
Two practical extensions:
- Glass care: Titan's Apex Glass & Windshield Coating is an easy-use option for improving visibility in wet weather and making the windshield easier to maintain.
- Regular wash habits: Softer tools, cleaner wash media, and less aggressive chemistry all help preserve the wheel finish you just rebuilt.
There's also a financial perspective. Historically, professional powder coating has been the most reliable solution for severe peeling clear coat on rims, with costs ranging from $250 to $400 per wheel in major markets, according to the verified data and its listed powder coating cost reference. That's why many owners try to save a failing wheel with a quick cosmetic fix. The problem is that shortcuts often lead right back to peeling.
A careful DIY refinish with modern wheel protection doesn't replace every professional service. It does give skilled DIYers and working detailers a serious alternative when the wheel is still worth saving and the goal is durability, not camouflage.
If you do the prep thoroughly, respect curing time, and maintain the finish with sane wash habits, the wheel won't just look repaired. It will look properly restored.
If you want coatings built around advanced surface protection for wheels, paint, and glass, take a look at APEX NANO – Titan Coatings. Their product range covers wheel protection, maintenance sprays, and glass coatings, which makes it easier to build a complete exterior protection routine instead of treating each surface as a separate problem.
0 Comments