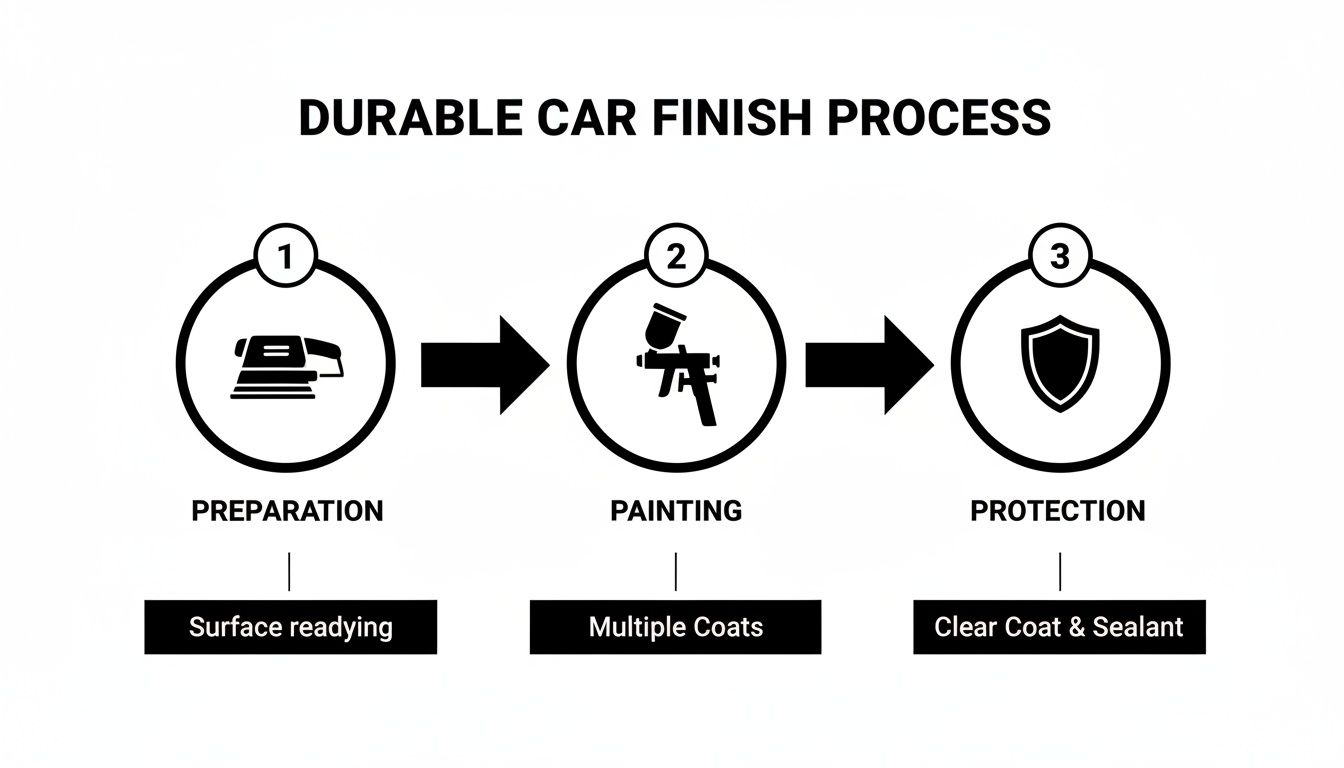
Learning how to paint correct a car is more than just a deep clean; it’s the art of permanently erasing surface flaws like scratches and swirl marks to bring back that original, jaw-dropping shine. It's a meticulous process, moving from deep cleaning and decontamination to machine polishing with specialized compounds. The goal is to level the clear coat until it’s as smooth as glass, creating the true foundation for a flawless, mirror-like finish that lasts.
The Secret to a Lasting Showroom Finish
Picture this: you've poured weeks, maybe even months, into a paint job. Every step was perfect—the sanding, the priming, the careful layering of color. The result is a gloss so deep you could swim in it. But fast-forward six months, and your heart sinks. The front bumper is peppered with new rock chips, and tiny, spider-web cracks are creeping in around the panel edges.
This all-too-common frustration isn’t a sign of bad painting skills. It’s a failure of the final, crucial layer of protection.
Beyond Traditional Protection
For a long time, the detailing world had one simple goal: make it shiny. Waxes and basic sealants gave us that temporary pop, but they offered next to no real defense against the realities of the road. The core issue is that traditional clear coats and top layers are fundamentally rigid. They look incredible at first, but they're brittle.
When a piece of road debris smacks the surface, that hardness becomes a weakness, causing a chip. When the metal body of the car expands in the summer heat and contracts in the winter cold, a rigid coating just can't flex with it. This leads to microscopic stress cracks and, eventually, total failure.
This is where the entire philosophy of paint protection has been turned on its head. It’s no longer about slapping on a hard shell; it's about engineering a resilient, intelligent shield.
The Power of Flexibility
I'll never forget working on a classic muscle car—a real passion project. After the final polish, the owner was over the moon. A year later, he brought it back, completely dejected. A single road trip had littered the pristine front end with dozens of tiny chips. It was a perfect paint job completely undone by imperfect protection. That’s what sent me down the rabbit hole of advanced coatings.
The real breakthrough in paint longevity isn't just hardness. It's the fusion of hardness with flexibility. A coating has to be tough enough to resist scratches yet elastic enough to absorb impacts and adapt to temperature swings.
This is the exact principle behind the technology that Titan Coatings has pioneered. They were the first to bring Elastomer coatings to the market, leveraging nanotube technology and their proprietary Dark Matter tech. Think of it like this: a pane of glass is incredibly hard, but it shatters on impact. A piece of reinforced rubber is flexible, but it scratches easily. Titan’s coatings manage to merge the best of both worlds.
Their Alpha Quartz is an Elastomer coating that cures hard like glass but maintains incredible flexibility. This elasticity changes everything:
- Impacts get absorbed. When a bug or small rock hits the car, the coating flexes and disperses the energy, dramatically reducing the chance of a chip.
- Temperature changes are no longer a threat. The coating expands and contracts right along with the vehicle's body, from freezing cold to blistering heat, without cracking under the pressure.
This approach fundamentally changes the game. You’re not just restoring a look anymore; you're engineering a durable finish that ensures all your hard work stands the test of time for years, not just a few seasons.
Mastering Surface Preparation And Repair
This is where the real artistry of a perfect paint job happens. It’s not under the bright lights of the spray booth, but in the slow, meticulous, and often overlooked stages of preparation. I can't stress this enough: a flawless finish is built on a flawlessly prepared surface. Trying to cut corners here is the fastest way to guarantee paint failure, turning all your hard work into a peeling, bubbling mess down the road.
The journey to a perfect canvas starts with a deep, chemical clean. A simple car wash just won't cut it. Your vehicle's paint is a magnet for stubborn, embedded contaminants that soap and water can’t touch—things like microscopic iron particles from brake dust, road tar, and all sorts of environmental fallout that have literally bonded to your clear coat.
The Foundation Of A Flawless Finish
To really understand how to paint a car correctly, you have to master decontamination. This chemical process is non-negotiable. Using specific iron removers and tar solvents, you can chemically dissolve and lift these bonded particles, leaving behind a truly clean slate. To see exactly how this is done, check out our in-depth guide on how to decontaminate car paint.
After the chemical wash, a clay bar treatment is the next essential step. This physically pulls out any remaining embedded grit, leaving the surface feeling as smooth as glass. Skipping this is a costly mistake.
The paints and coatings market is booming, projected to surge from USD 20.24 billion in 2024 to an incredible USD 43.86 billion by 2034. This growth highlights just how much precision goes into modern finishes. Yet, a shocking 60% of automotive damage claims are tied to paint failures caused by improper preparation. Often, the root cause is something as simple as skipping the clay bar, which can remove up to 80% of contaminants a regular wash leaves behind.
This process isn't just about slapping on new paint; it's a systematic approach where preparation, application, and final protection are all equally critical for a long-lasting, professional result.
Before you can even think about grabbing a sander, you need a clear plan. The table below breaks down the essential prep work into a simple checklist. Follow it, and you'll be starting on the right foot.
Essential Surface Preparation Checklist
| Stage | Tool/Product | Objective | Pro Tip |
|---|---|---|---|
| Damage Assessment | Your eyes, a fingernail | Identify the type and depth of all imperfections (scratches, chips, fading). | Do this after a full decontamination so you're not mistaking dirt for a deep scratch. |
| Deep Cleaning | Degreaser, quality car wash soap | Remove all surface-level dirt, grease, and grime. | Use the two-bucket wash method to avoid reintroducing grit onto the panel. |
| Chemical Decontamination | Iron remover, tar solvent | Dissolve and lift bonded contaminants that washing can't touch. | Spray on, let it dwell (you'll see it "bleed" purple), then rinse thoroughly. Never let it dry. |
| Mechanical Decontamination | Clay bar or mitt, clay lubricant | Physically pull out any remaining embedded particles from the clear coat. | The surface should feel perfectly smooth, like glass, when you're done. If it feels gritty, keep going. |
This checklist isn't just a suggestion—it's the bedrock of a professional paint job. Each step builds on the last, ensuring the surface is ready for the next phase.
From Damage Assessment To Sanding Strategy
With a truly clean surface, you can finally assess the real damage. Not all imperfections are created equal, and your strategy needs to match the problem.
- Deep Scratches: If a scratch is deep enough to catch your fingernail, it's punched through the clear coat and maybe even the base color. These will need body filler to level out the surface before you can even think about priming.
- Minor Defects: Swirl marks, light scratches, and clear coat oxidation are usually just surface-level issues. You can often remove these through careful, methodical sanding.
- Clear Coat Fading: Common on hoods and roofs baked by the sun, any faded or peeling clear coat has to be completely sanded away. You need a stable foundation for the new paint to bite into.
Let's walk through a common scenario: a hood with a hazy, failing clear coat. After a thorough decontamination, you'd start sanding with a medium grit paper, maybe a 400-grit, to strip away all that failed clear coat. The goal is to create a uniform, dull surface across the entire panel.
Pro Tip: Always, always use a sanding block. Sanding by hand is a recipe for disaster. Your fingers apply uneven pressure, which will create subtle waves in the panel that will scream at you once the glossy new paint is on. A block keeps everything perfectly flat.
Once the damaged layer is gone, it's all about the grit progression. You'll move to finer and finer grits of sandpaper—stepping up from 400-grit to 600-grit, and finally to 800-grit. Each step patiently removes the sanding marks from the previous one, creating a progressively smoother surface for the primer.
This patient, methodical approach is what separates a professional-grade finish from an amateur one. It ensures that your primer, color, and clear coats have a perfectly stable base to adhere to—the real secret to a durable, head-turning result that will last for years.
Priming and Masking for Razor-Sharp Lines
Now that the surface is clean and smooth, we get to the part that really sets the stage for a pro-level finish: priming and masking. Don't rush this. This is where your patience and precision directly translate into the final quality of your work. Think of it less as prep and more as drawing the blueprint for the paint job itself.
Primer is the handshake between the car's body and the new color. Its job is critical—it needs to bite into the substrate below while giving the basecoat a perfect, uniform surface to grab onto. Skipping this or using the wrong product is like building a house on sand. It’s just not going to last.

Choosing The Right Primer For The Job
I can't stress this enough: not all primers are the same. Picking the right one for your specific scenario is non-negotiable, and each type is designed to solve a different problem.
- Epoxy Primer: This is your absolute go-to for sealing up bare metal. If you've sanded down to steel or aluminum, a couple of coats of epoxy primer create a bulletproof, non-porous shield against corrosion. It's the best defense you have against future rust.
- High-Build (Urethane) Surfacer: After you've laid down body filler or done some heavy sanding, you’re left with minor scratches and imperfections. High-build primer is exactly what it sounds like—a thick primer that fills in those little flaws. You can then sand it perfectly flat, creating a glass-smooth foundation.
- Etch Primer: Got bare aluminum or galvanized steel? Paint hates sticking to these surfaces. Etch primer has a bit of acid in it that microscopically etches the metal, giving the next layers of paint something to really grip.
So, let's say you just fixed a dent. You’d smooth on your filler, sand it, and then spray a high-build surfacer over the repair and the surrounding area. If you hit bare metal anywhere during that process, you’d want to lay down a coat of epoxy primer first to seal it from moisture before the high-build goes on.
The Art of Precision Masking
Once your primer is cured and block-sanded smooth, it’s time to mask. This is what makes the difference between a crisp, factory edge and a sloppy, amateur mess. It’s a tedious process, but the payoff is huge.
Precision masking is a game of millimeters. A tiny gap in your tape or paper can lead to overspray that takes hours to correct. Take your time here to save yourself a massive headache later.
First things first, get yourself some quality automotive masking tape. That blue stuff from the hardware store won't cut it; automotive solvents will eat right through it, leaving you with bleeding edges and a sticky mess. For tight curves and body lines, fine-line tape is a must-have. It’s flexible and creates an unbelievably sharp edge.
Here’s a little trick we use in the shop called back-masking. Instead of laying the tape down for a hard line, you fold it back on itself. This creates a soft, diffused edge that’s perfect for blending new paint into an existing panel, making the transition practically invisible.
Of course, no matter how carefully you mask, overspray can happen. A little bit of paint mist can find its way onto the weirdest places. Don't panic. Knowing https://titancoatings.us/how-to-remove-paint-overspray/ is a skill that will save you from a lot of frustration. A small mistake shouldn’t derail the whole project.
Applying Color and Clear Coat Like a Pro
This is it—the moment of truth. All that meticulous prep work, the hours of sanding, cleaning, and priming, have all led to this. This is where your vision becomes a vibrant, glossy reality. Applying the color and clear coat is equal parts art and science; it’s a delicate dance of technique and timing that truly separates a good paint job from a great one.
Honestly, this is also the stage where any mistake becomes painfully obvious. Issues like "orange peel"—that bumpy texture that looks just like it sounds—or nasty runs and sags are common pitfalls for newcomers. But don't worry, with the right approach, they are completely avoidable.
Dialing in Your Spray Gun for Success
Your High-Volume, Low-Pressure (HVLP) spray gun is your most important tool right now, and setting it up correctly is non-negotiable. Think of it like tuning a guitar; every string has to be just right to get the perfect sound.
- Air Pressure (PSI): This is all about how finely the paint atomizes. Too low, and you'll get a splotchy, uneven coat. Too high, and you're just making a cloud of wasted paint. Stick to the manufacturer's recommendation, which is usually around 25-30 PSI at the gun for basecoats.
- Fan Pattern: This dial shapes your spray from a tight circle to a wide oval. For big, flat areas like a hood or door, you want a wide, cigar-shaped fan to cover the surface efficiently and evenly.
- Fluid Control: This knob determines how much paint comes out when you pull the trigger. A good starting point is to close it completely, then open it two or three full turns. Always test on a scrap piece of cardboard until you get a nice, wet coat that doesn't immediately run.
A proper setup is critical for getting the paint to lay down smoothly. The global automotive paints market is on track to blow past USD 25 billion by 2025, largely because of better application tech. Getting this wrong can lead to 30-50% more rework—a mistake that costs serious time and money. You can learn more about these trends in this industry report.
Laying Down a Flawless Basecoat
With your gun dialed in, it's go-time. Let's use a door panel as an example. Your technique needs to be consistent and methodical.
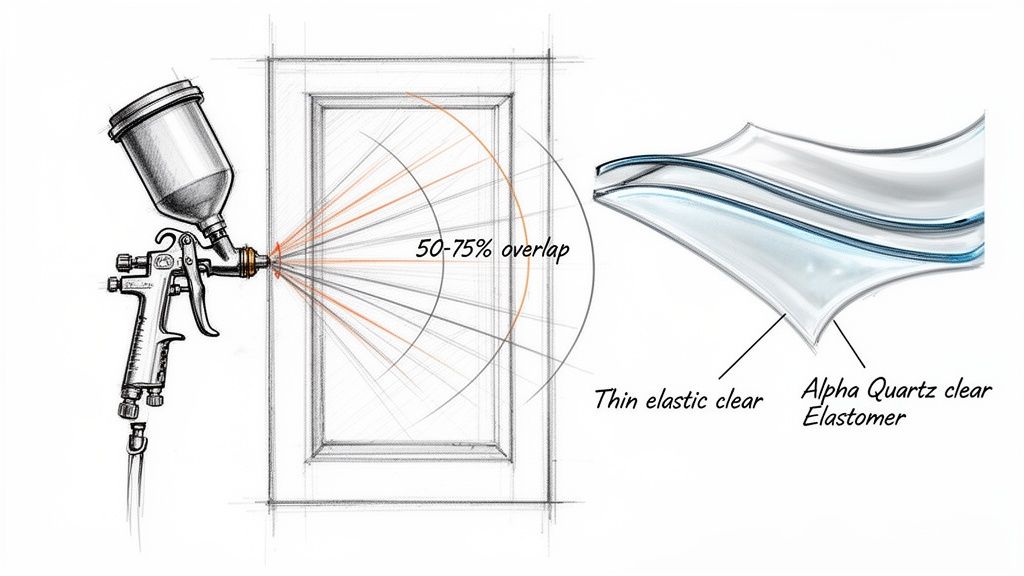
Hold the gun about 6-8 inches from the surface and keep it perfectly perpendicular to the panel. A really common mistake is arching your wrist as you move, which creates uneven coverage. Start each pass just off the edge of the panel, pull the trigger, and move across in one smooth, steady motion. Don't let go of the trigger until you're past the other edge.
The secret to a perfectly even, stripe-free finish is your overlap. Each new pass should cover the previous one by about 50-75%. This ensures the color builds up uniformly without creating light and dark spots. Most basecoats will need two to four coats to get full coverage, and you absolutely must wait for the recommended "flash time" between coats for the solvents to evaporate.
A great paint job is built in thin, even layers. Never try to get full coverage in one thick, heavy coat. That's a guaranteed recipe for runs, sags, and a finish that will never cure properly.
The Clear Coat: A Story of Strength and Flexibility
Once your final basecoat has flashed off, it’s time for the clear coat. This is what gives the paint its depth, gloss, and vital UV protection. The problem is, traditional clear coats have a hidden weakness: they're brittle. They chip easily from impacts and can crack under the stress of hot and cold cycles, which is a big reason people end up searching for how to fix clear coat peeling.
I learned this the hard way early in my career. I'd just finished a beautiful black sports car with a standard high-solids clear. It looked like a pool of ink—absolutely perfect. A month later, the owner came back, and he was heartbroken. A single long highway drive had peppered the front bumper and hood with dozens of tiny white rock chips, completely ruining that flawless finish.
It was a frustrating lesson that made me question the materials we were all using. We needed something tougher, something that could stand up to the real world. That search led me to a completely different kind of protection.
Instead of a standard clear, imagine laying down a final layer engineered with Dark Matter Tech and nanotechnology. This is the difference with Titan's Alpha Quartz, a true Elastomer coating. It was the first of its kind, and it fundamentally changes how durable a paint job can be.
While it cures to be hard like glass, its molecular structure is incredibly flexible. This elasticity means that when a small rock hits the surface, the coating absorbs and disperses the impact instead of shattering. When the car's metal panels expand in the summer heat and contract in the winter cold, Alpha Quartz flexes right along with them. This prevents the micro-cracks that eventually lead to peeling and failure. This is how you build a finish that doesn’t just look amazing—it’s built to last.
Locking in a Mirror Finish for the Long Haul
You’ve laid down the last coat, the spray gun is cleaned and put away, but you’re not done yet. Far from it. This final stretch is where a good paint job becomes a show-stopper. It’s all about patience, precision, and picking the right shield to protect all your hard work.
So many people, especially on their first few projects, get excited and jump the gun here. They rush to polish, and it’s a disastrous mistake. Fresh paint is still “gassing out,” meaning solvents are evaporating from deep within the layers. If you polish too soon, you trap those solvents. The result? A clear coat that can soften, haze up, or even fail down the road, undoing everything you've just accomplished. Always, always let the paint cure completely based on what the manufacturer tells you.
Refining the Surface to Flawless Perfection
Once the paint is fully cured, it's time to get surgical. No matter how pristine your spray booth is, microscopic dust nibs will find their way onto the wet clear coat. You’ll also likely notice a subtle texture, what we call “orange peel.” The fix for both is wet sanding, a process that requires a delicate touch and a bit of finesse.
Using a very fine-grit sandpaper—I usually start with 1500 and work my way up to 3000-grit—you’ll gently level out these tiny imperfections. The trick is to use plenty of soapy water as a lubricant and a quality sanding block to ensure you’re only leveling the high spots. This takes the surface from textured to perfectly flat, prepping it for the final gloss.
The demand for these exact finishing techniques is what’s driving the automotive coatings market, which is projected to grow from USD 19.5 billion in 2025 to USD 32.7 billion by 2035. It’s a big deal. In fact, an astonishing 25% of all refinish jobs in North America are redone because of dust nibs that could have been easily handled with proper wet sanding. You can dive deeper into these industry trends over at Future Market Insights.
After sanding, the panel will look dull and hazy. Don't panic; that's exactly what you want to see. Now you bring back the shine with a machine polisher, working through a series of compounds and pads to restore and then amplify the gloss. This is what creates that deep, liquid-like shine. For a complete guide on this critical process, check out our deep dive on how to properly polish car paint.
Taking Protection to the Next Level with Modern Tech
I’ll never forget spending an entire weekend wet sanding and polishing a freshly painted classic for a client. The finish was absolutely perfect, but I knew just how fragile that perfection was. One unexpected rainstorm or a trip down a gravel road could mar all that effort. That’s the moment I decided to finish every single project with a truly bulletproof final layer.
This is where you go from a standard finish to something exceptional. Forget old-school waxes that last a few weeks. The ultimate final step is a high-performance ceramic coating that not only deepens the gloss but also puts an incredible shield over your new paint and your glass.
The final step isn't just about shine; it's about making your hard work last. A superior coating creates a barrier that is harder, slicker, and more resilient than the paint itself.
For the best results, we turn to our lineup of professional-grade coatings. To help you navigate the options, here’s a quick comparison of our go-to products.
Titan Coatings Product Comparison
Choosing the right final layer depends on your specific goals for durability and appearance. This table breaks down our top performers to help you make the perfect choice for your project.
| Product | Primary Use | Key Feature | Ideal For |
|---|---|---|---|
| Titan T1 | Professional Paint Protection | Extreme hardness, chemical & scratch resistance | Daily drivers and show cars needing maximum long-term protection. |
| Titan T2 | Pro-Grade Paint Protection | Intense gloss, superior hydrophobic properties | Enhancing the depth and shine of a finish while providing solid defense. |
| APEX Glass Ceramic Coatings | Glass & Paint Protection | Extreme hydrophobicity, easy application | Both paint and glass, especially for improving wet-weather visibility. |
| Titan G2 | Graphene Paint Protection | Anti-static properties, reduces water spotting | Vehicles in harsh climates or those prone to collecting dust and pollen. |
Each of these formulas offers a significant upgrade over traditional waxes or sealants, locking in that finish you worked so hard to achieve.
For an amazing all-around performer that’s incredibly easy to work with, Titan’s APEX Glass Ceramic Coatings is a fantastic choice. On paint, its intense hydrophobic effect means dirt, grime, and water just don't want to stick, making washing the car almost effortless.
But its performance on glass is a true game-changer. Picture yourself driving in a heavy downpour. Instead of water smearing across the windshield, it forms into tiny, perfect beads and zips right off, often without you even needing to turn on the wipers at speed. It’s a massive improvement in safety and makes driving in bad weather a completely stress-free experience.
Applying this final layer of protection is your insurance policy. It guarantees that your mirror finish doesn't just look incredible the day you’re done—it stays that way, shielded from the elements and ready for anything the road throws at it.
Common Questions About Car Paint Correction
Diving into a paint correction project is a big step, and it's totally normal to have questions swirling around. Getting solid, experienced advice is the best way to build your confidence and sidestep those expensive mistakes. Let's walk through some of the most common questions we get from both weekend warriors and up-and-coming pros.
What's The Biggest Mistake When Painting a Car?
Hands down, the single biggest mistake is rushing the prep work. It’s a classic trap—you're just so eager to see that new color laid down. But the hard truth is that a flawless, durable paint job is 80% preparation and 20% application.
If you cut corners on decontaminating, degreasing, sanding, or priming, you're practically guaranteeing paint failure down the road. Peeling, bubbling, and fish eyes can almost always be traced back to a shortcut taken during prep. Trust me, every extra minute you spend creating that perfect, clean foundation will save you days of headaches and rework.
Can I Really Get Pro Results Without a Paint Booth?
While a professional booth is the gold standard for a controlled environment, you can absolutely achieve stunning results at home with some smart planning. The goal is to create a clean, dust-free, and well-ventilated space, usually with plastic sheeting.
Here are a few tricks I’ve learned over the years:
- Tame the Dust: Lightly misting the floor with water is a great way to keep dust from getting kicked up and landing in your fresh paint.
- Pick Your Day: Always try to spray on a calm day. Low humidity and a moderate temperature, somewhere around 70°F (21°C), is the sweet spot.
- Breathe Easy: Make sure you have solid airflow moving through your space, and never, ever spray without a quality respirator.
It takes a little more effort to manage contaminants outside of a booth, but a show-car finish is definitely achievable for anyone willing to control their environment.
How Is an Elastomer Coating Different From a Standard Clear Coat?
This is a great question, and it really gets to the core of what modern paint protection is all about. A typical clear coat is a hard, rigid layer. It's designed for gloss and UV protection, but that very hardness is also its biggest weakness—it makes the paint prone to chipping from rocks and cracking under stress.
I'll never forget a client who brought in his beautifully restored muscle car. The standard clear coat looked like glass. He came back a month later, just heartbroken. One road trip had peppered his front end with dozens of tiny chips.
That exact scenario is why Titan's Alpha Quartz was developed. It’s an Elastomer coating, which is a fundamentally different beast. Using advanced nanotube technology and our proprietary Dark Matter Tech, we engineered it to be incredibly flexible.
While it cures to a glass-like hardness, it keeps an amazing elasticity. This allows it to absorb the energy from a rock impact and flex with the body panels during temperature swings, preventing the micro-cracks that lead to failure. That flexibility is the secret sauce to its superior, long-term durability.
How Long Should I Wait to Coat New Paint?
Patience is a virtue here, and this final step is a critical one. Fresh paint needs to "gas out," which is just the process of solvents fully evaporating from the cured layers. If you seal the surface too early with a coating, sealant, or even wax, you trap those solvents. This can ruin your beautiful finish, causing it to look hazy or feel soft.
As a rule of thumb, wait a minimum of 30 to 90 days before applying any kind of protection. That said, you should always check the technical data sheet for your specific paint system, as cure times can differ. To get the best results, learning how to protect car paint with the right timing is essential for locking in that permanent, flawless bond.
Ready to give your car the ultimate, stress-free driving experience? The Titan Coatings APEX Glass Ceramic Coating makes water fly off your windshield, drastically improving visibility in the rain. Its easy-to-use formula provides an ultra-slick, hydrophobic barrier on both glass and paint.
0 Comments