It’s a process every car owner needs to understand: wash, decontaminate, correct, and protect. That's the secret sauce to bringing back faded, dull paint. You're not just cleaning the surface; you're methodically removing the damaged, oxidized layer of clear coat to reveal the vibrant color underneath and then locking that shine in for good.
The Slow Fade from Brilliant to Dull
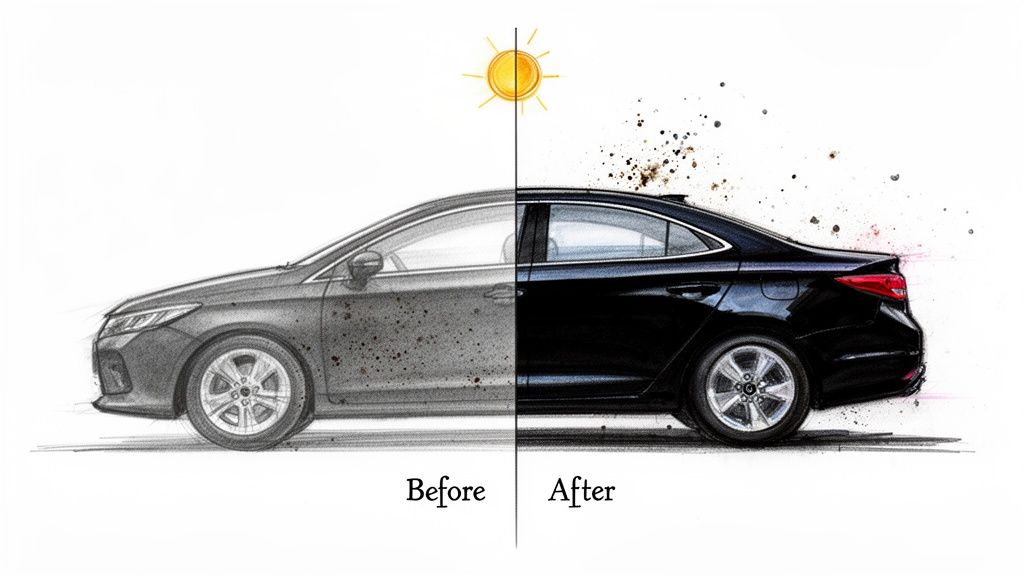
We've all been there. You walk out to your car one morning, and that deep, rich color you fell in love with just isn't there anymore. It’s been replaced by a hazy, lifeless version of its former self.
I remember this happening with a client's beautiful black sedan. After a few years as a daily driver, it looked more like dull charcoal than the gleaming obsidian it once was. What was the culprit? A relentless, multi-pronged attack on the car's clear coat.
This battle against paint fade is constant. Your car's finish is under siege from the moment it leaves the dealership.
- UV Rays: The sun is public enemy number one. Its ultraviolet radiation is brutal, breaking down the chemical bonds in your paint's clear coat. This causes it to oxidize and turn cloudy, much like how plastic gets brittle and yellowed over time.
- Oxidation: This is the direct result of that UV assault. As the clear coat reacts with oxygen and heat, it creates that chalky, hazy film that masks your car's true color.
- Acid Rain & Pollutants: Think of all the junk in the air. Industrial fallout and acidic rainwater settle on your car's surface. If you don't wash it off quickly, these contaminants can literally etch into the clear coat, creating microscopic pits that scatter light and dull the shine.
- Road Grime & Salt: Every mile you drive, your car gets blasted with harsh chemicals, salt, and tar. This stuff clings to the paint and acts like a fine-grit sandpaper, slowly wearing away that protective clear coat.
Understanding the Enemy
Think of your car's clear coat as its armor. Once that armor is compromised, the pigmented base coat underneath is left completely exposed, leading to the fading and discoloration that drives us all a little wild.
And this isn't just a niche problem; it's huge. With cars staying on the road longer than ever, the global automotive paint restoration market is expected to rocket to $7.1 billion by 2033. Owners are fighting back to preserve their investments.
While we're focused on fixing the damage here, prevention is always the best medicine. Exploring different automotive UV protection solutions can stop that fade before it even starts.
The great news? In most cases, this damage is entirely fixable. You just need the right game plan.
Before diving in, it helps to have a clear roadmap. This table gives you a quick overview of the entire journey, from figuring out how bad the damage is to locking in that flawless, head-turning shine.
Your Faded Paint Restoration Roadmap at a Glance
A quick summary of the key stages involved in restoring your car's faded paint to its original glory.
| Stage | Objective | Key Action |
|---|---|---|
| Assessment | Identify the type and severity of fading | Visual inspection and 'baggie test' for contamination |
| Preparation | Create a clean, safe surface for correction | Thorough wash, clay bar, and taping sensitive areas |
| Correction | Remove oxidation and restore gloss | Compounding and polishing to level the clear coat |
| Protection | Lock in the restored finish for years | Apply a durable Elastomer coating |
With this outline, you know exactly what's ahead. Now, let’s get our hands dirty.
Becoming a Paint Detective to Diagnose the Damage
Before you even think about grabbing a polisher, you need to play detective. Seriously. Jumping into a paint correction job without knowing exactly what you're dealing with is a classic rookie mistake, and it's a surefire way to make a bad situation a whole lot worse. Not all faded paint is the same, and the real diagnosis dictates your entire game plan.
This is the most critical part of restoring faded paint. Think of it like a doctor figuring out what's wrong before writing a prescription. Are you up against some simple surface oxidation, or is the clear coat giving up the ghost and failing completely? The answer changes everything.
Surface Oxidation vs. Clear Coat Failure
Let's break down the two main culprits. Surface oxidation is that hazy, chalky film that dulls your finish. It's caused by UV rays slowly breaking down the very top layer, but the clear coat itself is still intact underneath. This is the best-case scenario and, thankfully, it's usually very correctable with some quality time with a polisher.
Clear coat failure, on the other hand, is the point of no return for your paint. This is when the clear coat is so damaged that it physically delaminates, peels, and flakes away from the color underneath. You'll spot it as patchy, peeling sections that often look milky or whitish.
Crucial Tip: If you hit a panel suffering from clear coat failure with a polisher, you'll shred what little protection is left and burn right through to the base coat—or even the primer. This causes irreversible damage that only a full respray can fix.
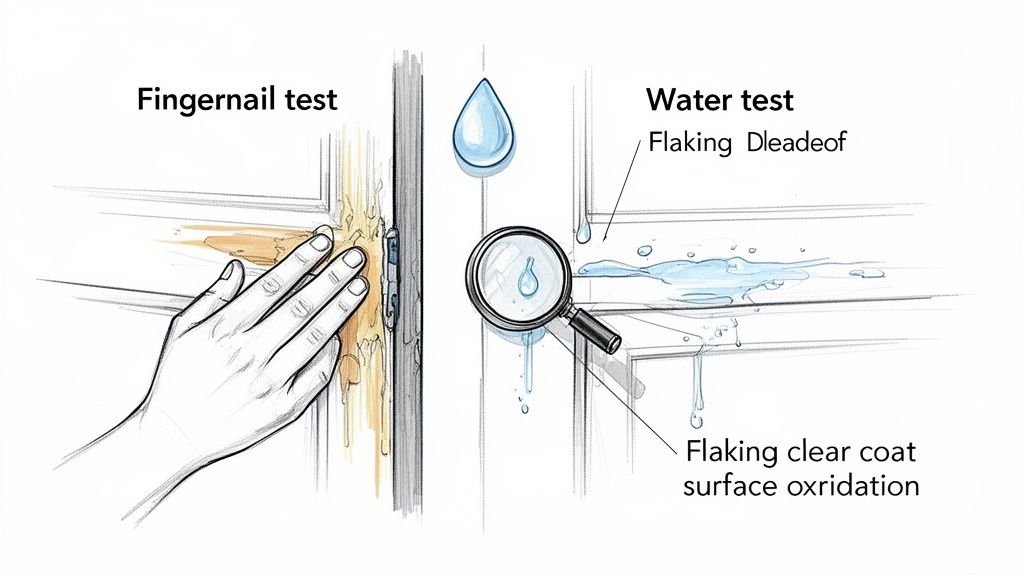
Simple Diagnostic Tests You Can Do Right Now
You don’t need any fancy gear to get to the bottom of this. A couple of simple, hands-on tests will tell you pretty much everything you need to know.
- The Fingernail Test: Gently drag your fingernail over the edge of a faded or patchy spot. Does your nail catch on a raised, rough edge? That’s the classic sign of peeling clear coat. A healthy surface is perfectly smooth; any kind of lip or edge means the layers are separating.
- The Water Test: Grab a spray bottle and mist some water onto the faded area. If the color suddenly gets deeper and the gloss comes back while it's wet, you're likely just dealing with surface oxidation. The water is temporarily filling in the microscopic pits, showing you what a good polish can achieve. If the water does next to nothing, the damage is much more severe.
- The Microfiber Towel Test: Put a small dab of polishing compound on a clean microfiber towel and gently rub a small, hidden spot. Now, look at the towel. If you see your car's color on it, stop immediately. This is a dead giveaway that the clear coat is gone, and you’re rubbing directly on the base coat.
Setting Realistic Expectations for Your Project
Once you have a diagnosis, you can set realistic goals. Let's look at a couple of real-world examples.
Scenario one: A red sports car with a hazy roof and hood, but zero peeling. The water test makes the color pop beautifully. This car is a perfect candidate for a full paint correction. With some work, it’s going to look incredible.
Scenario two: A family minivan with paint literally flaking off the hood in sheets, exposing a duller layer beneath. This is textbook clear coat failure. No amount of polishing is going to save it. For a vehicle like this, you’ll need to explore more intensive solutions, and you can learn about them by reading up on how to fix clear coat peeling.
Taking just ten minutes to run these simple checks can save you hours of wasted effort and potentially thousands in repair bills. You’ll know whether you can move forward with confidence or if it’s time to call a pro for a repaint.
Assembling Your Professional Restoration Toolkit
Let's be honest: the difference between a frustrating weekend chasing mediocre results and a head-turning, professional-grade finish comes down to the gear you use. If you want to properly restore faded car paint, you have to think like a pro, and that starts with your toolkit. This isn't just a shopping list; it’s about understanding what each tool does and how they all work in harmony to bring back that deep, wet shine.
Investing in quality tools from the get-go saves you from costly mistakes (like burning right through your paint) and sets you up for a flawless surface ready for the most important step: laying down a serious protective coating.
The Heart of the Operation: Your Polisher
For anyone tackling paint correction at home, a dual-action (DA) polisher is your absolute best friend. Seriously. Unlike the aggressive rotary polishers that can destroy a paint job in seconds in the wrong hands, a DA polisher oscillates and rotates at the same time. This unique motion makes it incredibly safe, slashing the risk of creating new swirls or burning through the clear coat.
Think of it as the ultimate safety net that still packs a serious punch for cutting and finishing. It's the one tool that gives enthusiasts the confidence to get results they thought were only possible in a pro detail shop.
Your Abrasive Arsenal: Compounds and Polishes
You wouldn't use a sledgehammer to tap in a finishing nail, right? The same logic applies here. For a proper restoration, you need a solid one-two punch of abrasives.
- Cutting Compound: This is your heavy hitter. A more aggressive compound is designed to slice through that chalky oxidation and level out the deeper imperfections in your clear coat. It's the first real step to bringing the underlying color back to life.
- Finishing Polish: After the compound does its work, the surface will be level but probably a bit hazy. A fine polish, with its much smaller abrasives, is what comes next. Its entire job is to remove that haze and refine the surface into a brilliant, high-gloss shine.
The numbers don't lie. The automotive refinish paint market was recently valued at a whopping $8.7 billion, and an incredible 80% of that is for cars. With so many vehicles on the road showing signs of fade, people are desperately looking for better solutions than a full, expensive repaint. Learn more about the refinish paint market trends on gminsights.com.
The Essential Support Crew for Flawless Prep
Your polisher and liquids might be the stars of the show, but the supporting cast is what guarantees a perfect finish. Rushing your prep work is the fastest way to sabotage your own results.
- High-Quality Microfiber Towels: Don't skimp here. You'll need at least a dozen. Use separate, dedicated towels for wiping off compound, polish, and panel prep solutions to avoid contaminating your work.
- Clay Bar or Clay Mitt: Before a single drop of polish touches your paint, you must remove the bonded grime that a normal wash leaves behind. A clay bar glides over the paint and pulls out nasty contaminants like industrial fallout and tree sap, leaving the surface perfectly smooth. You can dive deeper into the process by reading our guide on what a clay bar treatment involves.
- Detailing Tape: This is non-negotiable. Use good-quality painter's tape to protect all the sensitive plastic trim, rubber window seals, and emblems from getting stained or scuffed by the polisher.
- Isopropyl Alcohol (IPA) Solution: A simple 50/50 mix of IPA and distilled water is perfect for wiping down each panel between steps. It strips away any leftover polishing oils and residues, giving you an honest, true look at the surface you're actually working on.
- A Selection of Polishing Pads: Different pads have different levels of "cut." At a bare minimum, you'll want a firmer, more aggressive cutting pad for your compound and a soft, plush finishing pad for your polish.
The Hands-On Guide to Paint Correction
Alright, this is where the magic happens. You’ve assessed the damage and gathered your gear. Now it's time to roll up your sleeves and get to work bringing that faded paint back from the brink. This isn't just about slapping on some wax to make it shiny for a week; we're talking about a methodical process that peels back years of oxidation and grime to reveal the deep, rich color hiding underneath.
A perfect finish starts with perfect prep. I’ve seen it a hundred times—people get impatient, rush this stage, and end up with a disappointing result. Don't be that person. The prep work is every bit as important as the polishing itself.

Think of this as your roadmap. Each step builds on the last, creating a flawlessly clean surface that's absolutely essential before you even think about picking up a polisher.
Creating the Perfect Canvas
Before that polisher even comes out of the box, the car's surface needs to be surgically clean. Start with a thorough two-bucket wash. It’s a simple but incredibly effective way to avoid adding new scratches while you're trying to remove old ones. One bucket for your soapy water, the other for clean rinse water. Dunk your mitt in the rinse bucket before reloading with soap, and you won't be dragging grit all over your car.
Next up is chemical decontamination. Grab an iron remover and spray it on. You'll actually see it work as it turns a deep, satisfying purple, chemically dissolving the tiny metallic particles from brake dust and industrial fallout that have dug into your clear coat.
The final prep step is the clay bar treatment. Even after a good wash, run your hand over the paint (inside a plastic baggie is a great pro-trick to amplify the feel). Feel that slight roughness? That's bonded contamination. Gliding a clay bar over a lubricated surface physically pulls out anything left behind, like tree sap and road tar. When you're done, the paint should feel as smooth as glass. This step is non-negotiable if you’re serious about getting professional results.
The Art of Compounding and Polishing
With the surface prepped, it's time for the main event. Grab your DA polisher and prime a fresh cutting pad with a few pea-sized dots of compound. The key here is to work in small, manageable sections—think 2×2 foot squares. Trying to tackle a whole hood at once just spreads the product thin and guarantees an inconsistent finish.
Start the polisher on a low speed to spread the compound, then crank it up a notch and apply firm, even pressure. Use a slow, overlapping cross-hatch pattern. Move the polisher left to right, then up and down across your section, working the compound until it starts to turn clear. This systematic approach is the only way to ensure uniform coverage and correction.
My biggest tip? Get yourself a good light. A powerful LED held at an angle will reveal swirls and haze you’d never see in direct sunlight. This lets you check your progress in real-time instead of guessing.
Between your compounding and polishing stages, an isopropyl alcohol (IPA) wipedown is critical. The oils in compounds are sneaky; they can fill in fine scratches and trick you into thinking the surface is perfect. A quick wipe with a 50/50 mix of IPA and water strips those oils away, revealing the true state of the paint. For a deeper dive, check out our guide on how to properly polish your car's paint.
Finally, switch to a soft finishing pad and a fine polish. You’re going to repeat the exact same process—working in small sections with that cross-hatch pattern—but this time using much lighter pressure. This is the finessing stage. It refines the surface, removes any microscopic haze left by the compound, and dials in that unbelievable, deep gloss you’re after.
Locking In Your Hard Work With A Modern Coating
You’ve put in the hours. The wet-sanding, the compounding, the polishing—it’s all led to this moment. The paint looks incredible, deep and wet, just like it should. But leaving that flawless finish exposed to the elements now would be heartbreaking. All that effort would be for nothing.
This is where we shift from restoration to preservation. It’s the final, critical step, and a simple coat of wax just isn’t going to cut it.
Traditional waxes and sealants are just a temporary gloss. They sit on top of the paint, look good for a month or two, and then wash away. Suddenly, your hard work is vulnerable all over again. After going this far, you deserve a solution that actually bonds with the paint, creating a permanent, defensive shield.
It’s time to step beyond old-school products and into the world of advanced material science.
The Titan Coatings Elastomer Advantage
Imagine a protective layer that's as hard as quartz but as flexible as rubber. That’s precisely what you get with Titan’s Alpha Quartz. This isn't just another ceramic coating; it’s a true elastomer, a technology Titan pioneered for the automotive world. We were the first company to introduce elastomer coatings to the market, developing this formula using a unique blend of nanotube technology and our proprietary Dark Matter Tech.
The result is a coating with properties that older technologies just can't touch.
- Extreme Temperature Stability: This is where the elasticity is a game-changer. Your car’s metal panels are constantly expanding in the heat and contracting in the cold. A rigid, traditional ceramic coating can become brittle and develop micro-cracks under this stress. Alpha Quartz, however, flexes right along with the metal, keeping the protective layer intact from frozen winters to hot summers. The flexibility makes it last longer.
- Real-World Impact Absorption: That same flexibility helps the coating absorb and dissipate energy from small impacts—think about bugs splattering on your bumper at 70 mph or gravel kicking up from the road. Where other coatings might chip, our elastic coating holds strong.
- Unbelievable Durability: You get military-grade resistance to UV rays, harsh chemicals, and scratches. It effectively locks in that perfect gloss you just spent hours creating.
The automotive refinish coatings market has swelled to $11.12 billion, a clear sign that owners are looking for permanent solutions, not just temporary shine. In fact, modern, durable coatings can boost a vehicle's resale value by 10-20%. You can dig into more insights about the growing refinish coatings market on marketsandmarkets.com.
To truly appreciate what sets this apart, let's look at a direct comparison on our comparison page.
Titan Coatings vs Traditional Waxes
| Feature | Traditional Wax | Titan Alpha Quartz Elastomer Coating |
|---|---|---|
| Durability | 1-3 months | Years of protection |
| Bonding | Sits on top of the paint | Chemically bonds with the clearcoat |
| Protection | Minimal UV & chemical resistance | Military-grade UV & chemical resistance |
| Flexibility | Brittle, can crack with temperature change | Elastic, flexes with panels to prevent cracking |
| Hydrophobics | Good, but fades quickly | Extreme and long-lasting water-beading |
| Maintenance | Frequent reapplication needed | Simple washes maintain performance |
The difference is clear. Choosing an elastomer isn't just about protecting your paint; it's about future-proofing your restoration work. For a deeper dive into this unique technology, you can explore the science behind it on the official page for https://titancoatings.us/titan-coatings-elastomer/. You can explore all of our innovative products in our shop.
Applying Alpha Quartz For Years Of Protection
One of the best parts about Alpha Quartz is that you don't need a professional certification to get incredible, long-lasting results. The application is refreshingly straightforward.
Once you’ve done your final IPA wipedown, the paint is perfectly clean and ready. Working on one small section at a time (think half a hood or a single door panel), just apply a few drops of Alpha Quartz to your applicator pad. Wipe it onto the surface in a neat cross-hatch pattern to ensure even coverage.
You’ll see it begin to "flash"—it will look a bit like an oily rainbow on the surface. That’s your cue. Let it sit for the recommended time, then gently buff away the residue with a fresh, clean microfiber towel. It’s that simple. You’ve just created a protective bond that will last for years, not weeks.
Don't Forget The Glass
While you're at it, why not give your glass the same level of advanced protection? Titan’s Apex Glass Ceramic Coating is incredibly easy to use and creates a super-slick, hydrophobic surface on your windshield and windows. This is all about surface science; understanding hydrophobic and hydrophilic properties really shows why these coatings work so well.
The next time it rains, you'll see water bead up instantly and fly right off the glass as you drive. It drastically enhances visibility and makes driving under rain stress-free. It's a small detail that makes a massive difference in your daily driving experience.
Got Questions About Restoring Your Car's Paint? Let's Talk.
So, you've gone down the rabbit hole of paint correction, and now your head is probably buzzing with questions. It's a big undertaking, and you want to get it right. I get it. Let's tackle some of the most common things people ask so you can get started with total confidence.
Can I Really Restore Faded Car Paint Myself?
The short answer is yes, absolutely—as long as you’re dealing with moderate fading and oxidation. With the right tools, especially a good dual-action (DA) polisher and a healthy dose of patience, you can achieve some incredible results right in your own garage.
The key is knowing what you're up against. If the paint just looks dull, hazy, or has that chalky white film, you’re in a great spot for a DIY restoration. But, if you see the clear coat physically peeling away, like a bad sunburn, that's a different story. That’s total clear coat failure, and no amount of buffing can bring back paint that’s completely gone. That kind of damage, unfortunately, calls for a trip to the body shop for a repaint.
How Long Will My Hard Work Actually Last?
This is the million-dollar question, and the answer comes down to one thing: protection.
If you go through all the trouble of polishing your paint only to top it with a basic carnauba wax, you'll be re-doing the job in a few months. That beautiful gloss will start to haze over again as soon as the wax wears off and UV rays get back to work.
This is exactly why a modern, high-tech coating is a game-changer. When you apply a product like Titan's Alpha Quartz Elastomer, you're not just waxing the surface; you're creating a durable, chemically-bonded shield. Its flexible properties and serious UV blockers stop oxidation before it can even start, locking in that finish for years, not just a few months. That elasticity is crucial—it helps the coating expand and contract with the metal from frozen cold to blistering heat without cracking.
What's The Real Difference Between Compounding and Polishing?
It helps to think of this as a two-step process, going from coarse to fine, like sanding wood.
- Compounding is the heavy lifting. It's the first, more aggressive stage that uses larger abrasives to cut through that thick layer of oxidation and level out deeper scratches. Its entire job is to remove the damaged, dead paint.
- Polishing is all about finesse. After compounding, the surface will look a bit hazy. Polishing uses much finer, gentler abrasives to remove that haze and refine the surface, bringing out that brilliant, crystal-clear shine.
You almost always follow compounding with polishing. One without the other leaves the job half-finished. Together, they create that flawless, show-car look.
Ready to give your glass that same level of "why-didn't-I-do-this-sooner" protection? Titan Coatings makes it simple with our Apex Glass Ceramic Coating. You'll get amazing clarity, and watching water literally fly off the windshield in the rain is something you have to see to believe.
0 Comments