
The Thursday afternoon job always starts the same way. You open the door, the cabin light catches a dark smear on the bolster, and you already know the difference between a fresh spill and a stain that’s been worked deeper by heat, friction, and bad cleaning habits. Removing stains from leather car seats is never just about wiping harder. It’s about reading the leather finish, matching the chemistry to the stain, and getting the seat dry again without leaving the surface tired or blotchy.
If the stain is still sitting on top, the fix is usually simple. If it has bonded, migrated into seams, or been baked in by summer heat, the job changes fast. That’s why the first pass matters so much, and why the right protection after cleaning can save you from doing the same job again next week.
The Detailer’s First Look at a Stained Leather Seat
I’ve seen more seats ruined by a rushed first move than by the stain itself. A detailer leans in, torch in hand, and the first question isn’t “What cleaner do I use?” It’s “What am I looking at?” A greasy transfer from a sandwich wrapper behaves nothing like denim dye, and both are different from a food spill that has already dried into the grain.
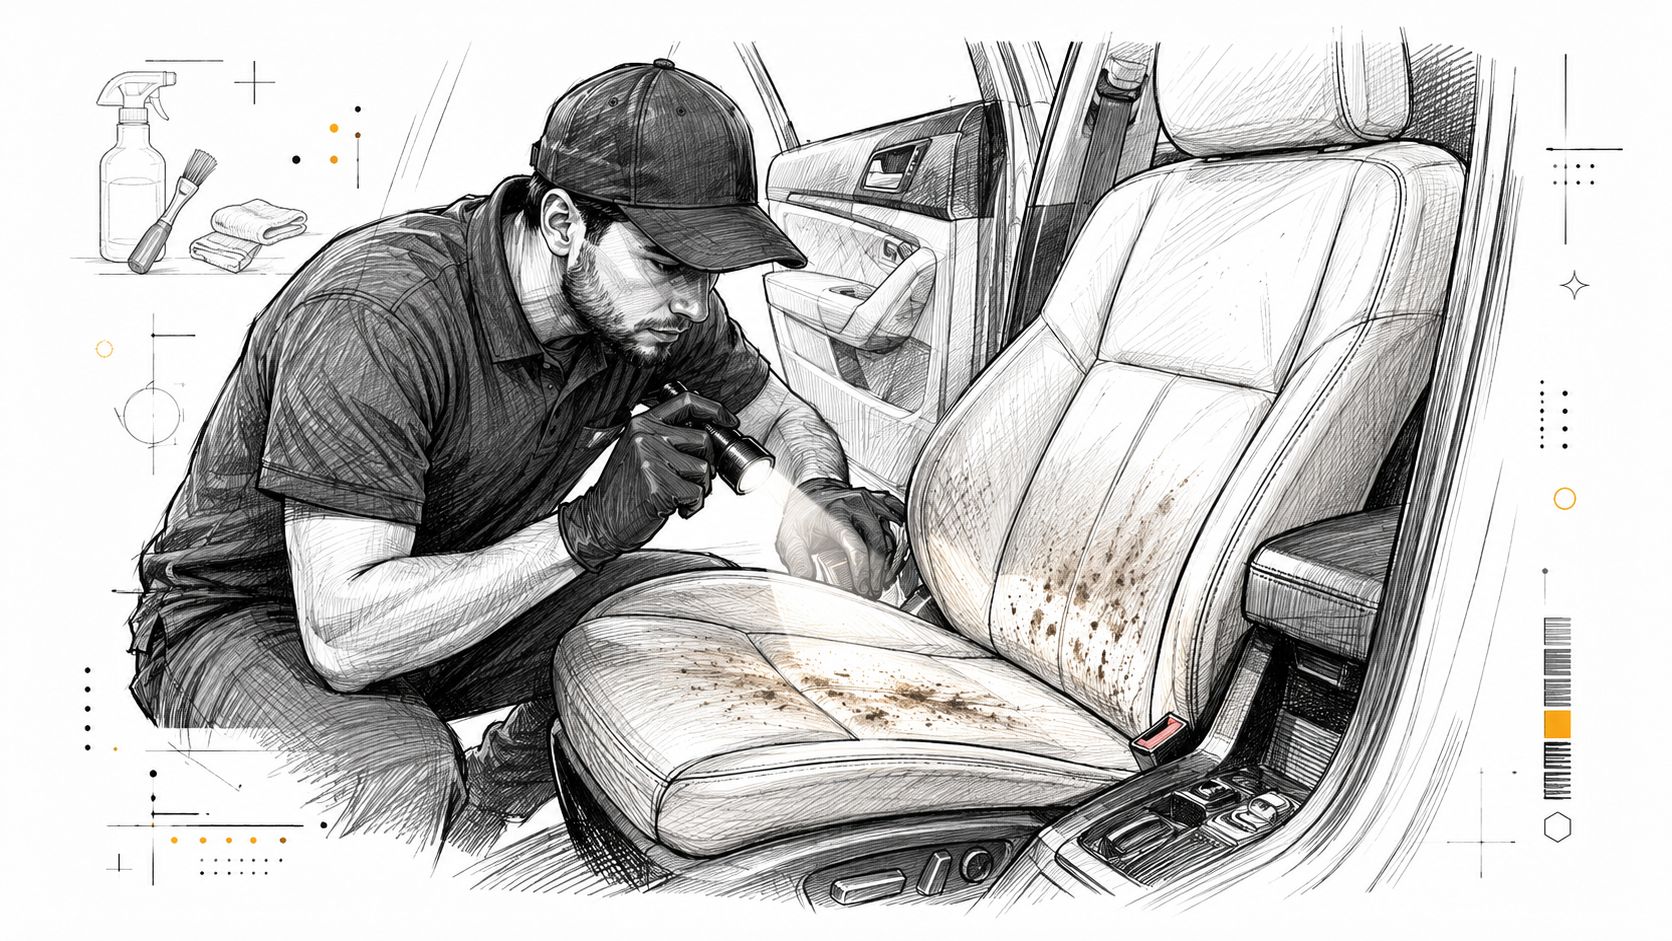
Read the stain before you touch it
Finished automotive leather usually has a protective topcoat, so stains often sit on the surface longer than people think. That’s why a proper inspection looks at sheen, texture, and whether the mark is in the finish or under it. If the color is missing, the leather may be damaged rather than stained, and no amount of scrubbing will put the finish back. The cleaner choice changes from the start when you separate removable contamination from finish failure, which is the same judgment detailers use when looking at repair work on leather upholstery, like the guidance shared in the Bulls Eye Repair sofa guide.
The practical habit is simple. Vacuum the loose grit, look closely at the stitching and seat creases, and decide whether the mark is oil, protein, dye, or organic residue. That first read keeps you from turning a small cleanup into a finish problem.
A second thing matters on real jobs. Dirty seams hide contaminants, and the crease line often tells you more than the stain face does. If the seat has been over-cleaned before, you’ll often see a dull halo where someone attacked the stain with too much liquid and too much pressure.
Practical rule: if you can’t name the stain class, don’t guess with a strong chemical. Leather usually punishes guessing.
For a broader interior workflow, the same diagnostic habit fits neatly with Titan’s interior DIY guide, especially when you’re deciding whether the seat needs spot treatment or a deeper full-panel reset. The trick is to stop thinking in terms of “dirty” versus “clean.” Think in terms of surface grime, embedded stain, and finish damage.
Tools, Cleaners, and the Spot Test You Should Never Skip
The shop bag for leather work doesn’t need to be complicated, but it does need to be disciplined. I keep microfiber towels, a soft-bristled brush, a vacuum with a crevice tool, a leather-safe cleaner, absorbent powder for oil, and a conditioner within reach before I ever touch the panel. For stubborn ink, a controlled alcohol dab can help, while tannin stains sometimes need a brief paste treatment rather than a full soak.
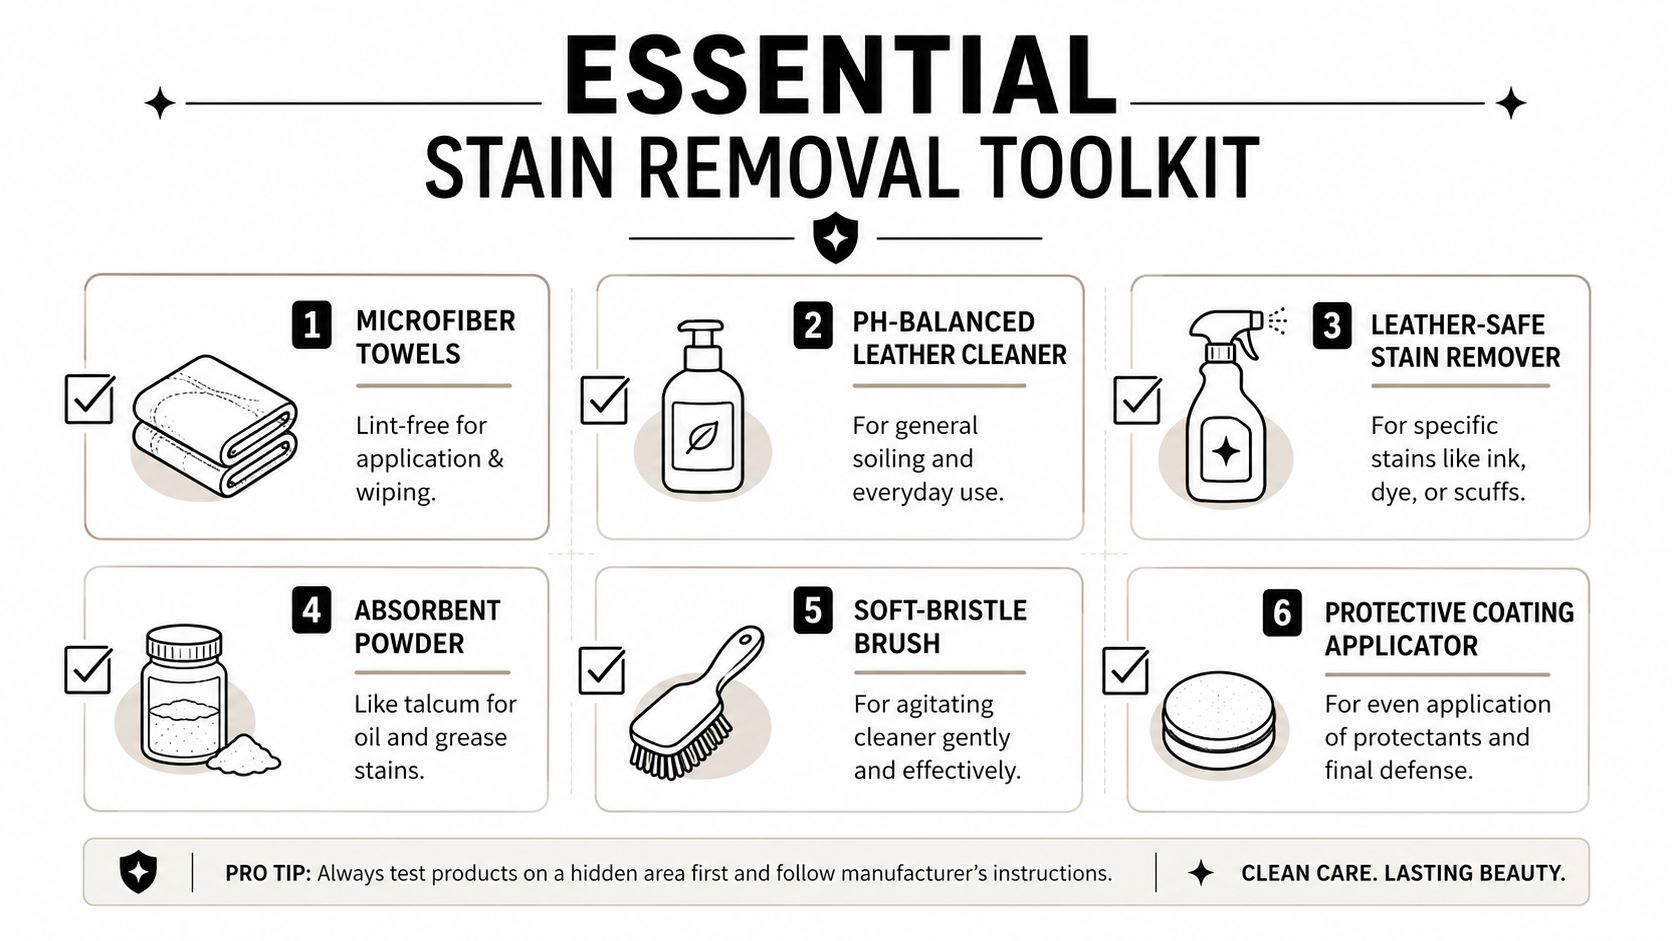
Build the kit before the cleaner opens
A working kit should include microfiber towels for application and wipe-down, a pH-balanced leather cleaner for general soil, a leather-safe stain remover for targeted marks like ink, and absorbent powder such as talcum or cornstarch for oil. A soft-bristle brush matters because it moves product through texture without gouging the finish, and a protective coating applicator becomes relevant once the seat is clean and dry.
One useful option in that same tool family is Titan’s leather shield product, which fits the protection stage rather than the stain-breaking stage. On the cleaning side, the cleaner only earns its place if it’s made for leather and used sparingly.
The spot test is the gatekeeper. Test the cleaner on a hidden area, wait, and read the result before you ever go after the visible stain. That small pause is what prevents color transfer, dulling, or finish lift on a seat that looked sturdy from the outside.
Use the test patch like a dealer prep check
Work in a hidden spot, not the middle of the bolster. Apply a small amount, wipe it off, and watch for discoloration, tackiness, or a change in sheen. If the finish reacts badly in the test patch, it will react worse on a visible panel.
Shop habit: when a cleaner needs force to work on the test patch, the cleaner is probably too aggressive for the seat.
For a deeper cleaning reference that matches this approach, Titan’s deep-clean guide for car seats fits the same logic, start light, verify the result, and only then step up carefully. That’s how you keep a “stain removal” job from turning into a finish correction job.
Matching the Right Method to Each Stain Type
The seat tells you what happened if you know how to read it. Oil sits differently from dye. Organic spills dry differently from protein-based stains. The cleaner that saves one seat can damage another, so the stain class should decide the method, not the other way around.
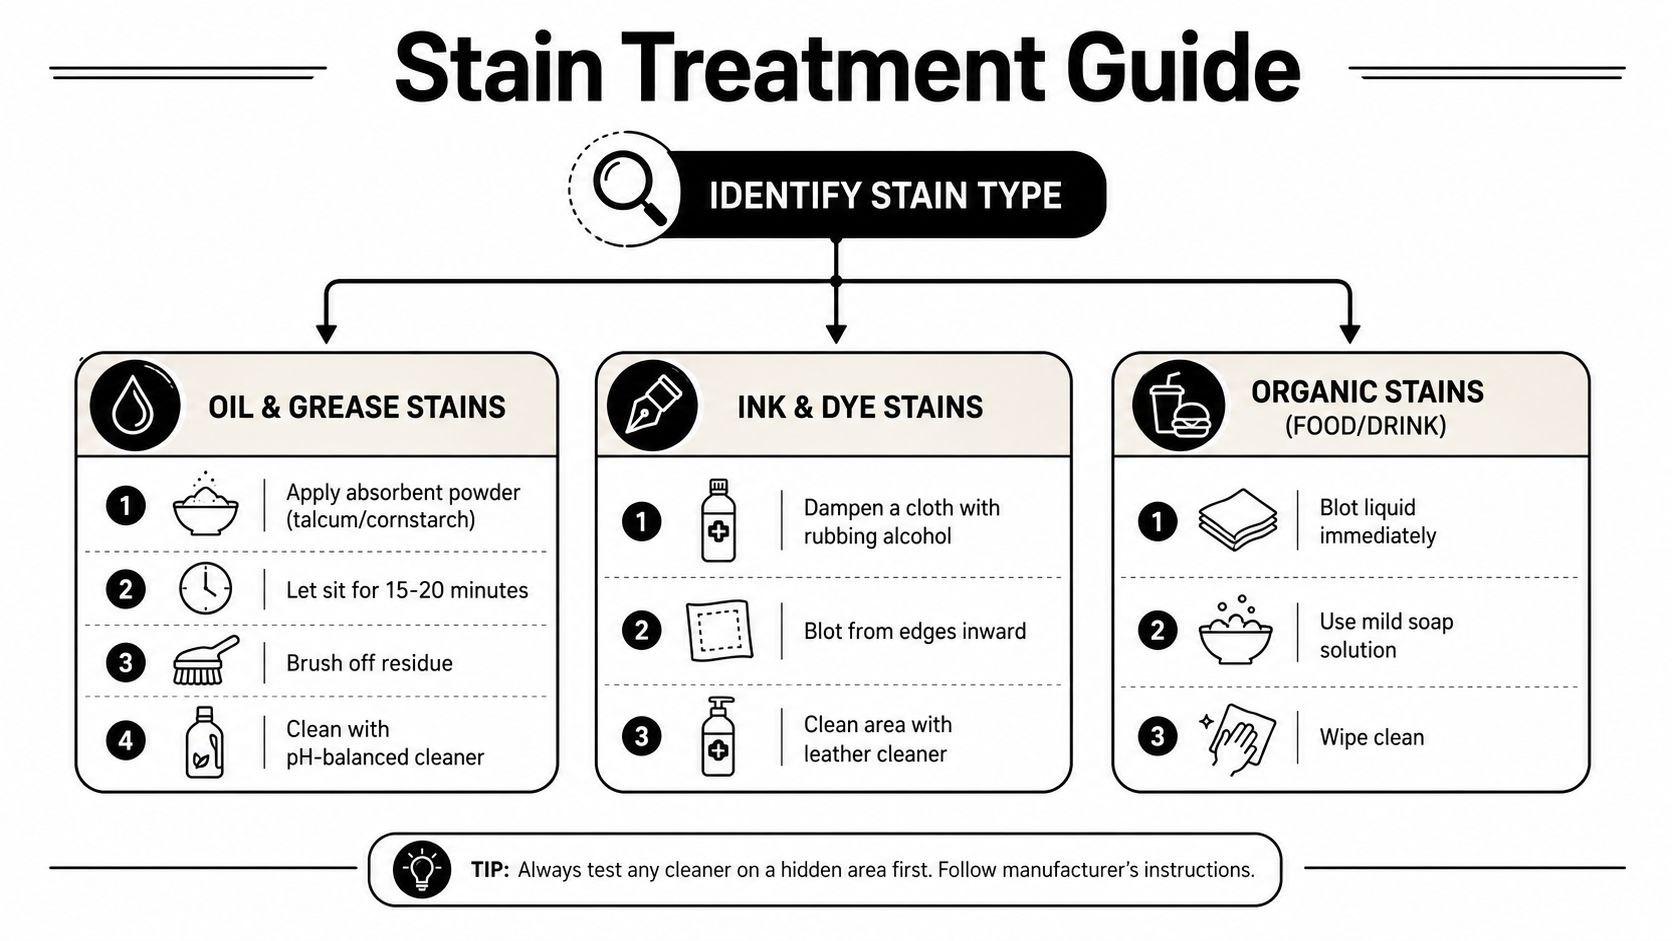
Oil and grease need absorbent first
Oil-based marks are the ones people usually make worse by reaching for liquid too fast. Start by covering the spot with talcum powder or cornstarch so the absorbent can pull some of the oil out before any wet cleaning begins. After it sits, brush away the residue, then use a leather-safe cleaner in small amounts.
If the stain is still visible, repeat the light cycle instead of scrubbing harder. That repeated, controlled approach is better than flooding the area and pushing oil deeper into the grain or seam line.
Ink and dye transfer need tight control
Ink is the stain most people panic over, and panic is where leather gets damaged. A tiny amount of isopropyl alcohol on a cotton swab or cloth can help lift fresh ink, but it should stay local. Blot from the edges inward and stop as soon as the color begins to transfer, then clean the area with a leather-safe product.
For dark clothing dye transfer, patience matters more than force. These stains often sit in the top layer, but they can also bond enough that repeated DIY passes stop helping. That’s where restraint beats enthusiasm.
Food, drink, and tannin stains follow a different path
Food and beverage spills should be blotted immediately. After that, a mild cleaner handles most residue, but stubborn tannin stains such as red wine or fruit juice can benefit from a 10-minute treatment with lemon juice and cream of tartar before wiping clean, according to practical leather-cleaning guidance from The Spruce. That timing matters because leather hates lingering moisture and heat.
Blood and other protein stains need cool treatment
Protein stains respond better to cold water and an enzymatic cleaner than to warm water or aggressive pressure. Hot water can set protein into the surface, which makes the stain harder to remove. Gentle, short-contact treatment works better than a long soak, and the seat should be dried fully before anything else touches it.
If the seat has multiple stains, don’t treat them all the same way. A spilled latte, denim dye, and engine grease all ask for different chemistry, which is why Titan’s leather care guide sits in a different lane from its stain-removal pages. The method should match the contamination, not the customer’s urgency.
Choosing the Right Cleaner for the Job
The right cleaner saves time, but the wrong one can dull a finish in minutes. I’d rather use a milder leather-safe product twice than use an all-purpose household chemical once and spend the rest of the afternoon trying to undo the damage. Leather cleaners are not interchangeable, and the stain class should narrow the choice quickly.
| Cleaner Match Guide for Common Leather Stains | Recommended Cleaner | Application Tool | Avoid |
|---|---|---|---|
| Oil and grease | Absorbent powder first, then leather-safe cleaner | Microfiber towel, soft brush | Soaking the panel, harsh degreasers |
| Ink | Controlled isopropyl alcohol on a swab, then leather cleaner | Cotton swab, microfiber | Flooding, aggressive rubbing |
| Dye transfer | Leather-safe cleaner with short dwell time | Microfiber towel | Harsh solvents, repeated scrubbing |
| Food and drink | Mild leather cleaner or light soap solution if approved | Microfiber towel | Strong detergents, excess moisture |
| Protein stains | Enzymatic cleaner, then gentle wipe-down | Microfiber towel | Hot water, strong chemicals |
Make the chemical match the stain
A dedicated leather cleaner is the safest general choice for normal soiling and light spills. A dilute soap solution can help on organic residue, but only if it’s mild and used sparingly. Vinegar mixtures show up in some guides for water-based contamination, but I treat them cautiously because leather finishes vary and the margin for error is narrow.
For sunscreen transfer on dark leather, a targeted resource like Nanak Car Wash’s sunscreen stain guide is useful because that kind of mark behaves more like an oily transfer than a simple dust stain. The core decision stays the same, use the least aggressive chemical that can still move the stain.
If you’re choosing a product family rather than a one-off bottle, Titan’s APEX NANO leather protection line can fit into the prevention side after cleaning, but the cleaner still has to do the primary work first. No coating fixes a bad cleaning pass.
Mistakes That Wreck Leather Seats
Most bad leather jobs don’t start with the stain. They start with the cleanup. A rushed tech grabs a hot dryer, a strong solvent, or a stiff brush, and the stain may come off while the leather pays for it later with dullness, cracking, or a chalky patch around the repair area.
The three damage paths I see most often
Oversaturation is the quiet killer. Liquid runs into seams, padding, and stitched edges, then lingers there long after the visible surface looks dry. That trapped moisture can leave odor, cause finish failure, and make the panel feel stiff once it finally dries.
Aggressive scrubbing is the second mistake. Leather doesn’t respond like fabric upholstery, and forcing a brush through the surface can wear the finish or spread the stain wider than the original mark. Gentle circular motion works because it moves residue without chewing the topcoat.
Direct heat is the fast way to create a new problem. A hairdryer can dry the seat unevenly, and concentrated heat can crack leather as it loses moisture too fast. Air-drying is slower, but it’s the safer route when the panel has already been cleaned.
The hidden failure is residue in the seams
A lot of people wipe the face of the stain and stop there. The seam line keeps holding cleaner, dirt, or moisture, and that leftover material shows up later as a smell, a dark edge, or a sticky spot that attracts new dirt. The job isn’t finished until the residue is gone and the surface is dry.
Real-world warning: if a cleaned seat still smells damp by the next morning, the leather was probably over-wet or the seams trapped the product.
Skipping the spot test causes a different kind of failure. A cleaner that looks harmless can still dull or discolor a hidden patch, and once that happens on a visible bolster, the customer notices immediately. Unapproved chemicals create the last major problem, because they can strip finish, dry the leather, or leave a residue that resists conditioning afterward.
Conditioning After Stain Removal and Why It Matters
Cleaning takes something out of the leather, even when the stain is gone cleanly. The surface loses a bit of softness, the finish feels drier, and the seat becomes more vulnerable if you leave it that way. Conditioner isn’t decorative. It’s the repair step that helps the leather settle back into normal use.
Put the moisture back in the right way
A good leather conditioner goes on thin and even, not thick and greasy. Let it sit according to the product directions, then buff off the extra so the surface feels natural instead of slick. Heavy application doesn’t protect better, it just makes the seat feel overloaded.
Titan’s how-to-care-for-leather-car-seats guide belongs in the same maintenance mindset, because the cleaning stage and the care stage should always work together. Clean first, dry fully, then condition once the leather is stable.
Practical rule: if the panel still feels cool or damp, skip the conditioner for now and let it finish drying.
Conditioning also sets the stage for future protection. A well-kept leather surface tends to handle spill cleanup more calmly than a neglected one, especially when a protective coating is added later. That’s where Titan’s elastic coatings enter the conversation in a useful way, they’re designed to be hard like glass yet flexible, so they move with the material instead of fighting it as temperatures change.
A Coating-First Defense That Keeps Future Stains Off the Seat
A clean seat is good. A clean seat with a protective layer is smarter. When the leather has already been cleaned and conditioned, a coating gives the next spill less time to settle in, which turns a stressful cleanup into a quick wipe-down.

Why flexible protection changes the job
Titan’s elastomer coatings use a flexible protective chemistry, including Dark Matter technology and Alpha Quartz in the product family, so the coating behaves like a barrier instead of a brittle shell. The practical benefit is simple. Leather expands, contracts, and gets handled all day, and a coating that can flex with it is less likely to crack under changing conditions.
That same protective mindset shows up across the rest of the vehicle too. Titan’s ceramic leather coating fits the interior side, while Apex Glass helps with windshields and Ultra Ceramic Spray covers paint and trim. The idea is consistent. Protect the surface before the stain becomes a job.
Titan’s leather protection also gives you a wider cleanup window before a stain can sink in. That means a spill has less chance to bond strongly, which is exactly what a detailer wants on busy interiors. For a mobile technician or DIYer, that can be the difference between a simple wipe and a full corrective session.
If you’re building a prevention-first routine, pair the coating with the cleaning habits above and keep the seat conditioned. That workflow holds up better than chasing stains one by one after they’ve already settled into the leather.
A CTA for APEX NANO – Titan Coatings.
0 Comments