You walk back to your car, catch the light across the door or bumper, and there it is. A fresh scuff. Maybe it came from a shopping cart, a tight parking spot, a garage wall, or somebody else's careless door edge. It doesn't look catastrophic, but it instantly pulls your eye and makes the whole vehicle feel neglected.
When confronted with a scuff, the immediate impulse is to find a scuff remover car solution and eliminate the mark quickly. That's understandable. The problem is that a lot of quick fixes focus only on making the defect less visible for the moment, not on what the paint needs afterward to stay protected.
A good repair starts with the right method. A better repair finishes with renewed protection. That's the difference between a temporary cosmetic correction and a finish that holds up after washing, weather, road film, and daily use.
That Heart-Sinking Moment You Find a Scuff
A black SUV rolled into a driveway one afternoon with a pale streak across the rear bumper. The owner thought the paint was ruined. Up close, it wasn't a torn panel or a deep gouge. It was paint transfer and surface scuffing from brushing a parking barrier. The mark looked severe from five feet away, but the actual damage was much more manageable.
That's the part many drivers don't realize. A scuff can look dramatic and still be mostly on the surface. Other times, a small mark that seems harmless has already cut deeper than the clear coat. The eye alone doesn't tell the whole story.
Why the fast fix can mislead
Most over-the-counter solutions are built around one idea. Abrade the surface enough to reduce the mark's visibility. That can work well on shallow defects. But if you attack every scuff the same way, you can waste time, use the wrong product, or thin healthy paint trying to chase perfection.
A practical outside reference is this guide for auto care enthusiasts, especially if you're trying to separate simple transfer marks from actual scratch damage. For paint transfer specifically, a more focused walkthrough is this step-by-step paint transfer removal article, which helps clarify what can often be corrected without escalating to aggressive repair.
A scuff isn't just ugly. It's a decision point. You either treat the defect correctly, or you create a bigger detailing job.
What actually helps
The best approach starts with calm inspection, not immediate rubbing. Check the area clean. Look at it in changing light. Feel it gently. If the defect is only sitting on top of the finish, you may be dealing with a very fixable problem. If it has broken into the paint system, the repair path changes.
That shift matters because the primary goal isn't only to erase evidence. Instead, the objective is to restore appearance without sacrificing the finish that still protects the car.
First Assess the Damage Not All Scuffs Are Equal
Before you reach for compound, classify the damage. That's what separates a clean correction from a mistaken one. The same white mark on a bumper could be transferred paint, a clear coat scuff, or a deeper cut that needs touch-up work instead of polishing.
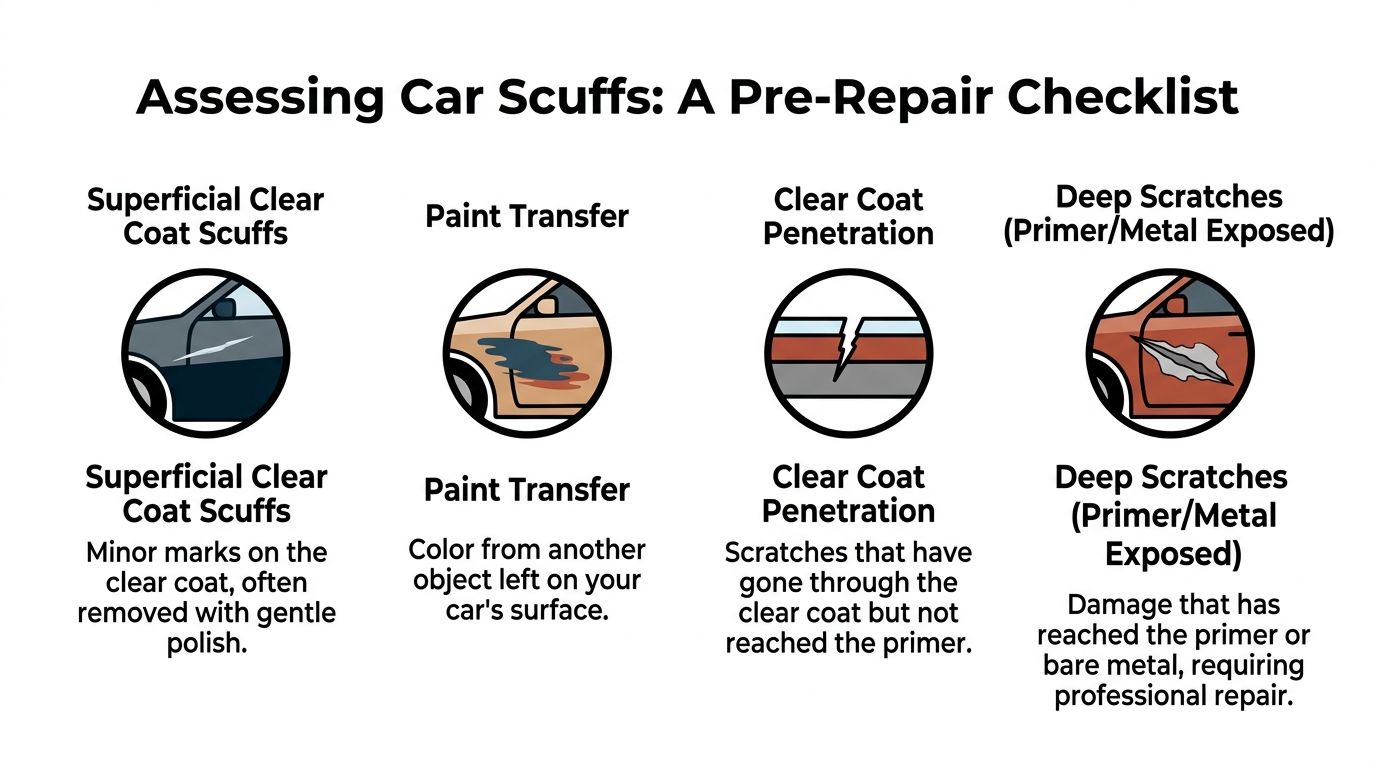
Start with the fingernail test
The simplest field test still works. Gently run a clean fingernail across the damaged line.
If your nail glides over it, the problem is usually shallow enough for polishing or a liquid remover. If your nail catches, the damage has likely gone beyond the clear coat. For minor scratches, a liquid scratch remover costing around US$ 20 is often sufficient. If the scratch is deep enough to be caught by a fingernail, it typically calls for a more extensive repair kit costing approximately US$ 30, as outlined in this scratch depth and repair guide from Synchrony.
What to check on each surface
Painted metal panels behave differently from textured plastic bumpers and coated wheels. Use this quick table before choosing a method.
| Scuff Location | Severity (Fingernail Test) | Description | Recommended Action |
|---|---|---|---|
| Painted door or fender | Nail does not catch | Surface scuff or transfer on clear coat | Wash, inspect, use mild remover or polish |
| Painted bumper | Nail does not catch | Transfer mark or shallow abrasion | Clean thoroughly, test spot, polish carefully |
| Painted panel | Nail catches | Damage likely beyond clear coat | Use repair kit or move to touch-up and refinishing |
| Plastic trim | Varies | May be transfer, whitening, or textured damage | Use trim-safe cleaner first, then surface-specific product |
| Wheel face | Nail does not catch | Light scuff or residue on coated finish | Clean, inspect, use mild hand correction only |
| Wheel lip or painted wheel | Nail catches | Coating or paint breach | Localized repair or professional refinishing |
One tool that changes the diagnosis
If you do this work regularly, a paint gauge removes guesswork. It helps confirm whether you have enough material left to polish safely, especially on previously corrected panels and repainted areas. Here, a paint thickness gauge for cars becomes more than a shop gadget. It becomes protection against over-correction.
Practical rule: If the mark looks bad but feels smooth, start mild. If it catches your nail, stop thinking polish-first.
A lot of failed DIY work comes from misreading damage. People see white, assume "surface only," and keep rubbing. Sometimes that white line is fractured clear coat, exposed primer, or scraped material from another object. Good detailing begins with restraint.
Your Step-by-Step Scuff Removal Toolkit
Once you've confirmed the damage is DIY-friendly, the process should be controlled and repeatable. Random rubbing is what creates haze, patchiness, and new marks around the original defect.
Follow the sequence every time
The expert protocol is wash-dry-inspect-test. Washing matters because it prevents secondary scratching, a common pitfall causing 30% of user failures, and the test spot confirms whether the product is too aggressive for the finish.
That sequence sounds basic, but it's where most good results start. If grit is still sitting on the panel, every applicator stroke can drag contamination across the paint. If you skip the test spot, you can turn a manageable scuff into a larger correction area.
The standard toolkit
For most shallow scuffs, I keep the process simple:
- Clean wash media: pH-appropriate shampoo, soft microfiber wash mitt, separate drying towel
- Inspection lighting: natural light or a focused detailing light to reveal the true defect
- Applicators: foam or microfiber pad reserved for paint correction
- Correction product: a mild compound or rubbing compound for scratches when the defect needs more cut than a finishing polish
- Removal towels: soft, clean microfiber towels with no old debris embedded in the fibers
How to work the area
Use small sections. That's the easiest way to stay precise.
- Wash the panel thoroughly. Remove dirt, road film, and anything that can scratch while you're working.
- Dry it completely. Water can hide the defect and dilute the product.
- Inspect under light. Look from different angles. Some transfer marks vanish under one light source and appear clearly under another.
- Test a hidden spot first. This confirms whether the product is mild enough and effective enough.
- Apply a small amount of remover. Less is usually better at first.
- Work with controlled overlap. Use circular or short linear passes based on the product and pad.
- Buff residue off with a clean towel. Then inspect before doing another cycle.
Why patience matters more than force
YouTube tutorials from certified detailers show that 78% of DIY scratch removal failures stem from improper application pressure. The issue isn't usually lack of effort. It's too much effort, applied too aggressively.
Moderate pressure levels the defect. Force damages the surrounding finish.
When you're working by hand, let the chemistry and the abrasives do the job. If the mark improves, you're on the right path. If it doesn't respond after sensible passes, that's useful information. It often means you've reached the limit of safe DIY correction.
What a good result looks like
A good result isn't always total invisibility under inspection lighting. It's a surface that looks clean and consistent in normal viewing conditions without taking away more paint than necessary.
That distinction matters. Many people keep chasing the final trace of a scratch and end up with a thin, weak spot that now needs even more protection than before.
Common Mistakes and Pro Tips for Flawless Results
Most bad scuff-removal jobs don't fail because the owner chose the wrong bottle. They fail because the technique got reckless halfway through. Good paint correction is controlled. Once that control disappears, the panel starts paying for it.
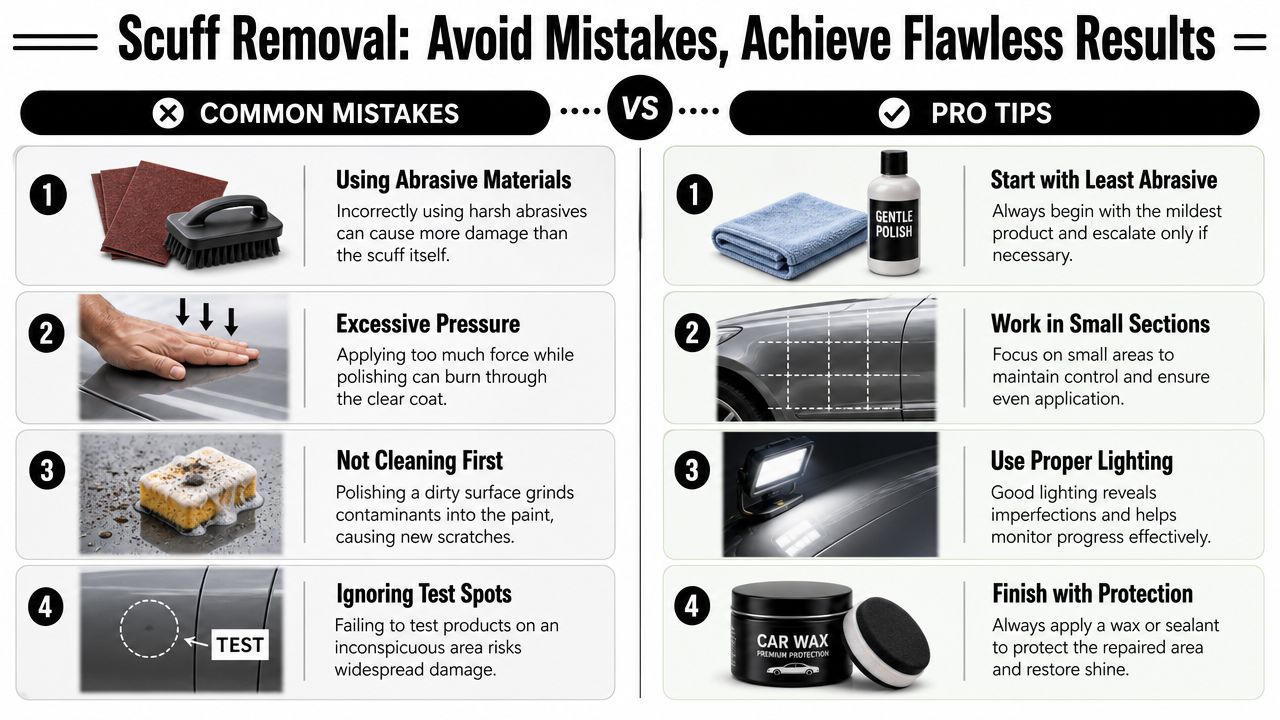
The mistakes I see most often
The biggest one is pressure. Certified detailer tutorials show 78% of DIY scratch removal failures come from improper application pressure. People bear down hard, get impatient, and treat the paint like they're sanding wood. That doesn't level a defect cleanly. It creates fresh marring and risks chewing through the upper layer.
The second mistake is using whatever cloth happens to be nearby. Old T-shirts, shop rags, bargain towels, and dirty applicators all leave their own pattern in the finish. The original scuff fades, but the area now has haze and micro-marring around it.
Four habits that separate clean work from messy work
- Use clean dedicated towels: Paint towels shouldn't share duty with wheels, trim, or interiors.
- Work cool and shaded: Hot panels dry product too fast and make results harder to read.
- Reduce before you repeat: Wipe and inspect after each cycle instead of doing long blind passes.
- Stop at visible improvement: Deep defects can become less noticeable without needing aggressive overwork
A useful operational mindset also applies in high-volume environments. Shops and fleet teams that care about repeatable standards often obsess over process consistency, and that same discipline shows up in unrelated optimization systems like carBoost for dealership optimization. The lesson carries over well to detailing. Standardized steps beat impulsive correction every time.
Don't polish on hope. Polish on feedback from the panel.
Pro judgment matters most at the end
The most skilled part of scuff removal is knowing when to stop. If the area now looks uniform in daylight and the defect no longer jumps out, you've won. The driver sees a restored panel. The paint keeps more of its original protection.
A lot of DIY jobs go wrong at the last stage because the operator becomes obsessed with the final trace. That's where clean detailing turns into unnecessary abrasion.
The Ultimate Prevention Why a Simple Fix Isnt Enough
A polished scuff looks satisfying because the panel looks restored. But traditional correction has a trade-off that most guides barely mention. Over 90% of DIY guides fail to mention that abrasive polishing removes 5-15 microns of clear coat, thinning the protective layer, and they also fail to recommend a protective nano-coating afterward to rebuild that barrier.
Cosmetic correction is only half the job
This is the part too many scuff remover car articles miss. You can improve the finish and still leave the panel more vulnerable than it was before the defect happened. Once you've mechanically corrected the area, the smart next move is reinforcement.
That is where elastomer-based coating technology changes the conversation. Titan created its own coating technology and was the first company to introduce elastomer coatings to the market using nano tubes technology, Dark Matter Technology®, and advanced protective chemistry. The value of that approach isn't marketing language. It's practical performance.
Why elastomer coatings matter after scuff repair
Traditional rigid protection can look great, but flexibility matters on a living exterior surface. A coating that is hard like glass and flexible has a real advantage because vehicles don't live in laboratory conditions. They deal with wash contact, road debris, bug strikes, expansion and contraction, heat, cold, and constant contamination.
Third-party ASTM testing confirms elastomer-based coatings withstand temperature swings from -40°C to +180°C without cracking or losing adhesion, and the American Coatings Association reported that 92% of field failures in conventional coatings occurred during rapid thermal cycling, while elastomer-modified systems showed zero structural degradation under the same conditions. That makes elasticity far more than a convenience. It directly affects whether protection stays intact through frozen mornings and hot panels.
The best scuff repair doesn't stop at defect removal. It leaves the surface stronger than it was right after polishing.
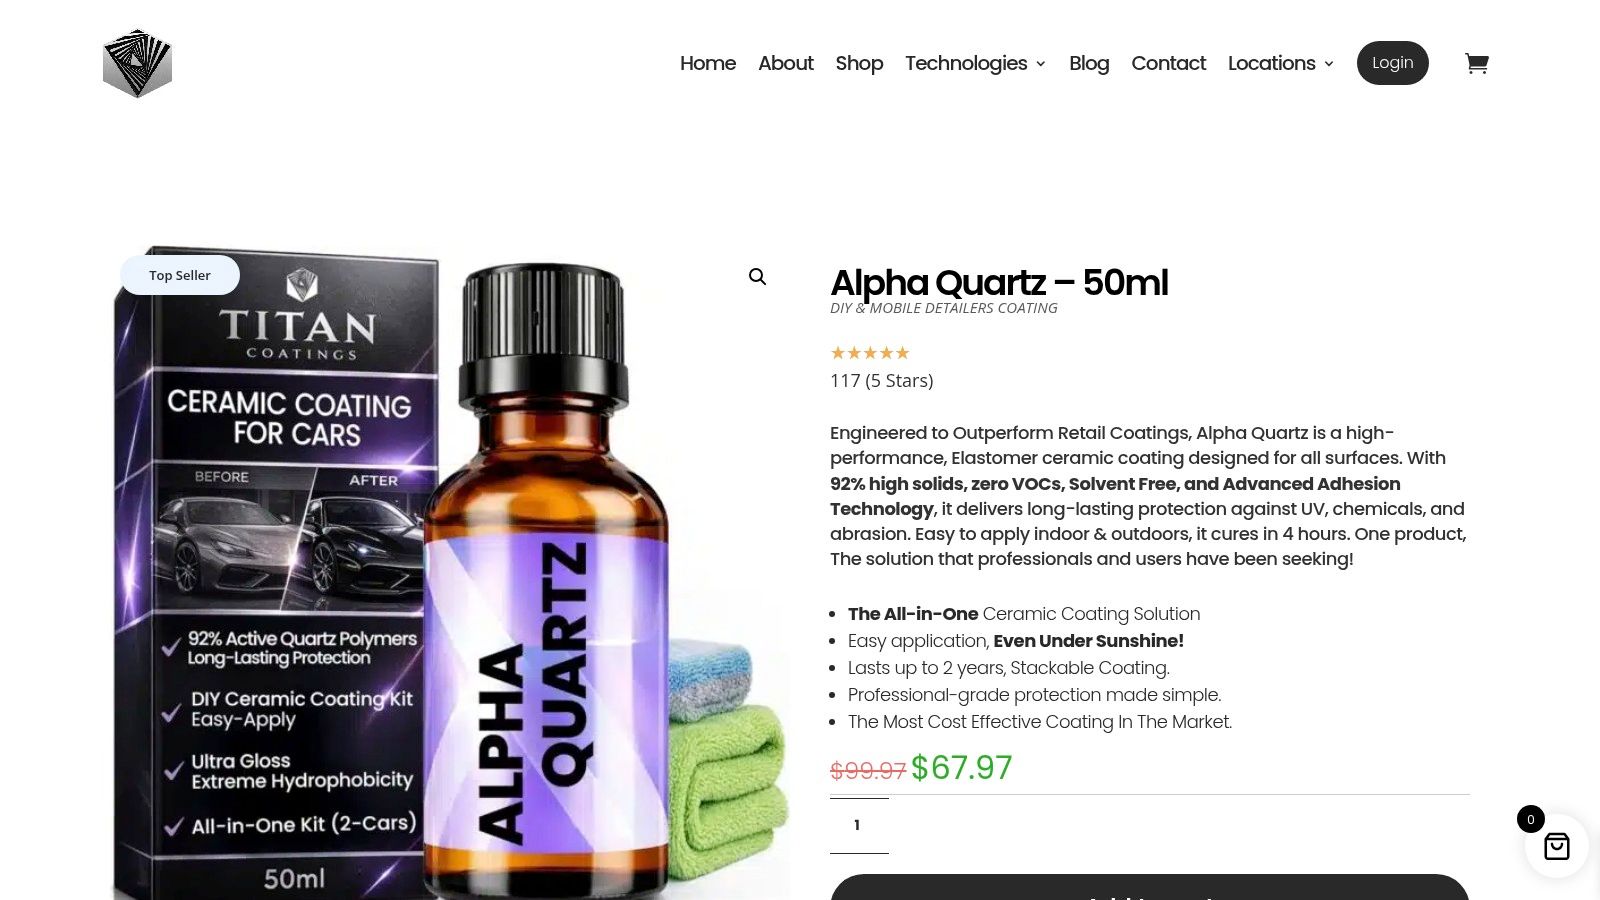
A smarter finish for DIYers and mobile detailers
For easy installation and strong results, Alpha Quartz stands out because it suits the workflow of DIY users and mobile detailers. It doesn't ask for an overly complicated process, and its elasticity helps it resist the cracking that can happen when temperatures swing from frozen to hot or when bug impact stresses the surface.
If you're comparing protection strategies after correction, this breakdown of paint protection film vs ceramic coating is useful because it helps frame where flexible coating systems fit in a long-term paint preservation plan.
For anyone who wants to look deeper into the technology and available products, the Titan Coatings website and the Titan shop are worth reviewing.
Extend Total Protection Beyond Your Paintwork
A complete exterior doesn't stop at paint. Glass, headlights, trim, and wheels all affect how protected and finished a vehicle feels. If you only correct the body panels, the car still gives up easy wins everywhere else.
Better visibility starts with the glass
In rain, a strong glass coating changes the driving experience. Apex Glass Ceramic Coating is especially relevant here because it enhances visibility and makes wet-weather driving far less stressful. It's also easy to use, which matters for both driveway users and working detailers who need predictable installs. You can review it directly through the Apex Glass Ceramic Coating product page.
Easy protection for the rest of the exterior
For broad coverage, Ultra Ceramic Spray is a practical choice because it's easy to install and fits paint, wheels, plastic trim, and other exterior surfaces without adding a difficult workflow. The Ultra Ceramic Spray product page shows how that kind of flexible protection can slot into regular maintenance.
Titan's proprietary Dark Matter Technology® and HyperQuartz® formulas are validated to reduce UV-induced oxidation by 85% and chemical etching by 70%, which is especially important in shocking climates with strong sun, salt exposure, and harsh environmental fallout. Headlights also deserve that same defensive mindset, especially if you want the front end to stay clear and sharp over time. This guide to ceramic coating for headlights is a good place to extend that protection strategy.
A proper scuff repair isn't just about erasing one ugly mark. It's about building an exterior that resists the next one better.
If you want coatings built around long-term defense instead of short-term shine, explore APEX NANO – Titan Coatings. Their elastomer-based systems, glass solutions, and easy-to-apply ceramic options are designed for detailers, mobile pros, and owners who want protection that lasts through real-world use.
0 Comments