
You’ve got a chipped hood after a long highway week, a faint scratch around the door handle, and a bottle of touch-up paint sitting on the bench. The temptation is to jump straight in and “fix” it tonight. That’s how a lot of good finishes get turned into lumpy repairs, haze marks, or a repaint bill that didn’t need to happen.
Car detailing and paint touch up sits at the point where cosmetic care turns into real paintwork judgment. The global detailing market is already measured at USD 41.40 billion in 2024 and projected to reach USD 58.06 billion by 2030 (industry summary), and that scale makes sense when you look at how often owners need appearance restoration, not just cleaning. The shops that stay busy aren’t the ones who rush, they’re the ones who diagnose correctly, prep patiently, and know when a defect is outside the reach of touch-up paint.
Why Most Paint Touch-Up Jobs Fail Before They Start
A customer pulls into a driveway with a small chip on the front bumper and says, “Can you just dab that real quick?” That’s usually where the trouble begins. The mark may be a clear coat nick, a shallow scratch, or a crater that has already gone through the basecoat and into primer.
I’ve seen repairs go bad before the first drop of paint touched the panel. A quick polish on the wrong defect can soften the surrounding finish and make the flaw stand out more. A heavy touch-up over dirty paint does the opposite of what people expect, it traps contamination under the repair and leaves a scar that refuses to blend cleanly.
Practical rule: if you don’t know the defect depth, you’re guessing, not repairing.
The numbers behind detailing show why this judgment call matters. Analysts tracking the field note broad labor demand and recurring consumer spending, including 118,000 U.S. jobs in 2023, USD 24.5 billion contributed to U.S. GDP in 2022, and USD 5.1 billion in tax revenue in 2022 (industry summary). That scale exists because owners keep paying to restore appearance, especially in the working-age customer base where 65% of U.S. detailing customers are ages 25–54. Those figures point to a simple reality, appearance repair is a regular part of vehicle care, not a one-off vanity fix.
The failure is usually mental. People treat every mark as a paint problem, then use a paint-process answer on a polishing problem, or a polishing answer on a chip that needs primer. Even a clean-looking repair can fail if the panel was not decontaminated first, which is why Prep the panel before you touch the defect has to happen before any touch-up work starts. A seasoned detailer reads the defect first, then chooses between touch-up paint, paint correction, or a body shop repair based on depth, spread, and where the damage sits on the panel.
Diagnosing Paint Damage Depth and Repair Strategy
The easiest way to sort damage is to work from the top layer down. A scratch that lives only in the clear coat usually feels light, sometimes barely catches a fingernail, and often responds to polishing. Once you can see a different color inside the mark, the repair path changes fast.
Read the defect before choosing a product
A chip with exposed primer needs touch-up paint and usually primer. A gouge that reaches bare metal needs corrosion protection and a more careful build-up. If the damage is broad, faded, or running along a body line, a body shop may be the safer choice because blending gets difficult very quickly.
That distinction matters because touch-up paint is not a universal fix. The same car can carry all three problems at once, a light clear coat scuff on one door, a chip through the basecoat on the hood, and a scratch deep enough to need repainting on the quarter panel. Each one calls for a different response, and the fingernail test is only the start, not the finish.
Use the visual cues that actually matter
Look for dullness, color loss, rough edges, and whether the damage sits below the surface of the surrounding paint. If the surrounding finish still looks intact and the blemish is shallow, correction may be enough. If the defect has a cratered center, exposed gray, or rust tint, you’re no longer in detailing territory.
For a deeper measuring habit, the panel’s thickness matters too. A straightforward way to build that habit is to check the paint before you sand, not after you’ve already committed to removal. Measuring paint thickness correctly keeps you from turning a repairable panel into an over-thinned one.
A useful way to think about it is simple. Clear coat damage can often be refined. Basecoat damage usually needs fill and blend. Bare metal or structural distortion needs a different conversation entirely.
Surface Preparation and Decontamination Workflow
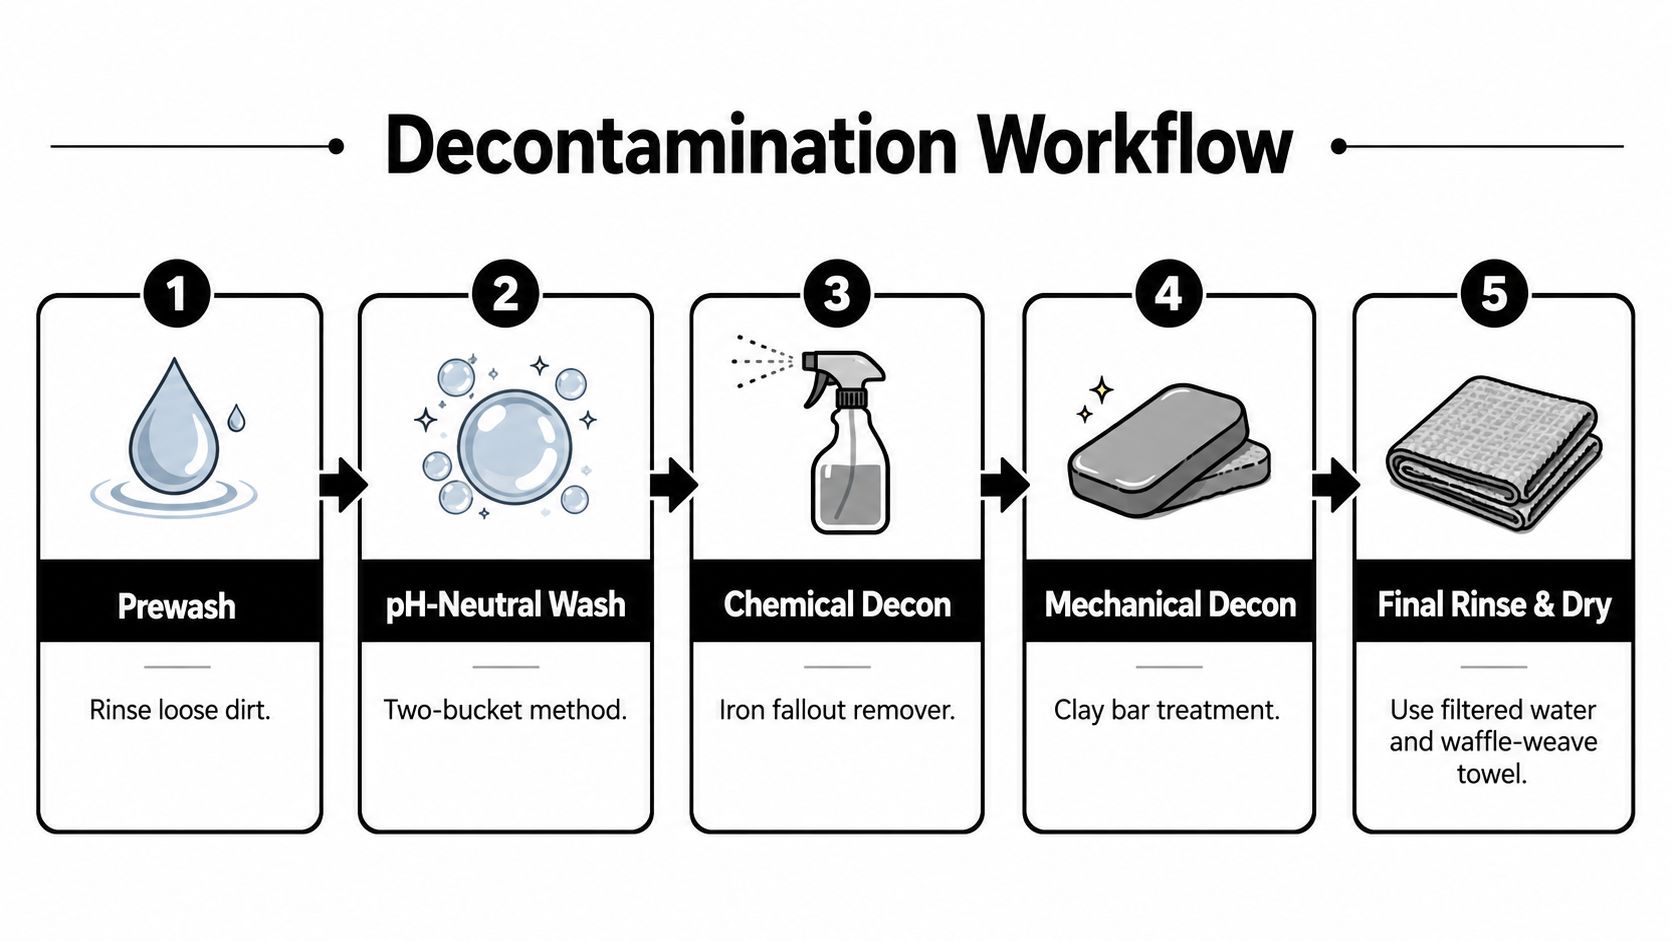
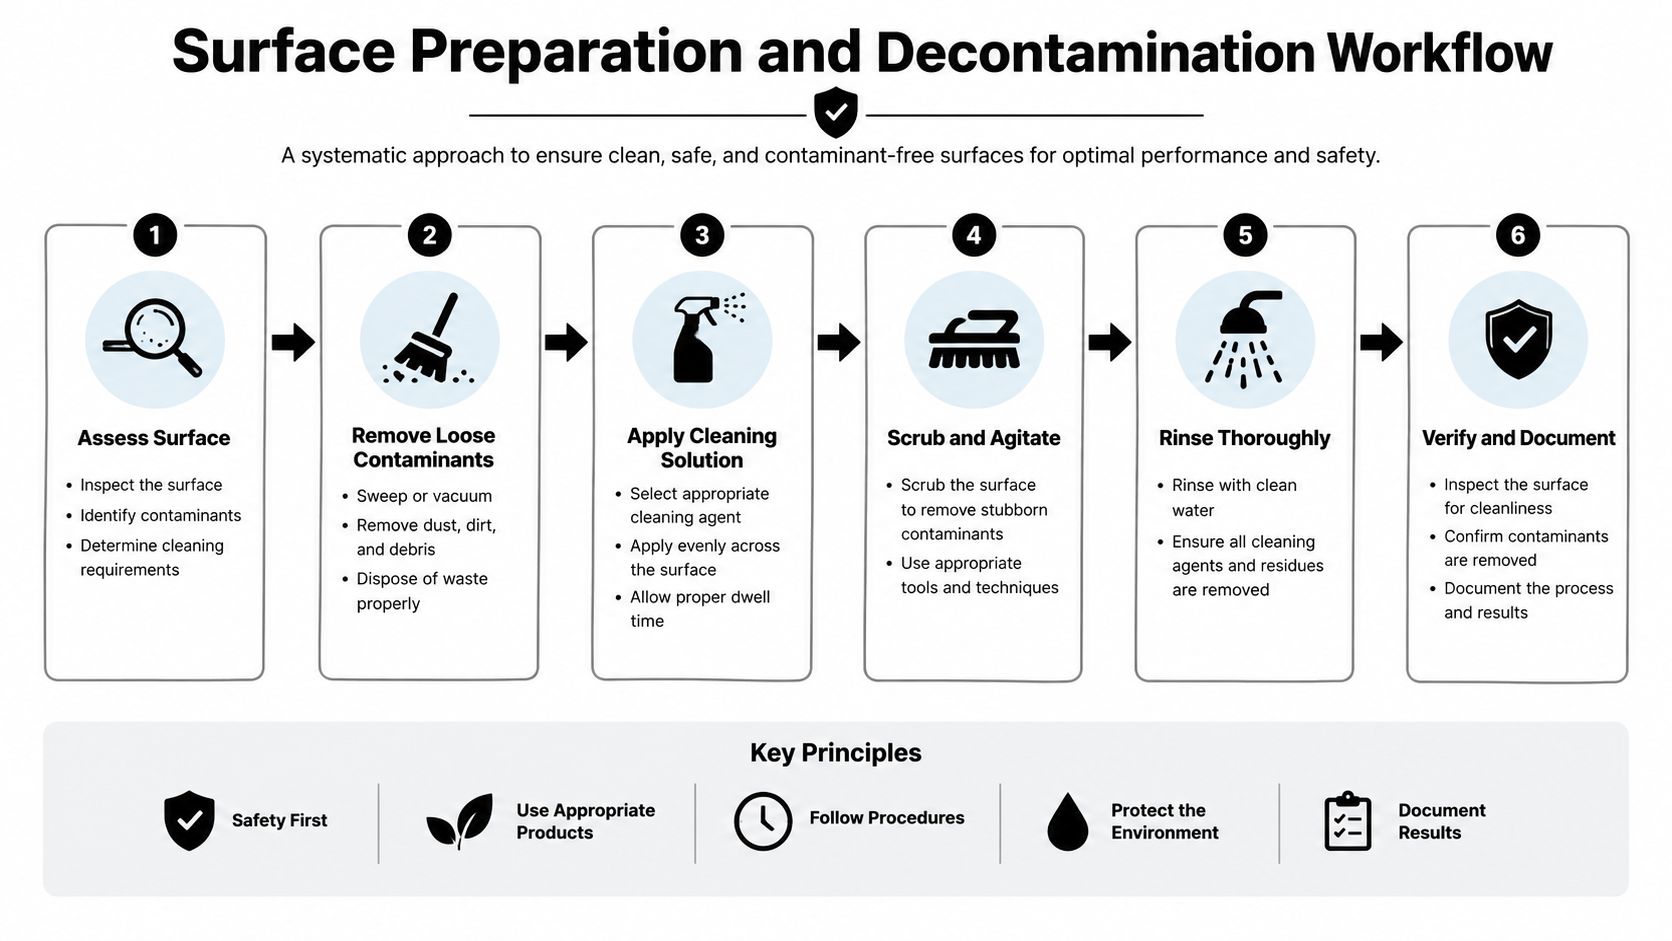
The repair starts long before paint. Any wax, sealant, road film, or embedded grit left behind will interfere with bonding and can leave a repair edge that shows up even from a distance. That’s why the first real job is to get the panel surgically clean, not just visually clean.
A proper workflow begins with a pH-neutral wash, followed by chemical decontamination and clay bar treatment if the panel feels rough. The goal is to remove what washing alone leaves behind, then degrease the exact repair area with prep solvent or rubbing alcohol so the touch-up lands on the paint, not on residue. That same discipline is what separates a solid repair from one that peels at the edge.
Clean paint is not the same as ready paint.
For larger chips and scratches, feathering matters. A small repair may stay local, but a broader defect usually needs the edges softened with 600- to 1,000-grit sandpaper so the patch doesn’t sit like a hard ridge. If bare metal is exposed, primer belongs only on that exposed spot, not as a blanket over the whole panel.
A strong DIY detailing routine at home helps here too, especially when owners are trying to keep the rest of the finish in order while they wait for parts or paint. This home-detailing guide is useful context for the broader cleaning discipline, even though touch-up prep requires more precision than a normal wash.
I also like to compare the panel to the area around it under clean light before I proceed. If the surface still beads irregularly, feels greasy, or shows polishing dust in the chip, it isn’t ready. Rushing this stage is the fastest way to turn a small repair into a visible patch.
Decontaminate the paint properly before repair
Paint Touch-Up Application and Blending Techniques
A chip repair goes wrong fast when the paint is applied like filler. The smarter move is to judge the defect first, because a shallow scratch can take touch-up paint and careful blending, while a wider gouge, failed clearcoat, or fractured edge may need paint correction or a body shop respray before any color goes on. That decision saves time, and it prevents a small repair from becoming a visible scar.
Build the repair in controlled layers
Once the panel is clean and the damage is correctly diagnosed, build the repair in razor-thin passes. Touch-up paint needs to settle into the chip, not sit proud of the surface, so use a fine brush or applicator and let capillary action pull the material into place. Heavy application creates runs, bubbles, and ridges that are much harder to level without disturbing the surrounding finish.
A practical field mix is color and clear adjusted to a slightly thicker-than-water consistency, then applied by dabbing rather than brushing forcefully. A low heat gun can shorten flash time, but it has to be used with restraint because excessive heat can distort the repair or make the surrounding paint move. I’ve seen more bad results from impatience than from cheap paint.
The cure schedule matters as much as the application itself. A neutral DIY guide recommends 2 to 3 color layers with about 15-minute intervals, then 24 hours of cure at roughly 21°C and 50% humidity before level sanding with 3000-grit paper (DIY guide). For clearcoat, the same source notes that it should be floated on lightly, because pressure can disturb the basecoat. It also delays cutting creme for about 3 days after clear application.
Professional shops often take a different route. They may use catalyzed clear and infrared curing, then level the repair with 1000-grit on a flat backing surface before hand wet sanding with 1500-grit and machine compounding (Professional Carwashing & Detailing). The order of operations matters more than the brand of products on the bench.
If the repair needs polishing after cure, a corded 6 inch buffer polisher can refine the finish without chewing up a small patch, provided the pad choice and pressure stay controlled. The tool is only as good as the hand using it. Too much cut leaves halos, and too much heat turns a tidy repair into a chase for the next defect.
Use the right repair sequence for chips and scratches
Ceramic Coating Application and Elastomer Technology Advantages
Once the defect is fixed and the finish is leveled, protection becomes the next decision. Traditional waxes and many sealants look good briefly, but they don’t offer the same long-term barrier behavior as a properly applied ceramic coating. The newer category that matters here is elastomer-based protection, because it addresses a problem standard hard coatings struggle with, stress from temperature swing and flex.
Titan Coatings’ Alpha Quartz uses an Elastomer Membrane Technology approach that’s designed to be hard like glass while staying flexible. That flexibility matters on real vehicles, because panels move, weather shifts, and temperature changes don’t stay polite. The coating’s value is not just gloss, it’s the ability to keep its structure when conditions change from frozen mornings to hot pavement.
What the application looks like in the real world
The application pattern is practical, not theatrical. Spread 20 to 25 drops on an applicator, work in a cross-hatch pattern over roughly 50 × 50 cm sections, wait 3 to 5 minutes, and don’t push beyond 15 minutes maximum before leveling with microfiber. Short pile microfiber handles the initial wipe, then long pile microfiber helps finish the buff.
That same family of protection also includes Ultra Ceramic Spray for fast maintenance and Apex Glass Ceramic Coatings for windshield protection, which improves visibility when rain turns the drive stressful. Titan Coatings positions APEX NANO as a multi-surface option for automotive paint, plastic, and wheels, so it can fit mixed-coverage maintenance plans when a shop wants one coating line for multiple surfaces.
The practical advantage is cure and usability. These coatings cure in about 4 hours, can be applied outdoors without a garage, and are designed for stackable protection with a service life that can last up to 2 years when applied correctly (Titan elastomer overview). That doesn’t replace good prep, but it does make the repair more durable once the surface is finally corrected.
Common Mistakes and How to Fix Them
Most bad touch-up jobs share the same story. Somebody skipped prep, added too much material, or polished before the coating or paint had time to settle. The finish looked acceptable under garage lighting, then turned patchy once it hit sun or rain.
The errors that show up most often
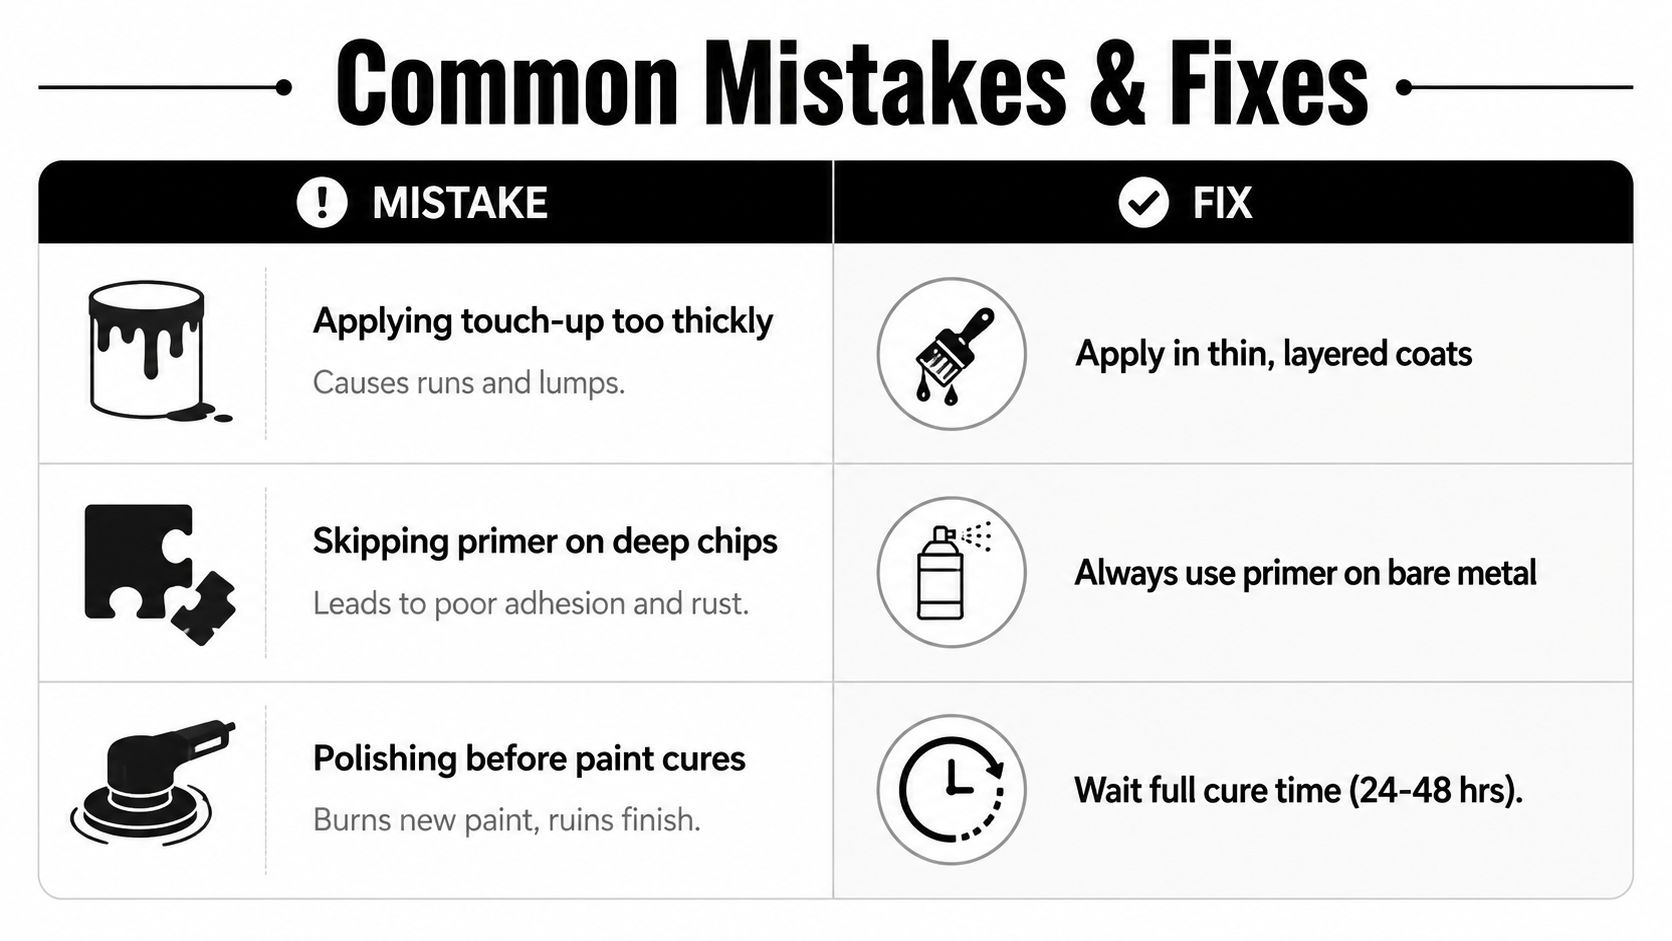
- Applying touch-up too thickly. That creates runs and raised lumps. The fix is to rebuild the chip with thin, layered coats and let each pass settle before the next one.
- Skipping primer on deep chips. Bare metal without primer is an adhesion and rust problem. Use primer only where it’s needed, then paint over that cured layer.
- Polishing before paint cures. Fresh paint can burn, smear, or haze under a pad. Wait the full cure time, then correct gently.
Applied coatings can fail in a similar way. High spots and streaks usually come from not leveling soon enough, while sunlight or a hot panel can make the product behave unpredictably before it flashes. I check coated panels under diffused light first, because that’s where streaks and missed wipes show up before they get locked in.
The bigger mistake is trying to save a repair that’s already past the point of simple touch-up. A wide peeling area, a scratch through multiple layers, or a panel that needs structural work should stop the process right there. Chasing perfection on the wrong defect usually adds labor and lowers the finish quality at the same time.
When to Handle Repairs Yourself Versus Calling a Professional
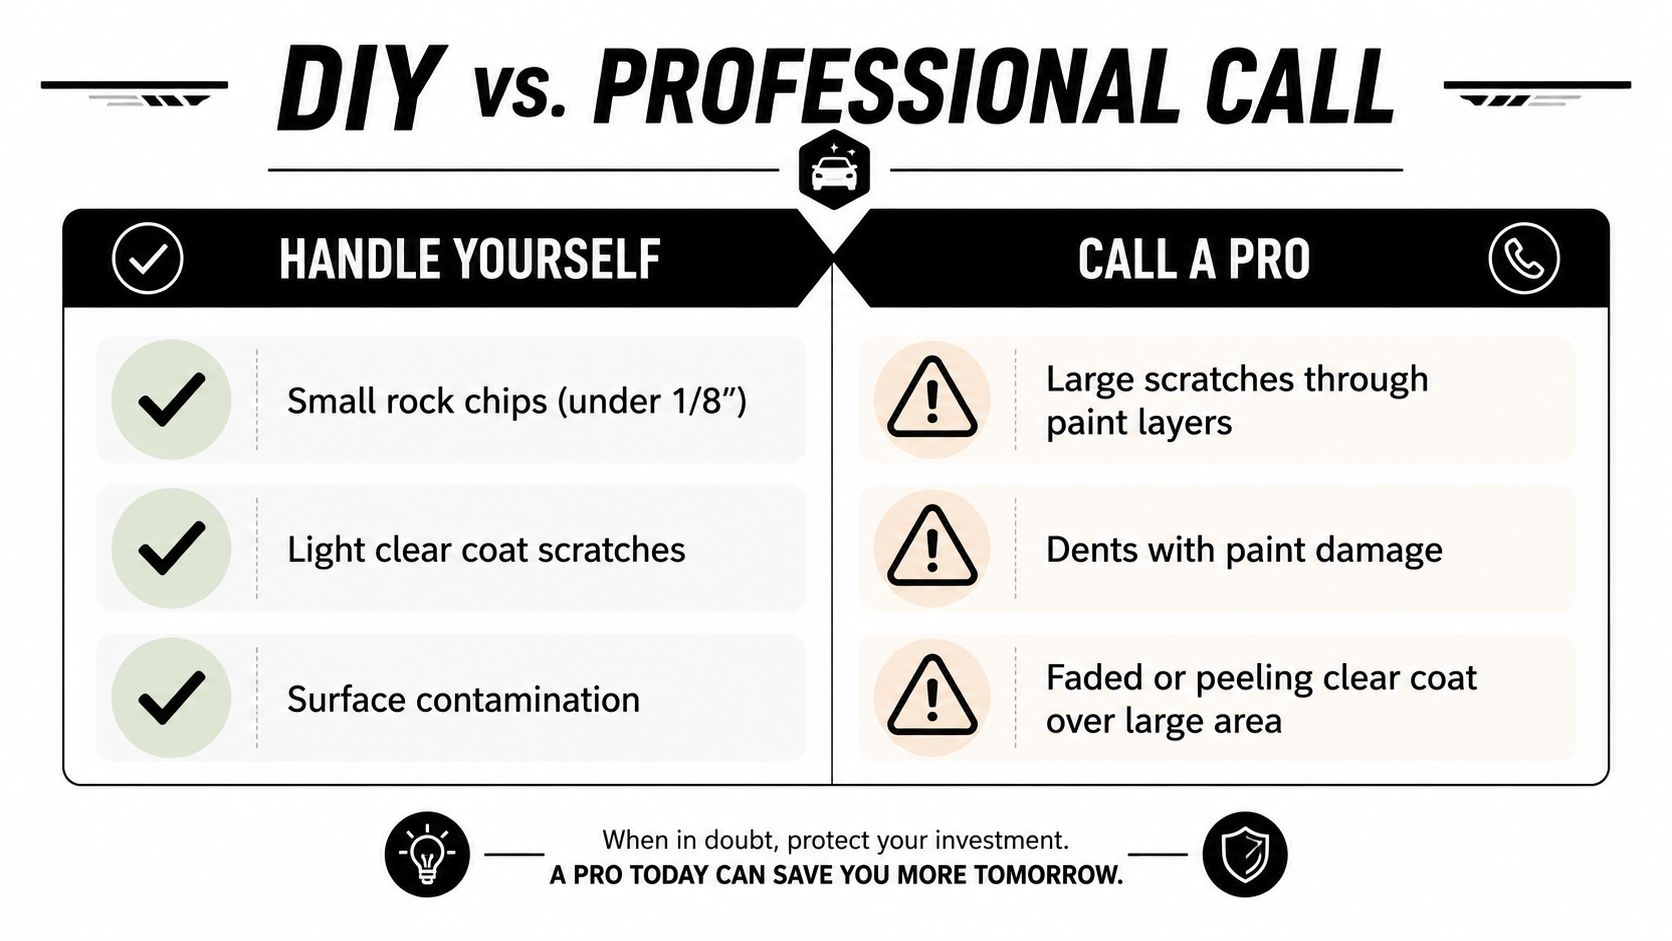
The cleanest rule is this, DIY touch-up works best on small, contained damage, while a body shop should handle large, deep, or structurally complicated defects. If the damage is a small rock chip, a shallow clear coat scratch, or a contaminated surface that just needs proper prep, a careful detailer can usually manage it. If the defect crosses layers, spreads across a panel, or exposes metal in a way that invites rust, a pro repair is the safer call.
A simple decision filter
- Handle yourself: small rock chips under 1/8 inch, light clear coat scratches, surface contamination.
- Call a pro: large scratches through paint layers, dents with paint damage, faded or peeling clear coat over a large area.
That split is commercially important too, because 48% of automotive appearance professionals already offered paint touch-up services in a 2014 survey (industry article). The demand is clearly there, but so is the need for honest boundaries. Shops that pair detailing with touch-up do well when they sell the right fix, not every fix.
For mobile detailers, the smartest move is often to bundle touch-up with maintenance, then refer out anything that needs blending, panel work, or repainting. That keeps expectations realistic and protects the relationship with the customer. The finish looks better, the workflow stays predictable, and nobody pretends a chip repair is a body shop respray.
If you want a coating and detailing system that fits real-world paint repair work, explore what APEX NANO – Titan Coatings offers for automotive protection, glass clarity, and maintenance-friendly application. Visit APEX NANO – Titan Coatings to review the coatings, compare options for your vehicle, and choose a protection system that matches the way you detail.
0 Comments